Publicité

Les langues disponibles
  • FR

Les langues disponibles

  • FRANÇAIS, page 20

Liens rapides

テーブルトップスタンド
Table top stand
Support de couverture de table
Tischgestell
Supporto di tavolo
Tafel staander
Table top stand
Soporte de mesa
臺式支架
PDK-TS03
取扱説明書
Operating instructions
Mode d'emploi
Bedienungsanleitung
Istruzioni per l'uso
Gebruiksaanwijzing
Bruksanvisning
Manual de instrucciones
操作說明書

Publicité

Table des Matières
loading

Sommaire des Matières pour Pioneer PDK-TS03

  • Page 1 テーブルトップスタンド Table top stand Support de couverture de table Tischgestell Supporto di tavolo Tafel staander Table top stand Soporte de mesa 臺式支架 PDK-TS03 取扱説明書 Operating instructions Mode d’emploi Bedienungsanleitung Istruzioni per l’uso Gebruiksaanwijzing Bruksanvisning Manual de instrucciones 操作說明書...
  • Page 2 Table top stand Support de couverture de table Tischgestell せた状態で行ってください。 Supporto di tavolo Tafel staander Table top stand Soporte de mesa 臺式支架 4. 設置場所について PDK-TS03 (イ) 設置場所にはスタンドとディスプレイの重量に十分 耐えられる強度をもつ場所を選定してください。 取扱説明書 Operating instructions Mode d’emploi (ロ) 設置場所は、水平、平面で安定しており、荷重が均 Bedienungsanleitung Istruzioni per l’uso Gebruiksaanwijzing...
  • Page 3 本体への取り付け 1. ディスプレイにキズおよび破損が生じないように、シートのようなものを敷いてください。 2. 必ず平坦なテーブルなどの上でプラズマディスプレイモニター本体を寝かせた状態で取り付けをしてください。 3. ボルトは穴に対して垂直に挿入し、必要以上に強く締め付けないでください。 ご注意 4. スタンドのネジ穴とプラズマディスプレイモニター本体の取り付けナット位置を必ず合わせてください。 5. ディスプレイは50 型モデルでその質量が約40kg あり、 奥行きがなく不安定なため、 取り付けおよび設置は 必ず 2 人以上で行ってください。 ■ 取り付け方法 プラズマディスプレイモニターを寝かせた状態にして、取り付けボルト 1(M8 × 20)2 本 手順 1 を、プラズマディスプレイモニター本体の穴 a に取り付ける。 このとき、横から見て、取り付けボルト 1 のネジ部が見えなくなったところで、ネジ止めを やめてください。 ( 最後までネジ止めすると、 スタンドパイプの取り付けができなくなります。 ) 取り付けボルト 1(M8 × 20) 穴...
  • Page 4 表に従い、 取り付けボルト1のネジ頭にスタンドパイプの穴 (A, Bの何れか) を引っ掛けて、 手順 2 スタンドをプラズマディスプレイモニター本体上方向にスライドさせ、取り付けボルト 1 に 突き当ててください。 (スライド量は、スタンドの構造上、19mm 以下となります。 ) 付属の六角レンチを使用して、取り付けボルト 2(M8 × 40)2 本で、スタンドをプラズマ 手順 3 ディスプレイモニター本体にネジ止めする。 (使用する穴の組み合わせは、 Aー A'、 Bー B'の 2 通りです。 ) 手順 1 で取り付けた、取り付けボルト 1 を付属の六角レンチで締め付ける。 手順 4 取り付けボルト 2 (M8 × 40) (手順 3) スタンドをスライドさせる...
  • Page 5 ■ プラズマディスプレイモニター本体の梱包材を置台として使用する方法 (イラストは50型のものです) ◆ プラズマディスプレイモニター本体の梱包箱の構成 外箱 中箱 パッド ミラーマット パッド プラズマディスプレイモニター本体 手順 1 上図に示した中箱とパッドを使い、 プラズマディスプレイモニターの置き台を作ります。 ( パッ ドは全て同じです) パッド 中箱 手順 2 パッドの上にプラズマディスプレイモニター本体を下図のように置きます。 (パッドの上にはキズ防止のため必ずミラーマットを敷いてください。 ) プラズマディスプレイモニター本体 ミラーマット 中箱の上にパッドを 2 つ置いた台 手順 3 取り付け方法 の手順 1 〜手順 4 に従って、スタンドをプラズマディスプレイモニター本体 に取り付けます。...
  • Page 6 ■ラック等に設置する場合 ● テーブルトップスタンドの前側および後側は必ず下図の指示以上のスペースを確保して設置してくださ い。 (最大回転時にテーブルトップスタンドがラックからはみ出さないようにするため) 後 側 ラック プラズマディスプレイモニター テーブルトップスタンド 前 側 ただし、 上記のスペースを確保できないラックを使用する場合は、 できるだけラックを壁に寄せて前側 のスペースを優先させてください。 回転時にスタンドがラックからはみ出すと、破損や転倒 など思わぬ事故の原因となります。 ご注意 はみ出すと危険です。...
  • Page 7 転倒防止 設置後は転倒防止の備えを必ず行ってください。 ■ 壁を利用する方法 ■床に固定する方法 (イラストは50型のものです) ●市販のネジを使って固定する。 1. プラズマディスプレイモニター本体に付属の転倒防止用 床に固定する際のネジは、呼び径 6、長さ 20mm ボルトをつける。 以上のものを使用してください。 2. 壁または柱など堅牢部に丈夫なヒモまたはくさりでしっ ご注意 かりと固定する。 (左右対称に同様の作業を行ってください。 ) 5mm以下 20mm以上 フック、 ひもまたはくさり、 取り付け具は市販品を ご使用ください。 ご注意 推奨フック:呼び径 8、長さ 12 〜 15mm 12〜15mm (50 型) フック ひもまたはくさり 取付具 (43 型) ◆...
  • Page 8 ■ 仕様 外形寸法 ........590 (幅) x 539 (高) x 344 (奥行) mm 質量 ..........10.0 kg ・上記の仕様および外観は、改良のため予告なく変更することがあります。 ■ 寸法図 単位:mm 50 型スピーカーなし 1218 回転角度:50 型スピーカーなし...
  • Page 9 50 型サイドスピーカー取り付け時 1368 1218 スピーカー スピーカー 回転角度:50 型サイドスピーカー取り付け時...
  • Page 10 43 型スピーカーなし 1070 43 型サイドスピーカー取り付け時 1220 1070 スピーカー スピーカー 43 型本体下側にスピーカー取り付け時 1070 スピーカー 2002パイオニア株式会社 禁無断転載...
  • Page 11 Installation ¶ Consult your dealer if you encounter any difficulties with this installation. ¶ Pioneer is not liable for any damage resulting from im- proper installation, improper use, modification, or natural disasters. Cautions This table top stand was exclusively designed for plasma •...
  • Page 12: Installation Method

    Stand attaching to the Plasma Display 1. Place a sheet or protective cover to protect the display from scratches or damage. 2. Assemble only with the plasma display lying flat on a table or similar surface. Notes 3. Insert the bolts vertically in the holes and tighten them, but do not apply excessive pressure that tightens them more than necessary.
  • Page 13 As shown in figure, hook the stand pipe holes (either pipe A or B) onto the screw heads Step 2. of the installation bolts 1, then slide the stand upwards to the main plasma display until it engages the installation bolts 1 (once put together with the display, the stand will slides no more than 19 mm (3/4 inch)).
  • Page 14 7 Instructions for using the main display packing material as a stand for the working on the display (50” display model is shown in the figure.) • Main plasma display packaging setup Outer box Inner box frame Mirror mat Plasma display Step 1.
  • Page 15 7 Installing the Product on a Rack, etc. ¶ Make sure to secure at least the following minimum spaces, specified below, in front and in back of the table top stand. (These spaces ensure that the table top stand does not protrude from the rack when it is rotated to the maximum.) Back Rack...
  • Page 16: Preventing Equipment From Falling Over

    Preventing Equipment from Falling Over After installing the stand, make sure to take measures so that the equipment will not fall over. 7 Stabilizing to the floor 7 Using a wall for stabilization ¶ Stabilize the equipment using screws that are available on (50”...
  • Page 17 7 Specifications Dimensions ......590 (W) x 539 (H) x 344 (D) mm (22-7/32 (W) x 21-7/32 (H) x 13-9/16 (D) in.) Weight ........10.0 kg (22.05 lb) • The above specifications and exterior may be modified without prior notice to improve the product. 7 Dimensions Diagram Units: mm (inch) Without speakers for the 50”...
  • Page 18 With speakers for the 50” display model installed 98 (3-7/8) 1368 (53-7/8) 65 (2-17/32) 1218 (47-31/32) Speaker Speaker 140 (5-1/2) 590 (22-7/32) 344 (13-9/16) Angle of rotation: With speakers for the 50” display model installed...
  • Page 19 Speaker Speaker 140 (5-1/2) 590 (22-7/32) 344 (13-9/16) 43" with optional speakers attached at bottom of display 98 (3-7/8) 1070 (42-1/8) 65 (2-17/32) Speaker 344 (13-9/16) 590 (22-7/32) Published by Pioneer Corporation. Copyright © 2002 Pioneer Corporation. All rights reserved.
  • Page 20: Vérifiez Que Vous Avez Toutes

    (Voir page 25) ¶ Pioneer décline toute responsabilité en cas de mauvaise installation et utilisation, de modification ou de catastro- 7 Vérifiez que vous avez toutes phes naturelles.
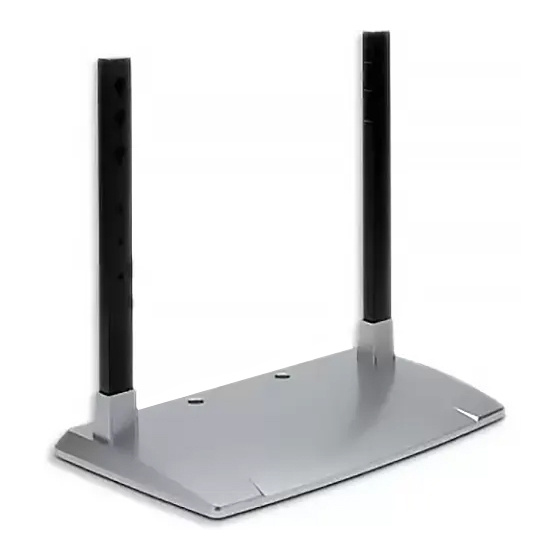
  • Page 21: Support De L'affichage De Plasma

    Support de l’affichage de plasma 1. Mettez une feuille ou une couverture de protection pour protéger l’affichage des égratignures et des dégâts. 2. Réunissez les différents pièces seulement avec l’affichage de plasma se trouvant à plat sur une table ou Remarque une surface similaire.
  • Page 22 Comme représenté sur la figure, accrochez les trous de piliers du support (tube A ou Etape 2. bien B) sur les têtes de vis des boulons d’installation 1. Puis glissez le support vers le haut à l’affichage de plasma principal jusqu’à ce qu’il engeance les boulons d’installation 1 (une fois assemblé...
  • Page 23: Instructions Pour L'usage Du Matériel D'emballage De L'affichage

    7 Instructions pour l’usage du matériel d’emballage de l’affichage principal comme un support pour le travail sur l’affichage (L’écran de 50 pouces est présenté sur la figure) • Empaquetage de l’affichage principal de plasma Boîte externe Cadre de boîte intérieure Garniture Natte de miroir Garniture...
  • Page 24 7 Dans le cas d’une installation de l’appareil sur une étagère ou une tablette, etc. ¶ Veuillez installer l’appareil en garantissant des espaces suffisants supérieurs à ceux indiqués sur la figure ci-dessous entre la face avant et la face arrière du support et les bords de l’étagère ou de la tablette (Lorsque l’on fait pivoter avec un angle maxi, vérifiez bien que le support ne dépasse pas de l’étagère ou de la tablette.) Face arrière...
  • Page 25: Fixation Au Sol

    Prévention du basculement de l’appareil Après installation, veuillez procéder sans faute à la mise en place du dispositif de sécurité destiné à prévenir le basculement de l’appareil. 7 Fixation au sol 7 Méthode utilisant le mur (le modèle de 50 pouces est ¶...
  • Page 26: Dimensions Du Schéma

    7 Spécificités Dimensions ......590 (W) x 539 (H) x 344 (D) mm Poids ........10,0 kg • Les caractéristiques et dimensions susmentionnées peuvent être modifiées sans préavis en vue d’améliorer l’appareil. 7 Dimensions du schéma Unités: mm Ecran de 50 pouces sans les haut-parleurs 1218 Angle de rotation : écran 50 pouces sans haut-parleurs...
  • Page 27 Ecran de 50 pouces après l’installation des haut-parleurs latéraux 1368 Haut-parleur Haut-parleur 1218 Angle de rotation : écran 50 pouces après l’installation des haut-parleurs latéraux...
  • Page 28 Ecran de 43 pouces après l’installation des haut-parleurs latéraux 1220 Haut-parleur 1070 Haut-parleur L’écran de 43 pouces avec haut-parleurs optionnels fixés au bas de l’écran 1070 Haut-parleur Publication de Pioneer Corporation. © 2002 Pioneer Corporation. Tous droits de reproduction et de traduction réservés.
  • Page 29 Wir bedanken uns bei Ihnen für den Kauf dieses Pioneer 6. Dieses Gerät ist 10° nach links und nach rechts drehbar. Produktes. Belassen Sie deshalb keine Gegenstände im Drehbereich Bitte lesen Sie diese Bedienungsanleitung aufmerksam durch dieses Geräts einschließlich des Displays. Installieren Sie um Ihr Produkt entsprechend benutzen zu können.
  • Page 30 Anschluß des Gestells an das Plasma Display 1. Legen Sie ein Bettuch oder Schutzdeckel um das Display von Kratzen und Schaden zu beschützen. 2. Das Plasma Display darf nur waagrecht liegend auf einem Tisch oder ähnlichen Fläche zusammengebaut werden. 3. Die Schrauben vertikal in die Schraublöcher einführen und sie anziehen, aber nicht mehr als nötig. Hinweise 4.
  • Page 31 Schritt 2. Laut der Abbildung hängen Sie die Löcher der Gestellsröhre (entweder Rohr A oder Rohr B) an den Köpfen der Senkkopfschrauben zur Installation 1, dann schieben Sie das Gestell in Richtung Plasma Display bis zu den Senkkopfschrauben zur Installation 1. (Nachdem Sie das Gestell an das Plasma Display angeschlossen haben, wird das Schieben des Gestells höchstens 19 mm).
  • Page 32 7 Instruktionen zur Benutzung des Packungsmaterials vom Display als Unterlage für die Arbeit am Display (In der Abbildung ist das 50”-Bildschirmmodell zu sehen.) • Zusammenbau der Packung vom Plasma Display Karton Inneres Gestell des Kartons Stopfung Spiegelfolie Stopfung Plasma Display Schritt 1.
  • Page 33 7 Installation des Displays in einem Regal oder etwas Vergleichbarem ¶ Sorgen Sie dafür, dass die unten genannten Mindestabstände vor und hinter dem Tischständer unbedingt eingehalten werden. (Diese Mindestabstände sichern, dass der Tischständer nicht aus dem Regal herausragt, wenn er in die jeweilige äußerste Position gedreht wird.) Rückseite Regal Plasma Display...
  • Page 34 Verhütung des Umstürzens des Geräts Sorgen Sie nach erfolgter Installation des Ständers dafür, dass Maßnahmen zur Verhütung des Umstürzens des Geräts getroffen werden. 7 Nutzung einer Wand für die 7 Befestigung zum Boden Stabilisierung ¶ Stabilisieren Sie das Gerät unter Verwendung von im Handel (In der Abbildung ist das 50”- erhältlichen Schrauben.
  • Page 35: Technische Daten

    7 Technische Daten Abmessungen ......590 (B) x 539 (H) x 344 (T) mm Poids ........10.0 kg • Die obigen Werte können im Zuge der Weiterentwicklung des Geräts ohne vorherige Ankündigung geändert werden. 7 Diagramm der Abmessungen Einheiten: mm Modell mit 50”-Display ohne Lautsprecher 1218 Drehwinkel: Modell mit 50”-Display ohne Lautsprecher...
  • Page 36 Installiertes Modell mit 50”-Display mit Lautsprechern 1368 Lautsprecher 1218 Lautsprecher Drehwinkel: installiertes Modell mit 50”-Display mit Lautsprechern...
  • Page 37 Modell mit 43”-Display ohne Lautsprecher 1070 Installiertes Modell mit 43”-Display mit Lautsprechern 1220 1070 Lautsprecher Lautsprecher 43”-Bildschirm mit den an der Unterseite des Bildschirms montierten wahlweise mitgelieferten Lautsprechern 1070 Lautsprecher Veröffentlicht von Pioneer Corporation. Urheberrechtlich geschützt © 2002 Pioneer Corporation. Alle Rechte vorbehalten.
  • Page 38: Avvertenze

    7 Verificate di essere in La ringraziamo per aver acquistato questo prodotto di Pioneer. La preghiamo di leggere attentamente le istruzioni di uso per possesso di tutti i pezzi sapere come usare corettamente il suo modello. Dopo di aver letto le istruzioni, metterle in un posto sicuro per un futuro riferimento.
  • Page 39: Metodo Di Installazione

    La base su cui montare il Display al plasma 1. Proteggete il display con un foglio o una copertura di protezione per evitare che si graffi. 2. Effettuate il montaggio della base al display esclusivamente con quest’ultimo in posizione orizzontale su un Nota tavolo o superficie analoga.
  • Page 40 Come da figura, inserite le viti di installazione nei relativi fori (A o B della rotaia della Fase 2. base, quindi fatela scivolare lungo il centro del display, in modo da allineare i fori delle viti 1 per il montaggio al display (una volta montata la base non potrà scivolare per più di 19mm.) Fase 3.
  • Page 41 7 Istruzioni per utilizzare l’imballaggio come punto d’appoggio per operare sul display (Il disegno illustra il modello da 50”) ¶ Montaggio dell’imballaggio del display a plasma Imballaggio esterno Struttura interna dell’imballaggio Sostegno Mirror mat Sostegno Display a plasma Fase 1. Costruite la base di supporto del display a plasma usando la struttura interna dell’imballaggio e i sostegni della figura qui sotto (Tutti i sostegni sono identici).
  • Page 42 7 Installazione del Prodotto su un Supporto, ecc. ¶ Assicuratevi che nella parte anteriore e posteriore della supporto di tavolo ci siano almeno gli spazi minimi specificati qui sotto. (Sono gli spazi che assicurano che la supporto di tavolo non sporga dalla struttura di sostegno durante la massima rotazione) Parte posteriore Supporto...
  • Page 43: Impedire La Caduta Dell'apparecchio

    Impedire la caduta dell’apparecchio Dopo aver installato la base, assicuratevi di prendere tutte le precauzioni per impedire la caduta dell’apparecchio. 7 Fissare la base al pavimento 7 Fissare l’apparecchio alla parete (Il disegno mostra il ¶ Fissate l’apparecchio usando viti disponibili sul mercato [le modello del display da 50”) normali viti in commercio].
  • Page 44: Diagramma Delle Dimensioni

    7 Specifiche Dimensione ......590 (L) x 539 (A) x 344 (P) mm Peso ......... 10,0 kg • Le specifiche qui sopra e la parte esterna possono essere modificate senza preavviso per migliorare il prodotto. 7 Diagramma delle dimensioni Unitá: mm Senza altoparlanti per il modello di display da 50”...
  • Page 45 Con gli altoparlanti per il modello di display da 50” 1368 1218 L’altoparlante L’altoparlante Angolo di rotazione: con gli altoparlanti per il modello di display da 50”...
  • Page 46 Senza altoparlanti per il modello di display da 43” 1220 1070 L’altoparlante L’altoparlante Modello da 43” con altoparlanti opzionali montati nella parte inferiore del display 1070 L’altoparlante Pubblicato da Pioneer Corporation. Copyright © 2002 Pioneer Corporation. Tutti i diritti reservati.
  • Page 47: Installatie

    Dank u wel voor het kopen van dit Pioneer produkt. Lees Dit product draait 10˚ naar links en naar rechts. alstublieft deze gebruiksaanwijzing door zodat u weet hoe u Plaats geen voorwerpen binnen de draaicirkel van dit uw model op een juiste manier moet laten functioneren. Nadat product en het plasmascherm.
  • Page 48 Staander aan het plasmascherm voegen 1. Zet een laken of een beschermend bedekking neer om het scherm van schrammen of schade te beschermen. 2. Stel het plasmascherm samen alleen als het op een tafel of op een dergelijke oppervlak plat ligt. Opmerkingen 3.
  • Page 49 Zoals het figuur het laat zien, haak de gaten van de staanderpoten (A of B in beide Stap 2. buizen) aan de schroefkoppen van de installatie schroeven 1, daarna laat de staander boven glijden in de richting van het plasmascherm totdat het de installatie schroeven 1 aanraakt (als het met het scherm samengesteld is, zal de staander niet meer dan 19mm glijden.) verplaats de installatie schroeven 2 (M8x40) door de staanderpoten en snoer de installatie...
  • Page 50 7 Instructies voor het gebruik van de verpakking van het hoofdscherm om het als staander laten functioneren (de figuur toont het beeldscherm van 50") • De werking van het plasmascherm verpakking Buitendoos Binnenste lijst van doos Opvulsel Spiegelbescherming Opvulsel Plasmascherm Stap 1.
  • Page 51 7 Installatie van het product op een stellage, enz. ¶ Zorg ervoor dat tenminste de volgende ruimte zoals hieronder aangegeven aan de voor- en achterzijde van de tafelbladstaander wordt vrijgelaten. (Deze ruimte zorgt ervoor dat de tafelbladstaander niet verder dan de stellage uitsteekt wanneer deze maximaal wordt gedraaid.) Achterzijde Stellage...
  • Page 52 Voorkomen dat het apparaat omvalt Zorg er na installatie van de staander voor dat het apparaat niet kan omvallen. 7 Stabilisering aan de vloer 7 Het gebruik van een muur voor stabiele plaatsing (de figuur ¶ Zorg voor een stabiele plaatsing van het apparaat met in de winkel verkrijgbare schroeven.
  • Page 53: Specificaties

    7 Specificaties Dimensies ........ 590 (L) x 539 (A) x 344 (P) mm Gewicht ........10.0 kg • Bovengenoemde specificaties en afmetingen kunnen zonder voorafgaande berichtgeving worden aangepast ter verbetering van het product. 7 Diagram van dimensie Uenheid: mm Zonder speakers voor het beeldscherm van 50” 1218 Draaihoek: Zonder speakers voor het beeldscherm van 50”...
  • Page 54 Met speakers voor het geïnstalleerde beeldscherm van 50” 1368 Luidspreker 1218 Luidspreker Draaihoek: Met speakers voor het geïnstalleerde beeldscherm van 50”...
  • Page 55 Met speakers voor het geïnstalleerde beeldscherm van 43” 1220 1070 Luidspreker Luidspreker Beeldscherm van 43" met aan de onderzijde van het scherm gemonteerde, afzonderlijk leverbare luidsprekers 1070 Luidspreker Uitgegeven door Pioneer Corporation. Copyright © 2002 Pioneer Corporation. Alle rechten voorbehouden.
  • Page 56 Installation ¶ Rådgör med er försäljare om svårigheter uppstår vid installationen. ¶ Pioneer är inte ansvarig för skada som uppstår genom felakig installation, felaktig användning, förändring,eller natur katastofer. VARNING Denna Table Top Stand är specialdesignad för Plast Paneler •...
  • Page 57 Fastsättning av ställningen till Plastpanelen 1. Placera ett skydd under panelen för att skydda den från skador. 2. Montera endast med plastpanelen liggande platt på ett bord eller liknande ytta. 3. kruva in skruven vertikalt i hålen och dra at dem, men använd ej mer an nödvändig kraft så att skruven dras åt OBS! för hårt.
  • Page 58 Se figur, haka hållen på ställningsrören (antingen rör A eller B) på installationsbultarnas Steg 2. skruvhuvuden 1. Skjut sedan ställningen uppåt till huvud plastpanelen tills den hakar i installationsbultarna 1. (hopsatt ställning glider inte mer än 19 mm). Skjut installationsbultarna 2 (M8x40) genom ställningsrören och dra till Steg 3.
  • Page 59 7 Instruktioner för användning av huvudpanelens förpackningsmaterial som ställning vid arbete på panelen. (Bilden visar 50" skärmen.) • Uppsättning av förpackningsmaterial till hunvud plastpanelen Yttre box Innre box ram Dyna Spegelmatta Dyna Plastpanel Steg 1. Kontruera ställningen för plastpanelen genom att använda den innre boxens ram och dyna enligt bild ovan (alla dynor är identiska).
  • Page 60 7 Installera produkten på en hylla eller annat underlag ¶ Se till att nedan angivna minimiavstånd framför och bakom bordsstativet inte underskrids. (Dessa mått gör att bordsstativet inte sticker ut utanför underlaget vid maximal vridning.) Baksida Underlag Plastpanel Table top stand Framsida Om man använder ett underlag där de ovan nämnda måtten inte kan garanteras ska underlaget placeras så...
  • Page 61 7 Förhindra att utrustningen tippar Efter att ha installerat stativet ska man vidta nödvändiga åtgärder för att förhindra att utrustningen tippar. 7 Fastsättning i golvet 7 Förankra i en vägg (Bilden visar 50" skärmen) ¶ Förankra utrustningen med hjälp av skruvar som finns att köpa i handeln.
  • Page 62: Specifikationer

    7 Specifikationer Dimensioner ......590 (B) x 539 (H) x 344 (D) mm Vikt .......... 10.0 kg • Ovanstående specifikationer och utrustningens utseende kan ändras utan föregående meddelande för att göra produkten bättre. 7 Dimensions Diagram Enhet : mm Modellen med 50" skärm utan högtalare 1218 Rotationsvinkel: för modellen med 50"...
  • Page 63 Modellen med 50" skärm med högtalare monterade 1368 1218 Högtalare Högtalare Rotationsvinkel: för modellen med 50" skärm med högtalare monterade...
  • Page 64 Modellen med 43" skärm utan högtalare 1070 Modellen med 43" skärm med högtalare monterade 1220 1070 Högtalare Högtalare 43" med tillvalbara högtalare monterade under skärmen 1070 Högtalare Published by Pioneer Corporation. Copyright © 2002 Pioneer Corporation. All rights reserved.
  • Page 65 Gracias por haber comprado este producto Pioneer. Le rogamos Este producto gira 10° hacia la izquierda y la derecha, por repase estas instrucciones para saber manejar su modelo lo que no deberá colocar ningún objeto en el campo de correctamente. Después de leer las instrucciones, guárdelas en rotación de este producto y de la pantalla de plasma.
  • Page 66: Método De Instalación

    Ajuste del soporte a la pantalla plasma 1. Coloque algún tejido o cobertura debajo de la pantalla para protegerla de rasguños o daños. 2. Siempre ejecute el montaje poniendo la pantalla con el lado llano sobre una mesa u otra superficie llana. Atención! 3.
  • Page 67 Enganchar los agujeros de los tubos del soporte (bien el tubo A o B) en las cabezas de Paso 2. los pernos de instalación 1, luego resbalar el soporte hacia arriba, en dirección de la pantalla plasma hasta que se engrane con los pernos de instalación 1, según lo mostramos en la figura (una vez compuestos el soporte y la pantalla, no se resbalarán más de 19 mm).
  • Page 68 7 Instrucciones para utilizar el embalaje de la pantalla como soporte para el trabajo con la misma (En la figura se muestra el modelo de pantalla de 50”) • Montaje del soporte de embalaje Caja exterior Marco interior de la caja Cojín de relleno Capa del espejo Cojín de relleno...
  • Page 69 7 Cómo instalar el producto en una estructura de montaje, etc. ¶ Asegúrese de que delante y detrás del soporte para tablero de mesa quedan, por lo menos, los espacios mínimos que se detallan a continuación. (Estos espacios garantizan que el soporte para tablero de mesa no sobresalga de la estructura de montaje cuando se haga girar al máximo.) Detrás Estructura de montaje...
  • Page 70: Fijación Al Suelo

    Cómo evitar que el equipo pueda caerse Después de haber instalado el stand, asegúrese de que toma las medidas necesarias para evitar que el equipo pueda caerse. 7 Fijación al suelo 7 Cómo estabilizar el equipo contra la pared (en la figura se muestra el ¶...
  • Page 71: Diagrama De Dimensiones

    7 Especificaciones Dimensiones ......590 (A) x 539 (A) x 344 (P) mm ........10,0 kg Peso • Las anteriores especificaciones y el exterior podrán modificarse sin previo aviso a fin de mejorar el producto. 7 Diagrama de dimensiones Unidades: mm Sin altavoces para el modelo de pantalla de 50”...
  • Page 72 Con los altavoces instalados para el modelo de pantalla de 50” 1368 1218 Altavoz Altavoz Ángulo de rotación: con los altavoces instalados para el modelo de pantalla de 50”...
  • Page 73 Con los altavoces instalados para el modelo de pantalla de 43” 1220 Altavoz 1070 Altavoz Pantalla de 43” con altavoces opcionales instalados en la parte inferior de la pantalla 1070 Altavoz Uitgegeven door Pioneer Corporation. Copyright © 2002 Pioneer Corporation. Alle rechten voorbehouden.
  • Page 74 Table top stand Support de couverture de table Tischgestell Supporto di tavolo (c) 請勿放置於屋外及溫泉、海邊附近。 Tafel staander Table top stand Soporte de mesa 臺式支架 (d) 請勿放置於有振動、沖擊的地方。 PDK-TS03 5. (a) 請切實依據安裝步驟,並在所有指定的位置將螺絲擰 緊。顯示器安裝之後可能會出現破損、翻倒等意想不 取扱説明書 Operating instructions Mode d’emploi 到的事故。 Bedienungsanleitung Istruzioni per l’uso Gebruiksaanwijzing...
  • Page 75 安裝到主體上 1. 為了防止顯示器有裂紋和破損,請用鋪上襯墊。 2. 請務必將等離子顯示器主體平放在平坦的桌面上,然後進行安裝。 3. 請將螺栓垂直插入孔內,擰緊螺栓時不要過度用力。 注意 4. 請務必將支架的螺釘孔和主體的固定螺帽相對準。 5. 使用 50 型顯示器,重量約為 40kg ,因為機體較薄,不很穩定,所以安裝以及設置時務必由兩人以上進行。 7 安裝方法 將等離子顯示器平放在桌面上,將兩個固定安裝螺栓 1(M8 × 20)安裝到等離子顯示器主體的 步驟 1 孔 a 中。這時,應將固定螺栓 1 擰緊到從側面看不到螺紋部位為止。(如果將螺栓一直擰到底 的話,則將無法安裝立管。) 固定螺栓 1(M8 × 20) 孔 a (等離子顯示器 固定螺栓 1 中央的螺釘孔) 等離子顯示器主體...
  • Page 76 如上表所示,將立管的孔(A 或 B)挂住螺栓 1 的頭部,使支架向等離子顯示器的上方滑動,直 步驟 2 到碰到固定螺栓 1 。(受支架構造限制,滑動幅度在 19mm 以下。) 步驟 3 使用附帶的內六角扳手,用兩個固定螺栓2 (M8×40) ,把支架固定到等離子顯示器的主體上。 (使用孔的組合為 A , A' 和 B , B' 的兩種。) 用附帶的內六角扳手擰緊在步驟 1 中安裝的固定螺栓 1 。 步驟 4 固定螺栓 2(M8 × 40) (步驟 3) 使支架滑動(步驟 2) 臺式支架...
  • Page 77 7 將等離子顯示器的主體的包裝材料用作放置臺的安裝方法(插圖為50型 顯示器) ◆ 等離子顯示器的主體包裝箱的構成 外箱 中箱 墊片 薄膜墊 墊片 等離子顯示器的主體 步驟 1 如上圖所示,使用中箱和墊片,製作等離子顯示器的放置臺。(墊片完全相同) 墊片 中箱 步驟 2 如下圖所示把等離子顯示器放置於墊片上。 (為防止產生劃痕,請務必在墊片上舖放薄膜墊。) 等離子顯示器的主體 薄膜墊 在中箱上放置兩個墊片後做成的臺子 步驟 3 請按照“安裝方法”的步驟 1 4 ,把支架安裝在等離子顯示器的主體上。...
  • Page 78 ■ 放置在支架上時 ¶ 放置時,請務必確保臺式支架前後側的空間大於下圖中所標出的尺寸。 (這是為保證旋轉角最大時臺式支架不超出支架) 後側 支架 等離子顯示器主體 臺式支架 前側 但是,在使用不能確保上述空間的支架時,請盡量將支架貼近牆壁,優先保證前側的空間。 旋轉時若臺式支架超出支架,可能會出現破損、翻倒 等意想不到的事故。 注意 超出的話危險。...
  • Page 79 防止翻倒 放置後,請務必採取防倒措施。 7 固定在地板上的方法 7 牆壁的利用方法 ¶ 使用商店出售的螺釘進行固定。 (插圖為50型顯示器) 固定在地板上時,請使用公稱直徑 6mm 、長度 20mm 1. 裝上等離子顯示器附帶的防倒螺栓。 以上的螺釘。 2. 用結實的繩索或鏈條用力固定在牆壁或立柱等牢固部位。 注意 (操作時,請對稱側也安裝防倒用螺栓。) 20mm 以上 5mm 以下 請使用商店出售的吊鉤、繩索或鏈條、安裝配件。 推薦使用吊鉤:公稱直徑 8mm 、長度 12 ∼ 15mm 注意 12〜15mm (50 型) 吊鉤 繩索或鏈條 安裝配件 (43 型) ◆...
  • Page 80 7 規格 外形尺寸 ...... 590(寬)x 539(高)x 344(深)mm 質量 ......10.0kg ・ 由於產品改進的需要,可能在未作預告的情況下變更上述規格及外觀。 7 尺寸圖 單位︰ mm 50 型顯示器不裝揚聲器時 1218 旋轉角度:50 型顯示器不裝揚聲器時...
  • Page 81 50 型顯示器主體兩側安裝揚聲器時 1368 揚聲器 揚聲器 1218 旋轉角度:50 型顯示器主體兩側安裝揚聲器時...
  • Page 82 43 型顯示器不裝揚聲器時 1070 43 型顯示器主體兩側安裝揚聲器時 1220 1070 揚聲器 揚聲器 43 型顯示器主體下側安裝揚聲器時 1070 揚聲器 日本先鋒公司出版 版權©2002日本先鋒公司 版權所有...
  • Page 84 PIONEER ELECTRONICS (USA) INC. P.O.BOX 1540, Long Beach, California 90801-1540, U.S.A., TEL: 1-310-952-2111 PIONEER EUROPE NV MULTIMEDIA DIVISION Pioneer House Hollybush Hill, Stoke Poges, Slough SL2 4QP, U.K., TEL: 44-1753-789-789 PIONEER ELECTRONICS AUSTRALIA PTY.LTD. 178-184 Boundary Road, Braeside, Victoria 3195, Australia, TEL: 61-39-586-6300 PIONEER ELECTRONICS ASIACENTRE PTE.

Table des Matières