IOGear GWU637 Manuel Utilisateur

IOGear GWU637 Manuel Utilisateur

Adaptateur sans fil universel ethernet-2-wifi

Publicité

Les langues disponibles

Les langues disponibles

Liens rapides

User Manual
Ethernet-2-WiFi Universal Wireless Adapter
Manuel Utilisateur
Adaptateur sans fil universel Ethernet-2-WiFi GWU637
Manual de Usuario
Adaptador inalámbrico universal GWU637
para Ethernet-2-WiFi
GWU637
PART NO. M1357
1
www.iogear.com

Publicité

Table des Matières
loading

Sommaire des Matières pour IOGear GWU637

  • Page 1 User Manual Ethernet-2-WiFi Universal Wireless Adapter Manuel Utilisateur Adaptateur sans fil universel Ethernet-2-WiFi GWU637 Manual de Usuario Adaptador inalámbrico universal GWU637 para Ethernet-2-WiFi GWU637 PART NO. M1357 www.iogear.com...
  • Page 2 Designed in California, USA ©2015 IOGEAR® All rights reserved. ATEN is a registered trademark of ATEN International Co., LTD. All other trademarks are the properties of their respective owners. Reproduction in whole or in part without permission is prohibited. Tested to Comply With FCC and CE Standards. FOR HOME OR OFFICE USE.
  • Page 3: Table Des Matières

    Table of Contents Package Contents Hardware Requirements Overview Setting Up Your Ethernet-2-WiFi Universal Wireless Adapter Compliance Information Limited Warranty Contact Contenu de l’emballage Configuration matérielle requise Vue d’ensemble Configuration de l’adaptateur sans fil universel Ethernet-2-WiFi Déclaration de Conformité Garantie limitée Contact Contenidos del Paquete Requisitos de hardware...
  • Page 4: Package Contents

    Package Contents 1 x GWU637 Ethernet-2-WiFi Universal Wireless Adapter 1 x USB Power Cable 1 x USB Power Adapter 1 x Ethernet Cable (3ft) 1 X Quick Start Guide 1 x Warranty Card Hardware Requirements • Ethernet enabled device • Wireless Router with WPS Setup or Wireless Router without WPS Setup and...
  • Page 5: Overview

    Overview 1. Wi-Fi Protected Setup (WPS) Button - Push and hold the WPS button for 3 - 5 seconds to enable the WPS feature. 2. Micro USB Port 3. Ethernet Port 4. Reset Button - Push and hold the reset button for 3 - 5 seconds to reset adapter to factory default settings.
  • Page 6: Led Indicators

    LED Indicators 5. WPS/Reset a. Solid – The unit is being reset to factory default settings b. Blinking – The WPS feature is enabled and active c. Off – The WPS feature is not active 6. WLAN a. Blinking – WLAN is transmitting or receiving data b.
  • Page 7: Setting Up Your Ethernet-2-Wifi Universal Wireless Adapter

    Setting Up Your Ethernet-2-WiFi Universal Wireless Adapter Wireless Configuration Using Wi-Fi Protected Setup (WPS) 1. Power on your Ethernet-2-WiFi adapter by connecting the included micro-USB cable to the USB power adapter and plugging into an available power outlet. 2. Refer to your wireless router’s user manual for instructions to enable Wi-Fi Protected Setup.
  • Page 8 4. Open Control Panel and select Network and Sharing Center. Note: Windows 10 users need to select Network and Internet settings before arriving at Network and Sharing Center. 5. Click on Ethernet.
  • Page 9 6. Select Properties. 7. Click to highlight Internet Protocol Version 4 (TCP/IPv4) and select Properties.
  • Page 10 8. Choose Use the following IP address. Enter 192.168.1.253 in the IP Address field and 255.255.255.0 as Subnet mask. Click OK to continue. 9. Open an Internet Browser and enter 192.168.1.254 in the address bar. 10. Enter the following factory default User Name and Password: User Name: admin Password: admin Click the Log In button.
  • Page 11 Next, click Search to select the wireless network to connect the adapter to. Wireless Connection is NOT ACTIVE GWU637 Home Network 12. The Wireless Site Survey window will open. Select the desired wireless network to connect to and click Done.
  • Page 12 13. If your wireless network is secured, choose the correct Encryption type from the dropdown menu and enter your network password. Click the Apply button to save settings. Wireless Connection is NOT ACTIVE GWU637 Home Network 14. Click the Finish button to reflect the updated settings.
  • Page 13 15. The adapter will reboot for 90 seconds. During the reboot process, the Wireless Connection status will change to ACTIVE. Home Network 16. Close your browser and change the network settings on your computer back to DHCP. Refer to steps 4 through 8. 17.
  • Page 14 Wireless Configuration - MAC 1. Start by disabling your MAC’s wireless connection. 2. Next, power on your Ethernet-2-WiFi adapter using either of the following methods: • Connect the included micro-USB cable to the USB power adapter and plug into an available power outlet. Connect the micro-USB cable to the Ethernet-2-WiFi adapter.
  • Page 15 6. Select Ethernet in the left pane and select Manually from the Configure IPv4 dropdown menu. Enter 192.168.1.253 in the IP Address field and 255.255.255.0 as Subnet Mask. Click the Apply button. 7. Open an Internet Browser and enter 192.168.1.254 in the address bar.
  • Page 16 User Name: admin Password: admin Click the Log In button. 9. The Ethernet-2-WiFi configuration utility will launch in your browser. Next, click Search to select the wireless network to connect the adapter to. Wireless Connection is NOT ACTIVE GWU637 Home Network...
  • Page 17 Home Network Office Network 11. If your wireless network is secured, choose the correct Encryption type from the dropdown menu and enter your network password. Click the Apply button to save settings. Wireless Connection is NOT ACTIVE GWU637 Home Network...
  • Page 18 12. Settings will save. Click the Finish button to reflect the updated settings. Wireless Connection is NOT ACTIVE GWU637 13. The adapter will reboot for 90 seconds. During the reboot process, the Wireless Connection status will change to ACTIVE. Wireless Connection is...
  • Page 19: Compliance Information

    14. Close your browser and change the network settings on your computer back to DHCP. Refer to steps 4 through 6. 15. Your Ethernet-2-WiFi adapter configuration is complete. Use the included Ethernet cable to connect the adapter to your Ethernet enabled device such as a Blu-Ray player, HDTV or game console.
  • Page 20 This device complies with Industry Canada license-exempt RSS standard(s). Operation is subject to the following two conditions: (1) This device may not cause interference, (2) this device must accept any interference, including interference that may cause undesired operation of the device. IC ID: 8740A (GWU637)
  • Page 21: Limited Warranty

    Contact WE’RE HERE TO HELP YOU! NEED ASSISTANCE SETTING UP THIS PRODUCT? Make sure you: 1. Visit www.iogear.com for more product information 2. Visit www.iogear.com/support for live help and product support 19641 Da Vinci, Foothill Ranch, CA 92610 www.iogear.com iogear.custhelp.com...
  • Page 22: Contenu De L'emballage

    Contenu de l’emballage 1 x Adaptateur sans fil universel Ethernet-2-WiFi GWU637 1 x Câbles d’alimentation USB 1 x Adaptateur de courant USB 1 x Câble Ethernet (91,4 cm/3 pi) 1 x Guide de démarrage rapide 1 x Carte de garantie Configuration matérielle requise...
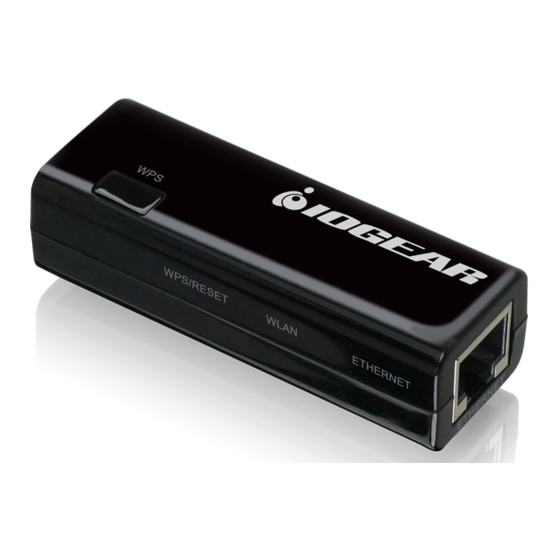
  • Page 23: Vue D'ensemble

    Vue d’ensemble 1. Bouton Wi-Fi Protected Setup (WPS) (Configuration de sécurité Wi-Fi) - Poussez et maintenez le bouton WPS enfoncé de 3 à 5 secondes pour activer la fonction WPS. 2. Port micro USB 3. Port Ethernet 4. Bouton de réinitialisation - Poussez et maintenez enfoncé...
  • Page 24: Voyants Del

    Voyants DEL 5. WPS/Reset (WPS/Réinitialisation) a. Continu – L’appareil est en cours de réinitialisation aux paramètres par défaut d’usine b. Clignotant – La fonction WPS est activée et active c. Éteint – La fonction WPS n’est pas active 6. WLAN a.
  • Page 25: Configuration De L'adaptateur Sans Fil Universel Ethernet-2-Wifi

    Configuration de l’adaptateur sans fil universel Ethernet-2-WiFi Configuration sans fil à l’aide de Wi-Fi Protected Setup (WPS) (Configuration de sécurité Wi-Fi) 1. Mettez l’adaptateur Ethernet-2-WiFi sous tension en connectant le câble micro USB inclus à l’adaptateur de courant USB et en le branchant à une prise de courant.
  • Page 26 4. Ouvrez Panneau de configuration et sélectionnez Network and Sharing Center (Centre Réseau et partage). Remarque: Les utilisateurs de Windows 10 doivent sélectionner les paramètres Network and Internet (Réseau et Internet) avant d’arriver au Network and Sharing Center (Centre Réseau et partage) 5.
  • Page 27 6. Sélectionnez Properties (Propriétés). 7. Cliquez pour mettre en surbrillance Internet Protocol Version 4 (TCP/IPv4) (Protocole Internet Version 4 (TCP/IPv4)) et sélectionnez Properties (Propriétés).
  • Page 28 8. Choisissez Use the following IP address (Utiliser l’adresse IP suivante). Saisissez 192.168.1.253 dans le champ IP Address (adresse IP) et 255.255.255.0 comme Subnet mask (masque de sous-réseau). Cliquez sur OK pour continuer. 9. Ouvrez un navigateur Internet et tapez 192.168.1.254 dans la barre d’adresse. 10.
  • Page 29 Search (rechercher) pour sélectionner le réseau sans fil pour connecter l’adaptateur. Wireless Connection is NOT ACTIVE GWU637 Home Network 12. La fenêtre Wireless Site Survey (évaluation de site sans fil) s’ouvre. Sélectionnez le réseau sans fil souhaité pour la connexion et cliquez sur Done (terminé).
  • Page 30 Cliquez sur le bouton Apply (appliquer) pour enregistrer les paramètres. NOT ACTIVE Wireless Connection is GWU637 Home Network 14. Cliquez sur le bouton Finish (terminer) pour refléter les paramètres mis à jour.
  • Page 31 15. L’adaptateur redémarre pendant 90 secondes. Pendant le processus de redémarrage, l’état de la connexion sans fil deviendra ACTIVE (ACTIF). Home Network 16. Fermez votre navigateur et remettez les paramètres réseau de votre ordinateur à DHCP. Reportez-vous aux étapes 4 à 8. 17.
  • Page 32 Configuration sans fil - Mac 1. Commencez par désactiver la connexion sans fil de votre Mac. 2. Ensuite, allumez l’adaptateur Ethernet-2-WiFi en utilisant l’une ou l’autre des méthodes suivantes: • Connectez le câble micro USB inclus à l’adaptateur de courant USB et en le branchant à...
  • Page 33 6. Sélectionnez Ethernet dans le volet de gauche et sélectionnez Manually (manuellement) dans le menu déroulant Configurer IPv4. Saisissez 192.168.1.253 dans le champ IP Address (adresse IP) et 255.255.255.0 comme Subnet Mask (masque de sous-réseau). Cliquez sur le bouton Apply (appliquer). 7.
  • Page 34 Mot de passe: admin Cliquez sur le bouton Log In (connexion). 9. L’utilitaire de configuration Ethernet-2-WiFi lancera votre navigateur. Ensuite, cliquez sur Search (rechercher) pour sélectionner le réseau sans fil pour connecter l’adaptateur. Wireless Connection is NOT ACTIVE GWU637 Home Network...
  • Page 35 11. Si votre réseau sans fil est sécurisé, choisissez le type de chiffrement correct dans le menu déroulant et entrez le mot de passe de votre réseau. Cliquez sur le bouton Apply (appliquer) pour enregistrer les paramètres. Wireless Connection is NOT ACTIVE GWU637 Home Network...
  • Page 36 12. Les paramètres se sauvegarderont. Cliquez sur le bouton Finish (Terminer) pour mettre à jour les paramètres. 13. L’adaptateur redémarre pendant 90 secondes. Pendant le processus de redémarrage, l’état de la connexion sans fil deviendra ACTIVE (ACTIF). Wireless Connection is ACTIVE GWU637 Home Network...
  • Page 37: Déclaration De Conformité

    Cet appareil a été testé et trouvé conforme aux directives de l’Union européenne: Capacités électromagnétiques (2004/108/CE), basse tension (2006/95/CE) et R&TTED (1999/5/CE). La déclaration de conformité et les documents connexes peuvent être téléchargés directement à partir de notre site Web: http://www.iogear.com/product/GWU637/certifications,...
  • Page 38: Garantie Limitée

    NOUS SOMMES LÀ POUR VOUS AIDER! BESOIN D’AIDE POUR LA CONFIGURATION DE CE PRODUIT? Assurez-vous de: 1. Visiter www.iogear.com pour plus d’information sur le produit 2. Visiter www.iogear.com/support pour obtenir de l’aide et un soutien technique en ligne iogear.custhelp.com support@iogear.com www.iogear.com...
  • Page 39: Contenidos Del Paquete

    Contenidos del Paquete 1 x Adaptador inalámbrico universal GWU637 para Ethernet-2-WiFi 1 x Cable de corriente USB 1 x Adaptador de corriente USB 1 x Cables de Ethernet (1 metro / 3 pies) 1 x Guía rápida de inicio 1 x Tarjeta de garantía Requisitos de hardware •...
  • Page 40: Generalidades

    Generalidades 1. Botón de configuración (WPS) de Wi-Fi progegida - Presione y sostenga el botón de WPS durante 3 a 5 segundos para activar la función WPS. 2. Puerto Micro USB 3. Puerto Ethernet 4. Botón de reinicio - Presione y sostenga el botón de reinicio durante 3 a 5 segundos para reconfigurar el adaptador a los parámetros establecidos en la fábrica.
  • Page 41 Indicadores LED 5. WPS/Reset (WPS/reinicio) a. Sólido – La nidad se está reconfigurando a los parámetros establecidos en la fábrica b. Intermitente – La funcón WPS está funcionando y activa c. Apagado – La función WPS no está activa 6. WLAN a.
  • Page 42: Cómo Configurar El Adaptador Inalámbrico Universal Para

    Cómo configurar el Adaptador inalámbrico universal para Ethernet-2-WiFi Configuración inalámbrica usando la configuración de Wi-Fi protegida (WPS) 1. Encienda el adaptador Ethernet-2-WiFi conectando el cable micro USB que se incluye al adaptador de corriente USB y enchufándolo a un tomacorriente. 2.
  • Page 43 4. Abra Control Panel (Panel de control) y seleccione Network and Sharing Center (Centro de redes y datos compartidos). Nota: Los usuarios de Widonws 10 deberán seleccionar las configuraciones de Network and Internet (Red e internet) antes de llegar a Network and Sharing Center 5.
  • Page 44 6. Seleccione Properties (Propiedades). 7. Haga clic para seleccionar Internet Protocol Version 4 (Protocolo de internet versión 4) (TCP/IPv4) y seleccione Properties (Propiedades).
  • Page 45 8. Seleccione Use the following IP address (Usar la siguiente dirección de IP). Ingrese 192.168.1.253 en el campo de IP Address y 255.255.255.0 como Subnet mask (máscara de la subred). Haga clic en OK para continuar. 9. Abra un navegador de internet e ingrese 192.168.1.254 en la barra de la dirección. 10.
  • Page 46 Wireless Connection is NOT ACTIVE GWU637 Home Network 12. Se abrirá la ventana de Wireless Site Survey (evaluación del sitio inalámbrico). Seleccione la red inalámbrica a la que desea conectarse y haga clic en Done (Completo).
  • Page 47 Haga clic en el botón de Apply (aplicar) para salvar la configuración. Wireless Connection is NOT ACTIVE GWU637 Home Network 14. Haga clic en el botón de Finish (terminar) para reflejar la configuración actualizada.
  • Page 48 15. El adaptador volveerá a arrancar durante 90 segundos. Durante el proceso de reinicio, el estado de la conexión inalámbrica cambiará al estado ACTIVE (ACTIVO). Home Network 16. Seleccione su navegador y cambie la configuración de la red en su computadora nuevamente a DHCP.
  • Page 49 Configuración inalámbrica - MAC 1. Comience por desactivar la conexión inalámbrica de su MAC. 2. Despues, encienda su adaptador Ethernet-2-WiFi usando uno de los siguientes métodos: • Conecte el cable micro USB que se incluye al adaptador de corriente USB y enchúfelo a un tomacorriente.
  • Page 50 6. Seleccione Ethernet en la parte izquierda y seleccione Manually (manualmente) en el menú desplegable de Configure IPv4. Ingrese 192.168.1.253 en el campo de IP Address y 255.255.255.0 como Subnet Mask (máscara de la subred). Haga clic en el botón de Apply (aplicar). 7.
  • Page 51 9. La función de configuración de Ethernet-2-WiFi se abrirá en su navegador. Después, haga clic en Search (buscar) para seleccionar la red inalámbrica a la cual va a conectar el adaptador. Wireless Connection is NOT ACTIVE GWU637 GWU637 Home Network...
  • Page 52 11. Si su red inalámbrica está asegurada, seleccione el tipo correcto de codificación en el menú desplegable e ingrese la contraseña de su red. Haga clic en el botón de Apply (aplicar) para salvar la configuración. Wireless Connection is NOT ACTIVE GWU637 Home Network...
  • Page 53 12. Configuración se guardará. Haga clic en el botón de Finish (Terminar) para reflejar la configuración actualizada. 13. El adaptador volveerá a arrancar durante 90 segundos. Durante el proceso de reinicio, el estado de la conexión inalámbrica cambiará al estado ACTIVE (ACTIVO). Wireless Connection is ACTIVE GWU637 Home Network...
  • Page 54: Información De Conformidad

    Este dispositivo fue probado y se determinó que cumple con las siguientes normas de la Unión Europea: Capacidad electromagnética (2004/108/EC), Bajo voltaje (2006/95/EC) y R&TTED (1999/5/EC). La declaración de conformidad y otros documentos relacionados pueden descargarse directamente a través de nuestro sitio web: http://www.iogear.com/ product/GWU637/certifications...
  • Page 55: Garantia Limitada

    Contacto ¡ESTAMOS AQUÍ PARA AYUDARLE! ¿NECESITA AYUDA CON ESTE PRODUCTO? Asegúrese de: 1. Visitar www.iogear.com para más información sobre nuestros productos 2. Visitar www.iogear.com/support para ayuda en directo y soporte técnico sobre el producto iogear.custhelp.com support@iogear.com www.iogear.com 19641 Da Vinci, Foothill Ranch, CA 92610...
  • Page 56 © 2015 IOGEAR ®...

Ce manuel est également adapté pour:

M1357

Table des Matières