Velleman TIMER8 Mode D'emploi
Liens rapides
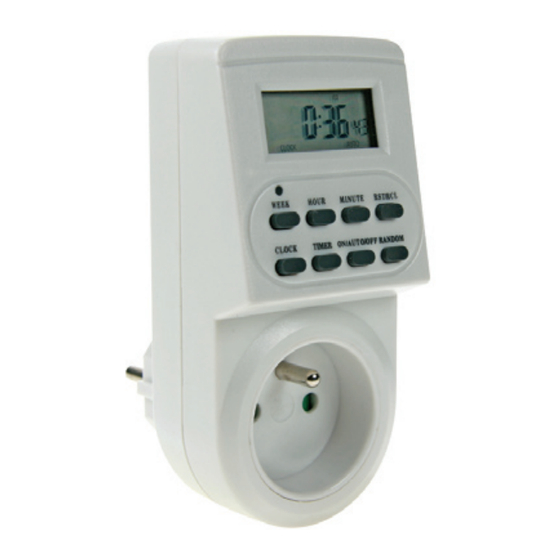
TIMER8
WEEKLY TIMER 3600W
1. Introduction
To all residents of the European Union
Important environmental information about this product
This symbol on the device or the package
indicates that disposal of the device after its
lifecycle could harm the environment.
Do not dispose of the unit (or batteries) as
unsorted municipal waste; it should be taken
to a specialized company for recycling.
This device should be returned to your distributor or to a
local recycling service.
Respect the local environmental rules.
If in doubt, contact your local waste disposal authorities.
Thank you for choosing Perel! Please read the manual
thoroughly before bringing this device into service. If the
device was damaged in transit, don't install or use it and
contact your dealer.
2. Safety Instructions
Damage caused by disregard of certain guidelines in this
manual is not covered by the warranty and the dealer
will not accept responsibility for any ensuing defects or
problems.
Do not connect to an appliance with a load exceeding
16A.
Always make sure the plug of the connected appliance is
fully inserted into the timer.
Wipe the device regularly with a dry cloth. Do not use
alcohol or solvents. Do not immerse the timer into water
or any other liquid.
It is recommended not to connect heaters or similar
appliances to the timer.
Note that damage caused by user modifications to the
device is not covered by the warranty.
Keep the device away from children and unauthorised
users.
3. Description
WEEK, HOUR, MINUTE: Day, hour or minute setting (with
CLOCK or TIMER).
RST/RCL: Override programs.
CLOCK: Day, hour or minute setting (with WEEK, HOUR
or MINUTE), 12/24h mode (with TIMER), daylight saving
time function (with ON/AUTO/OFF).
TIMER: Timer day, hour or minute setting (with WEEK,
HOUR or MINUTE), 12/24h mode (with CLOCK).
ON/AUTO/OFF: Operating modes.
RANDOM: Set or cancel random function.
MASTERCLEAR: Clear all data.
4. Initial Battery Charge
Connect the timer to the mains and let the internal battery
charge for approximately 14 hours. Press MASTERCLEAR
using a pointed object after the charging period. The timer
is now ready to be set.
5. Use
Setting the Time
Hold CLOCK pressed and set the day, the hour and the
minutes with WEEK, HOUR and MINUTE respectively.
Programming
Press TIMER once to enter the first program.
First, enter the regularity with WEEK. You can choose
between: single day, every day, every weekday, weekend,
every weekday + Saturday, etc.
Next, set the time with HOUR and MINUTE. Press TIMER
again to finish the programming.
Set remaining programs accordingly making sure not to
overlap programs.
ON/AUTO/OFF Setting
Choose one of the modes using the ON/AUTO/OFF
button.
AUTO: Programs will only be activated in this mode.
ON: Power output is always on and programs will not be
executed.
OFF: Power output is always off and programs will not
be executed.
When switching from ON mode to AUTO mode, the timer
will stay in ON mode until the next timer setting.
Random Function
Press RANDOM to activate this function (note that it will
only work in AUTO mode). The programs set between
6pm and 6am will be advanced by 10 to 31 minutes.
12/24h Mode
Hold CLOCK pressed and press TIMER to switch from
12h mode to 24h mode and back.
Daylight Saving Mode
Hold CLOCK pressed and press ON/AUTO/OFF to switch
from normal mode to daylight saving mode and back.
6. Technical Specifications
Power Supply max. 230VAC / 50Hz
Max. Load
max. 3600W
Dimensions
125 x 60 x75 mm
Total Weight
169kg
Velleman nv cannot be held responsible in the event of
damage or injury resulted from (incorrect) use of this
device.
For more info concerning this product, please visit our
website www.perel.eu.
The information in this manual is subject to change
without prior notice.
TIMER8
MINUTEUR HEBDOMADAIRE
3600W
1. Introduction
Aux résidents de l'Union européenne
Des
informations
importantes concernant ce produit
Ce symbole sur l'appareil ou l'emballage
indique que l'élimination d'un appareil en fin
de vie peut polluer l'environnement.
Ne pas jeter un appareil électrique ou électronique (et
des piles éventuelles) parmi les déchets municipaux non
sujets au tri sélectif ; une déchèterie traitera l'appareil en
question.
Renvoyer les équipements usagés à votre fournisseur ou
à un service de recyclage local.
Il convient de respecter la réglementation locale relative à
la protection de l'environnement.
En cas de questions, contacter les autorités locales pour
élimination.
Nous vous remercions de votre achat ! Lire la présente
notice attentivement avant la mise en service de l'appareil.
Si l'appareil a été endommagé pendant le transport, ne
pas l'installer et consulter votre revendeur.
2. Prescriptions de sécurité
La garantie ne s'applique pas aux dommages survenus
en négligeant certaines directives de cette notice et
votre revendeur déclinera toute responsabilité pour les
problèmes et les défauts qui en résultent.
Ne pas raccorder un appareil avec une charge supérieure
à 16A.
Veiller à insérer complètement la fiche dans la prise du
minuteur.
Essuyer l'appareil régulièrement avec un chiffon sec.
Éviter l'usage d'alcool et de solvants. Ne pas tremper le
minuteur dans un liquide quelconque.
Le raccordement d'un calorifère est déconseillé.
Les dommages occasionnés par des modifications à
l'appareil par le client, ne tombent pas sous la garantie.
Garder votre E305W hors de la portée de personnes non
qualifiées et de jeunes enfants.
3. Description
WEEK, HOUR, MINUTE : Paramétrage du jour, de l'heure
et des minutes (avec CLOCK ou TIMER).
RST/RCL : Écrasement des programmations.
CLOCK : Paramétrage du jour, de l'heure et des minutes
(avec WEEK, HOUR ou MINUTE), mode 12/24h (avec
TIMER), fonction horaire d'été (avec ON/AUTO/OFF).
TIMER : Paramétrage du jour, de l'heure et des minutes
de la minuterie (avec WEEK, HOUR ou MINUTE), mode
12/24h (avec CLOCK).
ON/AUTO/OFF : Modes d'opération.
RANDOM : Paramétrage ou effacement de la fonction
« Random ».
MASTERCLEAR : Effacement de toutes les données.
4. Première charge d'accu
Raccorder le minuteur au secteur (± 14h) afin de charger
l'accu interne. Enfoncer MASTERCLEAR à l'aide d'un
objet pointu après la charge complète. Le minuteur est
prêt à l'emploi.
5. Emploi
Paramétrage de l'heure
Maintenir enfoncé CLOCK et paramétrer le jour, l'heure
et les minutes avec respectivement WEEK, HOUR et
MINUTE.
Programmation
Enfoncer TIMER pour accéder au premier programme.
Entrer d'abord la combinaison de jours organisés avec
WEEK. Vous avez le choix entre : jour individuel, chaque
jour, chaque jour de la semaine, week-end, chaque jour
de la semaine + samedi, etc.
Ensuite, paramétrer l'heure avec HOUR et MINUTE.
Renfoncer TIMER pour terminer la programmation.
Programmer les intervalles restants comme ci-dessus en
veillant à ne pas recouvrir les intervalles.
environnementales

Manuels Connexes pour Velleman TIMER8


Sommaire des Matières pour Velleman TIMER8
- Page 1 RST/RCL : Écrasement des programmations. problems. Velleman nv cannot be held responsible in the event of CLOCK : Paramétrage du jour, de l’heure et des minutes Do not connect to an appliance with a load exceeding...
- Page 2 Zorg ervoor dat de stekker van het aangesloten toestel ne sera valable qu’en mode AUTO). Les intervalles goed in de timer steekt. Velleman nv is niet aansprakelijk voor schade of programmés entre 18h00 et 06h00 seront avancés de 10 Maak het toestel geregeld schoon met een droge doek.
- Page 3 WEEK, HOUR, MINUTE: Den Tag, die Uhrzeit und die Minuten (mit CLOCK oder TIMER) einstellen. Velleman SA no será responsable de daños ni lesiones RST/RCL: Die Programme überschreiben. causados por un uso (indebido) de este aparato. CLOCK: : Den Tag, die Uhrzeit und die Minuten (mit Para más información sobre este producto, visite nuestra...