Publicité
Liens rapides
Publicité
Chapitres

Manuels Connexes pour Singer 9920


Sommaire des Matières pour Singer 9920
- Page 1 INSTRUCTION MANUAL NOTICE D’UTILISATION MANUAL DE INSTRUCCIONES 9920...
-
Page 2: Important Safety Instructions
18. Do not expose the machine or machine case to sunlight directly. Also, do not keep it in a very warm or damp place. SAVE THESE INSTRUCTIONS Servcing should be performed by an authorized service representative. SINGER is a registered Trademark of The Singer Company Ltd. -
Page 3: Table Des Matières
CONTENTS IMPORTANT SAFETY INSTRUCTIONS .... 2 WHERE TO USE EACH STITCH ..... 40 MODEL 9920 ............8 STRAIGHT STITCH SEWING ......42 FOR EUROPEAN AND SIMILAR TERRITORIES: ..8 A. Straight Stitch ................ 42 B. Straight Stitch With Auto-lock Stitch (Pattern No. 3) ..... 42 MAIN PARTS ............ -
Page 4: Consignes De Sécurité Importantes
18. N’exposez pas la machine ni la housse de protection à la lumière directe du soleil. De même, n’entreposez pas la machine dans un endroit très chaud ni très humide. CONSERVEZ CETTE NOTICE D’UTILISATION La maintenance de la machine doit être assurée exclusivement par un professionnel agréé. SINGER® est une marque déposée par The Singer Company Ltd. - Page 5 TABLE DES MATIÈRES CONSIGNES DE SÉCURITÉ IMPORTANTES .. 5 DESCRIPTION DES POINTS ......41 MODÈLE 9920 ............ 9 COUTURE AU POINT DROIT ......43 POUR LES TERRITOIRES EUROPÉENS ET A. Point droit ................43 B. Point droit avec point d’arrêt automatique (n°3) ..... 43 ASSIMILÉS ............
-
Page 6: Normas De Seguridad Importantes
18. No exponga la máquina o la cubierta de la máquina directamente a la luz del sol. Tampoco la guarde en un lugar muy caliente o húmedo. CONSERVE ESTAS INSTRUCCIONES Las reparaciones deben ser realizadas únicamente por un servicio representativo autorizado. SINGER® es una marca registrada de The Singer Company Ltd. - Page 7 ÍNDICE NORMAS DE SEGURIDAD IMPORTANTES..6 DÓNDE UTILIZAR CADA TIPO DE PUNTADA 41 MODELO 9920 ........... 9 PUNTADA RECTA ..........42 PARA EUROPA Y TERRITORIOS A. Puntada recta ................42 B. Puntada recta con puntada en retroceso automática (nº 3) ..42 EQUIPARABLES: ..........
-
Page 8: Model 9920
CE identification. To ensure that you are always provided with the La machine à coudre SINGER, modèle 9920, a most modern sewing capabilities, the été testée par l’Association de contrôle manufacturer reserves the right to change the d’ingénierie TÜV conformément aux normes... -
Page 9: Modèle 9920
Copyright © 2003 THE SINGER COMPANY Reproducción © 2003 THE SINGER COMPANY. Tous droits réservés dans le monde entier. Reservados todos los derechos internacionales. -
Page 10: Main Parts
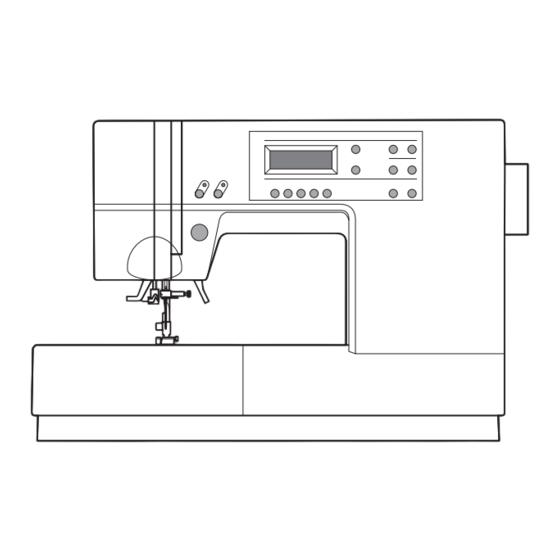
MAIN PARTS 1.Face Plate 2.Thread Take-Up Lever (Inside) 3.Pressure Regulator 4.Extension Table (Accessories) 5.Handle 6.Hand Wheel 7.Presser Foot Lifter 8.Thread Cutter 9.Buttonhole Lever 10.Needle Threader Lever 11.Needle Threader 12.Needle Thread Guide 10 11 13.Needle Clamp Screw 14.Needle 15.Presser Foot Thumb Screw 16.Presser Foot Holder 17.Presser Foot 18.Fabric Feed Dogs... -
Page 11: Pièces Principales
PIÈCES PRINCIPALES PARTES PRINCIPALES 1.Plaque frontale 1.Placa frontal 2.Releveur de fil (à l’intérieur) 2.Palanca tirahilos (interior) 3.Régulateur de pression 3.Regulador de presión 4.Plateau d’extension (accessoires) 4.Extensión (accesorios) 5.Poignée 5.Asa 6.Volant 6.Volante manual 7.Releveur de pied presseur 7.Palanca alzaprensatelas 8.Coupe-fil 8.Cortador de hilos 9.Levier de boutonnière 9.Palanca para ojales 10.Levier d’enfile-aiguille... -
Page 12: Accessories
ACCESSORIES Accessories are provided in the accessory case. (See next page, [EXTENSION TABLE]) 1. Needle Pack (#11, #14, #16, Needle for knit and synthetic fabric #11, #14) 2. 4 Bobbins ( 1 is in the machine) 3. Seam Ripper 4. Brush 5. -
Page 13: Accessoires
ACCESSOIRES ACCESORIOS Les accessoires sont disposés dans le Los accesorios se encuentran en el compartiment à accessoires (voire page suivante compartimento de accesorios (consulte la página « Plateau d’extension ») siguiente, “EXTENSIÓN”) 1. Assortiment d’aiguilles (#11, #14, #16, aiguille 1. Paquete de agujas (#11, #14, #16. Aguja para pour mailles et tissus synthétiques #11, #14) punto y tejido sintético #11, #14) 2. -
Page 14: Extension Table
EXTENSION TABLE a. REMOVING THE EXTENSION TABLE Hook your finger to the bottom of extension table and slide it to the left. To attach, insert to the right. b. OPENING THE ACCESSORY CASE Hook your finger to the left side of accessory case and pull toward you. -
Page 15: Plateau D'extension
PLATEAU D’EXTENSION EXTENSIÓN a. DÉGAGER LE PLATEAU D’EXTENSION a. RETIRADA DE LA EXTENSION Saisissez le plateau d’extension par-dessous Sujete el final de la extensión con los dedos y avec le doigt et faites-le glisser vers la gauche. deslícela hacia la izquierda. Para colocarla, Pour le fixer, insérez-le dans son emplacement insértela hacia la derecha. -
Page 16: Inserting The Needle
Syn 50 - 80 knit, tricot, green shank Needle for knit and Silk 50 spandex, jersey synthetic fabric Polyester Sweatshirt, Swim- 2001 wear, Double Knit, Polyester green shank Sweater Knit Leather 2032 Leather Use a Singer brand needle for better sewing results. -
Page 17: Mise En Place De L'aiguille
11/80 -14/90 maillots de bain, Polyester 2001 talon 11/80-14/90 punto, jersey de verde laine épaisse, vert punto tricot 2032 Cuero Cuir 2032 cuir cuero Utilice una aguja Singer para obtener los Pour un résultat optimal, utilisez une mejores resultados. aiguille Singer. -
Page 18: Connecting The Machine
CONNECTING THE MACHINE DANGER: To reduce the risk of electric shock. Never leave unattended when plugged in. Always unplug this machine from the electric outlet immediately after using and before maintenance. WARNING: To reduce the risk of burns, fire, electric shock, or injury to persons. 1. -
Page 19: Branchement De La Machine
CONEXIÓN DE LA BRANCHEMENT DE LA MAQUINA MACHINE PELIGRO: Para reducir el riesgo de DANGER - Pour réduire les risques descarga eléctrica. de décharge électrique : Nunca deje la máquina sola cuando esté Ne laissez jamais la machine branchée sans encendida. -
Page 20: Function Of Each Part
FUNCTION OF EACH PART A. REVERSE STITCH BUTTON The machine will sew in reverse (at low speed) while the button is pressed. When released, machine will sew forward. B. NEEDLE UP/DOWN BUTTON Needle stop position will be changed up or down by pressing this button. -
Page 21: Fonction Des Pièces Et Touches
FONCTION DES PIÈCES ET FUNCIÓN DE CADA UNA TOUCHES DE LAS PARTES A. TOUCHE DE MARCHE ARRIÈRE A. BOTON DE PUNTADA EN RETROCESO Tant que cette touche est enfoncée, la machine La máquina continuará cosiendo en retroceso (a coud en marche arrière (au ralenti). Une fois que baja velocidad) mientras el botón esté... -
Page 22: Control Panel
CONTROL PANEL When you turn on the power, machine will select the straight stitch and indicate information of stitch on the L.C.D. A. L.C.D. DISPLAY Stitch information is indicated on this display. According to the pattern, information will be changed. B. -
Page 23: Écran D'affichage
ÉCRAN D’AFFICHAGE PANEL DE CONTROL Quand vous allumez la machine, celle-ci Al encender la máquina, se seleccionará la sélectionne le point droit et affiche les informations puntada recta y se indicará la información de esa concernant le point sur l’écran LCD. puntada en la pantalla LCD. -
Page 24: Bobbin Setting
BOBBIN SETTING A. REMOVING THE BOBBIN 1. Pull the bobbin cover latch to the right and remove the bobbin cover. 2. Lift up the bobbin from the machine. B. SETTING SPOOL OF THREAD ON SPOOL PIN 1. Pull up the left end of spool pin and set the spool of thread on spool pin. -
Page 25: Canette
CANETTE AJUSTE DE LA CANILLA A. RETIRER LA CANETTE A. CÓMO SACAR LA CANILLA 1. Déplacez le loquet d’ouverture du couvercle de 1. Mueva el seguro de la cubierta de la canilla la canette vers la droite et retirez le couvercle hacia la derecha y quite la cubierta. -
Page 26: Inserting The Bobbin
4. Pull thread out about 10 cm (4 inches). Replace the bobbin cover. Set the left tab into the hole in needle plate and push the right side of bobbin cover down until it clicks into place. NOTE: Use Singer bobbins only. -
Page 27: Mise En Place De La Canette
REMARQUE : N’utilisez que des canettes Singer. NOTA: Utilice sólo canillas Singer. -
Page 28: Threading The Machine
THREADING THE MACHINE A. PREPARING TO THREAD MACHINE 1. Raise the presser foot lifter. 2. Press the needle up/down button and set the needle in up position. (Keep this position until needle eye threading.) Open the top cover and set spool as below. B. -
Page 29: Enfilage De La Machine
ENFILAGE DE LA MACHINE ENHEBRADO DE LA MÁQUINA A. PRÉPARATION EN VUE DE L’ENFILAGE A. PREPARACIÓN PARA ENHEBRAR LA 1. Remontez le releveur du pied presseur. MÁQUINA 2. Appuyez sur la touche de positionnement de 1. Suba la palanca alzaprensatelas. l’aiguille et réglez l’aiguille en position haute. -
Page 30: Threading The Needle Eye
D. THREADING THE NEEDLE EYE CAUTION: To prevent accidents. Do not lower the threader lever while machine is operating. Note:The needle threader is used for needle sizes 11/80, 14/90, and 16/100. 1. Lower the presser foot. 2. Check that the needle is raised. If it is not so, raise needle by pressing needle up/down button. -
Page 31: Enfilage Du Fil Dans Le Chas De L'aiguille
D. ENFILAGE DU FIL DANS LE CHAS DE D. ENHEBRADO DEL OJO DE LA AGUJA L’AIGUILLE PRECAUCIÓN: Para prevenir ATTENTION! Pour éviter les accidentes incidents : No baje la palanca del enhebrador mientras la N’abaissez pas le levier de l’enfile-aiguille máquina está... -
Page 32: Starting To Sew
STARTING TO SEW The machine will be set to sew straight stitches when power switch is turned on. CAUTION: To prevent accidents. While sewing, special care is required around the needle. As machine automatically feeds the fabric, do not pull nor push fabric. A. -
Page 33: Début De La Couture
DÉBUT DE LA COUTURE COMENZAR A COSER La machine est programmée de façon à coudre Al poner la máquina en marcha, estará ajustada des points droits dès sa mise en marche. para dar puntadas rectas. ATTENTION! Pour éviter les PRECAUCIÓN: Para prevenir incidents : accidentes Pendant la couture, il est important de faire... -
Page 34: Turning Corners
C. TURNING CORNERS 1. Stop the machine when you reach a corner. 2. Lower needle into the fabric. To lower the needle, press the needle up/down button or turn the handwheel toward you. When you lower the needle by pressing needle up/down button, machine will stop in down position from next stitch. -
Page 35: Couture Des Angles
C. COUTURE DES ANGLES C. CÓMO GIRAR EN LAS ESQUINAS 1. Arrêtez la machine quand vous arrivez dans un 1. Pare la máquina cuando llegue a la esquina. angle. 2. Baje la aguja en el tejido. Para ello puede tanto 2. -
Page 36: Adjusting The Thread Tensions
ADJUSTING THE THREAD TENSIONS Normally, when upper thread regulating dial is set to [AUTO], thread tensions will be satisfactory for most all sewing. If it is difficult to obtain correct tensions depending on the type of fabric and threads being used, adjust the upper thread tension dial to settings shown below. -
Page 37: Réglage De La Tension Du Fil
RÉGLAGE DE LA TENSION AJUSTE DE LA TENSIÓN DU FIL DE LOS HILOS Normalement, quand la molette de réglage de la Normalmente, cuando el dial de regulación del hilo tension du fil d’aiguille est réglée sur AUTO, la superior está colocado en AUTO, las tensiones tension du fil convient à... -
Page 38: Selecting Utility Stitch Pattern
SELECTING UTILITY STITCH PATTERN Utility stitches are indicated in the pattern chart located inside of the top cover. When you turn on the machine, straight stitch will be selected automatically. Select utility stitch pattern as follows. A. SELECTING THE PATTERN 1. -
Page 39: Sélection Des Points Utilitaires
SÉLECTION DES POINTS SELECCIÓN DE PUNTADAS UTILITAIRES UTILITARIAS Les points utilitaires sont indiqués dans le tableau Las puntadas utilitarias se indican en la tabla de des points à l’intérieur du carter supérieur. puntadas situada en el interior de la cubierta superior. Quand vous allumez la machine, le point droit est Al poner la máquina en marcha, la puntada recta sélectionné... -
Page 40: Where To Use Each Stitch
WHERE TO USE EACH STITCH 01. Straight stitch center needle positon For top stitching, zipper sewing etc. 02. Straight stitch left needle position For top stitching etc. 03. Straight stitch with auto-reverse stitch 04. Straight stretch stitch (center needle position) Reinforcement straight stitch 05. -
Page 41: Description Des Points
DESCRIPTION DES DÓNDE UTILIZAR CADA POINTS TIPO DE PUNTADA 01. Point droit, position centrale de l’aiguille 01. Puntada recta con posición centrada de la Pour les travaux de couture ordinaires, les aguja: para pespuntes, costura de fermetures à glissière etc. cremalleras, etc. -
Page 42: Straight Stitch Sewing
STRAIGHT STITCH SEWING Straight stitch patterns should be selected to suit the type of fabric being sewn. Left needle position(No.2) is most suited for sewing light weight fabrics. No. 1.Center needle Position No. 2.Left needle Position No. 3.Center needle with buiit-in reverse stitch General Purpose Foot A. -
Page 43: Couture Au Point Droit
PUNTADA RECTA COUTURE AU POINT DROIT Los diseños de puntada recta deben seleccionarse en función del tipo de tejido que se Les motifs au point droit doivent être sélectionnés vaya a coser. en fonction du type de tissu à coudre. La posición izquierda de la aguja (nº... -
Page 44: Zigzag Stitch Sewing
ZIGZAG STITCH SEWING Your machine can sew zigzag stitches of various widths and lengths by changing the settings of the stitch width and stitch length. No. 7 Zigzag Stitch General or Satin Foot Zigzag stitches are very good for joining two pieces of fabrics, applique and sewing various decorative patterns. -
Page 45: Couture Au Point Zigzag
COUTURE AU POINT PUNTADA DE ZIG-ZAG ZIGZAG Su máquina puede coser puntadas de zig-zag de varios anchos y largos cambiando los ajustes del La machine peut effectuer des points zigzag de ancho y largo de puntada. différentes largeurs et longueurs quand vous changez les réglages de la largeur et de la nº... -
Page 46: Quilting
QUILTING A quilt always consists of three layers of material. The top middle and bottom. The top layer is formed by multiple geometrically shaped pieces of materials joined together. No. 1 Straight stitch (Center Needle Position) No. 6 Hand look Quilting Stitch Straight Stitch / Patch Quilting Foot CAUTION: To prevent accidents. -
Page 47: Quilting
QUILTING ACOLCHADO Le quilting consiste à assembler trois épaisseurs Un acolchado “quilt” siempre está formado por de tissu : l’épaisseur supérieure, intermédiaire et tres capas de material. inférieure. La superior, la media y la inferior. L’épaisseur supérieure est formée de nombreux La capa superior está... -
Page 48: Elastic Stitch Sewing
ELASTIC STITCH SEWING Elastic stitches are strong and flexible and will give with the fabric without breaking. Good for easy to ravel and knit fabrics as well as joining durable fabrics such as denims. No. 4 Straight Stretch Stitch No. 5 Stem Stitch for Stretch fabrics No.14 Ric-rac Stitch General Purpose Foot We recommend that you use a needle for knit and... -
Page 49: Couture De Points Élastiques
COUTURE DE POINTS PUNTADA ELÁSTICA ÉLASTIQUES Las puntadas elásticas son fuertes y flexibles y se Les points élastiques sont solides et souples, ce adaptarán al tejido sin romperse. Son adecuadas qui leur permet de suivre les mouvements du tissu para tejidos de fácil deshilachado y de punto, así sans se casser. -
Page 50: Overcasting-Overlocking
OVERCASTING- OVERLOCKING A. USING THE OVERCASTING FOOT No. 7 (Stitch Width 5.0) No. 12, 13, 26 (Stitch Width 5.0-7.0) Overcasting Foot Press fabric against the guide plate of the overcasting foot so that needle falls near the edge of seam. a. -
Page 51: Surjet - Surfilage
SURJET - SURFILAGE SOBREHILADO- REMALLADO A. AVEC LE PIED DE SURJET A. CON EL PRENSATELAS PARA N° 7 (réglage de la largeur du point : 5,0) SOBREHILADO N° 12, 13, 26 (réglage de la largeur du point : 5,0- 7,0) nº... -
Page 52: Blind Hem Stitching
BLIND HEM STITCHING This stitch will sew without stitches showing on right side of fabric. No. 8 Blind hemming for stretch fabric. No. 9 Blind hem for regular fabric. Blind Foot 1. Fold the fabric as shown on drawing. a. Medium, Heavy weight fabric b. -
Page 53: Couture D'ourlets Invisibles
COUTURE D’OURLETS DOBLADILLO DE PUNTADA INVISIBLES INVISIBLE Ce motif permet de coudre des points qui Esta puntada se cose sin que la puntada sea n’apparaissent pas sur l’endroit du tissu. visible en el lado derecho del tejido. N°8 : Ourlet invisible pour tissus extensibles. nº... -
Page 54: Patch Work
PATCH WORK For additional decorative purposes, use different kind of materials. No. 16, 17 General Purpose or Satin Foot 1. Place two pieces of fabric right sides together and sew a long straight stitch. 2. Press the seam open. 3. Be sure that stitches fall on both sides of fabric. APPLIQUE No. -
Page 55: Patchwork
PATCHWORK LABORES DE PARCHEADO Utilisez des matériaux différents pour accentuer Para efectos decorativos adicionales, use l’effet décoratif de votre ouvrage. diferentes tipos de materiales. N° 16, 17 nº 16, 17 Pied universel ou pied satin. Prensatelas para realce o universal 1. -
Page 56: Inserting Zippers Centered Insertion
INSERTING ZIPPERS CENTERED INSERTION No. 1 Straight Stitch (Center Needle Position) Zipper Foot CAUTION: To prevent accidents. Zipper foot should be used for sewing center needle position straight stitch No. 1 only. It is possible that needle could hit the presser foot and break when sewing other patterns. -
Page 57: Fermeture À Glissière - Pose Bord Àbord
INSERCIÓN DE FERMETURE À GLISSIÈRE - POSE BORD À BORD CREMALLERAS INSERCIÓN CENTRADA N°1 Point droit (position centrale de l’aiguille) nº 1 Puntada recta (posición centrada de la aguja) Pied fermeture à glissière Prensatelas para cremalleras ATTENTION! Pour éviter les incidents : PRECAUCIÓN: Para prevenir Le pied fermeture à... -
Page 58: Lapped Insertion
INSERTING ZIPPERS LAPPED INSERTION No. 1 Straight Stitch (Center Needle Position) Zipper Foot CAUTION: To prevent accidents. Zipper foot should be used for sewing center needle position straight stitch No. 1 only. It is possible that needle could hit the presser foot and break when sewing other patterns. -
Page 59: Fermeture À Glissière - Pose Sous Patte
FERMETURE À GLISSIÈRE - INSERCIÓN DE POSE SOUS PATTE CREMALLERAS INSERCIÓN SOLAPADA N°1 Point droit (position centrale de l’aiguille) nº 1 Puntada recta (posición centrada de la aguja) Pied fermeture à glissière Prensatelas para cremalleras ATTENTION! Pour éviter les incidents : PRECAUCIÓN: Para prevenir Le pied fermeture à... -
Page 60: Buttonhole Sewing
BUTTONHOLE SEWING This machine can sew 8 type buttonholes. 62. Bar-tack Butonhole (Narrow) for light to medium weight fabrics 63. Bar-tack Buttonhole (Wide) for large buttons 64. Keyhole Buttonhole for heavy weight fabrics 65. Keyhole Buttonhole with reinforced bar tack 66. -
Page 61: Couture De Boutonnières
COUTURE DE CÓMO COSER OJALES BOUTONNIÈRES Esta máquina puede coser 8 tipos de ojales. La machine est en mesure de coudre des 62. Ojal con presilla (estrecho) para tejidos ligeros boutonnières de 8 formes différentes. y medios 63. Ojal con presilla (ancho) para botones más 62. - Page 62 7. Machine will sew the buttonhole in the order as shown and stop automatically after sewing. 8. Raise the presser foot and cut thread. b. To sew over same buttonhole, raise presser foot to return to original position. 9. Cut center of buttonhole being careful not to cut stitches on either side.
-
Page 63: Presillas Y Zurcidos Automaticos
7. La máquina coserá el ojal en el orden que se 7. La machine coud la boutonnière comme muestra y se detendrá automáticamente indiqué sur l’illustration et s’arrête automatiquement après la couture. después de coser. 8. Relevez le pied presseur et coupez les fils. 8. -
Page 64: Automatic Bar-Tack And Darning
AUTOMATIC BAR-TACK AND DARNING You can sew automatic bar-tack and darning using the buttonhole foot. No. 60 Bar-tack, to reinforce areas that will be subject to strain, such as pocket corners. No.61 Darning, mending and other applications. Buttonhole Foot 1. Adjust slide on base according to the length of bar-tack or darning. -
Page 65: Arrêt Et Reprisage Automatiques
ARRÊT ET REPRISAGE PRESILLAS Y ZURCIDOS AUTOMATIQUES AUTOMÁTICOS Le pied boutonnière permet d’effectuer un arrêt ou Puede realizar presillas y zurcidos automáticos un reprisage automatiquement. usando el prensatelas para ojales. N°60 : Arrêt pour renforcer les zones fragiles, nº 60 Presilla, para reforzar las áreas sujetas a telles que les coins de poche. -
Page 66: Sewing On Buttons
SEWING ON BUTTONS No. 11 Button Sewing Foot 1. Lower the feed dogs by moving the drop feed lever to the left. 2. Attach the button sewing foot and align two holes of button with slot of presser foot and lower foot to hold the button securely. -
Page 67: Couture De Boutons
COUTURE DE BOUTONS CÓMO COSER BOTONES N°11 nº 11 Pied pour boutons Prensatelas para coser botones 1. Abaissez les griffes en poussant le levier des 1. Baje los transportadores moviendo la palanca griffes vers la gauche. de arrastre hacia la izquierda. 2. -
Page 68: Darning/Free-Hand Embroidery
DARNING/FREE-HAND EMBROIDERY No. 1 Darning/Embroidery Foot A. ATTACHING THE DARNING/ EMBROIDERY FOOT 1. Lower the feed dogs by moving the drop feed lever to the left. 2. Remove the presser foot and holder. (See page 3. The arm of darning/embroidery foot should ride onto the shaft of the needle clamp screw. -
Page 69: Reprisage/Broderie
REPRISAGE / BRODERIE ZURCIDO Y BORDADO A MANO LIBRE N°1 : Point droit (Position centrale de l’aiguille) nº 1 Posición centrada de la aguja Pied broderie et reprisage Prensatelas para zurcidos/bordados A. MISE EN PLACE DU PIED BRODERIE ET REPRISAGE A. -
Page 70: Twin Needle Sewing
General Purpose Foot or Satin Foot Note: A twin needle is not provided with this machine. Call for your Singer Dealer to purchase. CAUTION: To prevent accidents. a. Use only needle designed for this machine (Singer Style 2025). Other needles may break. -
Page 71: Couture Avec Aiguille Jumelée
: accidentes a. N’utilisez que les aiguilles conçues spécialement a. Utilice únicamente la aguja diseñada para esta pour votre machine (Singer Style 2025). Les autres máquina (Singer Style 2025). Otras agujas aiguilles pourraient se casser. pueden romperse. b. L’enfile-aiguille ne peut pas être utilisé. Enfilez b. -
Page 72: Decorative & Letter Stitch Sewing
DECORATIVE & LETTER STITCH SEWING You can combine decorative & letter stitches into a string by selecting each pattern. A. SELECTING DECORATIVE & LETTER STITCH 1. Press the decorative & letter stitch button. First 5 patterns of decorative patterns will be indicated on the lower line of LCD. -
Page 73: Couture De Lettres Et Points Décoratifs
COUTURE DE LETTRES ET PUNTADAS DECORATIVAS Y LETRAS POINTS DÉCORATIFS Puede combinar puntadas decorativas y letras en Vous pouvez combiner les lettres et les points una secuencia seleccionando cada puntada. décoratifs dans une seule séquence en sélectionnant chaque motif. A. SELECCIÓN DE PUNTADAS A. -
Page 74: To Check Selected Patterns
C. TO CHECK SELECTED PATTERNS As the length of the string increases, patterns will disappear from sight. You can check patterns by shifting cursor to the left. D. INSERTING PATTERN 1. Shift the cursor to next pattern you want to insert. 2. -
Page 75: Vérification Des Motifs Sélectionnés
C. VÉRIFICATION DES MOTIFS C. VISIÓN DE LOS DISEÑOS SÉLECTIONNÉS SELECCIONADOS Quand la longueur de la séquence augmente, les A medida que se incrementa la secuencia, los premiers motifs disparaissent de l’écran. diseños se perderán de vista. Vous pouvez vérifier les motifs en déplaçant le Puede comprobarlos moviendo el cursor a la izquierda. -
Page 76: Sewing The Selected Pattern
c. Elongation By pressing the elongation button (most right function button), stitch will elongate as below. c-1. Regular length c-2. Double length c-3. Triple length c-4. 4X length c-5. 5X length If mark is not indicated, the pattern cannot elongate. d. -
Page 77: Couture Du Motif Sélectionné
c. Élongation c. Alargamiento Quand vous appuyez sur la touche d’élongation Pulsando el botón de alargamiento (botón de (touche de fonction située le plus à droite), le función de la derecha), la puntada se alargará point s’allonge de la façon suivante : como se indica a continuación: c-1 : Longueur normale c-2 : Longueur double c-1. -
Page 78: Decorative And Letter Stitch Chart
DECORATIVE AND LETTER STITCH CHART Decorative pattern indicated bold line is one unit of pattern. The marks on the chart meanings: Mirror Stitch included Reverse Stitch included Mirror and Reverse stitch included X5 Elongation included... -
Page 79: Tableau Des Lettres Et Points Décoratifs
TABLEAU DES LETTRES ET TABLA DE PUNTADAS POINTS DÉCORATIFS DECORATIVAS Y LETRAS La ligne épaisse du motif décoratif représente une Los grupos de puntadas decorativas están unité du motif. separados por una línea negra. Les symboles du tableau ont les significations Las marcas de la tabla tienen los siguientes suivantes : significados:... -
Page 80: Maintenance
MAINTENANCE DANGER: To reduce the risk of electric shock. Disconnect the power line plug from electric outlet before carrying out any maintenance. CLEANING If lint and bits of thread accumulate in the hook, this will interfere with the smooth operation of the machine. -
Page 81: Entretien
ENTRETIEN MANTENIMIENTO DANGER! Pour réduire les risques PELIGRO: Para reducir el riesgo de de décharge électrique : descarga eléctrica. Débranchez le câble d’alimentation avant Desconecte el enchufe de la toma de corriente d’entreprendre toute opération d’entretien. antes de llevar a cabo ninguna labor de mantenimiento. -
Page 82: Helpful Hints
HELPFUL HINTS PROBLEM CAUSE CORRECTION Page Machine not properly threaded. Re-thread machine. Upper thread Thread entwined around bobbin. Remove entwined thread. breaks Needle inserted incorrectly. Re-insert needle. Thread tension too tight. Readjust thread tension. Thread of incorrect size or poor quality. Choose correct thread. -
Page 83: Solution Aux Problèmes Courants
SOLUTION AUX PROBLÈMES COURANTS Cause Anomalie Solution Page La machine n’est pas enfilée correctement. Enfilez à nouveau la machine. Le fil s’est pris dans la canette. Retirez les fils emmêlés. L’aiguille n’est pas insérée correctement. Le fil d’aiguille Insérez à nouveau l’aiguille. casse La tension du fil est trop élevée. -
Page 84: Recomendaciones Útiles
RECOMENDACIONES ÚTILES PROBLEMA CAUSA CORRECCIÓN Página La máquina está enhebrada incorrectamente. Vuelva a enhebrar la máquina. Hilo enrollado alrededor de la canilla. Retire el hilo enrollado. El hilo superior La aguja está insertada incorrectamente. Vuelva a insertar la aguja. se rompe El hilo está... - Page 88 9920EFS 33098-a D6...