Table des Matières
Publicité
Les langues disponibles
Les langues disponibles
Liens rapides
900 6369
HS-LED LIgHt 1200
The new innovative cordless LED curing light 1200
Innovadora lámpara LED de fotopolimerización sin cable 1200
Nouvelle innovation Lampe HS-LED sans fil 1200
Das neue innovative kabellose LED-Lampe 1200
Nuova Lampada LED senza fili 1200
®
INSTrucTIoNS for uSE
INSTruccIoNES DE uSo
MaNuEL D'uTILISaTIoN
GEbraucHSaNwEISuNG
ISTruzIoNI pEr L'uSo
Publicité
Chapitres
Table des Matières
Dépannage

Manuels Connexes pour Henry Schein HS-LED LIGHT 1200


Sommaire des Matières pour Henry Schein HS-LED LIGHT 1200
- Page 1 900 6369 HS-LED LIgHt 1200 The new innovative cordless LED curing light 1200 Innovadora lámpara LED de fotopolimerización sin cable 1200 Nouvelle innovation Lampe HS-LED sans fil 1200 Das neue innovative kabellose LED-Lampe 1200 Nuova Lampada LED senza fili 1200 ®...
-
Page 2: Table Des Matières
Table of Contents PREFACE..................1 DISCLAIMER ..................1 SAFETY PRECAUTIONS..............2 PARTS AND FUNCTIONS ..............3 GENERAL INSTALLATION ...............4 PANEL OPERATIONS...............5 COOLING SYSTEM................6 CHARGER SIGNALS................7 TROUBLE SHOOTING TIPS ............8 DEVICE SPECIFICATION ..............8 MAINTENANCE CHECK LIST............9 Any malfunction of this product caused by weather, tempera- ture or used material or any outside influences we reserve the right to negate the warranty. -
Page 3: Preface
WARNING : Beware of high temperature and strong light. Do not look directly into the light source without eye protection. PREFACE : Prior to using the product, please read this USER MANUAL carefully and thoroughly as it provides details of correct usage, maintenances, and troubleshooting instructions. Please keep this manual in a safe place for future reference. -
Page 4: Safety Precautions
SAFETY PRECAUTIONS : Please follow instruction steps in this manual for correct and safe operations of the device. Pay special attention to the following warning signs beside the operation descriptions where applicable. a) DANGER • This message appears where the operation may potentially cause severe injury if instruction not followed correctly. -
Page 5: Parts And Functions
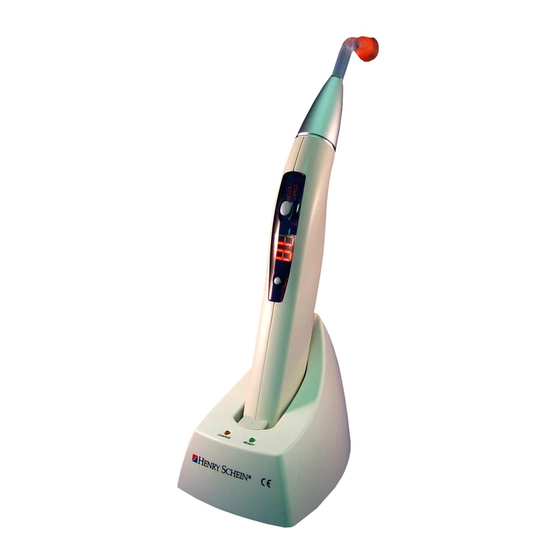
PARTS & FUNCTIONS : PART A. The LED Handpiece : (1) Button switch TIME (Power on) (2) Button switch START/STOP (3) Fibre optic probe (8 mm) (4) Body cover (5) Anti-glare cone (6) DC Charger input PART B. The Charger : (1) DC Charger stand (2) DC Adapter (9V) -
Page 6: General Installation
GENERAL INSTALLATION : ** Please follow the instructions below carefully to insure correct function of this device. 1. Insert the fibre optic probe into the handpiece and ensure that it is securely installed at the fixed position (2mm of the fiber optic metal colour will remain visible). 2. -
Page 7: Panel Operations
PANEL OPERATIONS : (A) TIME (Power on) : > Function 1 : Press the “TIME” button once to turn on the operation panel. The digital display will show the curing time set from the previous working cycle. > Function 2 : Hold down the button until the numbers on the display flash to reset the required curing time. -
Page 8: Cooling System
(B) START / STOP : > Press once to begin or stop the curing cycle. At the last 3 seconds a “Beep” will sound indicating that the cycle is almost finished. COOLING SYSTEM : The HS-LED is equipped with a special self-cooling system. This completely shuts off the handpiece control panel to prevent overheating, after con- secutively running 10 full curing cycles (of 30 seconds). -
Page 9: Charger Signals
CHARGER SIGNALS : ** Please note the following different colour signals indicating the current status of the charger stand, to charge or recharge the LED handpiece. Charge Ready Current Status Signal Signal (RED) (GREEN) Charger is Ready Charging in Progress Charging is Finished Battery is Defective Flash... -
Page 10: Device Specification
TROUBLESHOOTING : CAUTION : In the event of failures or errors please use the following table to identify. If the error or problem still occurs, please return to the manufacture for repair. DESCRIPTIONS FAILURE CAUSE SOLUTION Return to the dealer or Defect in Li-Ion battery manufacturer for repair No power or time display... -
Page 11: Maintenance Check List
WARNING: Li-Ion Battery • Please charge the battery every 2-months even when not in use • Please recycle the battery. • Do not dispose in fire to prevent injury or burns. • Do not short circuit. • Do not disassemble. •... - Page 12 Tabla de contenidos INTRODUCCIÓN ................1 ADVERTENCIAS................1 PRECAUCIONES DE SEGURIDAD..........2 PIEZAS Y FUNCIONES..............3 INSTALACIÓN ..................4 PANEL DE OPERACIONES..............5 SISTEMA DE REFRIGERACIÓN............6 SEÑALES DEL CARGADOR ............7 PROBLEMAS FRECUENTES............8 ESPECIFICACIONES DEL DISPOSITIVO........8 LISTA DE MANTENIMIENTO ............9 En relación a la discrepancia del producto, causada por el clima, temperatura y materiales usados, nos reservamos los derechos de explicación.
-
Page 13: Introducción
PRECAUCIÓN : No exponga la lámpara a altas temperaturas ni a la luz solar directa. No mire directamente a la luz sin protección para sus ojos. INTRODUCCIÓN : Ha adquirido usted una lámpara de fotopolimerización LED (Light Emitting Diode) “HS- LE ”... -
Page 14: Precauciones De Seguridad
PRECAUCIONES DE SEGURIDAD : Por favor, siga paso a paso las instrucciones en este manual para una operación cor- recta y segura del dispositivo. Siga con especial atención los apartados en que se indi- can las precauciones a tomar, cuando sean aplicables. a) PELIGRO •... -
Page 15: Partes Y Funciones
PARTES Y FUNCIONES PARTE A. La pieza de mano LED : Botón TIME (Power on) Botón START/STOP Fibra óptica (8 mm) Carcasa del cuerpo Cono anti deslumbramiento Toma de carga PARTE B. El cargador : (1) Base para el cargador (2) Cargador (9V) -
Page 16: Instalación
INSTALACIÓN GENERAL : ** Por favor, siga las instrucciones de abajo cuidadosamente para asegurar el correcto funcionamiento del dispositivo. 1. Inserte la punta de fibra óptica en la pieza de mano y asegúrese de que está conectada correctamente (2mm de la fibra óptica color metalizado continuarán siendo visibles). 2. -
Page 17: Panel De Operaciones
PANEL DE OPERACIONES : (A) TIEMPO (Encendido) : > Función 1 : Pulse una vez el botón “TIME” para cambiar al panel de operaciones. El display digital mostrará el tiempo de polimerización del anterior ciclo de trabajo. > Función 2 : Mantenga pulsado el botón hasta que los números del display se enciendan para cambiar el tiempo de polimerización requerido. -
Page 18: Sistema De Refrigeración
(B) START / STOP : > Pulse una vez para comenzar o parar el ciclo de polimerización con la cuenta atrás en el display. Los últimos 3 segundos también suenan como un “Beep” e indican que el ciclo está a punto de terminar. SISTEMA DE REFRIGERACIÓN : La HS LED está... -
Page 19: Señales Del Cargador
SEÑALES DEL CARGADOR: ** Por favor, recuerde las señales de diferentes colores que indican el estado actual de carga, para cargar o recargar la pieza de mano LED. Carga Preparado Situación actual Señal Señal (ROJO) (VERDE) Cargador preparado Carga en proceso Carga finalizada Batería defectuosa Flash... -
Page 20: Problemas Frecuentes
PROBLEMAS FRECUENTES : PRECAUCIÓN : Cuando haya fallos o errores, por favor use la siguiente tabla para intentar solucionarlo. Si el dis- positivo sigue dando problemas, por favor envíese de vuelta al fabricante para su reparación. DESCRIPCIÓN FALLO CAUSA SOLUCIÓN Devuélvalo al vendedor Defecto en la batería Li-Ion o fabricante para reparar... -
Page 21: Lista De Mantenimiento
PRECAUCIÓN: Batería Li-Ion • Por favor, cargue la batería cada 2 dos meses cuando no se utilize. • Por favor, recicle la batería. • No exponer al fuego. • No cortocircuitar. • No desmontar. • No golpear. • Mantenga la batería seca. •... - Page 22 Table des matières PRÉFACE..................1 AVERTISSEMENTS ................1 CONSIGNES DE SÉCURITÉ............2 DESCRIPTION DE L’APPAREIL............3 INSTALLATION GÉNÉRALE.............4 ECRAN DE CONTRÔLE..............5 COOLING SYSTÈME................6 SIGNAUX DE CHARGEMENTS ............7 CONSEIL DE DÉPANNAGE .............8 SPÉCIFICATIONS................8 LISTE DE CONTRÔLE DE MAINTENANCE ........9 Concernant les variations constatées sur l’appareil dues au temps, à...
-
Page 23: Préface
AVERTISSEMENT : Attention à la température élevée et à la forte lumière. Ne regardez pas directement la source lumineuse sans protection oculaire. PREFACE : Félicitations d’avoir choisi la lampe LED ( Diode électroluminescente) haute efficacité HS-LED, veuillez lire avec attention le contenu suivant. Avant d’utiliser l’appareil, veuillez lire attentivement et en totalité... -
Page 24: Précaution De Sécurité
PRéCAUTION DE SéCURITé : Veuillez suivre les instructions de ce manuel afin d’utiliser l’appareil dans les bonnes conditions de sécurité. Faites particulièrement attention aux signaux d’avertissements suivants qui peuvent apparaître dans certaines conditions d’utilisation. a) DANGER • Ce message apparaît quand l’utilisation de l’appareil risque de causer de graves préjudices si les instructions ne sont pas respectées. -
Page 25: Description De L'appareil
DESCRIPTION DE L’APPAREIL : PARTIE A. la Pièce à main de la LED : (1) Touche de sélection du temps de programmation ( Power on) (2) Touche MARCHE/ARRET (3) Embout de fibre optique (8mm) (4) Corps de l’appareil (5) Embout de protection (6) Base de connexion pour le chargement PARTIE B. -
Page 26: Installation Générale
INSTALLATION GENERALE : **Veuillez suivre correctement les instructions suivantes pour une bonne utilisation de l’appareil 1. Insérer la fibre optique dans la pièce à main et assurez-vous qu’elle est bien fixée dans la bonne position. 2. Placez l’embout de protection orange sur la fibre optique et ajustez-la dans la posi- tion souhaitée. - Page 27 TABLEAU DE COMMANDE : (A) TEMPS (Power on) : > Fonction 1 : Appuyez 1 fois pour allumer le tableau de commande, l’affichage digital montre le temps de travail sélectionné pour le mode opératoire prévu. > Fonction 2 : pressez en continu le bouton jusqu’à ce que le temps que vous aviez choisi selon le type de composite ou votre choix de travail, s’affiche.
-
Page 28: Cooling Système
(B) START / STOP : > Appuyez sue le bouton pour activer ou arrêter le décompte affiché sur l’écran. Les 3 dernières secondes, un bip sonore indique que le cycle est presque terminé. COOLING SYSTEME : La HS LED est équipée d’un système spécial d’auto refroidissement qui coupe totale- ment l’écran de contrôle de la pièce à... -
Page 29: Signaux De Chargements
SIGNAUx DE CHARGEMENT : ** Veuillez prendre note des indications suivantes concernant les différents signaux de couleurs indiquant le niveau de chargement sur le socle selon le chargement ou rechargement de la lampe LED. Signal de Signal de Situation courante chargement chargement (ROUGE) (VERT) -
Page 30: Dépannage
DéPANNAGE : AVERTISSEMENTS : Lorsqu’une panne ou une erreur se présente, veuillez consulter le tableau suivant afin de trouver et de réparer la panne, si toutefois la panne persiste renvoyez l’appareil chez le fabricant pour réparation. DESCRIPTION PANNE CAUSE SOLUTION Faible connexion Vérifiez la connexion entre entre la prise et le câble... -
Page 31: Liste De Contrôle De Maintenance
ATTENTION: la batterie Ion-Lithium • Veuillez recharger la batterie tous les 2 mois si vous ne l’utilisez pas. • Veuillez recycler la batterie. • Ne pas jeter sur le feux afin d’éviter toute blessure ou brûlure. • Ne pas court-circuiter. •... - Page 32 Inhaltsangabe : VORWORT..................1 GARANTIE/HAFTUNG ..............1 ALLGEMEINE SICHERHEITSHINWEISE / VORSICHTSMAßNAHMEN ..............2 TEILE UND FUNKTIONEN ..............3 GENERELLE INSTALLATIONEN .............4 BEDIENUNGSABLAUF ..............5 KÜHLSYSTEM..................6 LADESIGNALE .................7 STÖRUNGSHILFEN .................8 GERÄTESPEZIFIKATIONEN ............8 WARTUNGSCHECKLISTE ...............9 Wir behalten uns das Recht der Erklärung vor bzgl. Diskrepanzen dieses Produktes, die hervorgerufen werden könnten durch das Wetter, Temperaturen gebrauchtem...
-
Page 33: Vorwort
WARNUNG : Achtung, bitte vor hohen Temperaturen und starken Licht schützen. Schauen Sie nicht direkt in den Lichtstrahl, ohne Ihre Augen zu schützen. VORWORT : Vielen Dank für den Erwerb des HS-LED lights. Bitte beachten Sie folgende Inhalte. Bevor Sie das Produkt benutzen, lesen Sie bitte die Arbeitsanleitung gewissenhaft durch, diese stellt Ihnen viele hilfreiche Informationen über die Bedienung, Wartung und Störungshilfen, zur Verfügung. -
Page 34: Vorsichtsmaßnahmen
SICHERHEITSVORSICHTSMAßNAHMEN: Bitte beachten erfüllen alle Schritte Inbetriebnahme Bedienungsabläufe, wie in dieser Bedienungsanleitung beschrieben. Beachten Sie im Speziellen auch die Warnsignale neben der Bedienungsanleitung, wenn Sie zutreffen. a) DANGER: Es kann eine sehr gefährliche Situation entstehen, wenn der Bediener nicht die Instruktionen korrekt folgt. -
Page 35: Teile Und Funktionen
TEILE UND FUNKTIONEN : TEILE A. Das LED Handstück : (1) Schalter TIME (anschalten) (2) Schalter START/STOP (3) Fiber-Optik-Spitze (8mm) (4) Gehäuse (5) Blendschutz (6) Kontaktpunkte für die Stromzufuhr TEILE B. die Stromversorgung : (1) DC-Ladestation (2) DC-Adapter (9V) -
Page 36: Generelle Installationen
GENERELLE INSTALLATION : ** Bitte befolgen Sie die nachfolgenden Instruktionen genau um die sichere Funktion des Gerätes sicherzustellen. 1. Setzen Sie die Fiber-Optik-Spitze in das Handstück ein und versichern Sie sich, daß die Spitze sicher in der zu fixierenden Position installiert wurde (2mm des metallfarbe- nen Teils werden sichtbar bleiben). -
Page 37: Bedienungsablauf
BEDIENUNGSABLAUF : (A) TIME (anschalten) : > Funktion 1: Bitte betätigen Sie den „Time“-Schalter um die Bedienung zu starten. Das digitale Display wird Ihnen die Aushärtezeit für den ersten Arbeitsgang anzeigen. > Funktion 2: Halten Sie den Schalter so lange gedrückt, bis die Anzeige anfängt zu blinken. -
Page 38: Kühlsystem
(B) START / STOP : > Drücken Sie den “START / STOP“-Schalter um den Aushärteprozess, mit Nutzung des Countdowns, zu starten oder zu stoppen. KüHLSYSTEM : Das HS LED light ist ausgestattet mit einem Selbstkühlungssystem. Um eine Über- hitzung des Gerätes zu vermeiden, aktiviert sich das Selbstkühlungssystem selbst nach Durchführung von 10 Arbeitsgängen. -
Page 39: Ladesignale
LADEGERäT-SIGNALE : ** Bitte beachten Sie die Unterschiede der folgend genannten Signale des Ladegeräts. Die Signale informieren Sie über den gegenwärtigen Status (Laden oder Entladen des LED-Geräts) des Ladegeräts. Ladesignal Ladesignal Gegenwärtiger Status Fertigmeldung Fertigmeldung (ROT) (GRÜN) Ladevorgang abgeschlossen Ladevorgang in Arbeit Ladevorgang ist beendet... -
Page 40: Störungshilfen
STöRUNGSHILFEN : WICHTIG : Bitte nutzen Sie die nachfolgende Tabelle um bei auftretenden Fehlern oder Störungen des Geräts, eine schnelle Hilfe zu gewährleisten. Bei wieder auftretenden Fehlern bzw. größeren Störungen, bitten wir Sie das Gerät an den Hersteller zur Reparatur zurück zu senden. BESCHREIBUNG FEHLER URSACHE... -
Page 41: Wartungscheckliste
WARNUNG Li-ION-Akku : • Bitte laden Sie den Akku alle zwei Monate auf, auch wenn Sie das Gerät nicht betätigt haben. • Bitte recyceln Sie den Akku • Bitte vermeiden Sie den Kontakt mit Feuer , um Verletzungen oder Verbrennungen zu vermeiden. •... - Page 42 Indice : PREFAZIONE..................1 CONTRO-SPIEGAZIONE ..............1 AVVISI DI SICUREZZA/MISURE PRECAUZIONALI .......2 PEZZI E FUNZIONI ................3 ISTALLAZIONE GENERALE.............4 PROCEDIMENTO PER LA MANOVRA..........5 SISTEMA DI RAFFREDDAMENTO ..........6 SEGNALI DI RICARICA..............7 AIUTO IN CASO DI GUASTO............8 SPECIFICAZIONE DELLO STRUMENTO........8 MANUTENZIONE ................9 Si riserva il diritto di spiegazione in caso di difetti del prodotto, causati dal tempo, temperatura e materiali usati.
-
Page 43: Prefazione
AVVERTENzA : Proteggere da temperatura alta e luce troppo forte. Evitare di guardare direttamente nella luce proiettata senza protezzione degli occhi. PREFAzIONE : Grazie per l acquisto di HS-LED light. Si prega di considerare seguenti contenuti. Prima di metter in uso il prodotto leggere attentamente l istruzione per l uso, contiene informazioni utili sulla manovra, manutenzione e aiuto in caso di guasti. -
Page 44: Avvisi Di Sicurezza/Misure Precauzionali
AVVISI DI SICUREzzA : Si prega di seguire ogni passo dell iscrizione per l uso e procedura di manovra, secon- do quanto descritto nelle seguenti istruzioni, in caso che avvengano. a) DANGER: Può formarsi una situazione di pericolo in caso che le istruzioni non vengono seguite correttamente. -
Page 45: Pezzi E Funzioni
PEzzI E FUNzIONI : PARTE A. Il manopolo LED : (1) Pulsante TIME (accendere) (2) Pulsante START/STOP (3) Puntale della fibra ottica (8 mm) (4) Involucro (5) Schermo di protezione (6) Punti di contatto per la connessione con la corrente PARTE B. -
Page 46: Istallazione Generale
ISTALLAzIONE GENERALE : **Si prega di seguire attentamente presenti istruzioni per effettuare un funzionamento sicuro dello strumento. 1. Mettere il puntale della fibra ottica nel manipolo assicurandosi che il puntale sia fis- sato nella posizione corretta (2 mm del pezzo di metallo rimangono visibili). 2. - Page 47 PROCEDIMENTO PER L´USO: (A) TIME (accendere) : > Funzione 1: Premere il pulsante „Time“ per attivare l adoperazione. Il display indica il tempo di fotopolimerizzazione per il primo procedimento di lavoro. > Funzione 2: Premere il pulsante affinché il segnale lampeggi. Secondo la necessità, i tempi di lavoro come di fotopolimerizzazione di materiali di composizioni differenti possono essere...
-
Page 48: Sistema Di Raffreddamento
(B) TIME (accendere) : > Premere il pulsante „START / STOP“ per attivare o fermare la fotopolimerizzazione usando il countdown. SISTEMA DI RAFFREDDAMENTO : HS Led light è fornito di un auto-sistema di raffreddamento. Per evitare che lo strumen- to si riscaldi troppo questo sistema di raffreddamento si attiva automaticamente dopo 10 manovre. - Page 49 SEGNALI DEL CARICABATTERIA : ** Prestare attenzione alle differenze die seguenti segnali del caricabatteria. I segnali indicano lo stato attuale (caricare o scaricare lo strumento LED) del caricabatteria. Segnale Segnale Stato attuale di caricamento di terminazione (ROSSO) (VERDE) Caricamento terminato spento acceso Caricamento in corso...
-
Page 50: Specificazione Dello Strumento
SOCCORSO IN CASO DI GUASTI : IMPORTANTE : Si prega di far uso delle seguenti indicazioni per prestare soccorso in caso si presentino difetti o guasti allo strumento. In caso di ripetuti difetti o guasti si prega di inviare lo stru- mento al prduttore per ripararlo. -
Page 51: Manutenzione
AVVERTENzA Li-ION-Batteria: • Caricare la batteria ogni due mesi, anche in caso che lo strumento non venga adoperato. • Reciclare la batteria. • Evitare il contatto con il fuoco per non provocare ferite ed ustioni. • Non interrompere il processo di circolazione della corrente. •... - Page 52 Inhoudsopgave : VOORWOORD..................1 DISCLAIMER ..................1 VEILIGHEIDSVOORSCHRIFT ............2 PRODUCTOMSCHRIJVING .............3 INSTALLATIE ..................4 BEDIENINGSPANEEL ..............5 BEVEILIGING..................6 OPLADER ..................7 TROUBLE SHOOTING ..............8 SPECIFICATIES................8 ONDERHOUDS AANWIJZINGEN ............9 Wij behouden ons het recht van verklaring voor m.b.t. dis- crepanties van dit product ten aanzien van weer, temperatuur en de gebruikte materialen.
-
Page 53: Voorwoord
WAARSCHUWING : Pas op voor fel licht en hoge temperaturen. Kijk niet in de lichtbron zonder oogbescherming. VOORWOORD : Gefeliciteerd met de aanschaf van de HS LED, wij verzoeken u vriendelijk eerst deze gebruiksaanwijziging te lezen alvorens u gebruik gaat maken van de LED lamp. Deze gebruiksaanwijzing geeft u de nodige informatie die u tijdens het gebruik van de lamp ten goede zult komen. -
Page 54: Veiligheidsvoorschriften
VEILIGHEIDSVOORSCHRIFTEN : Ten einde voor een lange duur gebruik te kunnen maken van de HS LED is het van groot belang deze instructies goed te lezen. Indien een van de volgende woorden aangegeven worden dient u extra op te passen. a) DANGER: Dit bericht wijst er op als de handeling mogelijk gevaarlijke situaties oproept indien de instructies niet juist worden opgevolgd. -
Page 55: Productomschrijving
PRODUCTOMSCHRIjVING : DEEL A. Het LED handstuk (1) Schakelaar TIME (aanzetten) (2) Schakelaar START/STOP (3) Fiber Optic lichtgeleider (8mm)( (4) Handvat (5) Cureshield (6) Contacten voor stroomtoevoer DEEL B. De oplader : (1) DC oplader (2) DC adapter (9V) -
Page 56: Installatie
INSTALLATIE : **Gaarne de navolgende instructies nauwgezet uitvoeren om de juiste functionaliteit te waarborgen. 1. Druk de fiber optic in het handstuk tot het gefixeerd is (2mm van het metalen gedeelte blijft zichtbaar) 2. Plaats een van de oranje tips op de fiber optic en richt deze naar wens teneinde de ogen te beschermen tegen de lichtbron. -
Page 57: Bedieningspaneel
BEDIENINGSPANEEL : (A) TIME ( aan schakelaar) : > Functie 1 : Druk eenmaal op de « TIME » schakelaar. De display geeft u het aantal seconden aan van de laatst gebruikte cycle. > Functie 2 : Hou de « TIME » schake- laar ingedrukt totdat de display gaat knipperen, u kunt nu de gewenste tijds- duur instellen door de TIME schakelaar... -
Page 58: Beveiliging
(B) START/STOP : > Druk op de START/STOP schakelaar om de lamp te activeren en de-activeren, u kunt het verloop van de seconden volgen op de display. De laatste 3 seconden geeft de unit een akoestisch signaal teneinde aan te geven dat de belichting bijna gereed is. BEVEILIGING : De HS-LED is uitgerust met een intern afkoelingsmechanisme ter voorkoming van oververhitting. -
Page 59: Oplader
DE OPLADER : ** De volgende kleur indicaties kunnen op de oplader te zien zijn. Aan het Status opladen Gereed (ROOD) (GROEN) De oplader is gereed Aan het opladen Het opladen is gereed De batterij is defect Knippert ROOD GROEN (aan het (gereed opladen) -
Page 60: Trouble Shooting
TROUBLE SHOOTING : CAUTION : Gebruik de volgende tabel om bij voorkomende fouten en storingen de oplossingen te kun- nen vinden. BESCHRIJVING PROBLEEM OOORZAAK OPLOSSING Defecte accu Opsturen ter reparatie Geen indicatie van electriciteit of tijdsdisplay zelfs niet als de TIME schakelaar wordt gedrukt. - Page 61 WARNING Li-ION ACCU : • Laad de accu alle twee maanden op ook als u het apparaat niet gebruikt • Zorg voor een juiste afvalverwerking van de accu • Vermijd open vuur om verwondingen en brandwonden te voorkomen • Maak geen kortsluiting •...