
Manuels Connexes pour cecotec TIT X-BIKE


Sommaire des Matières pour cecotec TIT X-BIKE
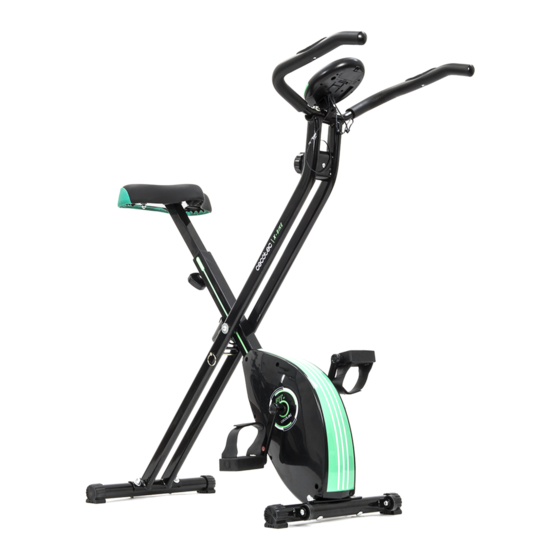
- Page 1 USER GUIDE GUÍA DE USUARIO GUIDE D’UTILISATION BEDIENUNGSANLEITUNG GUIA DO USUÁRIO GUIDA UTENTE...
-
Page 2: Table Des Matières
INHALT ÍNDICE Instrucciones de seguridad 4 Wichtige Sicherheitshinweise 28 Teile und Komponenten 29 Piezas 5 Montageanleitung 31 Instrucciones de montaje 7 Instrucciones para el ejercicio 8 Trainingshinweise 32 LCD-Bildchirm 34 Pantalla LCD 10 Technische Daten 35 Detalles técnicos 11 Garantía y SAT 11 Kundendienst und Garantie 35 INDICE INDEX... -
Page 3: Instrucciones De Seguridad
ESPAÑOL ESPAÑOL INSTRUCCIONES DE SEGURIDAD IMPORTANTES Utilice técnicas apropiadas para levantar peso y/o ayuda. Por favor, guarde este manual de instrucciones en un lugar seguro para referencias futu- PIEZAS ras o nuevos usuarios. 1. Lea el manual por completo antes de proceder al montaje de la bicicleta. El producto solo será... - Page 4 ESPAÑOL ESPAÑOL INSTRUCCIONES DE MONTAJE PASO 1 Una los dos estabilizadores (2) a la estructura principal (1) usan- Tornillo M8x50 Arandela curva (M8) Tuerca ciega (M8) do 4 tuercas ciegas (5), arandelas curvas (4) y tornillos M8X50 (3). Tornillo Allen M8x35 Llave fija PASO 2 Tornillo M4x25...
-
Page 5: Instrucciones Para El Ejercicio
ESPAÑOL ESPAÑOL el asiento. Hay 7 agujeros en el tubo del sillín que le permiten ajustar la altura. Una vez PASO 5 seleccionada la altura, introduzca el pomo y fíjelo. La rueda de resistencia le permite ajustar el nivel de resistencia de los pedales. Un nivel más alto hará más difícil el pedaleo, Fije el soporte de la pantalla LCD (13) al manillar (11) con un mientras que un nivel bajo lo hará... -
Page 6: Detalles Técnicos
3. Si en alguna ocasión detecta una incidencia con el producto, debe contactar con el · CALORIE: presione este botón hasta que la pantalla muestre “CAL”. La pantalla LCD mos- Servicio de Asistencia Técnica oficial de Cecotec y hacer llegar la factura de compra del trará las calorías consumidas. -
Page 7: Important Safety Instructions
ENGLISH ENGLISH IMPORTANT SAFETY INSTRUCTIONS PIECES Please, keep this instruction manual in a safe place for future reference or new users. 1. Read the entire manual before assembling and using the equipment. Safe and efficient use can only be achieved if the bike is properly assembled, maintained, and used. -
Page 8: Assembly Instruction
ENGLISH ENGLISH ASSEMBLY INSTRUCTION STEP 1 Attach the two stabilizers (2) to the main frame (1) using four sets of dome nuts (5), curved washers (4) and M8X50 (3) key Key Head Bolt M8x50 Washer (M(8) Dome Nut (M8) head bolts. STEP 2 Allen Key Bolt M8x35 Rigent Wrench... -
Page 9: Exercise Instructions
ENGLISH ENGLISH STEP 5 The seat height can be adjusted by removing the adjusting knob and raising or lowering the seat. There are 7 holes in the seat post, which allows you to adjust the height. Once Fix the LCD screen holder (13) on the handle bar (11) with the correct height has been chosen, refit the adjustment knob and tighten it. -
Page 10: Technical Details
3. If at any time a problem with the product is detected, you should contact the official the distance you have “travelled”. Technical Support Service from Cecotec, and send the purchase invoice of the product · CALORIE: press this button until the screen displays “CAL”. The LCD screen will show the via e-mail to the following address: calorie consumption. - Page 11 FRANÇAIS FRANÇAIS INFORMATIONS IMPORTANTES DE SÉCURITÉ 11. Cet appareil n’est pas adapté aux usages thérapeutiques. 12. Faites attention lorsque vous levez ou déplacez le vélo, pour ne pas blesser votre dos. S’il vous plaît, veuillez conserver ce manuel d’instructions dans un lieu sûr pour consulta- Utilisez les techniques appropriées pour lever des poids et/ou demandez de l’aide.
- Page 12 FRANÇAIS FRANÇAIS INSTRUCTIONS DE MONTAGE PAS 1 Fixez un des deux stabilisateurs (2) à la structure principale (1) Vis Torx M8x50 utilisant 4 écrous borgnes (5), des rondelles courbes (4) et des Rondelle ressort Écrou borgne (M8) vis M8X50 (3). (M(8) PAS 2 Vis Allen M8x35...
-
Page 13: Utilisation
FRANÇAIS FRANÇAIS UTILISATION PAS 5 La hauteur de la selle peut être ajustée en retirant la roue régulatrice et en montant ou descendant la selle. Il y a 7 trous sur le tube de la selle qui vous permettent d’ajuster la Fixez le support de l’écran LCD (13) au guidon (11) avec une hauteur. -
Page 14: Écran Lcd
3. Si vous détectez un incident ou un problème avec le produit, vous devez contacter le · CALORIE: appuyez sur le bouton jusqu’à ce que l’écran montre “CAL”. L’écran LCD mon- Service Après-Vente officiel de Cecotec et transmettre la facture d’achat du produit via trera les calories que vous avez brûlé. -
Page 15: Wichtige Sicherheitshinweise
D E U T S C H D E U T S C H WICHTIGE SICHERHEITSHINWEISE Gerät verfangen und Sie behindern bzw. Schäden und Verletzungen verursachen. Beginnen Sie Ihr Training mit einer geringen Geschwindkeit und halten Sie sich am Bitte bewahren Sie diese Bedienungsanleitung an einem sicheren Ort, für zuckünftige Lenker fest und vermeiden Sie, sich während des Trainings vom Sattel zu heben. -
Page 16: Montageanleitung
D E U T S C H D E U T S C H MONTAGEANLEITUNG SCHRITT 1 Befestigen Sie die Stabilisatoren (2) am Hauptrhamen (1) Mit 4 Hutmuttern (5), Feder-Unterlegscheiben (4) und den Feder-Unterlegscheibe Kreuzschlitzschraube M8x50 Schrauben M8X50 (3). Hutmutter (M8) (M(8) SCHRITT 2 Richten Sie den Sattel (6) zur Sattelstütze aus (7). -
Page 17: Trainingshinweise
D E U T S C H D E U T S C H ttels. Schrauben Sie den Knauf fest zum fixieren des Sattel nachdem Sie die gewünschte SCHRITT 5 Höhe ausgewählt haben. Der Widerstandsregler (Drehknauf ) ermöglicht es Ihnen, den Widerstand der Pedale je nach Bedarf einzustellen. -
Page 18: Lcd-Bildchirm
Schaden an Ihrem Produkt entdecken bzw. beobachten, kontaktieren Sie bitte den offi- · ODOMETER: Drücken Sie die Taste bis Sie “ODO” sehen. Der LED-Bildschirm zeigt die ziellen Technischen Kundendienst von Cecotec und senden Sie bitte Ihren Kaufbeleg Gesamtstrecke an. per E-Mail an: ·... -
Page 19: Instruzioni Di Sicurezza
ITALIANO ITALIANO INSTRUZIONI DI SICUREZZA IMPORTANTI Utilizzare tecniche appropriate per alzare peso e/o aiuto. Per favore, conservare questo manuale di istruzioni in un posto sicuro per consultazioni PEZZI future e nuovi utenti. 1. Leggere il manuale completamente prima di procedere al montaggio della bicicletta. Il prodotto è... -
Page 20: Istruzioni Di Montaggio
ITALIANO ITALIANO ISTRUZIONI DI MONTAGGIO PASSO 1 Unire i due stabilizzatori (2) alla struttura principale (1) usando 4 dadi ciechi (5), rondelle curve (4) e vite M8X50 (3). Vite M8x50 Rondella curva (M(8) Dado cieco(M8) PASSO 2 Brugolat M8x35 Chiave fissa Alineare il sellino (6) con il tubo del sellino (7). -
Page 21: Istruzioni Per L'esercizio
ITALIANO ITALIANO sando il sellino. Sono presenti 7 fori sul tubo del sellino che le permettono di regolare l’al- PASSO 5 tezza. Una volta selezionata l’altezza, introdurre il pomello e fissarlo. La ruota di resistenza le permette di regolare il livello di resistenza dei pedali. Un livello più alto renderà più Fissare il supporto dello schermo LCD (13) al manubrio (11) difficile pedalare, mientras que un nivel bajo lo hará... -
Page 22: Schermo Lcd
· Se il problema è originato dall’usura dei pezzi dovuta all’uso. Il servizio di garanzia copre trerà la velocità attuale. tutti i difetti difetti di fabbrica del suo Frullatore di cecotec per 2 anni in base alla legis- · DISTANCE: premere il pulsante finchè sullo schermo appare “DIST”. Lo schermo LCD lazione vigente, eccetto i pezzi soggetti ad alta usura come la vaschette, le lame e anelli mostrerà... -
Page 23: Instruções De Segurança
PORTUGUÊS PORTUGUÊS INSTRUÇÕES DE SEGURANÇA IMPORTANTE costas. Use técnicas adequadas para o levantamento de peso e/ou ajuda. Por Guarde este manual de instruções em um lugar seguro para referências futuras ou PEÇAS novos usuários. 1. Leia o manual por completo antes de prosseguir para a montagem da bicicleta. O produto só... -
Page 24: Instruções De Montagem
PORTUGUÊS PORTUGUÊS INSTRUÇÕES DE MONTAGEM ETAPA 1 Um dois estabilizadores (2) para o quadro principal (1), utilizan- Parafuso M8x50 do arruelas 4 porcas (5), curvadas (4) e parafusos M8X50 (3). Arruela (M8) Porca de cúpula (M8) ETAPA 2 Allen Key parafuso Rigent chave Alinhe o assento (6) com o tubo do assento (7). -
Page 25: Instruções Para O Exercício
PORTUGUÊS PORTUGUÊS abaixar o assento. Há 7 buracos no tubo do assento, que permitem ajustar a altura. De- ETAPA 5 pois de seleccionar a altura, insira o punho e corrigi-lo. Roda de resistência permite que você ajuste o nível de resistência dos pedais. Um nível mais alto tornará mais difícil a ca- Fixe o suporte do LCD (13) para o identificador (11), com um dência, enquanto um nível baixo, será... -
Page 26: Tela De Lcd
3. Se, em qualquer ocasião, detecta uma incidência com o produto, deve entrar em con- a distância percorrida. tato com o serviço de funcionário assistência técnica Cecotec e obter a factura de com- · CALORIA: Pressione este botão até que o display indique “CAL”. O visor LCD mostrará as pra do produto através do e-mail:...