
Manuels Connexes pour DeVilbiss Healthcare Drive TSE 120


Sommaire des Matières pour DeVilbiss Healthcare Drive TSE 120
- Page 1 TSE 120 / TSE 120 Plus Gebrauchsanweisung - Instructions for use - Mode d’emploi - Gebruiksaanwijzing - Istruzioni per l’uso...
-
Page 2: Table Des Matières
Inhaltsverzeichnis Inhaltsverzeichnis ..............2 Vorwort ..................3 Konformitätserklärung ..............3 Lebensdauer ................3 Entsorgung ..................3 Typenschild ..................3 Wiedereinsatz ................3 Gewährleistung ................3 Indikation ..................4 Lieferumfang ................4 Sicherheitshinweise ..............5 Anwendung ................5 Montage ..................5 Höheneinstellung ..............7 Technische Daten ..............7 Reinigung | Wartung ..............7 Drive Medical GmbH &... -
Page 3: Vorwort
Vorwort Typenschild Wir danken Ihnen, dass Sie sich für ein Produkt aus dem Hause Drive DeVilbiss entschieden haben. Das Design, die Funktionalität und die Qualität dieses Produktes werden Sie nicht enttäuschen. Bitte lesen Sie diese Bedienungsanleitung vor dem ers- ten Gebrauch sorgfältig durch. Sie erhalten wichtige Sicherheitshinweise und wertvolle Tipps zur richtigen Benutzung und Pflege. -
Page 4: Indikation
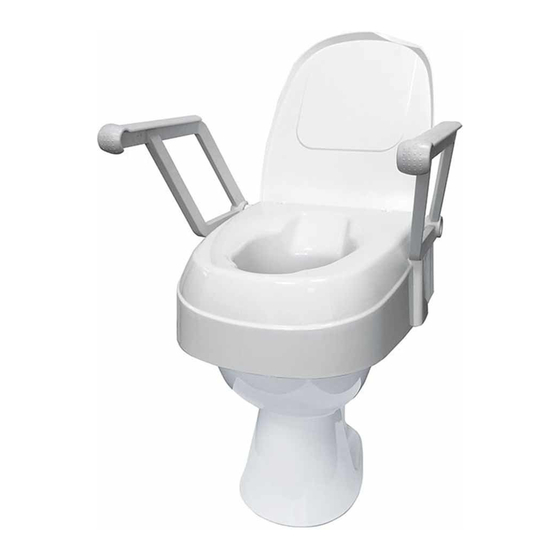
TSE 120 TSE 120 Plus Armlehne Deckel 11. Aufl age vorn Armlehnenaufnahme Befestigungsschraube 12. Versteifungen Verriegelung für Raster/Aufnahme Griff muttern 13. Hygieneaussparrungen Korpus Aufl age hinten 14. Sterngriff schraube Griff mulde (im Deckel) 10. Raster / Aufnahmen 15. Topmontage-Dübel Indikation Lieferumfang INDIKATION: 1 x A... -
Page 5: Sicherheitshinweise
Um die Höhe vorne einzu- Sicherheitshinweise stellen, stecken Sie die Aufl agen (D) in die ent- • Bei Defekt nicht verwenden! sprechende Öff nung bis es hörbar einrastet • Vorsicht – Abrutsch-/Absturzgefahr! (Bild 3). • Der Deckel darf im geöff neten Zustand nicht als Rückenlehne verwendet werden! •... - Page 6 TSE 120 PLUS: Die Raster/Aufnahmen (C) können nur in eine Richtung in die Toilettensitzerhöhung eingesteckt werden. Topmontage-Dübel (I) wie auf dem Bild dargestellt MONTAGE DECKEL: zusammendrücken von oben in die Befesti- Der Deckel ist bei Auslieferung vormontiert, kann im gungslöcher der Keramik Bedarfsfall getauscht werden.
-
Page 7: Höheneinstellung
Höheneinstellung Reinigung | Wartung • Von Hand mit einem feuchten Tuch regelmäßig Die Toilettensitzerhöhung kann über Raster (C) wahlwei- reinigen! se für eine Erhöhung um 8,5 cm, 12 cm oder 15,5 cm ein- gestellt werden. • Keine aggressiven Reinigungsmittel verwenden! •... - Page 8 Table of contents Table of contents............... 8 Preface ..................9 Declaration of conformity ............9 Service life .................. 9 Disposal ..................9 Identification plate ..............9 Reuse .................... 9 Warranty ..................9 Indication ..................10 Scope of delivery ..............10 Safety instructions ..............11 Use ....................11 Assembly ..................11 Height settings ................
-
Page 9: Preface
Preface Identification plate Thank you for choosing a product from Drive DeVilbiss. You will not be disappointed by the design, functionality and quality of this product. Please read these operating instructions carefully prior to initial use. They contain important safety information and valuable tips for the proper use and care. -
Page 10: Indication
TSE 120 TSE 120 Plus Armrest 11. Front support Armrest holder Fixing screw 12. Braces Locking mechanism for adjustable holder Knurled nuts 13. Hygiene openings Body Rear support 14. Star screw Recessed grip (in the lid) 10. Adjustable holders 15. Top-mounting pin Indication Scope of delivery INDICATION:... -
Page 11: Safety Instructions
To adjust the height in the Safety instructions front, insert the supports (D) in the corresponding • Do not use if there are any defects! opening until they audibly click into place (photo 3). • Caution – risk of slipping/falling! •... - Page 12 TSE 120 PLUS: LID ASSEMBLY: Push the top-mounting pin The lid is preassembled at the time of delivery, but can together (I) as shown in the be replaced if necessary. To do this, turn the body (A) of photo and insert down into the raised toilet seat around and press the lid clips at the the mounting holes of the same time.
-
Page 13: Height Settings
Height settings Cleaning | Maintenance • Clean regularly with a moist cloth! The raised toilet seat can optionally be adjusted using the adjustable holders (C) for an elevation of 8.5 cm, • Do not use any aggressive cleaning agents! 12 cm or 15.5 cm. •... - Page 14 Sommaire Sommaire ................... 14 Avant-propos ................15 Déclaration de conformité .............15 Durée de vie ................15 Élimination ..................15 Plaque signalétique ..............15 Recyclage ...................15 Garantie ..................15 Indication ..................16 Contenu de la livraison ............16 Consignes de sécurité ............17 Utilisation..................17 Montage ..................17 Réglage en hauteur ..............19 Caractéristiques techniques ..........19 Nettoyage I maintenance ............19...
-
Page 15: Avant-Propos
Avant-propos Plaque signalétique Nous vous remercions d'avoir choisi un produit de De- Vilbiss. Le design, la fonctionnalité et la qualité de ce produit sauront vous apporter pleine satisfaction. Avant d’utiliser le produit pour la première fois, veuil- lez lire attentivement le présent mode d’emploi. Vous y trouverez des consignes de sécurité... -
Page 16: Indication
TSE 120 TSE 120 Plus Accoudoir Couvercle 11. Support avant Logement de l'accoudoir Vis de fi xation 12. Renforts Verrouillage de la tringle Écrous 13. Découpes pour toilette intime Corps Support arrière 14. Vis à poignée étoile Poignée (intégrée au couvercle) 10. -
Page 17: Consignes De Sécurité
Pour régler la hauteur à Consignes de sécurité l’avant, insérer les sup- ports (D) dans les trous • Ne pas utiliser le produit s’il est défectueux. à la hauteur souhaitée et les enfoncer à fond (on • Attention – Risque de glissade/de chute. doit entendre un « ... - Page 18 TSE 120 PLUS : MONTAGE DU COUVERCLE : Comprimer les chevilles Le réhausseur est livré avec le couvercle prémonté. Ce- pour montage par le haut lui-ci peut être remplacé si nécessaire. Pour cela, retour- (I) comme indiqué sur la ner le corps du réhausseur (A) tout en appuyant sur les fi gure et les insérer par le clips du couvercle.
-
Page 19: Réglage En Hauteur
Réglage en hauteur Nettoyage I maintenance • Nettoyer régulièrement le produit à la main avec un La hauteur de réhausse peut être réglée au choix à chiffon humide. 8,5 cm, 12 cm ou 15,5 cm au moyen des tringles (C). • Ne pas utiliser de détergents agressifs. •... - Page 20 Inhoudsopgave Inhoudsopgave ................20 Voorwoord .................21 Verklaring van overeenstemming ........21 Levensduur ................21 Verwijdering ................21 Typeplaatje ................21 Hergebruik .................21 Garantie ..................21 Indicatie ..................22 Geleverd product ..............22 Veiligheidsinstructies .............23 Gebruik ..................23 Montage ..................23 Hoogte instellen ..............25 Technische gegevens ............25 Reiniging | onderhoud ............25 Drive Medical GmbH &...
-
Page 21: Voorwoord
Voorwoord Typeplaatje Hartelijk dank dat u hebt gekozen voor een product van het merk Drive DeVilbiss. Het ontwerp, de functionaliteit en de kwaliteit van dit product zullen u niet teleurstellen. Lees deze bedieningshandleiding voor het eerste ge- bruik aandachtig door. De handleiding bevat belangrijke veiligheidsinstructies en waardevolle tips voor verant- woord gebruik en onderhoud. -
Page 22: Indicatie
TSE 120 TSE 120 Plus Armleuning Deksel 11. Steun voor Armleuninghouder Bevestigingsschroef 12. Verstevigingen Vergrendeling voor rooster/houder Greepmoeren 13. Hygiëne-uitsparingen Romp Steun achter 14. Stervormige schroef Greepschaal (in deksel) 10. Rooster/houders 15. Topmontage-plug Indicatie Geleverd product INDICATIE: 1 x A Romp Bemoeilijkt toiletgebruik vanwege onaangepaste zit- 1 x B... -
Page 23: Veiligheidsinstructies
Om de hoogte voor in te Veiligheidsinstructies stellen, steekt u de steu- nen (D) in de betreff ende • Niet gebruiken bij een defect! opening tot ze hoorbaar vastklikken (afb eelding 3). • Voorzichtig – gevaar voor uitglijden/vallen! • De deksel mag in geopende stand niet als rugleuning •... - Page 24 TSE 120 PLUS: DEKSEL MONTEREN: Druk de topmontage-plug- Bij de levering is de deksel voorgemonteerd, maar in- gen (I) zoals op de afb eel- dien nodig kan deze worden vervangen. Hiervoor draait ding te zien is in elkaar en u de romp van de toiletverhoger (A) om en drukt u tege- steek ze van boven in de lijkertijd op de dekselklemmen.
-
Page 25: Hoogte Instellen
Hoogte instellen Reiniging | onderhoud • Reinig dit product regelmatig met de hand met een De toiletverhoger kan via houders (C) naar keuze worden vochtige doek! ingesteld op een verhoging van 8,5 cm, 12 cm of 15,5 cm. • Gebruik geen agressieve reinigingsmiddelen! •... - Page 26 Indice Indice ..................26 Introduzione................27 Dichiarazione di conformità ..........27 Durata ..................27 Smaltimento ................27 Targhetta tipologica ............... 27 Riutilizzo ..................27 Garanzia ..................27 Indicazioni .................28 Materiale in dotazione ............28 Avvertenze di sicurezza ............29 Utilizzo ..................29 Montaggio .................29 Regolazione dell’altezza ............31 Dati tecnici .................31 Pulizia | Manutenzione ............31...
-
Page 27: Introduzione
Introduzione Targhetta tipologica La ringraziamo di avere scelto un prodotto Drive DeVilbiss. Il design, la funzionalità e la qualità di questo prodotto non La deluderanno. La invitiamo a leggere attentamente le presenti istruzioni prima di usare il prodotto per la prima volta. Riceverà così importanti informazioni sulla sicurezza e preziosi consigli sull’uso e la manutenzione corretti. -
Page 28: Indicazioni
TSE 120 TSE 120 Plus Bracciolo Coperchio 11. Supporto anteriore Supporto bracciolo Vite di fi ssaggio 12. Rinforzi Bloccaggio per sostegni regolabile Dadi 13. Aperture per igiene Corpo Supporto posteriore 14. Vite a stella Dispositivo di presa (nel coperchio) 10. Sostegni regolabili 15. -
Page 29: Avvertenze Di Sicurezza
Per regolare l’altezza an- Avvertenze di sicurezza teriore, inserire i supporti (D) nell’apposita apertura • Non utilizzare il prodotto se difettoso! fi no a percepire lo scatto (fi g. 3). • Attenzione - Pericolo di scivolare/cadere! • Il coperchio aperto non deve essere usato come •... - Page 30 TSE 120 PLUS: MONTAGGIO DEL COPERCHIO: Comprimere il tassello per Il coperchio è premontato alla consegna, ma se montaggio top (I) come necessario può essere sostituito. A questo scopo girare mostrato nella fi gura e in- il corpo del rialzo (A) premendo al tempo stesso le clip serirlo dall’alto nei fori di del coperchio.
-
Page 31: Regolazione Dell'altezza
Regolazione dell’altezza Pulizia | Manutenzione • Pulire regolarmente a mano con un panno umido! Il rialzo per toilette (C) può essere regolato mediante i sostegni regolabili su un rialzo di 8,5 cm, 12 cm o 15,5 cm. • Non impiegare detergenti aggressivi! •... - Page 32 Ihr Fachhändler: Irrtum und Änderungen vorbehalten Stand: 24.03.2020 Version: MDR-1.0 Drive Medical GmbH & Co. KG Leutkircher Straße 44 • 88316 Isny|Allgäu • Germany T +49 7562 9724 0 • F +49 7562 9724 25 www.drivemedical.de • info@drivemedical.de...