Table des Matières
Publicité
Les langues disponibles
Les langues disponibles
Liens rapides
Publicité
Table des Matières

Sommaire des Matières pour Haverland PH-21
- Page 1 PH-21 Manual de instalación y uso Manual de instalação e uso Instructions & installation manual Manuel d’installation et utilisation Español Português English www.haverland.com Français www.haverland.co.uk PH21_V1.2_02062020_MISA_ESUKFP2020...
-
Page 2: Table Des Matières
2. Assembling process ..................3. Operation ......................4. Maintenance ....................Français 1. Avertissements généraux ................2. Processus D’assemblage ................3. Fonctionnement ....................4. Maintenance ..................... GARANTIA / GARANTIA / GUARANTEE / GARANTIE Español ........................ Português ......................English ........................Français ........................ PH-21... -
Page 3: Advertencias Generales
• No enrolle el cable de alimentación en la estufa. • El aparato debe manejarse con cuidado y evitar vibraciones o golpes. • El aparato debe estar conectado a enchufe con toma tierra de forma segura durante su uso. PH-21... - Page 4 • Se debe prestar especial atención a los niños y a las personas vulnerables que pudieran estar presentes. • La garantía del aparato no cubrirá cualquier daño causado por la no lectura de estas instrucciones. PH-21...
-
Page 5: Instrucciones De Montaje
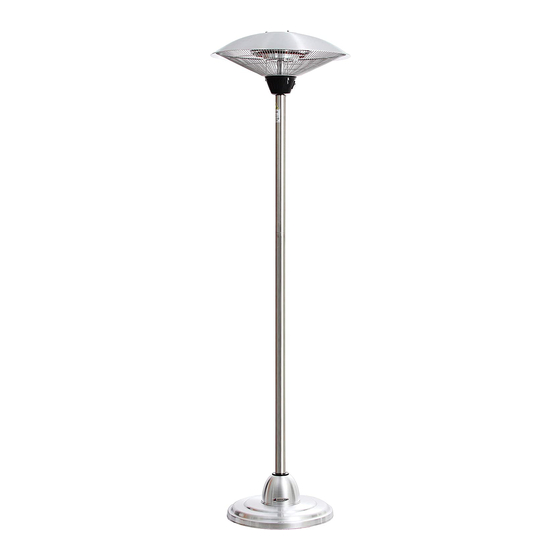
Paso 2: Atornille el tubo medio con el tubo inferior. Fig. 3 Paso 3: Pase el cable de alimentación a través de la base y del tubo inferior, del tubo central y tire de unos 2 m del cable. Fig. 4 PH-21... - Page 6 2 tornillos M4*8 suministrados. Fig. 6 Paso 6: Tire del cable de alimentación suavemente de la base tanto como sea posible. Fije el cable de alimentación debajo de la base lastrada utilizando las 4 tuercas M4 suministradas. Fig. 7 PH-21...
- Page 7 2. INSTRUCCIONES DE MONTAJE Paso 7: Levante o retraiga el tubo superior a la altura deseada y ajuste al tubo central enroscando el anillo de cierre hacia abajo. ¡Listo! Fig. 8 Fig. 9 PH-21...
-
Page 8: Funcionamiento
• Si la estufa no va a ser usada durante un período de tiempo prolongado, guárdela en un lugar fresco y seco cuando no esté en uso. Para evitar la acumulación de polvo y suciedad, use el embalaje original para volver a empaquetar el aparato. NUNCA UTILICE DISOLVENTES, PRODUCTOS DE LIMPIEZA NI PRODUCTOS ABRASIVOS. PH-21... -
Page 9: Advertências Gerais
PERIGO: Não cubra a unidade com nenhum objeto • durante a sua utilização ou pouco tempo depois de ser desligada. • Não enrole o cabo de alimentação no aparelho. • O aparelho deve ser manuseado com cuidado e evitar vibrações ou impactos. PH-21... - Page 10 PRECAUÇÃO: Alguns componentes deste produto • podem aquecer muito e causar queimaduras. • Atenção especial deve ser prestada quando crianças e pessoas vulneráveis estão presentes. PH-21...
-
Page 11: Instalação E Montagem
Passo 2: Enrosque o tubo do meio com o tubo inferior. Fig. 3 Passo 3: Passe o cabo de alimentação através da base e do tubo inferior, tubo médio e puxe cerca de 2 m de cabo. Fig. 4 PH-21... - Page 12 2 parafusos M4 * 8 fornecidos. Fig. 6 Passo 6: Puxe o cabo de alimentação suavemente para fora da base, o máximo possível. Fixe o cabo de alimentação sob a base contrapesada usando as porcas M4 4pcs fornecidas. Fig. 7 PH-21...
- Page 13 2. INSTALAÇÃO E MONTAGEM Passo 7: Levante ou retraia o tubo superior até a altura desejada e ajuste-o no tubo meio aparafusando o anel de fecho. Pronto! Fig. 8 Fig. 9 PH-21...
-
Page 14: Funcionamento
• Se o aquecedor não for utilizado por um longo período de tempo, guarde-o num local fresco e seco quando não estiver em uso. Para evitar acúmulo de poeira e sujeira, use a embalagem original para embalar a unidade. NUNCA UTILIZE SOLVENTES, PRODUTOS DE LIMPEZA NEM PRODUTOS ABRASIVOS. PH-21... -
Page 15: Safety Notes
• Don’t wrap the power supply cord around the unit. • The unit must be handled with care, and avoid vibration or knocking. • The unit must be securely grounded during operation. • When assembling, keep clear from any board or flammable PH-21... -
Page 16: Important
CAUTION: Some parts of this product can become very • hot and cause burns. • Particular attention has to be given where children and vulnerable people are present. • The warranty of the radiator does not cover any damage caused by failing to read these instructions. PH-21... -
Page 17: Assembling Process
Fig. 1 Fig. 2 Step 2: Screw the middle tube with the bottom tube. Fig. 3 Step 3: Feed the Power Cord through the Base and the Bottom Tube, middle tube ,and pull through around 2m of cable. Fig. 4 PH-21... - Page 18 Step 5: Fit the heater head to the top hollow tube and fix it in position using the supplied 2 X M4*8 screws. Fig. 6 Step 6: Pull the power cord gently out of the base as much as possible. Fix the power cord under the weighted base using the supplied 4pcs M4 nuts. Fig. 7 PH-21...
- Page 19 ASSEMBLING PROCESS Step 7: Extend or retract the top tube to the desired height and tighten to the middle tube by screwing down the locking ring. Complete! Fig. 8 Fig. 9 PH-21...
-
Page 20: Operation
• If the heater will not be used for a long period of time, store it in a cool, dry location when not in use. To prevent dust and dirt build-up, use the original packaging to repack the unit. NEVER USE SOLVENTS OR ABRASIVE PRODUCTS. PH-21... -
Page 21: Avertissements Généraux
• N’enroulez pas le cordon d’alimentation autour de l’appareil. • L’appareil doit être manipulé avec soin et éviter les vibrations ou les coups. • L’appareil doit être solidement mis à la terre pendant le PH-21... - Page 22 PRÉCAUTION : Certaines parties de ce produit peuvent • devenir très chaudes et provoquer des brûlures. • Une attention particulière doit être prêtée aux enfants et aux personnes vulnérables qui pourraient être présents. PH-21...
-
Page 23: Processus D'assemblage
Étape 2: Vissez le tube central avec le tube inférieur. Fig. 3 Étape 3: Faites passer le cordon d’alimentation à travers la base et le tube inférieur, le tube central, et tirez environ 2 m de câble. Fig. 4 PH-21... - Page 24 à l’aide des 2 vis M4 * 8 fournies. Fig. 6 Étape 6: Tirez le cordon d’alimentation doucement hors de la base autant que possible. Fixez le cordon d’alimentation sous la base lourde à l’aide des 4 écrous M4 fournis. Fig. 7 PH-21...
- Page 25 PROCESSUS D’ASSEMBLAGE Étape 7: Soulevez ou rétractez le tube supérieur à la hauteur désirée et serrez au tube central en vissant la bague de fermeture vers le bas. Complété! Fig. 8 Fig. 9 PH-21...
-
Page 26: Fonctionnement
• Si le parasol chauffant ne sera pas utilisé pendant une longue période, rangez-le dans un endroit frais et sec lorsqu’il n’est pas utilisé. Pour éviter l’accumulation de poussière et de saleté, utilisez l’emballage d’origine pour remballer l’appareil. N’UTILISEZ JAMAIS DE SOLVANTS, DE PRODUITS DE NETTOYAGE OU DE PRODUITS ABRASIFS. PH-21... - Page 27 Europe. Pour garantir le traitement correct du produit en tant que déchet, veuillez vous en défaire conformément à la législation locale applicable ou aux prescriptions relatives à l’élimination des équipements électriques. De cette façon, vous aiderez à préserver de l’environnement. PH-21...
- Page 28 91 324 40 60 (Horario: Lunes a Viernes de 9 a 20 h) o enviar un correo electrónico a postventa@haverland.com solicitando la información necesaria sobre el procedimiento a seguir. Para la sustitución, cancelación o rebaja del precio, en su caso, el consumidor deberá dirigirse al establecimiento vendedor.
-
Page 29: Apoio Ao Cliente
Para a reparação do aparelho, o consumidor deve contactar o Serviço de Assistência Técnica através do telefone + 34 91 324 40 60 (Horário: segunda a sexta das 09h00 às 20h00) ou enviar um correio eletrónico para postventa@haverland.com, pedindo a informação necessária sobre o procedimento a seguir. - Page 30 24 months as from the purchase date shown on the invoice. HAVERLAND guarantees against material, design or manufacturing faults at the moment of its original acquisition for 2 years. This warranty only covers the device whose model appears on the purchase invoice.
- Page 31 + 34 91 324 40 60 (Horaire : du lundi au vendredi, de 9 h à 20 h) ou envoyer un email à postventa@haverland.com en sollicitant l’information nécessaire de la démarche à suivre. Pour demander une substitution, une annulation ou un rabais, le cas échéant, le consommateur devra s’adresser à...
- Page 32 230 V 50 Hz PH-21 CLASE I / CLASS I 900 /1200 /2000 CLASSE I IP 44...