Table des Matières
Publicité
Les langues disponibles
Les langues disponibles
Liens rapides
PORT4BT / PORT4BT-H
P
O
P
O
© Copyright LOTRONIC 2015
C
O
M
C
O
M
R
T
A
B
L
E
S
T
R
T
A
B
L
E
S
T
PORT4BT
PORT4BT-H
GB - INSTRUCTION MANUAL
F - MANUEL D'UTILISATION
B
I
N
E
M
O
B
I
B
I
N
E
M
O
B
I
A
N
D
A
L
O
N
E
A
N
D
A
L
O
N
E
( 95-1276 )
( 95-1277 )
L
E
L
E
P
A
S
Y
S
T
E
P
A
S
Y
S
T
E
WWW.BSTDJ.COM
M
M
Page 1
Publicité
Table des Matières

Manuels Connexes pour LOTRONIC BST PORT4BT


Sommaire des Matières pour LOTRONIC BST PORT4BT
- Page 1 PORT4BT / PORT4BT-H WWW.BSTDJ.COM PORT4BT ( 95-1276 ) PORT4BT-H ( 95-1277 ) GB - INSTRUCTION MANUAL F - MANUEL D’UTILISATION Page 1 © Copyright LOTRONIC 2015...
-
Page 2: Consignes De Securite Et D'utilisation
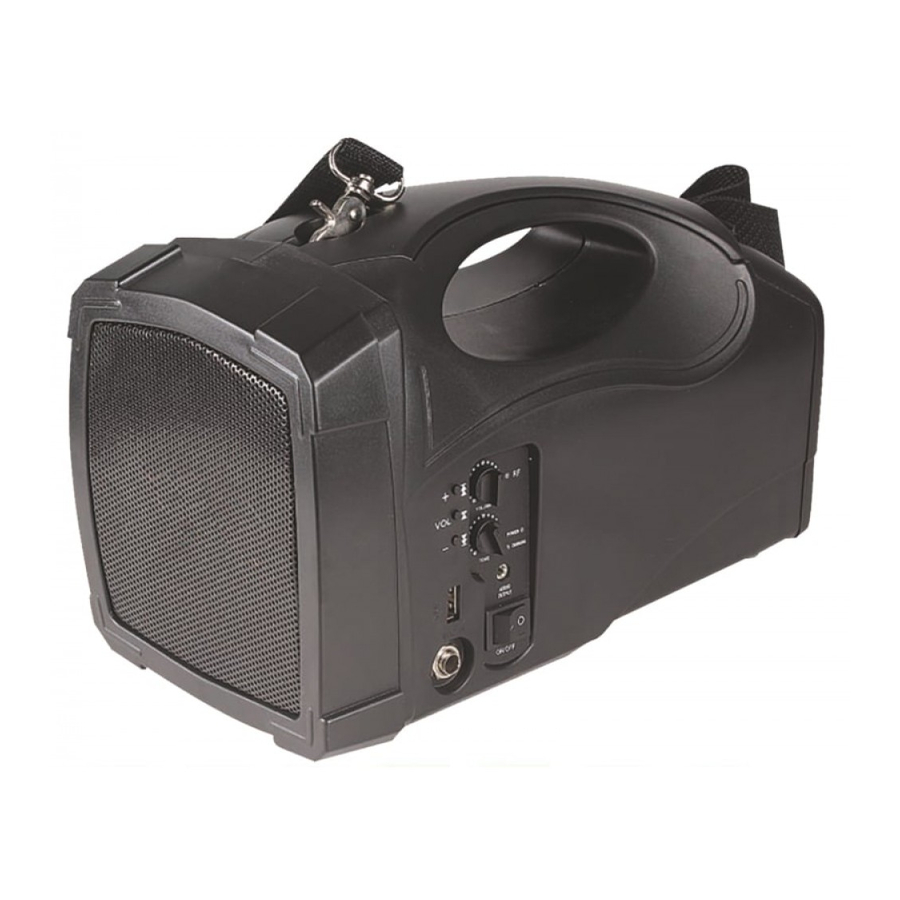
à des courts-circuits, un choc électrique, l’explosion de la lampe, une chute, etc. et invaliderait la garantie. DESCRIPTION GENERALE REGLAGE VOLUME GENERAL Permet d’ajuster le niveau de volume de l’enceinte REGLAGE TONALITE Permet ‘ajuster la tonalité du signal master de l’enceinte ( plus grave ou plus aigue ) SORTIE LINE OUT Cette sortie permet d’envoyer le signal master de l’enceinte vers une autre enceinte, une table de mixage ou un ampli INTERRUPTEUR ON / OFF Permet d’allumer ou d’éteindre l’enceinte ENTREE MICRO Connectez sur cette entrée un micro filaire ( prise Jack 6.35mm ) INDICATEUR RF Cet indicateur s’allume lorsque la communication HF entre l’émetteur HF ( micro main ou metteur ceinture ) est active. Si le voyant ne s’allume pas quand vous allumez l’émetteur HF, vérifiez la fréquence ou la pile de l’émetteur INDICATEUR POWER / CHARGE Lorsque vous connecteur le cable secteur de l’enceinte sur le 220V, l’enceinte se charge automatiquement Si le voyant est vert, l’enceinte est allumée et chargée. Si le voyant est orange, l’enceinte est allumée et en cours de chargement Si le voyant est rouge, l’enceinte est allumée mais déchargée. Vous devez la brancher pour pouvoir la charger BOUTON CHANSON PRECEDENTE MODULE USB / BLUETOOTH Utilisez ce bouton pour passer à la chanson précédente ( en MP3 USB ou bluetooth ) BOUTON PLAY / STOP MODULE USB / BLUETOOTH Utilisez ce bouton pour passer lire ou stopper la chanson sélectionnée 10) BOUTON CHANSON SUIVANTE MODULE USB / BLUETOOTH Utilisez ce bouton pour passer à la chanson suivante ( en MP3 USB ou bluetooth ) Page 2 © Copyright LOTRONIC 2015... -
Page 3: Description Emetteur Ceinture
1. CELLULE / GRILLE 2. VOYANT ON/OFF Lorsque vous allumez le micro, le voyant doit s’allumer. Si le voyant reste éteint, cela signifie que les piles sont HS. Vous devez alors les changer 3. BOUTON ON/OFF Permet d’allumer ou d’éteindre le micro HF LOGEMENT PILE Insérez deux piles 1.5V ( attention à la polarité ). La durée d’utilisation est d’environ 8H DESCRIPTION EMETTEUR CEINTURE 1. RÉGLAGE VOLUME Permet d’ajuster le volume de l’émetteur ceinture 2. VOYANT ON/OFF Lorsque vous allumez l’émetteur , le voyant doit s’allumer. Si le voyant reste éteint, cela signifie que les piles sont HS. Vous devez alors les changer 3. INTERRUPTEUR ON / OFF Permet d’allumer ou d’éteindre l’émetteur ceinture 4. CONNECTEUR MICRO Connectez votre micro casque sur cette prise. Attention Jack à vis. Il faut enfoncé le connecteur jack puis le visser 5. CONNECTEUR MICRO CRAVATE Insérez ce connecteur dans la prise micro de l’émetteur puis vissez le 6. CONNECTEUR MICRO CASQUE Insérez ce connecteur dans la prise micro de l’émetteur puis vissez le Page 3 © Copyright LOTRONIC 2015... -
Page 4: Consigne De Securite
Incorporé au micro main Pile : 2x 1.5V AA Durée d’utilisation : 8 heures max Puissance : 10mW Emetteur ceinture : Impédance micro : 470Kohms Pile : 2x 1.5V AA Durée d’utilisation : 10 heures max Page 4 © Copyright LOTRONIC 2015... -
Page 5: Conditions De Garantie
Les potentiomètres ont une durée de vie limitée et ne sont pas garantis par le fabricant en cas d’utilisation très intensive. Pour toute demande relative à ces services, adressez-vous à votre distributeur habituel, qui sera le plus apte à vous renseigner Page 5 © Copyright LOTRONIC 2015... - Page 6 MAIN DESCRIPTION MAIN VOLUME CONTROL Use to adjust the main volume control of the speaker TONE CONTROL Use to adjust the tone control of the main signal ( more bass or more treble ) LINE OUT Use to send master signal to another speaker, mixer or power amplifier POWER SWITCH Use to switch the speaker on or off MIC INPUT Use to connect a wired microphone ( connectorJack 6.35mm ) RF LED This led lights on when you swith the wireless transmitter on ( Handheld mic or belt transmitter ). If the led stay off, check the frequency or the batteries of the transmitter POWER / CHARGE LED This led give you an information about built‐in battery state. When you connect the speaker to the main power supply, the battery will automaticaly charge If the led lights green, that means the speaker is on and full charged. If the led lights orange, that means the speaker is on but the battery is on charge If the led is red, that means the battery is low. You must to charge it PREVIOUS SONG BUTTON ( MP3 / BLUETOOTH ) Use to select the previous song ( in MP3 USB or Bluetooth mode ) PLAY / PAUSE BUTTON ( MP3 / BLUETOOTH ) Use to start the playback or to pause the song ( in MP3 USB or Bluetooth mode ) 10) NEXT SONG BUTTON ( MP3 / BLUETOOTH ) Use to select the next song ( in MP3 USB or Bluetooth mode ) 11) USB CONNECTOR Insert your USB key in this connector. Note : Don’t use USB key more that 8Go 12) MODE BUTTON Use to choose operating mode : MP3 USB or Blutooth In MP3, just insert the USB key For That, please check the user manual of your Bluetooth device Page 6 © Copyright LOTRONIC 2015...
-
Page 7: Power Switch
Use to switch the handheld mic on or off BATTERIES PLACE Insert two 1.5V batteries ( pay attention to the polarity). The operating time is about 8 hours BELT TRANSMITTER DESCRIPTION 1. VOLUME CONTROL 2. ON / OFF LED When you turn on the microphone, the light should lights on. If the indicator stay off, that means that the batteries are too low. You must to replace its 3. POWER SWITCH Use to switch the belt transmitter on or off 4. MIC INPUT Connect your headset to this input. Note: screw jack socket. It is necessary to hold the jack connector and then screw it 5. TIE MIC CONNECTOR Insert the connector in mic input of the belt transmitter and then screw it 6‐ HEADSET MIC CONNECTOR Insert the connector in mic input of the belt transmitter and then screw it Page 7 © Copyright LOTRONIC 2015... -
Page 8: Safety Instructions
Built-in antenna Batteries : 2x 1.5V AA Operating time : 8 hours max RF power : 10mW Belt transmitter : Mic impedance : 470Kohms Batteries : 2x 1.5V AA Operating time : 10 heures max Page 8 © Copyright LOTRONIC 2015... -
Page 9: Warranty Conditions
BST will return the goods by pre-paid mail during the first year of warranty; thereafter the mailing cost is to be paid by the recipient Potentiometers have a limited lifetime and are not covered by the manufacturer for more than normal use. For all service enquiries, refer to your local distributor, as he is best able to help you. Page 9 © Copyright LOTRONIC 2015... - Page 10 PORT4BT / PORT4BT-H WWW.BSTDJ.COM Page 10 © Copyright LOTRONIC 2015...
- Page 11 PORT4BT / PORT4BT-H WWW.BSTDJ.COM Page 11 © Copyright LOTRONIC 2015...