Publicité

Les langues disponibles
  • FR

Les langues disponibles

Liens rapides

I
ISTRUZIONI DI MONTAGGIO PORTABICICLETTE "IRON"
GB
ASSEMBLY INSTRUCTIONS BICYCLE RACK "IRON"
F
INSTRUCTIONS DE MONTAGE DU PORTE-VÉLOS "IRON"
D
MONTAGEANLEITUNG DES FAHRRADTRÄGER "IRON"
E
INSTRUCCIONES DE MONTAJE PORTABICICLETAS "IRON"

Publicité

Table des Matières
loading

Sommaire des Matières pour Menabo IRON

  • Page 1 ISTRUZIONI DI MONTAGGIO PORTABICICLETTE “IRON” ASSEMBLY INSTRUCTIONS BICYCLE RACK “IRON” INSTRUCTIONS DE MONTAGE DU PORTE-VÉLOS “IRON” MONTAGEANLEITUNG DES FAHRRADTRÄGER “IRON” INSTRUCCIONES DE MONTAJE PORTABICICLETAS “IRON”...
  • Page 2 N° pezzo Disegno Descrizione del pezzo Quantità Stück-Nr. Stückbeschreibung Menge Zeichnung Piece Nr. Drawing (Picture) Piece description Quantity N° pieza Diseño Descripción de la pieza Cantidad Pièce Nr. Dessin Pièce description Quantité Gruppo di sostegno Rahmenhalter Support module Grupo de sostén Support Profili appoggiaruote Profilierte Radschiene...
  • Page 3 IMPORTANTE: Verificare le indicazioni del costruttore della vostra autovettura in merito al carico massimo ammesso sul tetto Prima del montaggio, è obbligatorio leggere le istruzioni di montaggio nella loro totalità ed attenersi scrupolosamente a quanto indicato. FASE 1- UNIONE DEI PROFILI APPOGGIARUOTE (N.2 DELLA LISTA ,PEZZI 2).
  • Page 4: Avvertenze Di Sicurezza

    Fig.4 FASE 4 – MONTAGGIO DELLA BICICLETTA SUL POR- TABICI PER ESEGUIRE CORRETTAMENTE QUESTA OPERAZIO- NE È CONSIGLIABILE LA PRESENZA DI DUE PERSONE PosizIonare la bicicletta sul profilo appoggiaruote (n.2 Della lista) come indicato nella figura 5, allentare la maniglia di sgancio, posta a lato del gruppo di sostegno ,facendo ruotare la stessa in senso antiorario sino al raggiungimento della apertura minima necessaria per l’inserimento del telaio della...
  • Page 5: Important

    IMPORTANT: Check the manufacturerís indications in order to respect the maximum carrying capacity allowed on the top of the car. Before proceeding with the assembly, it is essential to read all the instructions and to strictly comply with the indications. PHASE No.
  • Page 6: Safety Warnings

    Fig.4 PHASE No. 4 Bikeís mounting on the bicycle carrier In order to execute this process perfectly, it is advisable the teamwork of two persons. Position the bike on crossbar (No. 2 of the list) as shown in Fig. 5, let up on the handle bar near to the support module and let it round counter clockwise until reaching the minimum opening for the introduction of the bike frame (see Fig.
  • Page 7 IMPORTANT: Respecter en particulier les indications du fabricant du véhicule en ce qui concerne la charge admise sur le toit. Avant de commencer l’assemblage du porte-vélos il est obligatoire de lire entièrement et de respecter scrupuleusement les instructions de montage. LA PHASE 1.
  • Page 8: Consignes De Securite

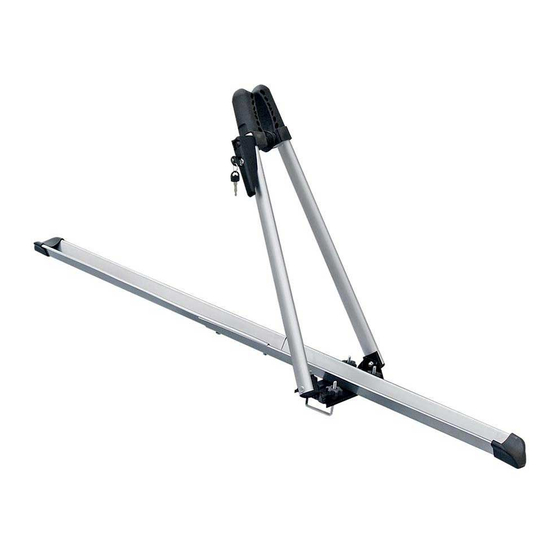
    Fig.4 LA PHASE 4.MISE EN PLACE DU VÉLOS SUR LE PORTE VÉLOS DEJA FIXÉ SUR LA VOITURE. Attention ! Pour cette operation il est recommandée la présence de deux personnes. Placez le velos sur le rail (nr.2 de la liste), voir fig.5 et desserrez la manille de déclenchement ,situé...
  • Page 9 WICHTIG: Beachten Sie die Angaben Ihres PKW-Herstellers zur höchstzulässigen Dachlast. Vor der Montage unbedingt die Montageanleitung ganz durchlesen und sorgfältig beachten. SCHRITT 1- VERBINDUNG DER PROFILIERTEN RAD- SCHIENEN (Nr. 2 DER LISTE, 2 STÜCK). Die beiden profilierten Radschienen verbinden, indem man sie im zentralen Teil übereinander legt, so wie es in der Abbildung zu sehen ist, und sie nacheinander in die Befestigungslöcher steckt: Stück-Nr.
  • Page 10: Sicherheitshinweise

    Abb.4 SCHRITT 4 – MONTAGE DES FAHRRADS AUF DEM FAHR- RADTRÄGER. UM DIESEN VORGANG KORREKT AU- SZUFÜHREN, WERDEN ZWEI PERSONEN GEBRAUCHT. Das Fahrrad wie in Abb. 5 gezeigt auf der profilierten Rad- schiene (Nr. 2 der Liste) absetzen, den Klemmgriff auf der Seite des Rohrträgers lockern und dann entgegen dem Uhr- zeigersinn drehen, bis die kleinste Öffnung erreicht ist, die Sie brauchen, um den Rahmen Ihres Fahrrads hineinzustecken,...
  • Page 11 IMPORTANTE: Verificar las indicaciones del fabricante de su vehículo respecto a la carga máxima admitida sobre el techo. Antes de proceder al montaje, es obligatorio leer las instrucciones completas y respetar taxativamente lo que indica su contenido. FASE 1- UNIÓN DE LOS PERFILES APOYA-RUEDAS (N.2 DE LA LISTA, PIEZAS 2).
  • Page 12: Advertencias De Seguridad

    Fig.4 FASE 4 – MONTAJE DELA BICICLETA EN EL PORTABI- CICLETAS PARA EFECTUAR CORRECTAMENTE ESTA OPERACIÓN SE ACONSEJA LA PRESENCIA DE DOS PERSONAS Colocar la bicicleta en el perfil apoya-ruedas (N °2 De la lista) como se indica en la figura 5, aflojar la manilla de desenganche, presente al lado del grupo de sostén, hacién- dola girar en sentido antihorario hasta alcanzar la apertura mínima necesaria para la colocación del cuadro de la bicicleta...

Ce manuel est également adapté pour:

Fa0073

Table des Matières