Publicité

Les langues disponibles

Les langues disponibles

Liens rapides

VAPORE- ASPIRAZIONE • CARICA AUTOMATICA • DETERGENTE
STEAM/SUCTION • AUTOMATIC FILLING • DETERGENT
DAMPFEN UND SAUGEN • AUTOMATISCH NACHFÜLLEN • REINIGUNGSMITTEL
VAPEUR – ASPIRATION – RECHARGE AUTOMATIQUE - DETERGENT
MANUALE ISTRUZIONI
INSTRUCTIONS MANUAL
BEDIENUNGSANLEITUNG
MODE D'EMPLOI

Publicité

Table des Matières
loading

Sommaire des Matières pour Forza PLUS F5

  • Page 1 VAPORE- ASPIRAZIONE • CARICA AUTOMATICA • DETERGENTE STEAM/SUCTION • AUTOMATIC FILLING • DETERGENT DAMPFEN UND SAUGEN • AUTOMATISCH NACHFÜLLEN • REINIGUNGSMITTEL VAPEUR – ASPIRATION – RECHARGE AUTOMATIQUE - DETERGENT MANUALE ISTRUZIONI INSTRUCTIONS MANUAL BEDIENUNGSANLEITUNG MODE D’EMPLOI...
  • Page 3: Dati Tecnici

    DATI TECNICI Carica automatica caldaia Sensore acustico fine acqua Comandi in bassa tensione 230V - 50/60Hz Alimentazione elettrica 3100 W Potenza massima 2 x 1050 W Resistenza Caldaia 0,5 MPa (5 bar) Pressione d'esercizio 1000 W bistadio tangenziale Potenza aspirazione 21 kPa Depressione max 45 litri/secondo...
  • Page 4 - La caratteristica prioritaria che contraddistingue i nostri prodotti è l'assoluta praticità di utilizzo, unita all'economia di esercizio. - Con l'ausilio degli accessori per la pulizia, può utilizzare la forza del vapore per compiere una completa e profonda disinfezione del Suo ambiente. Una volta pulito con il vapore può...
  • Page 5: Precauzioni Per L'utilizzo

    PRECAUZIONI PER L'UTILIZZO Prima di utilizzare il Generatore - Aspiratore - Stiro, leggere attentamente le presenti istruzioni d'uso. La ditta Costruttrice declina ogni responsabilità per eventuali danni a persone o cose causati dall'inosservanza di quanto qui di seguito riportato o dall'utilizzo improprio dell'apparecchio.
  • Page 6: Prescrizioni Di Sicurezza

    ESEGUITO SOLO DA CENTRI AUTORIZZATI PRESCRIZIONI DI SICUREZZA ATTENZIONE La forza del vapore sostituisce completamente tutti i detersivi, aggiungendo all'azione pulente quella, importantissima, della disinfezione. A causa della elevata temperatura del vapore, si consiglia un attento esame preliminare delle superfici da trattare, magari sperimentando l'effetto del vapore su piccoli campioni o parti non in vista prima di procedere.
  • Page 7 USO DELL’ APPARECCHIO VAPORE/ASPIRAZIONE Legenda componenti macchina 1. Corpo macchina 11. Interruttore super potenza caldaia 2. Serbatoio di recupero 12. Interruttore caldaia 3. Maniglia di trasporto 13. Sonde troppo pieno nel sebatoio di recupero. Quando il serbatoio di recupero è troppo pieno 4.
  • Page 8 Accessori 21. Impugnatura con 3 comandi completa 29. Nebulizzatore di tubo flessibile e presa multifunzione 30. Lancia 22. Bottiglia con tappo di sicurezza per 31. Puntale curvo per lancia riempimento caldaia 32. 3 Mezzi ficcanasi per lancia 23. 2 Tubi prolunga 33.
  • Page 9 Riempimento della caldaia. Riempire la bottiglia (21) con acqua demineralizzata o acqua del rubinetto (Fig. 6). Aprire manualmente il tappo di riempimento acqua (9); capovolgere la bottiglia sul foro della caldaia, vuotare l’acqua all’interno di essa; . Successivamente, quando il Fig.
  • Page 10: Avvertenze Generali D'uso

    Collegamento tubo Aspirazione/Iniezione (21) Aprire completamente lo sportello della presa accessori (16) ed inserire l’attacco rapido del tubo flessibile (21) nella presa posta sulla parte anteriore dell’apparecchio, premendo a fondo. Chiudere lo sportello della presa accessori (16) sul corpo dell’attacco rapido assicurandosi che i due particolari si aggancino.
  • Page 11 ACCENSIONE DELL'APPARECCHIO PER LA FUNZIONE VAPORE/ASPIRAZIONE Accertarsi che il pulsante (18) e gli interruttori (19/20), posti sull’impugnatura (21), non siano inseriti. - Premere l’interruttore generale (10) e l’interruttore caldaia(12) per accendere l’apparecchio e la caldaia. In caso necessiti una maggiore potenza e quindi un riscaldamento più veloce, premere l'interruttore super potenza (11).
  • Page 12 Utilizzo degli accessori. L’apparecchio é corredato di una serie di accessori che permettono di soddisfare tutte le esigenze. Per innestare o staccare i vari componenti é sufficiente inserire o togliere la parte terminale maschio nella parte femmina. (fig.12). Scegliere gli accessori in dotazione più adatti per l'utilizzo. Sostituire i vari accessori con gli interruttori sull’impugnatura Fig.
  • Page 13 MONTAGGIO SPAZZOLA MULTIUSO (25) Per il montaggio del telaio setolato per moquettes e tappeti (26), inserire nelle apposite guide le spazzole rigide con le linguette rivolte all’interno (Fig. 15). Per applicare al corpo spazzola l’inserto desiderato é sufficiente appoggiare la prima alla seconda e premere sino all’aggancio della levetta posta sulla parte esterna del corpo spazzola nell’apposito spacco (Fig.
  • Page 14 Utilizzare solamente accessori originali che offrono le maggiori caratteristiche di qualità e sicurezza. Il mancato uso di accessori originali libera il costruttore da ogni responsabilità. Arresto dell’apparecchio vapore/aspirazione. Per arrestare l’apparecchio spegnere gli interruttori di comando posti sull’impugnatura (21) (Fig. 19); spegnere gli interruttori posti sull’apparecchio e scollegare la spina dalla presa di Fig.
  • Page 15: Accessori Opzionali

    ACCESSORI OPZIONALI FERRO DA STIRO (Fig. 20 - 21 - 22) UTILIZZO DEL GENERATORE PER STIRARE Per il suo utilizzo inserire l'attacco (3) del ferro da stiro nella sede della presa accessori (Fig. 20) al posto del tubo flessibile, come descritto a pag.
  • Page 16 ACCESSORI OPZIONALI PER LE FUNZIONI VAPORE - ASPIRAZIONE SPAZZOLA ROTANTE A DEPRESSIONE Unisce all'azione igienizzante del vapore l'effetto della depressione generata dall'aspirazione del motore, permettendo di rimuovere peli, polvere ed impurità da tutte le superfici tessili (tappeti, moquettes, divani, sedili di automobili, ecc.) INSERIMENTO: Inserire la spazzola nella parte terminale femmina del tubo prolunga o dell'impugnatura del flessibile.
  • Page 17 NOTE IMPORTANTI Il Vostro apparecchio vapore/aspirazione, come ogni apparecchiatura tecnica, deve essere utilizzata solo secondo le istruzioni. Non devono essere aspirati materiali come cemento o calcinacci unitamente ad umidità, perchè il materiale potrebbe indurirsi all’interno del serbatoio di recupero, provocare incrostazioni che rovinano i filtri e quindi danneggiano i motori in modo irreparabile.
  • Page 18 MANUTENZIONE Manutenzione caldaia. La manutenzione della caldaia deve avvenire in media ogni 300 ore di lavoro. Se l’apparecchio viene utilizzato con acqua dal grado di durezza elevato (> 30°Fr), diminuire gli intervalli di intervento. Effettuare il lavaggio della caldaia utilizzando un apposito prodotto disincrostante che può essere richiesto all'azienda produttrice operando come segue.
  • Page 19: Pulizia Degli Accessori

    Prima di eseguire qualsiasi manutenzione scollegare l’apparecchio vapore/aspirazione dalla rete elettrica scollegando la spina dalla presa. L’apparecchio è disinserito dalla rete elettrica solo scollegando la spina dalla presa di corrente. A manutenzione ultimata, prima di ricollegare l’apparecchio vapore/aspirazione alla rete elettrica, assicurarsi che tutte le parti siano state rimontate correttamente.
  • Page 20 ACCANTONAMENTO In caso di accantonamento per lunghi periodi è necessario scollegare l’apparecchio vapore/aspirazione dalla rete elettrica scollegando la spina dalla presa, svuotare e lavare il serbatoio di recupero rifiuti e pulire la caldaia, provvedere alla protezione di quelle parti che potrebbero risultare danneggiate in seguito al deposito di polvere.
  • Page 21: Inconvenienti E Rimedi

    INCONVENIENTI E RIMEDI INCONVENIENTE CAUSE RIMEDI Assicurarsi che ci sia tensione. L’apparecchio non funziona. Manca Tensione. Rivolgersi al centro di assistenza. Cavo o interruttori difettosi. Svuotare il serbatoio di recupero Serbatoio di recupero troppo Esce acqua dal corpo e controllare il galleggiante, macchina (uscita aria).
  • Page 22 INCONVENIENTE CAUSE RIMEDI Trafila qualche goccia Per i primi minuti di utilizzo è Dopo alcuni minuti di utilizzo d’acqua dagli accessori. normale il formarsi della l’inconveniente si risolve; condensa causa la differenza se persiste provvedere alla di temperatura tra accessori pulizia della caldaia.
  • Page 23: Technical Features

    TECHNICAL FEATURES Automatic boiler filling ‘No water’ buzzer Low voltage controls 230V - 50/60Hz Power supply 3100 W Max. power 2 x 1050 W Boiler element 0,5 MPa (5 bar) Operative pressure 1000 W 2-stage tangential Vacuum power 21 kPa Max.
  • Page 24 Dear Customer, The appreciation you have shown in purchasing this appliance deserves much more than a simple thank you note. Your purchase is an important expression of confidence and we are very grateful about that. How can we best reward your choice? By assuring you that, you have purchased a machine combining attractive design and excellent performance.
  • Page 25 PRECAUTIONS TO BE TAKEN WHEN OPERATING THE MACHINE Before attempting to operate the Steam generator – Vacuum cleaner – Iron, read these instructions for use. The Manufacturer disclaims all responsibility for any injury to people or damage to property arising from failure to adhere to the instructions in this manual or from improper use of the appliance.
  • Page 26: Safety Precautions

    NOTICE Any repair or service to the supply lead should only be carried out by authorised service centre personnel. THE INSIDE OF THE APPLIANCE SHOULD ONLY BE SERVICED BY AUTHORIZED SERVICE CENTRES SAFETY PRECAUTIONS IMPORTANT The power of steam substitutes for all detergents. It cleans but also provides the added advantage of sanitizing your living environments.
  • Page 27 OPERATING THE STEAM/VACUUM APPLIANCE Key to machine components 1. Body of the machine 11. Boiler switch super power 12. Boiler switch 2. Recovery tank 13. Overfilling probes in recovery tank. When the 3. Transfer handle recovery tank is overfilled, the probes (13) will 4.
  • Page 28 Accessories 21. Three control handle, hose and 29. Sprinkler multipurpose socket 30. Nozzle 22. Boiler fill bottle with safety cap 31. Curved end for nozzle 23. 2 Extension tubes 32. 3 Half crevice for curved nozzle 24. Textiles tool 33. 1 Crevice brush for curved nozzle 25.
  • Page 29: Filling The Boiler

    Filling the boiler Fill the bottle (21) with demineralised or tap water (Fig. 6). Open the water fill cap (9) by hand; turn the bottle upside down with the top over the boiler hole and empty the contents of the bottle into the boiler. When the tank is full, close the cap (9) (Fig.
  • Page 30 Connecting the Suction/Injection hose (21) Pull the accessories socket door (16) wide open and plug the quick connection for the hose (21) into the socket on the front of the appliance; push the quick connection in as far as it will go. Close the accessories socket door (16) against the body of the quick connection and ensure that the two parts latch onto each other.
  • Page 31 STARTING THE APPLIANCE STEAM/VACUUM FUNCTION Make sure the button (18) and switches (19, 20) on the handle (21) are OFF. - Press the main switch (10) und the boiler switch (12) to turn the appliance and the boiler on. If more power is needed and in order to accelerate the heating process, press the boiler switch super power (11).
  • Page 32 Using the accessories. The appliance is provided with a number of accessories to fulfil different needs. To connect or disconnect the different components, simply install or remove the male end to or from the female part. (fig.12). Choose among the set of standard accessories the ones that are most fit for the job.
  • Page 33 FITTING THE MULTIPURPOSE BRUSH (23) To install the bristled frame for fitted and non-fitted carpets (26), introduce the stiff brushes into the appropriate guides with the tabs facing inwards (Fig. 15). To fit the desired insert to the brush body simply place the insert against the brush body and press one against the other until the little lever on the outside of the brush body is fully engaged in the slot provided (Fig.
  • Page 34 Only use original accessories, as these provide better quality and safety characteristics. Non-use of original accessories shall relieve the manufacturer from any responsibility. Stopping the steam/vacuum appliance. To stop the appliance, turn the steam and suction control switches on the handle (21) to the off position (Fig. 19); move the switches on the appliance to the off position and disconnect the plug from the socket.
  • Page 35: Optional Accessories

    OPTIONAL ACCESSORIES IRON (Fig. 20 - 21 - 22)) USING THE STEAM GENERATOR FOR IRONING To use the iron, install the iron connection (3) to the accessory socket (Fig. 20). Follow the same procedure used for attaching the hose. Refer to "Fitting the hose"...
  • Page 36 OPTIONAL ACCESSORIES FOR THE STEAM-VACUUM FEATURES ROTATING VACUUM BRUSH This brush combines the cleaning action of steam with the powerful effect of vacuum generated by the motor and enables the operator to remove hairs, dust, and debris from all textile surfaces (loose and fitted carpets, sofas, car seats, etc.).
  • Page 37 IMPORTANT NOTES Your steam/vacuum appliance, like any technical appliance, must be used only in accordance with the instructions. Materials such as concrete and masonry debris should not be vacuumed in the presence of moisture, as these materials may harden inside the recovery tank and cause incrustations that lead to filter damage and, eventually, to permanent motor damage.
  • Page 38 MAINTENANCE Boiler maintenance. The boiler should be serviced on average every 300 hours of operation. If the appliance is used with particularly hard water (> 30∞Fr), service the boiler at shorter intervals. Wash the boiler using a boiler de-scaling product (available from the manufacturer), carrying out the steps set out below.
  • Page 39: Cleaning The Accessories

    Before attempting to carry out any maintenance, disconnect the steam/vacuum cleaner from the mains by unplugging the appliance. The appliance will only be disconnected from the mains once it is disconnected from the power outlet. When maintenance is complete and before reconnecting the steam/vacuum cleaner to the mains, make sure that all parts have been reassembled properly.
  • Page 40: Legal Notice

    STOWAGE When stowing the appliance away for long periods of time, you should first disconnect the steam/vacuum appliance from the mains supply by removing the plug from the socket. Then, empty and wash the waste recovery tank and clean the boiler. Also, take adequate precautions to protect any parts that may be damaged because of dust build-ups.
  • Page 41 TROUBLES AND REMEDIES TROUBLES CAUSES REMEDIES Ensure there is power. The appliance is not Power failure. Contact the Service Centre. functioning. Faulty cable or switches Empty the recovery tank and Recovery tank is too full. Water is coming out from the check the float;...
  • Page 42 TROUBLES CAUSES REMEDIES Little drops of water dripping This condition is normal during The inconvenience is normally from the accessories. the first minutes of operation; eliminated after a few minutes condensate will form because of operation; If the trouble is of a difference in temperature still there, clean the boiler.
  • Page 43: Technische Daten

    TECHNISCHE DATEN Automatisches Nachfüllen des Heizkessels Sensor für Wassermangel – akustisches Signal Niederspannungssteuerungen 230V - 50/60Hz Stromversorgung 3100 W Maximale Leistung: 2 x 1050 W Heizkessel-Widerstand 0,5 MPA (5 bar) Betriebsdruck 1000 W zweistufig tangential Saugleistung 21 kPa Max. Unterdruck 45 Liter/Sekunde Luftdurchsatz 1,5 Liter...
  • Page 44 Sehr geehrter Kunde, Als erstes möchten wir uns herzlich bei Ihnen für den Kauf und das damit von Ihnen entgegengebrachte Vertrauen bedanken. Sie haben damit eine Wahl getroffen, die bestätigt, dass unsere Anstrengung ein ästhetisch schönes und technisch zuverlässiges Gerät herzustellen, Ihren Ansprüchen entsprechen konnte.
  • Page 45 VORSICHTSMASSNAHMEN ZUM GEBRAUCH Bevor Sie das Gerät zum Dampfen – Saugen – Bügeln verwenden, lesen Sie bitte vorliegende Anweisungen sorgfältig. Der Hersteller haftet nicht für Schäden oder Unfälle, die sich durch Nichtbeachtung der nachstehenden Anweisungen oder einen unsachgemäßen Gebrauch des Geräts ergeben sollten. Heben Sie die Gebrauchsanweisungen an einem sicheren Ort auf und legen Sie diese dem Gerät bei, sollte dieses von einer anderen Person benutzt werden.
  • Page 46: Sicherheitsvorschriften

    HINWEIS Das Speisekabel dar f nur von zugelassenen Fachleuten reparier t werden. JEDER EINGRIFF IM INNEREN DES GERÄTS DARF NUR VON EINER ZUGELASSENEN KUNDENDIENSTSTELLEN VORGENOMMEN WERDEN SICHERHEITSVORSCHRIFTEN ACHTUNG Die Dampfkraft ersetzt völlig alle Reinigungsmitten und reinigt nicht nur sondern desinfiziert gleichzeitig. Da die Dampftemperatur sehr hoch ist, empfehlen wir die zu reinigende Fläche zuerst zu prüfen, indem Sie den Dampf an einer kleinen Stelle ausprobieren.
  • Page 47 GEBRAUCH DES DAMPFSAUGERS Erläuterung der Gerätekomponenten 1. Gehäuse 11. Schalter Heizkessel-Superleistung 2. Schmutzwasserbehälter 12. Hauptschalter für Heizkessel 13. Sonde Schmutzwasserbehälter voll. Wenn der 3. Handgriff für den Transport Schmutzwasserbehälter voll ist, schalten die Sonden 4. Stromkabel (13) den Motor automatisch aus. Das Gerät auf 5.
  • Page 48 Zubehör 21. Handgriff mit 3 Steuerungen, Schlauch 29. Zerstäuber und Multifunktions-Steckbuchse 30. Fugendüse 22. Flasche mit Sicherheitsverschluss zum 31. Punktstrahldüse für Fugendüse Auffüllen des Heizkessels 32. 3 Halbrunde Bürstchen für Fugendüse 23. 2 Verlängerungsrohre 33. 1 Kleines Bürstchen für Punktstrahldüse 24.
  • Page 49 Heizkessel füllen. Die Flasche (21) mit entmineralisiertem Wasser oder Leitungswasser füllen (Abb. 6). Den Verschluss des Wassereinfüllstutzens (9) von Hand öffnen; mit Hilfe der Flasche den Heizkessel mit Wasser füllen. Wenn der Behälter voll ist, diesen wieder mit dem Abb. 6 Verschluss (9) schließen (Abb.
  • Page 50 Arbeitsschlauch anschließen (saugen/sprühen) (21) Die Klappe der Steckbuchse (16) für das Zubehör ganz öffnen und den Schnellanschluss des Arbeitsschlauchs (21) in die vordere Steckbuchse des Geräts stecken. Den Schnellanschluss fest hinein drücken. Die Klappe der Steckbuchse (16) an den Körper des Schnellanschlusses drücken und kontrollieren ob die beiden Teile richtig ineinander rasten.
  • Page 51 GERÄT MIT DER DAMPF- UND SAUGFUNKTION EINSCHALTEN Sicherstellen dass der Druckknopf (18) und die Schalter (19/20) am Handgriff (21) ausgeschaltet sind; - Den Schalter (10) des Hauptschalter und den Schalter (12) für Heizkessel drücken, um das Gerät und den Heizkessel einzuschalten. Falls eine höhere Leistung und folglich ein schnelleres Aufheizen benötigt wird, den Schalter für die Superleistung (11) drücken.
  • Page 52 Gebrauch des Zubehörs Das Gerät ist mit verschiedenen Zubehörteilen ausgestattet, um allen Bedürfnissen nachzukommen. Um die verschiedenen Zubehörteile zu montieren oder abzunehmen, genügt es das Steckteil in das Aufnahmestück zu stecken oder herauszuziehen. (Abb. 12). Das Zubehör wählen, das für den Gebrauch am geeignetesten ist.
  • Page 53 MONTAGE DER MEHRZWECKBÜRSTE (25) Zur Montage der Borstenleiste (26) für Teppichböden und Teppiche, die steifen Bürsten mit nach innen gerichteten Läppchen in die dazu bestimmten Führungen schieben (Abb. 15). Um den gewünschten Einsatz auf die Mehrzweckbürste zu montieren, genügt es das Teil auf die Bürste zu legen und fest anzudrücken, bis der Haken im Sitz einrastet (Abb.
  • Page 54 Nur Originalzubehörteile verwenden, die die Qualitäts- und Sicherheitseigenschaften gewährleisten. Falls nicht Originalzubehörteile verwendet werden, haftet der Hersteller nicht für die daraus entstehenden Schäden. Dampfsauger ausschalten. Um das Gerät auszuschalten, alle Schalter am Handgriff (21) ausschalten (Abb. 19); die Schalter am Gerät ausschalten und den Stecker aus der Steckdose ziehen.
  • Page 55: Zubehör Auf Anfrage

    ZUBEHÖR AUF ANFRAGE BÜGELEISEN (Abb. 20 - 21 - 22) GEBRAUCH DES DAMPFERZEUGERS ZUM BÜGELN Dazu den Stecker (3) des Bügeleisens in die Steckbuchse für das Zubehör (2) (Abb. 20) anstelle des Schlauchs laut Anweisungen auf Seite 49 (Abb. 10) „ Arbeitsschlauch anschließen (saugen/sprühen)“...
  • Page 56 ZUBEHÖR AUF ANFRAGE FÜR DIE DAMPF- UND SAUGFUNKTION ROTIERENDE BÜRSTE Durch den Unterdruck, der durch das Ansaugen erzeugt wird, ist diese Bürste ideal um Teppiche, Teppichböden, Sofas, Autositze usw. von Haaren, Staub und Schmutz zu reinigen und zu hygienisieren. MONTAGE: Die Bürste in das Aufnahmeteil des Verlängerungsrohrs oder des Schlauchhandgriffs stecken.
  • Page 57 WICHTIGE BEMERKUNGEN Ihr Dampfsauger, wie jedes andere technische Gerät, darf nur laut den Anweisungen verwendet werden. Es darf kein Material wie Beton oder Mörtelschrott zusammen mit Feuchtigkeit aufgesaugt werden, da das Material im Schmutzwasserbehälter aushärten und verkrusten könnte, was die Filter und folglich die Motoren dauerhaft beschädigen würde.
  • Page 58 WARTUNG Wartung des Heizkessels. Die Wartung des Heizkessels muss ungefähr alle 300 Betriebsstunden erfolgen. Wenn hartes Wasser verwendet wird (mit einem Härtegrad von > 30°Fr), den Heizkessel öfters warten. Den Heizkessel mit dem geeigneten Entkalker entkalken, der beim Hersteller bezogen werden kann und folgendermaßen vorgehen: Keine anderen Produkte zum Entkalken des Heizkessels verwenden als was empfohlen wird.
  • Page 59: Reinigung Des Zubehörs

    Vor jeder Wartung den Stecker des Dampfsaugers aus der Steckdose ziehen. Das Gerät ist erst stromlos, wenn der Stecker aus der Steckdose gezogen worden ist. Nach beendeter Wartung und bevor der Dampfsauger wieder an das Stromnetz angeschlossen wird, sicherstellen dass alle Teile wieder richtig montiert worden sind. Schmutzwasserbehälter und Zubehör reinigen.
  • Page 60: Längerer Stillstand

    LÄNGERER STILLSTAND Soll der Dampfsauger längere Zeit stillstehen, den Stecker aus der Steckdose ziehen, den Schmutzwasserbehälter und den Heizkessel leeren und reinigen und die Teile schützen, die durch Staub beschädigt werden könnten. Bei der erneuten Inbetriebnahme kontrollieren, ob der Arbeitsschlauch oder das Zubehör Risse aufweisen. VERSCHROTTUNG Falls der Dampfsauger nicht mehr gebraucht wird, empfehlen wir das Speisekabel abzutrennen und alle Teile unschädlich zu machen, damit sie besonders für Kinder keine Gefahr darstellen...
  • Page 61: Störungen Und Lösungen

    STÖRUNGEN UND LÖSUNGEN STÖRUNG URSACHE ABHILFE Kontrollieren, ob Strom vorhanden Das Gerät funktioniert nicht. Keine Spannung vorhanden. ist. Den Kundendienst anrufen Kabel oder Schalter defekt Schmutzwasserbehälter leeren Schmutzwasserbehälter ist zu Wasser tritt aus dem und den Schwimmer kontrollieren; Gerätekörper (Luftablass) voll ggf.
  • Page 62 STÖRUNG URSACHE ABHILFE Einige Tropfen Wasser tropfen Während der ersten Minuten Das Problem löst sich von aus dem Zubehör. des Betriebs kann sich allein nach einigen Minuten Kondenswasser durch den Betrieb; wenn das Problem Temperaturunterschied weiterhin besteht, den zwischen Zubehör und Heizkessel reinigen.
  • Page 63: Caracteristiques Techniques

    CARACTERISTIQUES TECHNIQUES Recharge automatique de la chaudière Capteur avec signal acoustique pour manque d’eau Commandes en basse tension 230V - 50/60Hz Alimentation électrique 3100 W Puissance max. 2 x 1050 W Résistance chaudière 0,5 MPa (5 bar) Pression d’exercice 1000 W bi-stade tangentielle Puissance d’aspiration 21 kPa Dépression max.
  • Page 64 Cher Client, l’agrément que vous avez exprimé par l’achat de notre appareil mérite bien plus qu’un simple remerciement. C’est pour nous une manifestation de confiance importante dont nous vous savons gré. Nous vous exprimons notre reconnaissance pour votre choix en vous donnant l’assurance que vous venez d’acheter un appareil esthétiquement agréable et techniquement valable.
  • Page 65: Precautions Pour L'utilisation

    PRECAUTIONS POUR L’UTILISATION Avant d’utiliser le Générateur – Aspirateur – Fer à repasser, lire attentivement les présentes instructions pour l’emploi. Le constructeur décline toute responsabilité pour tout préjudice corporel ou matériel éventuellement provoqué par un manque d’observation des indications illustrées ci-dessous ou à la suite d’une utilisation impropre de l’appareil. Conserver ces instructions d’utilisation dans un endroit sûr et les annexer au nettoyeur à...
  • Page 66: Prescriptions De Securite

    AVERTISSEMENT Toute intervention sur le cordon d’alimentation doit exclusivement être réalisée par le personnel du service après-vente agréé. TOUTE INTERVENTION A L’INTERIEUR DE L’APPAREIL DOIT ETRE EXCLUSIVEMENT EFFECTUEE PAR UN CENTRE AGREE PRESCRIPTIONS DE SECURITE ATTENTION La force de la vapeur remplace complètement tous les produits détergents, en alliant une action nettoyante à...
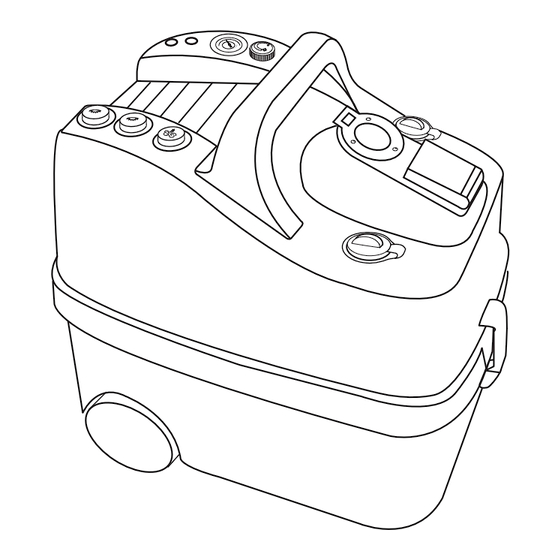
  • Page 67: Usage De L'appareil De Vapeur/Aspiration

    USAGE DE L’APPAREIL DE VAPEUR/ASPIRATION Légende composants machine 1. Corps machine 11. Interrupteur super puissance chaudière 12. Interrupteur chaudière 2. Réservoir de récupération 13. Sonde de trop plein réservoir de récupération 3. Poignée de transport Quand le réservoir de récupération est trop plein, 4.
  • Page 68: Accessoires

    Accessoires 21. Poignée à 3 commandes avec tuyau 29. Nébuliseur flexible et prise multifonctions 30. Lance 22. Bouteille avec bouchon de sécurité 31. Pointeau courbe pour lance pour remplissage chaudière 32. 3 petites demi-brosses pour lance 23. 2 Tuyaux rallonge 33.
  • Page 69 Remplissage de la chaudière. Remplir la bouteille (21) avec de l’eau déminéralisée ou de l’eau du robinet (Fig. 6). Ouvrir manuellement le bouchon de remplissage de la chaudière (9); renverser la bouteille sur le trou de la chaudière et vider l’eau à l’intérieur de celle-ci. Ensuite, lorsque la Fig.
  • Page 70: Precautions Generales Pour L'emploi

    Fixation du tuyau d’Aspiration/Injection (21) Ouvrir complètement le volet de la prise des accessoires (16) et introduire la fixation rapide du tuyau flexible (21) dans la prise située sur la partie avant de l’appareil, en appuyant à fond. Fermer le volet de la prise des accessoires (16) sur le corps de la fixation rapide en vous assurant que les deux éléments s’accrochent.
  • Page 71: Branchement De L'appareil Pour La Fonction Vapeur/Aspiration

    BRANCHEMENT DE L’APPAREIL POUR LA FONCTION VAPEUR/ASPIRATION S’assurer que le bouton (18) et les interrupteurs (19/20), placés sur la poignée (21), ne sont pas branchés. - Appuyer sur l’interrupteur général (10) et sur l’interrupteur chaudière (12) pour activer la machine et la chaudière;...
  • Page 72: Pour L'utilisation, Intercaler Le Nébuliseur Entre Le Tuyau Rallonge Et La Brosse

    Utilisation des accessoires. L’appareil est équipé d’une série d’accessoires qui permettent de satisfaire toutes les exigences. Pour brancher ou débrancher les différents composants, il suffit de brancher ou de débrancher le bout mâle de la partie femelle. (fig.12). Choisir les accessoires fournis les plus adaptés à l’emploi requis.
  • Page 73: Montage Brosse Multi-Usages

    MONTAGE BROSSE MULTI-USAGES (25) Pour monter le châssis-brosse pour moquettes et tapis (26), introduire les brosses dures dans les brosses dures, avec les (Fig. 15). languettes orientées vers l’intérieur Pour appliquer au corps de la brosse l’élément désiré, il suffira d’appuyer la première contre le second et de faire pression jusqu’à...
  • Page 74 Employer exclusivement des accessoires d’origine qui offrent les meilleures caractéristiques de qualité et de sécurité. Le manque d’emploi d’accessoires d’origine dégage le constructeur de toute responsabilité. Arrêt de l’appareil de vapeur/aspiration. Pour arrêter l’appareil débrancher les interrupteurs de commande placés sur la poignée (21) (Fig. 19); débrancher les interrupteurs placés sur l’appareil et débrancher la fiche Fig.
  • Page 75: Accessoires En Option

    ACCESSOIRES EN OPTION Fer à repasser (Fig. 20 - 21 - 22 EMPLOI DU GENERATEUR POUR REPASSER Pour son utilisation introduire la fixation (3) du fer à repasser dans la prise accessoires (Fig. 20) à la place du tuyau flexible, de la manière décrite à la page 69 (Fig.
  • Page 76: Accessoires En Option Pour La Fonction Vapeur - Aspiration

    ACCESSOIRES EN OPTION POUR LA FONCTION VAPEUR - ASPIRATION BROSSE ROTATIVE A DEPRESSION Cette brosse allie l’action assainissante de la vapeur à l’effet de la dépression générée par l’aspiration du moteur, en permettant d’enlever les poils, la poussière et les impuretés de toutes les surfaces textiles (tapis, moquettes, sièges de voiture, etc.) FIXATION: Fixer la brosse dans la partie terminale femelle du tuyau rallonge ou de la poignée du...
  • Page 77 NOTES IMPORTANTES Tout comme les autres appareils techniques, votre appareil de vapeur/aspiration doit être exclusivement utilisé conformément aux instructions. Veiller de ne pas aspirer des matériaux comme le ciment ou des gravats humides, car ceux-ci pourraient durcir à l’intérieur du réservoir de récupération en provoquant des incrustations qui abîmeraient les filtres et endommageraient les moteurs de manière irréparable.
  • Page 78: Entretien

    ENTRETIEN Entretien chaudière. Effectuer l’entretien de la chaudière en moyenne toutes les 300 heures de fonctionnement. Si vous employez l’appareil avec de l’eau ayant un haut degré de dureté (> 30 °Fr), diminuer les périodicités d’intervention. Laver la chaudière avec un détartrant en vente dans les services après-vente agréés, en suivant la marche indiquée ci-dessous.
  • Page 79: Pour Le Nettoyage Suivre La Marche Ci-Dessous

    Avant d’effectuer tout entretien, débrancher l’appareil de vapeur/aspiration du réseau électrique en retirant la fiche de la prise. L’appareil n’est coupé du réseau électrique qu’après avoir débranché la fiche de la prise de courant. A la fin de l’entretien, avant de rebrancher l’appareil de vapeur/aspiration au réseau électrique, s’assurer que toutes les parties ont été...
  • Page 80: Informations De Caractère Juridique

    IMMOBILISATION En cas d’immobilisation prolongée, débrancher l’appareil de vapeur/aspiration du réseau électrique en retirant la fiche de la prise de courant, vider et laver le réservoir de récupération des déchets et nettoyer la chaudière, protéger les parties qui pourraient s’endommager à la suite du dépôt de poussière. Lors de la remise en fonction, vérifier que les tuyaux d’aspiration et de débit de vapeur, ainsi que les accessoires, ne présentent ni fuites ni entailles.
  • Page 81: Inconvenients Et Remedes

    INCONVENIENTS ET REMEDES INCONVENIENT CAUSES REMEDES S’assurer de la présence de la L’appareil ne marche pas. Manque de tension. tension.S’adresser au service Cordon ou interrupteurs défectueux. après-vente. Réservoir de récupération trop L’eau sort du corps de la Vider le réservoir de récupération machine (sortie air).
  • Page 82 INCONVENIENT CAUSES REMEDES Quelques gouttes d’eau fuient Lors des premières minutes Après quelques minutes des accessoires. d’utilisation, la formation de d’utilisation l’inconvénient est vapeur de condensation est éliminé; s’il persiste, nettoyer normale à cause de la la chaudière. différence de température entre les accessoires et la vapeur.

Table des Matières