Bo Jungle B-Genius Mode D'emploi
Liens rapides
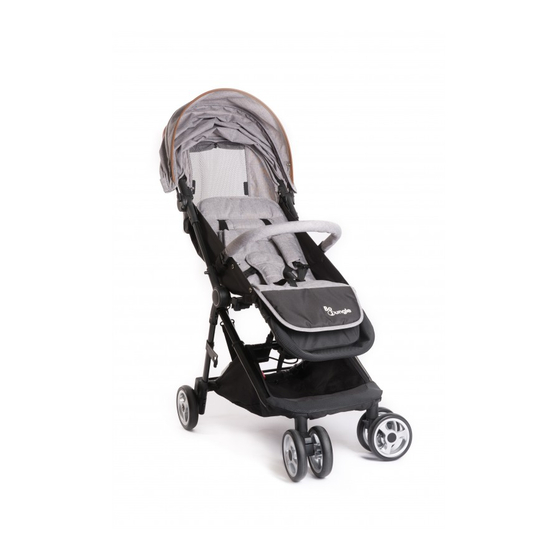
B-Genius Reversible Stroller Light Grey–Dark Grey
(Manual – Handleiding – Mode d'emploi)
B750500 – B750510
English , Nederlands , Français
Made In China – Bo Jungle - Vox Populi BVBA – Brambroek 23b - -9500 GERAARDSBERGEN– BELGIUM
www.bojungle.eu
–
info@bojungle.eu
– Tel: +32 54 240 331 – Fax: +32 9 270 01 80
IMPORTANT !
PLEASE READ CAREFULLY & KEEP FOR FUTURE REFERENCE
This product is designed to comply with Europe standard EN 1888:2012.
IMPORTANT !
VEUILLEZ LIRE ATTENTIVEMENT ET CONSERVER POUR RÉFÉRENCE ULTÉRIEURE
Ce produit est conçu pour être conforme à la norme européenne EN 1888: 2012.
BELANGRIJK !
LEES AANDACHTIG DOOR & BEWAAR VOOR TOEKOMSTIG GEBRUIK
Dit product is ontworpen om te voldoen aan de Europese norm EN 1888:2012.
1

Sommaire des Matières pour Bo Jungle B-Genius
- Page 1 B-Genius Reversible Stroller Light Grey–Dark Grey (Manual – Handleiding – Mode d’emploi) B750500 – B750510 English , Nederlands , Français Made In China – Bo Jungle - Vox Populi BVBA – Brambroek 23b - -9500 GERAARDSBERGEN– BELGIUM www.bojungle.eu – info@bojungle.eu –...
- Page 2 WARNING – AVERTISSEMENT- WAARSCHUWING • WARNING: Never leave your child unattended. • WARNING: Ensure that all the locking devices are engaged before use. • WARNING: To avoid injury ensure that your child is kept away when unfolding and folding this product. •...
- Page 3 • WAARSCHUWING: Laat uw kind nooit zonder toezicht achter. • WAARSCHUWING: Zorg er vóór gebruik voor dat alle vergrendelingen zijn vergrendeld. • WAARSCHUWING: Zorg er om letsel te voorkomen voor dat uw kind uit de buurt blijft tijdens het uitvouwen en opvouwen van dit product.
- Page 4 FIRMLY. • DO NOT RUN WITH THE STROLLER. • WHENEVER YOU STOP, ALWAYS APPLY THE BRAKES BEFORE YOU LEAVE THE STROLLER. • DO NOT HANG BAGS OR GOODS FROM THE HANDLE AS THIS COULD CAUSE THE STROLLER TO TIP OVER. USE THE STORAGE BASKET.
- Page 5 MANUAL HANDLING TECHNIQUES - TECHNIQUES DE MANIPULATION MANUELLES - HANDMATIGE HANTERINGSTECHNIEKEN The SMART lifting technique This technique can be used to pick up small light loads from low levels. Size up the Load • Assess the load (size, shape and weight). •...
- Page 6 • Beoordeel of de last moet worden verplaatst; • Waar wordt de last geplaatst? Controleer of er geen obstakels zijn; • Beoordeel of er mechanische of menselijke hulp benodigd is. Verplaats de last zo dicht mogelijk bij het lichaam • Een last is zwaarder om op te tillen of te dragen als deze zich niet dicht bij het lichaam bevindt. •...
- Page 7 PARTS LIST – LISTE DES PIÈCES – ONDERDELENLIJST Canopy Canopy Bumper Car Barre pare-chocs Veiligheidsbeugel Safety Buckle Boucle de sécurité Veiligheidsgesp Footrest Repose-pieds Voetensteun Stop Pin Goujon d’arrêt Stoppin Front Wheel Roue avant Voorwiel Fold Handle Poignée pour pliage Handgreep voor vouwen Handle Poignée Handgreep...
- Page 8 TO OPEN STROLLER - 1. POUR OUVRIR LA POUSSETTE - 1. DE KINDERWAGEN UITVOUWEN (1) Open storage latch, refer to Fig. A (2) Lift handle of stroller up, refer to Fig B&C (3) Hold the Gray Lock Pedal, then Lift handle of stroller up untill heard “Click”, refer to Fig D, CHECK that the stroller is completely latched open every time you open the stroller and before continuing with the rest of the assembly steps.
- Page 9 REAR WHEEL – ROUE ARRIERE – ACHTERWIEL Attach Rear wheels(L&R) to stroller as Fig. A,CHECK that wheel is securely attached by pulling on wheel assembly. For easy transport or storage, remove Rear wheel by pushing button as Fig. B. Fixez les roues arrière (L & R) à la poussette comme sur l'illustation A, VÉRIFIEZ que la roue est bien fixée en tirant sur l’assemblage des roues.
- Page 10 AVERTISSEMENT : TOUJOURS ACTIONNER LES FREINS LORSQUE LA POUSSETTE EST A L’ARRÊT. De kinderwagen op de rem zetten en van de rem halen: Druk de remhendels omlaag om op de rem te zetten; Fig. A Druk de remhendels omhoog om van de rem te halen; Fig. B WAARSCHUWING: ZET DE KINDERWAGEN ALTIJD OP DE REM ALS DEZE STILSTAAT.
- Page 11 ADJUSTING THE BACKREST - RÉGLAGE DU DOSSIER - DE RUGLEUNING INSTELLEN Adjustment of the reclined/upright position: Pull the webbing with both sides upward to make the backrest up(Fig A). Pull down the buckle to put the backrest down (Fig B). WARNINGS: •...
- Page 12 SECURING YOUR CHILD TO HARNESS - ATTACHER VOTRE ENFANT AU HARNAIS - UW KIND VASTZETTEN IN HET HARNAS WARNING: USE THE HARNESS AT ALL TIMES. When not in use disconnect shoulder straps from the waist strap and buckle to prevent strangulation. A five point harness is provided to restrain your child.
- Page 13 pull the harness strap, to adjust to the Tighten or loosen the waist straps, hold and lift the 4 bar slider and then desired fit. The waist strap needs to fit firmly around the child (Fig D). to adjust to the desired fit. Always adjust Tighten or loosen the shoulder straps, slide the 3 bar slider up or down the harness strap when changing the seating position of the child (Fig E).
- Page 14 Het kinderwagenstoeltje heeft 3 groepen harnassleuven op verschillende hoogten voor uw kind. U kunt de hoogte van de schoudergordel wijzigen door de schoudergordeltong uit de huidige harnassleuf en door de achterkant van het stoeltje te drukken (Fig. G). Afhankelijk van het model U kunt het harnas herpositioneren door de schoudergordeltong door de gewenste sleuf te trekken (Fig.
- Page 15 Les leviers de dégagement du cadre sont sous le siège. Appuyez sur le bloc de verrouillage, puis relevez les leviers de dégagement jusqu'au dégagement du cadre, comme indiqué sur les illustrations E, F et G. Assurez-vous que le levier de verrouillage automatique s'enclenche bien. La poussette peut se lever après le pliage. Voir l'Illustration H De frame-ontgrendelingshendels zitten onder het stoeltje.
- Page 16 Hold the footrest front and raising it to up position, Fig. E Put the Reversing Seat Pad into seat.Fig. F. Align The Reversing Seat Pad Velcro (5) to Seat Velcro, Fig G & H. Tenez le repose-pieds par l'avant et soulevez-le, Illustration E Placez le coussin de siège réversible dans le siège.
- Page 17 Poussez la boucle "日" 3 (extrémité de la ceinture de taille) du siège vers l’avant pour passer dans la fente, la ceinture de taille a été fixée. Illustration I Répétez la procédure pour les autres. Poussez la boucle “日” 1 dans l'extrémité de la sangle d'entrejambe de l'avant du siège pour passer dans la fente.
- Page 18 Remarks: For America Version, there is a Foot Barrier under the footrest too, just use Fabric Connector in this step. Zip up the Canopy and Fabric Connector.Fig. G. 0+ Reversing Seat Kit instrall finised, Fig. H. To remove Reversing Seat,Reversing the install step. In NON Reversing status, Reversing Seat Pad can replace the Main Seat Pad, refer to Fig.
- Page 19 CARE AND MAINTENANCE - ENTRETIEN ET MAINTENANCE - ZORG EN ONDERHOUD To prolong the life of your stroller keep it clean and do not leave it in the direct sunlight or in the car boot for extended periods of time. Removable fabric covers and trims may be cleaned using warm water with a household soap or milddetergent.