Télécharger Imprimer la page

AVE CRONOTC1B Instructions D'utilisation

Chronothermostat touch screen alimenté par batteries
Masquer les pouces Voir aussi pour CRONOTC1B:

Publicité

Les langues disponibles

Les langues disponibles

Liens rapides

SRB
Uputstvo za upotrebu
Hronotermostat sa ekranom na dodir - napajanje baterijama
CRONOTC1B / CRONOTC2B / CRONOTC3B
Instructions for Use
Touchscreen chronothermostat - battery power supplied
CRONOTC1B / CRONOTC2B / CRONOTC3B
Instructions d'utilisation
Chronothermostat Touch Screen alimenté par batteries
CRONOTC1B / CRONOTC2B / CRONOTC3B
Instrucciones para el uso
Cronotermostato Touch Screen con pilas
CRONOTC1B / CRONOTC2B / CRONOTC3B
3
27
47
69
International Trademark registration n° 327040 - 942905 - 330600

Publicité

loading

Sommaire des Matières pour AVE CRONOTC1B

  • Page 1 International Trademark registration n° 327040 - 942905 - 330600 Uputstvo za upotrebu Hronotermostat sa ekranom na dodir - napajanje baterijama CRONOTC1B / CRONOTC2B / CRONOTC3B Instructions for Use Touchscreen chronothermostat - battery power supplied CRONOTC1B / CRONOTC2B / CRONOTC3B Instructions d’utilisation Chronothermostat Touch Screen alimenté...
  • Page 3: Table Des Matières

    Sadržaj ..................Održavanje Uvod .................... 4 Blokiranje tastature ..................Komande i signalizacija ................. 5 ................Ekran na dodir Komande ....................5 ..............Zamena baterija Signalizacija .................... 6 Instalacija ..................17 Uputstvo za upotrebu ..................Postavljanje baze ................Podešavanje dana i vremena ..............7 Električno povezivanje ................
  • Page 4: Uvod

    53GA91-T. režima rada ili se može kreirati režim rada prilagođen potrebama korisnika. Pored modela u beloj boji Domus RAL 9010 (CRONOTC1B) postoje i modeli u Veliki displej pokazuje temperaturni profil - odnos između vremenskog intervala crnoj boji Life (CRONOTC2B) i sivoj boji Allumia (CRONOTC3B) i temperature koju treba održavati - izmerenu temperaturu, relativnu vlažnost,...
  • Page 5: Komande I Signalizacija

    Komande i signalizacija Komande 1. Dugme za odabir režima rada “Manual” ili povećavanje vrednosti 8. Točkić za korekciju temperature T2 ili trajanja režima rada (▲) * “Jolly” * 2. Dugme za odabir režima rada “Automatic” ili smanjivanje vrednosti 9. Točkić za korekciju temperatura T3 ili trajanja režima rada (▼) * “Jolly”...
  • Page 6: Signalizacija

    Signalizacija 15 3 13 12 1. Vreme 10. Temperatura prostorije/spoljašnja 2. Temperaturni profil 11. Tekući dan (1 = Ponedeljak… 7 = Nedelja; 8 = praznik) 3. Vrednost temperature T1 ili broj dana aktivnog režima rada “Jolly” 12. Zimski režim rada 4.
  • Page 7: Uputstvo Za Upotrebu

    Uputstvo za upotrebu 3. Podesite minute pomoću ▲ i ▼ i pređite na podešavanje dana ►. Za održavanje hronotermostata u funkciji nakon njegve instalacije, izvršite ove operacije prema sledećem redosledu: 1. Podešavanje dana i vremena. 2. Odabir režima rada leto/zima. 3.
  • Page 8: Režim Rada Leto/Zima

    Režim rada leto/zima Režim rada “Manual” Kada je aktivan režima rada “Manual” hronotermostat podešava način rada sistema grejanja ili hlađenja tako da uvek održava istu temperaturu. Za odabir režima rada MAN pritisnite dugme MAN. Za prelazak sa zimskog režima rada (sistem grejanja) na letnji režim rada (sistem hlađenja), i obrnuto, držati najmanje 4 sekunde pritisnuto dugme leto/zima.
  • Page 9: Režim Rada "Automatic

    Režim rada “Automatic” Temperatura T2 ne sme da bude viša od temperature T3 ili niža od temperature T1. Kada je aktivan režim rada “Automatic” hronotermostat podešava način rada sistema grejanja ili hlađenja prateći definisane profile za različite dane u nedelji. Za odabir režima rada “Automatic”...
  • Page 10: Režim Rada "Holiday

    Režim rada “Holiday” Režim rada “Jolly” Kada je aktivan režim rada “Holiday” hronotermostat podešava način rada Kada je aktivan režim rada “Jolly” hronotermostat prekida režim rada koji je u sistema grejanja i hlađenja prateći jedinstveni temperaturni profil, koji je važeći toku i podešava način rada sistema grejanja ili hlađenja kako bi održao za sve dane.
  • Page 11 Za podešavanje visine temperature treba koristiti donji točkić. Broj dana se može podesiti u rasponu od 0 do 99. Temperatura može da bude u rasponu od 2 do 40 °C, u sekvencama 0,1 °C. Režim rada “Jolly” može se prekinuti u bilo kom trenutku odabirom bilo kog drugog režima rada.
  • Page 12: Funkcija Isključivanja (Off)

    Funkcija isključivanja (OFF) Funkcija isključivanja aktivira se pritiskom na dugme OFF. Zimski režim rada Letnji režim rada Kada se aktivira funkcija isključivanja termostata (OFF) u toku zimskog režima rada, hronotermostat upravlja sistemom za grejanje na način da održava “antifriz” temperaturu, sa ciljem da se smanji potrošnja energije i istovremeno da se izbegnu oštećenja koja su prouzrokovana veoma niskim temperaturama.
  • Page 13: Predefinisani Programi

    Predefinisani programi Programiranje hronotermostata Moguće je personalizovati temperaturni profil režima rada “Automatic” i Hronotermostat poseduje dva predefinisana programa, jedan zimski i jedan “Holiday” kako bi bili prilagođeni potrebama korisnika. Za podešavanje novih letnji, koji olakšavaju njegovo pokretanje. temperaturnih profila, treba postupiti na sledeći način: Zimski program –...
  • Page 14: Vraćanje Fabrički Podešenih Parametara

    Vraćanje fabrički podešenih parametara 3. Dugmićima ▲ i ▼ može se menjati nivo temperature (T1, T2 ili T3). Za vraćanje fabrički podešenih temperaturnih profila i predefinisanih vrednosti temperature (T1-T2-T3-Temperature u režimu rada “Manual”, “Jolly” i antifriz temperature i OFF funkcije) pritisnite i istovremeno držite pritisnutim ▲...
  • Page 15: Statistika

    Statistika 4. Strana 3: minimalna dostignuta temperatura u toku dana i vreme dostizanja temperature (na slici 15,8 °C u 3.15 časova). Pomoću dugmeta ► pređite Hronotermostat pruža statističke podatke o radu uređaja. Da bi se pristupilo na sledeću stranu. podacima, treba postupiti kao što je opisano u nastavku: 1.
  • Page 16: Održavanje

    Održavanje Podešavanja i podaci su sačuvani u neizbrsivoj memoriji. Da bi skinuli hronotermostat sa baze, povucite ga sa leve i desne strane, bez pritiskanja točkića. Blokiranje tastature Kako bi se mogao očistiti hronotermostat, bez neželjene izmene samih podešavanja, potrebno je blokirati tastaturu pritiskom na dugme leto/zima. Kada je tastatura blokirana, na displeju se pojavljuje simbol .
  • Page 17: Instalacija

    Instalacija UPOZORENJE: Instalaciju mora da izvrši obučeno lice, strogo se pridržavajući važećih normi Instalacija hronotermostata se sastoji od: • Postavljanja baze. • Električnog povezivanja. • Postavljanja baterija. • Pričvršćivanja hronotermostata na bazu. Konfigurisanje parametara hronotermostata. • RASTOJANJE IZMEĐU OTVORA ZA POSTAVLJANJE BAZE Postavljanje baze Razdvojite bazu od hronotermostata podižući ga odgovarajućim alatom kroz otvor koji se nalazi na pozadini baze.
  • Page 18: Električno Povezivanje

    Električno povezivanje Priključak 4 je slobodan i može se koristiti za signalizaciju ili za neku drugu namenu. Pre nego što se izvrši povezivanje, potrebno je skinuti zaštitnu kapicu sa Nula Faza priključka i sačuvati je zajedno sa krstastim šrafom za fiksiranje. POTROŠAČ...
  • Page 19: Postavljanje Baterija

    Postavljanje baterija Povezivanje spoljašnje temperaturne sonde za pod Postavite dve alkalne baterije tipa AA od 1,5 V sa zadnje strane hronotermo- stata, poštujući označene polove. Hronotermostat se automatski uključuje nakon postavljanja baterija. Pričvršćivanje hronotermostata na bazu Rukom pritisnite hronotermostat na bazu, proveravajući da li je višepolni konektor postavljen pravilno.
  • Page 20 Svaki parametar konfigurisanja koji ima predefinisana podešavanja, definisan je Indeks Parametar Oznaka Vrednosti Predefinisano na displeju indeksom ili oznakom. Za izmenu vrednosti nekog parametra Tip konekcije baze rEL / rAd / --- nijedna ▲ [dugme 1] i [dugme 2] koristite dugmiće ;...
  • Page 21 Tip konekcije baze Opseg regulacije Hronotermostat može da utvrdi da li je baza povezana ili ne. Ukoliko baza nije Odaberite odgovarajuću vrednost koja je u skladu sa termičkim gradijentom povezana prikazuju se samo crtice, a ukoliko je povezana pojavljuje se oznaka sistema (široki opseg za visoke gradijente –...
  • Page 22 Korekcija temperature prostorije (offset) Prazna baterija Određuje stanje releja kada su baterije prazne duže od 15 dana. Ako je Omogućava dodavanje/oduzimanje offset vrednosti od temperature koju je parametar isključen (---), hronotermostat nastavlja da upravlja relejom na način izmerio hronotermostat. koji je predviđen prilikom podešavanja sve dok mu to dužina trajanja baterije omogućava.
  • Page 23: Tehničke Karakteristike

    2 alkalne baterije AA 1,5 V 60730-1 i drugim delovima. Rok trajanja baterije oko 1 godine Ave S.p.A zadržava pravo da izvrši tehničke ili izmene u izradi za koje smatra da su neophodne, bez prethodne najave. Izlaz 1 jedopolni relej 250 Va.c. 5(3) A...
  • Page 24 Napomena ................................................................................................................................................................................................................................................................................................................................................................................................................................................................................................................................................................................................................................................................................SRPSKI...
  • Page 25 Index Introduction ...................26 Maintenance ..................38 Keyboard lock ..................38 Controls and Indications ................27 Touch Screen ..................38 Controls ....................27 Batteries replacement ................38 Indications ....................28 Installation .....................39 User manual ....................29 Base fastening ..................39 Setting the date and time ................29 Electric connections ................40 Summer/Winter selection ................30 Batteries fitting ..................41 Operating modes ..................30 Fastening the chronothermostat onto the base .........41...
  • Page 26: Introduction

    Chronothermostat is available in the following colours: The wide display shows the temperature profile - i.e.: the relationship between the time • "Domus RAL 9010" white (p.n. CRONOTC1B) table and the temperature to be kept -, as well as the measured temperature, relative •...
  • Page 27: Controls And Indications

    Controls and indications Controls 1. Button used to select the “Manual” operating mode or increase a value (▲) * 8. Rotary selector for correcting temperature T2 or the Jolly duration * operating mode 2. Button used to select the “Automatic” operating mode or decrease a value (▼) * 9.
  • Page 28: Indications

    Indications 15 3 13 12 Time Ambient/external temperature Temperature profile Current day (1 = Monday … 7 = Sunday; 8 = Holiday) Temperature value T1 or “Jolly” operating mode duration (days) Winter operation Temperature value T2 or “Jolly” operating mode duration (hours) Summer operation Temperature value T3 Battery charge level...
  • Page 29: User Manual

    User manual 3. Modify the minute setting by means of the ▲ and ▼ buttons, then go to the day In order to start the chronothermostat after it has been installed, proceed as follows: setting by means of the ► button. 1.
  • Page 30: Summer/Winter Selection

    Summer/Winter selection “Manual” operating mode With the Manual operating mode, the chronothermostat adjusts the operation of the heating or cooling system in order to always keep the same temperature. To select “Manual”, press MAN. To shift from the Winter operation (heating system) to the Summer operation (cooling system), and vice versa, keep the Summer/Winter button pressed for at least 4 seconds.
  • Page 31: Automatic" Operating Mode

    “Automatic” operating mode With the “Automatic” operating mode, the chronothermostat adjusts the operation of the heating or cooling system by following the profiles defined for the various days of the week. To select “Automatic”, press AUTO. Temperature T1 cannot be higher than temperature T2 or lower than 2 °C. The three temperature levels used can be modified during operation by means of the rotary selectors located on the right side of the chronothermostat.
  • Page 32: Holiday" Operating Mode

    “Holiday” operating mode “Jolly” operating mode With the “Holiday” operating mode, the chronothermostat adjusts the operation With the “Jolly” operating mode, the chronothermostat interrupts the current of the heating or cooling system by following one single temperature profile, operating mode and adjusts the operation of the heating or cooling system to which is valid for all days.
  • Page 33: Off" Function

    The temperature can be modified from 2°C to 40 °C, by 0.1 °C increments. You can interrupt the “Jolly” mode at any time, by selecting any other operating mode. To set the “Jolly” operating mode duration, i.e. hours («h»), use the central rotary The “Jolly”...
  • Page 34: Winter Operation

    Winter operation Summer operation The chronothermostat adjusts the operation of the heating system to keep the The system will be fully turned off and the “OFF” message will appear on the “Antifreeze” temperature, in order to reduce the energy consumption and, at the display, without any temperature profile.
  • Page 35: Preset Programs

    Preset programs Chronothermostat programming The chronothermostat has two preset programs (i.e. “Winter” and Summer”) for You can customize the temperature profiles for the “Automatic” and “Holiday” quicker start-up. operating modes, so as to adapt them to your own needs. To set new temperature profiles, proceed as follows: “Winter”...
  • Page 36: Displaying The Temperature Detected By The Separate Probe

    3. Use the ▲ and ▼ buttons to modify the temperature level (T1, T2 or T3). Reset default parameters To resume the preset temperature profiles and values (T1-T2-T3-Temperature used with the Manual mode, Temperature used with the Jolly mode, Antifreeze temperature, OFF function), keep the ▲...
  • Page 37: Statistical Data

    Statistical data 4. Page 3: minimum temperature reached on the current day, and time at which such minimum temperature was reached (15.8°C at 03.15 a.m. in the The chronothermostat provides a set of statistical data concerning the system image). Use the ► button to go to the next page. operation.
  • Page 38: Maintenance

    Maintenance To remove the chronothermostat from the base pull the left and right sides of the chronothermostat, without applying force to selectors. To clean the chronothermostat use a soft cotton cloth and no detergent. Do not use paper handkerchiefs to clean the touch screen. Keyboard lock To clean the chronothermostat without changing accidentally its settings, press the Summer/Winter key in order to activate the keyboard lock.
  • Page 39: Installation

    Installation CAUTION: The chronothermostat shall be installed by qualified personnel only, in compliance with the current regulations in force. Chronothermostat installation involves the following operations: • Fastening the base. • Electric connections. • Fitting the batteries. • Fastening the chronothermostats onto the base. • Configuring chronothermostat parameters. SPACING DIMENSIONS FOR FIXING THE BASE Fastening the base Separate the base from the chronothermostat levering on the slot located at the bottom of the base by means of a proper tool.
  • Page 40: Electric Connections

    Electric connections Terminal 4 is free and may be used for signalling or other use, as necessary. Before making connections, remove the terminal protection guard (keep it Neutral Phase together with the fastening cross-slotted screw). LOAD Chronothermostat relay terminal block LOAD = burner - circulation pump Warning: Make sure the relay load value is not exceeding the values specified in «Technical data».
  • Page 41: Fitting The Batteries

    Fitting the batteries Connecting the external floor temperature probe Fit two long-life 1.5 V AA alkaline batteries into the back of the chronothermostat, observe the specified polarity. After fitting the batteries the chronothermostat will turn on automatically. Fastening the chronothermostat onto the base Press by hand the chronothermostat onto the base, make sure the multi-pole connector fits properly.
  • Page 42 Every configuration parameter featuring preset settings is identified on the Index Parameter Writing Values Preset value display by an index and a writing. To change parameter values use keys ▲ [key Type of connected card rEL / rAd / --- none 1] and ▼...
  • Page 43 Type of connected card Regulation period The chronothermostat can check whether the base is connected. If it is not To set the regulation cycle length (ON period + OFF period) when the proportional connected dashes will be displayed whereas when it is connected the writing temperature regulation mode is chosen.
  • Page 44 Optimization Low Battery To calculate the advance switch-on time required to reach the desired To determine the relay status when batteries are flat for over 15 days. If this temperature at the set time, considering the system thermal inertia. Optimization parameter is excluded (---), the chronothermostat will keep on controlling the relay takes place only at the first switch-on of the day, i.e.: the first programmed as required by regulation until the remaining battery charge allows for it.
  • Page 45: Technical Data

    Power supply 2 AA alkaline batteries, 1.5 V parts. Battery life about 1 year AVE S.p.A. reserves the right to make whatever technical and manufacturing modification without prior notice. Outputs 1 single-pole relay voltage 250 Va.c. rating 5(3) A Inputs...
  • Page 46 Notes ................................................................................................................................................................................................................................................................................................................................................................................................................................................................................................................................................................................................................................................................................ENGLISH...
  • Page 47 Table des matières Entretien ....................60 Introduction ...................48 Blocage clavier ..................60 Commandes et signalisations ...............49 Ecran Touch Screen ................60 Commandes ..................49 Remplacement des batteries ..............60 Signalisations ..................50 Installation .....................61 Mode d’emploi ..................51 Fixation de la base ................61 Réglage du jour et de l’heure ..............51 Raccordements électriques ..............62 Sélection été...
  • Page 48: Introduction

    Le chronothermostat est disponible en blanc Domus RAL 9010 (code selon les propres exigences. CRONOTC1B), en noir Life (code CRONOTC2B) et en gris Allumia (code CRONOTC3B). Son grand écran visualise le profil de la température - c’est-à-dire le rapport entre l’horaire et les températures à...
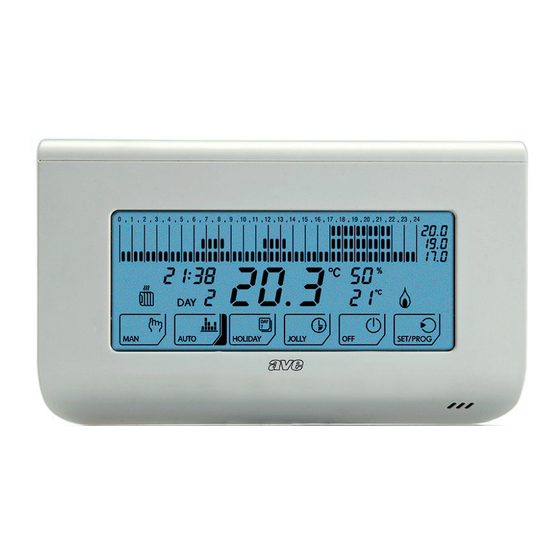
  • Page 49: Commandes Et Signalisations

    Commandes et signalisations Commandes 1. Touche pour sélectionner le mode de fonctionnement « Manuel » ou 8. Sélecteur rotatif pour la correction de la température T2 ou de la durée du mode de fonctionnement « Jolly » *. augmenter une valeur (▲) *. 2.
  • Page 50: Signalisations

    Signalisations 15 3 13 12 1. Heure 10. Température ambiante / extérieure 2. Profil de la température 11. Jour courant (1 = Lundi ... 7 = Dimanche ; 8 = jour « Holiday ») 3. Valeur de la température T1 ou durée en jours du mode de fonctionnement 12.
  • Page 51: Mode D'emploi

    Mode d’emploi Une fois installé le chronothermostat, il faut réaliser dans l’ordre respectif les 3. Modifier les minutes à l’aide des touches ▲ et ▼, passer au jour à l’aide de opérations suivantes pour le mettre en fonctionnement : la touche ►. 1.
  • Page 52: Sélection Été / Hiver

    Sélection été / hiver Mode de fonctionnement «Manuel» Au mode de fonctionnement « Manuel », le chronothermostat régule le fonctionnement du système de chauffage ou de refroidissement pour maintenir toujours la même température. Pour sélectionner « Manuel », appuyer sur la Pour passer du fonctionnement d'hiver (système touche «...
  • Page 53: Mode De Fonctionnement «Automatique

    Mode de fonctionnement «Automatique» La température T2 ne peut pas être supérieure à la température T3 ou inférieure à la température T1. Au mode de fonctionnement « Automatique », le chronothermostat régule le fonctionnement du système de chauffage ou de refroidissement selon les profils définis pour les différents jours de la semaine.
  • Page 54: Mode De Fonctionnement « Holiday

    Mode de fonctionnement « Holiday » Mode de fonctionnement « Jolly » Au mode de fonctionnement « Holiday », le chronothermostat régule le Au mode de fonctionnement « Jolly », le chronothermostat suspend le mode de fonctionnement du système de chauffage ou de refroidissement selon un seul fonctionnement en cours et régule le fonctionnement du système de chauffage profil de température, valable pour tous les jours.
  • Page 55: Fonction « Éteint » (Off)

    Pour modifier le niveau de température, utiliser le sélecteur rotatif inférieur. Les jours peuvent varier de 0 à 99. La température peut varier de 2 à 40 °C, par tranches de 0,1 °C. Le mode « Jolly » peut être interrompu à tout moment, en sélectionnant un autre mode de fonctionnement quelconque.
  • Page 56: Fonctionnement D'hiver

    Fonctionnement d'hiver Fonctionnement d'été Le système s’éteint complètement et sur l’écran apparaît le message « OFF », sans aucun profil de température. Le chronothermostat régule le fonctionnement du système de chauffage pour maintenir la température antigel, dans le but de diminuer la consommation d’énergie et d’éviter en même temps les dommages provoqués par des températures trop rigoureuses.
  • Page 57: Programmes Prédéfinis

    Programmes prédéfinis Programmation du chronothermostat Le chronothermostat est équipé de deux programmes prédéfinis, l’un d'hiver et Il est possible de personnaliser les profils de température des modes « l’autre d'été, afin de permettre de le mettre en marche plus rapidement. Automatique »...
  • Page 58: Rétablissement Des Paramètres Prédéfinis

    3. Utiliser les touches ▲ et ▼ pour modifier le niveau de la température (T1, T2 Rétablissement des paramètres prédéfinis ou T3). Pour rétablir les profils de température et les valeurs de température prédéfinies (T1-T2-T3, température utilisée en mode manuel, température utilisée en mode «...
  • Page 59: Données Statistiques

    Données statistiques 4. Page 3 : température minimale atteinte le jour courant et heure à laquelle Le chronothermostat fournit un ensemble de données statistiques sur le elle a été atteinte (sur l’image, 15,8 ºC à 3 h 15). Utiliser la touche ► pour fonctionnement du système.
  • Page 60: Entretien

    Entretien Pour enlever le chronothermostat de la base: • Tirer le chronothermostat des côtés gauche et droit, sans forcer les Pour nettoyer le chronothermostat, il est conseillé d’utiliser un chiffon doux, en sélecteurs. coton, sans détergent. Pour nettoyer l’écran ne pas utiliser de mouchoirs en papier.
  • Page 61: Installation

    Installation ATTENTION: l’installation doit être effectuée exclusivement par de personnel qualifié, en respectant scrupuleusement les normes en vigueur. L’installation du chronothermostat est constituée de : • Fixation de la base au mur. • Raccordements électriques. • Introduction des batteries. • Fixation du chronothermostat sur la base. • Configuration des paramètres du chronothermostat.
  • Page 62: Raccordements Électriques

    Raccordements électriques La borne 4 est libre et peut être utilisée pour indication ou autre utilisation. Avant d’effectuer les raccordements, il faut enlever le petit carter de protection Neutre Phase des bornes, en le conservant avec la vis cruciforme de fixation. Charge Plaques à...
  • Page 63: Introduction Des Batteries

    Introduction des batteries Raccordement de la sonde de température extérieure pour chauffage de surface Introduire deux batteries alcalines AA de longue durée, de 1,5 V, dans la partie arrière du chronothermostat, en respectant la polarité indiquée. Une fois les batteries sont introduites, le chronothermostat s’allume automatiquement. Fixation du chronothermostat à...
  • Page 64 Chaque paramètre de configuration ayant des réglages prédéfinis est identifié Indice Paramètre Message Valeurs Prédéfini sur l’écran par un indice et un message. Pour modifier les valeurs d’un Type de carte connectée rEL / rAd / --- Aucun paramètre, utiliser les touches ▲ [touche 1] et ▼ [touche 2]; pour se déplacer Échelle des températures CELS o °C / °F...
  • Page 65 Type de carte connectée Période de régulation Le chronothermostat est capable de vérifier su la base est connecté. Si elle n’est Il configure la durée du cycle de régulation (période d’allumage + période pas connectée, des tirets sont visualisés, tandis que si elle est connectée, le d’extinction) lorsqu’on a choisi le mode proportionnel de réglage de la message rEL est visualisé.
  • Page 66: Batterie Déchargée

    Optimisation Batterie Déchargée Il calcule l’avance à l’allumage nécessaire pour atteindre la température souhaitée à Il détermine l’état du relais quand les batteries sont déchargées pendant plus de l’horaire établi, en considérant l’inertie thermique du système. L’optimisation se fait 15 jours. Si le paramètre est exclu (---), le chronothermostat continue à piloter seulement sur le premier allumage de la journée, c’est-à-dire sur le premier passage le relais comme demandé...
  • Page 67: Caractéristiques Techniques

    2 batteries alcalines AA de 1,5 V et modifications. Durée des batteries Environ 1 an Ave S.p.A. se réserve le droit d’apporter sans avis préalable toute modification Sorties 1 relais unipolaire tension 250 Vca porte 5(3) A technique ou de fabrication qu’elle jugerait nécessaire.
  • Page 68 Notes ................................................................................................................................................................................................................................................................................................................................................................................................................................................................................................................................................................................................................................................................................FRANÇAIS...
  • Page 69 Índice Mantenimiento ..................82 Introducción ...................70 Bloqueo del teclado ................82 Mandos e indicaciones ................71 Pantalla Touch Screen ................82 Mandos ....................71 Sustitución de las pilas ................82 Indicaciones ...................72 Instalación .....................83 Manual de uso ..................73 Fijación de la base ..................83 Programación del día y de la hora ............73 Conexiones eléctricas ................84 Selección Verano / Invierno ..............74 Colocación de las batterie ...............85...
  • Page 70: Introducción

    Introducción Es posible conectarse a una sonda de temperatura externa por suelo cod. AVE El cronotermostato CRONOTC...B mide la temperatura ambiente y regula el sistema 53GA91-T. de calefacción o de aire acondicionado al que está conectado. Puede escogerse el modo de funcionamiento entre aquellos predefinidos o personalizados, de acuerdo a las propias exigencias.
  • Page 71: Mandos E Indicaciones

    Mandos e indicaciones Mandos 1. Tecla para seleccionar el modo de funcionamiento Manual o aumentar un 8. Selector giratorio para corregir la temperatura T2 o la duración del modo de valor (▲) * funcionamiento Jolly * 2. Tecla para seleccionar el modo de funcionamiento Automático o disminuir un 9.
  • Page 72: Indicaciones

    Indicaciones 15 3 13 12 1. Hora 9. Temperatura captada, visualizada al grado 2. Perfil de la temperatura 10. Temperatura ambiente / exterior 3. Valor de la temperatura T1 o duración en días del modo de funcionamiento 11. Día actual (1 = Lunes… 7 = Domingo; 8 = día Holiday) Jolly 12.
  • Page 73: Manual De Uso

    3. Modificar los minutos con las teclas ▲ y ▼ y pasar al día con la tecla ►. Manual de uso Para poner en funcionamiento el cronotermostato después de instalarlo, seguir en este orden las siguientes operaciones: 1. Programación del día y de la hora. 2.
  • Page 74: Selección Verano / Invierno

    Selección Verano / Invierno Modo de funcionamiento Manual Con el modo de funcionamiento Manual el cronotermostato regula el funcionamiento del sistema de calefacción o refrigeración para mantener siempre la misma temperatura. Para seleccionar Manual presionar la tecla MAN. Para pasar del funcionamiento de invierno (sistema de calefacción) al funcionamiento de verano (sistema de refrigeración), y viceversa, mantener presionada por lo menos 4 segundos la tecla Verano / Invierno.
  • Page 75: Modo De Funcionamiento Automático

    Modo de funcionamiento Automático La temperatura T2 no puede ser superior a la temperatura T3 o inferior a la temperatura T1. Con el modo de funcionamiento Automático el cronotermostato regula el funcionamiento del sistema de calefacción o refrigeración siguiendo los perfiles definidos para los diferentes días de la semana.
  • Page 76: Modo De Funcionamiento Holiday

    Modo de funcionamiento Holiday Modo de funcionamiento Jolly Con el modo de funcionamiento Holiday el cronotermostato regula el Con el modo de funcionamiento Jolly el cronotermostato interrumpe el modo de funcionamiento del sistema de calefacción o refrigeración siguiendo un único funcionamiento en curso y regula el funcionamiento del sistema de calefacción perfil de temperatura, válido para todos los días.
  • Page 77: Función Apagado (Off)

    Para modificar el nivel de temperatura usar el selector giratorio inferior. Los días pueden cambiar de 0 a 99. La temperatura puede cambiarse de 2 a 40 °C, con pasos de 0,1 °C. Puede interrumpirse en cualquier momento el Jolly seleccionando cualquier otro modo de funcionamiento.
  • Page 78: Funcionamiento De Invierno

    Funcionamiento de invierno Funcionamiento de verano El sistema se apaga por completo y en la pantalla aparece el mensaje OFF, sin ningún perfil de temperatura. El cronotermostato regula el funcionamiento del sistema de calefacción para mantener la temperatura Anticongelante con la finalidad de disminuir el consumo energético y evitar al mismo tiempo los daños causados por las temperaturas demasiado rigurosas.
  • Page 79: Programas Predefinidos

    Programas Predefinidos Programación del cronotermostato El cronotermostato posee dos programas predefinidos, uno de invierno y otro de Pueden personalizarse los perfiles de temperatura de los funcionamientos verano, para ponerlo en funcionamiento más rápidamente. Automático y Holiday para adecuarlos a exigencias propias. Para programar los nuevos perfiles de temperatura, realizar lo siguiente: Programa de invierno –...
  • Page 80: Restablecimiento De Los Parámetros Predefinidos

    3. Usar las teclas ▲ Y ▼ para modificar el nivel de temperatura (T1, T2 o T3). Restablecimiento de los parámetros predefinidos Para restablecer los perfiles de temperatura y los valores de las temperaturas predefinidas (T1-T2-T3- Temperatura usada en manual, Temperatura usada en Jolly, Temperatura anticongelante función Off) presionar y mantener presionadas al mismo tiempo las teclas ▲...
  • Page 81: Estadísticas

    Estadísticas Usar la tecla ► para pasar a la página siguiente. El cronotermostato CH150 proporciona un conjunto de datos estadísticos sobre el funcionamiento del sistema. Para acceder a los datos, realizar lo siguiente: 5. Página 4: temperatura máxima alcanzada el día en curso y hora en la que fue alcanzada (en la imagen 22,5 °C a la hora 21.08).
  • Page 82: Mantenimiento

    Mantenimiento Las configuraciones y los datos se conservan en la memoria no volátil. Para quitar el cronotermostato de la base tirar de los lados izquierdo y derecho Para la limpieza del cronotermostato se aconseja usar un paño suave de algodón del cronotermostato, sin forzar los selectores.
  • Page 83: Instalación

    Instalación ATENCIÓN: La instalación debe ser realizada exclusivamente por personal cualificado, respetando escrupulosamente las normas vigentes. La instalación del cronotermostato está constituida por: • Fijación de la base. • Conexiones eléctricas. • Colocación de las pilas. • Fijación del cronotermostato en la base. • Configuración de los parámetros del cronotermostato. DISTANCIAS ENTRE LOS CENTROS DE PERFORACIÓN Separar la base del cronotermostato haciendo palanca con una herramienta Fijación en la base adecuada en la muesca ubicada en el fondo de la base.
  • Page 84: Conexiones Eléctricas

    Conexiones eléctricas El terminal 4 está libre y puede ser utilizado para señalizaciones u otros usos. Antes de realizar las conexiones se debe quitar la portezuela de protección de los Neutral Fase terminales, conservándola junto con el tornillo en cruz de fijación. Carga Bloque de terminales relé...
  • Page 85: Fijación Del Cronotermostato En La Base

    Colocación de las pilas Conexión de la sonda de temperatura externa Colocar dos pilas alcalinas tipo AA de larga duración, de 1,5 V, en la parte trasera del cronotermostato, respetando la polaridad indicada. Luego de colocar las pilas, el cronotermostato se enciende automáticamente. Fijación del cronotermostato en la base Colocar, presionando manualmente, el cronotermostato a la base, asegurándose de que el conector multipolar sea colocado correctamente.
  • Page 86 Cada parámetro de configuración, que tiene configuraciones predefinidas, Indice Parámetro Texto Valores Predefinido es identificado en la pantalla por un índice y un mensaje. Para modificar el Tipo de placa conectada rEL / rAd / --- ninguno parámetro actual usar las teclas ▲ [tecla 1] y ▼ [tecla 2]; para desplazarse Scala delle temperature CELS o °C / °F...
  • Page 87 Tipo de placa conectada Período de regulación El cronotermostato se encuentra en grado de controlar si la base está conectada. En Programa la duración del ciclo de regulación (período de encendido + período caso en que no lo esté, se muestran las rayitas, mientras que si está conectado se de apagado) cuando se escoge la modalidad de regulación de la temperatura visualiza el texto rEL.
  • Page 88 Optimización Batería Descargada Calcula la anticipación del encendido necesaria para alcanzar la temperatura Determina el estado del relé cuando las pilas están descargadas por más de 15 deseada en el horario establecido, considerando la inercia térmica del sistema. días. Si se excluye el parámetro (---), el cronotermostato continua controlando La optimización se realiza sólo en el primer encendido del día, o se en el primer el relé...
  • Page 89: Características Técnicas

    Duración de las pilas aproximadamente 1 año Ave S.p.A. se reserva la facultad de introducir todas las modificaciones técnicas Salidas 1 relé unipolar tensión 250 V c.a. potencia 5(3) A y de fabricación que considere necesarias sin obligación de aviso previo.
  • Page 90 Notas ................................................................................................................................................................................................................................................................................................................................................................................................................................................................................................................................................................................................................................................................................
  • Page 92 • AVE proizvodi su namenjeni za elektroinstalaciju.

Ce manuel est également adapté pour:

Cronotc2bCronotc3b