Table des Matières

Manuels Connexes pour Yamaha NS-PA150


Sommaire des Matières pour Yamaha NS-PA150
- Page 1 Speaker Package Package Enceintes NS-PA150 / NS-P150 (NS-PA150 / NS-P150: NS-C150 + NS-B150) Owner’s Manual Mode d’emploi Bedienungsanleitung Manual De Instrucciones Инструкция По Эксплуатации...
- Page 2 Precautions Please read the following operating precautions before use. Yamaha will not be held responsible for any damage and/or injury caused by not following the cautions below. 1. To assure the finest performance, please read this Information for Users on Collection and Disposal manual carefully.
-
Page 3: Package Contents
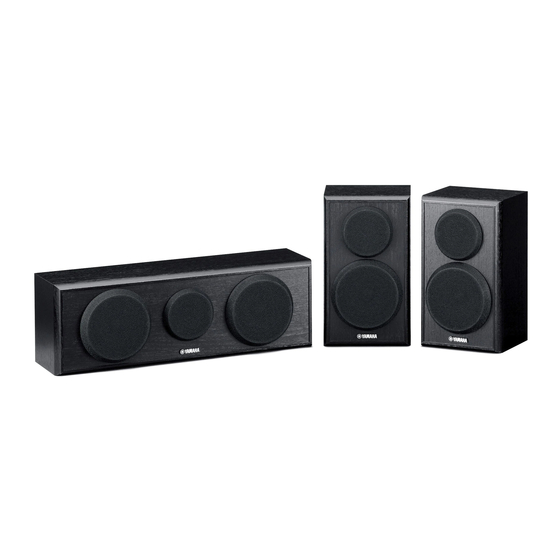
Connection diagram..........4 Installing the speakers........2 Specifications............5 Installing the center speaker........2 Wall-mounting the speakers........3 Package contents Make sure the package contains the following items. Type of package NS-PA150 NS-P150 Contents Center speaker (NS-C150) Surround speaker (NS-B150) (13.1 ft.) Speaker cable 10 m (32.8 ft.) -
Page 4: Installing The Speakers
NS-B150 NS-B150 NS-B150 (NS-PA150 only) * Place the two front speakers (commercially available) on the left and right sides of the TV, facing directly forward. ** Place the left and right surround speakers behind your listening position, facing slightly inward. -
Page 5: Wall-Mounting The Speakers
/ ceiling’s construction. ■ Mounting the center speaker on the Yamaha YTS-F500/YTS-T500 TV stand You can use the screw holes [diameter: 6 mm (1/4"), hole depth: 16 mm (5/8")] on the rear of this unit to mount the speaker on the YTS-F500/YTS-T500. -
Page 6: Connecting The Speakers
Right Left depends on your amplifier. Surround speakers Surround back speakers (NS-PA150 only) ■ Preparing the speaker cables Once you’ve positioned the speakers, you’ll need to Notes prepare the speaker cables for connecting the • Do not bundle or roll up excess cable. - Page 7 Specifications ■ Operating the speaker terminals Loosen Rotate the speaker terminal counterclockwise to loosen it. Insert the bare wire. Tighten Rotate the speaker terminal clockwise to tighten it. Test the security of the connection by pulling gently on the cable. Negative (–) Positive (+) Notes...
- Page 8 Précautions Lisez attentivement les précautions d’utilisation suivantes. Yamaha décline toute responsabilité en cas de dommages et/ou de blessures découlant du non respect de ces consignes. 1. Pour profiter au mieux de votre acquisition, lisez Information concernant la Collecte et le attentivement ce mode d’emploi.
-
Page 9: Contenu De L'emballage
Caractéristiques techniques......5 Installation de l’ e nceinte centrale ......2 Monter les enceintes sur le mur ......3 Contenu de l’emballage Veuillez-vous assurer que l’ e mballage contient les éléments suivants. Type NS-PA150 NS-P150 d’enceinte Contenu Enceinte Centrale (NS-C150) Enceinte Surround (NS-B150) Câble... -
Page 10: Installation Des Enceintes
** Surround • NS-B150 gauche droite (NS-PA150 seulement) NS-B150 NS-B150 * Placez les deux enceintes avant (disponibles sur le marché) à la gauche et à la droite du téléviseur, orientez-les vers l’avant. ** Placez les enceintes surround droite et gauche derrière votre position d’ é coute, orientées les légèrement vers l’intérieur. -
Page 11: Monter Les Enceintes Sur Le Mur
■ Monter l’enceinte central sur le pied de téléviseur Yamaha YTS-F500/YTS-T500. Vous pouvez utiliser les trous de vis [diamètre: 6 mm, profondeur du trou: 16 mm] derrière le haut-parleur pour monter l’ e nceinte sur le YTS-F500/YTS-T500. Pour les détails d’installation, veuillez vous referez au mode d’ e mploi fourni avec le YTS-F500/YTS-T500. -
Page 12: Connexion Des Enceintes
Gauche enceintes dépend de votre amplificateur. Enceintes Surround Enceintes Surround arrière (NS-PA150 seulement) ■ Préparation des câbles d’enceintes Une fois que vous avez positionné les enceintes, vous Remarques allez devoir préparer les câbles d’ e nceinte pour • Veuillez ne pas plier ni enrouler l’ e xcès de câble. -
Page 13: Fonctionnement Des Bornes D'enceinte
Caractéristiques techniques ■ Fonctionnement des bornes d’enceinte Dévisser Dévissez le bouton de la borne dans le sens inverse des aiguilles d’une montre. Visser Insérez l’extrémité dénudée. Vissez le bouton de la borne dans le sens des aiguilles d’une montre. Vérifiez la solidité de la connexion en tirant légèrement sur le câble au niveau de la borne. - Page 14 Vorsichtsmaßnahmen Bitte lesen Sie sich die folgenden Sicherheitshinweise vor der Inbetriebnahme durch. Yamaha kann für etwaige Schäden und/oder Verletzungen, die durch eine Nichtbeachtung der folgenden Sicherheitshinweise entstehen, nicht haftbar gemacht werden. 1. Um optimales Leistungsvermögen sicherzustellen, Verbraucherinformation zur Sammlung und lesen Sie bitte diese Anleitung aufmerksam durch.
-
Page 15: Lieferumfang
Aufstellen der Lautsprecher ......2 Technische Daten ..........5 Aufstellen des Center-Lautsprechers....2 Wandmontage der Lautsprecher......3 Lieferumfang Überprüfen Sie zunächst, ob die nachfolgend aufgeführten Teile und Geräte im Lieferumfang enthalten sind. Lautsprecher- system NS-PA150 NS-P150 Inhalt Center-Lautsprecher (NS-C150) Surround-Lautsprecher (NS-B150) Lautsprecher- kabel... -
Page 16: Aufstellen Der Lautsprecher
NS-B150 NS-B150 • (nur bei NS-PA150) * Stellen Sie die beiden (im Fachhandel erhältlichen) Frontlautsprecher links und rechts vom Fernsehgerät auf und richten Sie sie geradeaus nach vorn. ** Der linke und der rechte Surround-Lautsprecher müssen sich hinter der Hörposition befinden und etwas nach innen gedreht werden. - Page 17 Wand hervorstehenden Schrauben auf. ■ Montage des Center-Lautsprechers an den Yamaha TV-Racks YTS-F500 und YTS-T500 Sie können die Bohrlöcher (Durchmesser: 6 mm, Tiefe: 16 mm) auf der Rückseite dieses Geräts verwenden, um die Lautsprecher am YTS-F500 / YTS-T500 anzubringen. Weitere Informationen zur Montage finden Sie in der Bedienungsanleitung des YTS-F500 / YTS-T500.
-
Page 18: Anschließen Der Lautsprecher
Surround- Surround-Lautsprecher hinten verwendeten Verstärker. Lautsprecher (nur bei NS-PA150) ■ Vorbereiten der Lautsprecherkabel Nach dem Aufstellen der Lautsprecher müssen Sie die Hinweise Lautsprecherkabel zum Anschluss der Lautsprecher • Zu lange Kabel sollten weder gebündelt noch aufgerollt vorbereiten. -
Page 19: Technische Daten
Technische Daten ■ Anschließen der Kabel an die Lautsprecherklemmen Lösen Drehen Sie die Lautsprecherklemme gegen den Uhrzeigersinn, um sie zu lösen. Sichern Stecken Sie den blanken Draht ein. Drehen Sie die Lautsprecherklemme im Uhrzeigersinn, um sie zu sichern. Ziehen Sie vorsichtig am Kabel, um zu überprüfen, ob es fest sitzt. Minuspol (–) Pluspol (+) Hinweise... - Page 20 Precauciones Lea las siguientes precauciones de funcionamiento antes de iniciar el uso del aparato. Yamaha no se responsabilizará de cualquier daño o lesión causada por no seguir las precauciones que aparecen a continuación. 1. Para asegurar el mejor rendimiento posible, lea con Información para Usuarios sobre Recolección y...
-
Page 21: Contenido Del Paquete
Instalar los altavoces ..........2 Especificaciones ..........5 Instalar el altavoz central ........2 Instalar los altavoces en la pared......3 Contenido del paquete Compruebe que el paquete contiene los siguientes elementos. Tipo de embalaje NS-PA150 NS-P150 Contenido Altavoz central (NS-C150) Altavoz Surround (NS-B150) Cable de... -
Page 22: Instalar Los Altavoces
Surround trasero ** Surround ** Surround NS-B150 izquierdo derecho (NS-PA150 NS-B150 NS-B150 solamente) * Coloque los dos altavoces frontales (a la venta) en los laterales derecho e izquierdo del televisor, mirando hacia adelante. ** Sitúe los altavoces surround derecho e izquierdo por detrás de la posición de audición, ligeramente hacia dentro. -
Page 23: Instalar Los Altavoces En La Pared
Cuelgue cada altavoz por los orificios en los tornillos que sobresalen. ■ Instalar el altavoz central sobre el soporte Yamaha YTS-F500/YTS-T500 TV Puede utilizar los orificios [diámetro: 6 mm , profundidad del orificio: 16 mm] que encontrará en la parte trasera de esta unidad para instalar el altavoz en el YTS-F500/YTS-T500. -
Page 24: Conectar Los Altavoces
Altavoces Surround Altavoces Surround traseros amplificador. (NS-PA150 solamente) ■ Preparar los cables del altavoz Una vez haya situado los altavoces, necesitará preparar Notas los cables para conectar los altavoces. • No ate ni enrolle los cables excesivamente. - Page 25 Especificaciones ■ Utilizar los terminales del altavoz Aflojar Gire el terminal del altavoz en dirección contraria a las agujas del reloj para aflojarlo. Apretar Inserte el cable pelado. Gire el terminal del altavoz en dirección de las agujas del reloj para apretarlo.
-
Page 26: Меры Предосторожности
Меры предосторожности Прочитайте описание следующих мер предосторожности перед использованием аппарата. Yamaha не несет ответственность за любые повреждения и (или) травмы, вызванные несоблюдением приведенных ниже мер предосторожности. 1. Для обеспечения наилучшего результата, Информация для пользователей по сбору и пожалуйста, внимательно изучите данную... - Page 27 Схема подключения ...........4 Установка колонок ...........2 Технические характеристики ....... 5 Установка центральной колонки ....2 Крепление колонок на стену......3 Содержимое упаковки Убедитесь в том, что в состав комплекта входят следующие изделия. Комплектация NS-PA150 NS-P150 Содержимое Центральная колонка (NS-C150) Колонка объемного звучания (NS-B150) 4 м...
-
Page 28: Установка Колонок
объемного NS-B150 звучания звучания • (только для NS-PA150) NS-B150 NS-B150 * Установите две центральные колонки (имеются в продаже) слева и справа от телевизора, лицевой стороной к слушателю. ** Установите левую и правую колонки объемного звучания позади слушателя, немного повернув их внутрь. - Page 29 Повесьте каждую колонку шпоночным пазом на выступающий винт. ■ Установка центральной колонки на тумбу для телевизора Yamaha YTS-F500/YTS-T500 Чтобы установить колонки на тумбу YTS-F500/YTS-T500, можно воспользоваться расположенными на задней стороне колонки отверстиями под винты (диаметр 6 мм, глубина 16 мм). Более подробная информация по установке приведена...
-
Page 30: Подключение Колонок
Правая сторона Левая сторона колонок зависит от используемого усилителя. Колонки объемного Задняя объемного звучания звучания (только для NS-PA150) ■ Подготовка кабелей колонок Разместив колонки в местах установки, Примечания подготовьте кабели для подключения колонок. • Не связывайте и не сматывайте лишний кабель. -
Page 31: Подключение К Усилителю
Технические характеристики ■ Работа с клеммами колонок Ослабьте зажим клеммы, вращая ее против часовой стрелки. Ослабить Вставьте оголенный конец кабеля в клемму. Завинтить Чтобы зажать клемму, вращайте ее по часовой стрелке. Проверьте надежность подключения, слегка потянув за кабель. Отрицательный (–) Положительный... - Page 32 Yamaha’s discretion, without any charge for parts or labour. Yamaha reserves the right to replace a product with that of a similar kind and/or value and condition, where a model has been discontinued or is considered uneconomic to repair.
- Page 33 Yamaha se compromete, sujeto a las condiciones listadas más abajo, a reparar el producto o cualquier pieza (o piezas) que tenga defectos, o a sustituirlo, a discreción de Yamaha, sin cobrar ningún honorario por las piezas o la mano de obra.
- Page 36 Printed in Indonesia WY43660 © 2011 Yamaha Corporation...