Table des Matières

Publicité

Les langues disponibles
  • FR

Les langues disponibles

  • FRANÇAIS, page 33

Liens rapides

130*150mm
Kat. Nr. 35.1144.IT
DRAHTLOSE 868 MHz WETTERSTATION
WIRELESS 868 MHz WEATHER STATION
STATION METEO SANS FIL 868 MHz
DRAADLOOS 868 MHz WEERSTATION
STAZIONE METEOROLOGICA WIRELESS A 868 MHz
ESTACIÓN METEOROLÓGICA INALÁMBRICA DE 868MHZ
Betriebsanleitung
Instruction manual
Mode d'emploi
Mode d'emploi
Gebruiksaanwijzing
Istruzioni per l'uso
Manual de instrucciones

Publicité

Table des Matières
loading

Sommaire des Matières pour iT+ TFA 35.1144.01.IT

  • Page 1 130*150mm Kat. Nr. 35.1144.IT DRAHTLOSE 868 MHz WETTERSTATION WIRELESS 868 MHz WEATHER STATION STATION METEO SANS FIL 868 MHz DRAADLOOS 868 MHz WEERSTATION STAZIONE METEOROLOGICA WIRELESS A 868 MHz ESTACIÓN METEOROLÓGICA INALÁMBRICA DE 868MHZ Betriebsanleitung Instruction manual Mode d’emploi Mode d’emploi Gebruiksaanwijzing Istruzioni per l'uso Manual de instrucciones...
  • Page 2: Bevor Sie Mit Dem Gerät Arbeiten

    DRAHTLOSE 868 MHZ-WETTERSTATION Betriebsanleitung Kat. Nr. 35.1144.01.IT Vielen Dank, dass Sie sich für diese Funk-Wetterstation aus dem Hause TFA entschieden haben. BEVOR SIE MIT DEM GERÄT ARBEITEN Lesen Sie sich bitte die Bedienungsanleitung genau durch. So werden Sie mit Ihrem neuen Gerät vertraut, lernen alle Funktionen und Bestandteile kennen, erfahren wichtige Details für die Inbetriebnahme und den Umgang mit dem Gerät und erhalten Tipps für den Störungsfall.
  • Page 3: Zu Ihrer Sicherheit

    ZU IHRER SICHERHEIT:  Das Produkt ist ausschließlich für den oben beschriebenen Einsatzbereich geeignet. Verwenden Sie das Produkt nicht anders, als in dieser Anleitung dargestellt wird.  Das eigenmächtige Reparieren, Umbauen oder Verändern des Gerätes ist nicht gestattet. Vorsicht! Verletzungsgefahr: ...
  • Page 4 EINLEGEN UND ERSETZEN DER BATTERIEN IM THERMO-HYGRO-AUSSENSENDER Der Außensender arbeitet mit 2 x 1,5 V-Batterien vom Typ Micro AAA, IEC LR3. Wird ein Batterietausch nötig, so erscheint auf dem LCD des Senders ein Batteriesymbol als Batterietiefstandsanzeige. Zur Installation oder zum Austausch dieser Batterien folgen Sie bitte den Schritten unten: Entfernen Sie den Batteriefachdeckel.
  • Page 5 FUNKTIONSTASTEN: Wetterstation Die Wetterstation verfügt über fünf einfach bedienbare Funktionstasten: SET-Taste (Einstellung)  Drücken und halten Sie die Taste zum Eintritt in die Einstellmodi für folgende Funktionen: LCD- Kontrast, Sommer-/Winterzeit, Referenzeinstellung des relativen Luftdrucks, manuelle Zeit- und Kalendereinstellung  Beendigung des Weckalarms ...
  • Page 6: Lcd-Bildschirm

    LCD-BILDSCHIRM Sommerzeitanzeige Zeit Wochentag Alarm-Symbol Raumtemperatur in °C Raumluftfeuchtigkeit in RH% Kalender Mondphasenanzeige Sonnenuntergangszeit Sonnenaufgangszeit Wettervorhersage- Balkengrafik der Symbol Relativen Luftdruckstatistik Wettertendenz- anzeige Luftdruck Batterietiefstands- (relativ/absolut) anzeige Batterietiefstands- (Wetterstation) anzeige Außentemperatur (Außensender) in °C Außenempfangs- signal MIN/MAX Außentemperatur Außenluftfeuchtigkeit in RH% * Wird das Sendesignal des Außensenders von der Wetterstation erfolgreich empfangen, so wird das Außensignal-Empfangssymbol eingeschaltet (bei Fehlempfang erscheint kein Symbol auf dem LCD).
  • Page 7: Einstellung Des Lcd-Kontrasts

    Drücken und halten Sie die SET-Taste für etwa 3 Sekunden zum Eintritt in den manuellen Einstellmodus: EINSTELLUNG DES LCD-KONTRASTS blinkend Der LCD-Kontrast kann nach den Ansprüchen des Anwenders in 8 Stufen eingestellt werden (Voreinstellung LCD 3). Einstellung wie folgt: Die obige Darstellung kommt zur Anzeige. Drücken Sie die + -Taste zur Einstellung der gewünschten Kontraststufe.
  • Page 8 Drücken Sie zum Eintritt in die „Kalendereinstellung“ die SET-Taste oder verlassen Sie den Einstellmodus durch Drücken der ALARM- oder der SUN-Taste. KALENDEREINSTELLUNG Wochentag Jahr (blinkend) Datum. Monat. Die Jahresstellen blinken. Stellen Sie mit der + -Taste das gewünschte Jahr ein. Benutzen Sie die MIN/MAX-Taste zur Verminderung der Werte.
  • Page 9 EINSTELLUNG DES ORTS FÜR DIE SONNENAUFGANGS- UND -UNTERGANGSZEIT In Abhängigkeit der Örtlichkeit, des Datums, der Zeit und der Einstellung von Sommer-/Winterzeit (DST) wird die Sonnenaufgangs- und -untergangszeit bzw. die Sonnenscheindauer täglich automatisch um 00:00 Uhr auf den aktuellen Stand gebracht. Drücken und halten Sie zum Eintritt in den Orts-Einstellmodus für 3 Sekunden die SUN-Taste.
  • Page 10: Einstellung Des Weckzeitalarms

    ANZEIGE DER TAGESLÄNGE TAGESLÄNGE Drücken Sie im normalen Anzeigemodus zur Anzeige der (Gesamtstunden der Sonnenlichtdauer des Tages) zwei Mal die SUN-Taste. Durch einmaliges weiteres Drücken der SUN-Taste wird die gewählte Stadt angezeigt (siehe “EINSTELLUNG DES ORTS FÜR DIE SONNENAUFGANGS- und -UNTERGANGSZEIT”). Drücken Sie zur Rückkehr in den normalen Anzeigemodus ein weiteres Mal die SUN-Taste.
  • Page 11 Bei plötzlichen oder größeren Schwankungen des Luftdrucks werden die Anzeigesymbole aktualisiert, um die Wetterveränderung anzuzeigen. Ändern sich die Anzeigesymbole nicht, dann hat sich entweder der Luftdruck nicht verändert oder die Veränderung ist so langsam eingetreten, dass sie von der Wetterstation nicht registriert werden konnte.
  • Page 12 LUFTDRUCKSTATISTIK (ELEKTRONISCHES BAROMETER MIT TRENDANZEIGE DES BAROMETRISCHEN DRUCKES) Die rechte Seite der zweiten Sektion des LCD-Bildschirms zeigt die Balkengrafik der Luftdruckhistorie. Luftdruckverlauf über die letzten 12 Stunden Die Balkengrafik zeigt den statistischen Luftdruckverlauf über die letzten 12 Stunden in 5 Schritten zum Zeitpunkt 0h, -3h, -6h, -9h und -12h an.
  • Page 13 RAUMTEMPERATUR-/RAUMLUFTFEUCHTIGKEITSDATEN Die Raumtemperatur- und Raumluftfeuchtigkeitsdaten werden automatisch aktualisiert und in der ersten Sektion des LCD-Bildschirms angezeigt. Raumtemperatur Relative Raumluft- in ºC feuchtigkeit in RH% AUSSENTEMPERATUR-/AUSSENLUFTFEUCHTIGKEITSDATEN Die unterste Sektion des LCD-Bildschirms zeigt die Außentemperatur und Außenluftfeuchtigkeit sowie das Empfangssymbol für die Außenbereichsdaten. Relative Außenluftfeuchtigkeit in RH%...
  • Page 14 MONDPHASENSYMBOL Die Darstellung zeigt in 8 Symbolen die verschiedenen Mondphasen an. Die aktuelle Mondphase wird in Abhängigkeit des eingestellten Kalenderdatums mittels eines Balkensegments gekennzeichnet. Anzeigebalken (kennzeichnet aktuelle Zunehm. Voll- Abn. Abnehm. Zun. Abn. Zun. Neumond Mondphase) Mond mond Halb- Mond Halb- Drei- Drei-...
  • Page 15: Platzierung Der Wetterstation

    PLATZIERUNG DER WETTERSTATION: Die Wetterstation bietet die Option von Tischaufstellung oder Wandmontage. Bitte stellen Sie vor der Wandmontage sicher, dass die Außenbereichsdaten an der gewünschten Montagestelle korrekt empfangen werden können. Wandmontage wie folgt: Schraube (nicht im Lieferumfang) an der gewünschten Stelle in die Wand drehen. Dabei den Schraubenkopf etwa 5 mm von der Wand abstehen lassen.
  • Page 16: Pflege Und Wartung

    PFLEGE UND WARTUNG  Reinigen Sie das Gerät und den Sender mit einem weichen, leicht feuchten Tuch. Keine Scheuer- oder Lösungsmittel verwenden! Vor Feuchtigkeit schützen.  Entfernen Sie die Batterien, wenn Sie das Gerät längere Zeit nicht verwenden. FEHLERBESEITIGUNG Problem Lösungen ...
  • Page 17 1% bis 99% mit 1% Auflösung (Anzeige “- -” bei Temperatur im Überlauf Außenluftfeuchtigkeitsbereich : (OF.L); Anzeige 1% bei < 1% und 99% bei > 99%) Prüf- und Empfangsintervalle: Innenraum alle 16 Sekunden Außenbereich alle 4 Sekunden Luftdruck-Prüfintervall alle 1 Minuten Übertragungsfrequenz 868 MHz Maximale Sendeleistung...
  • Page 18: Scope Of Supply

    WIRELESS 868 MHz WEATHER STATION Instruction manual Cat. No. 35.1144.01.IT Thank you for choosing this instrument from TFA. BEFORE YOU USE IT Please be sure to read the instruction manual carefully. This information will help you to familiarise yourself with your new device, learn all of its functions and parts, find out important details about its first use and how to operate it and get advice in the event of faults.
  • Page 19: For Your Safety

    FOR YOUR SAFETY:  The product is exclusively intended for the field of application described above. The product should only be used as described within these instructions.  Unauthorised repairs, modifications or changes to the product are prohibited. Caution! Risk of injury: ...
  • Page 20 TO INSTALL AND REPLACE BATTERIES IN THE THERMO-HYGRO TRANSMITTER The outdoor thermo-hygro transmitter uses 2 x AAA, IEC LR3, 1.5V batteries. When the batteries need to be replaced, the low battery symbol will appear on the LCD of the outdoor transmitter. To install and replace the batteries, please follow the steps below: Remove the cover.
  • Page 21: Function Buttons

    FUNCTION BUTTONS Weather station: The weather station has five easy to use function buttons: SET button  Press and hold for 3 seconds to enter manual setting modes: LCD contrast, Daylight Saving Time ON/OFF, manual time, calendar and relative air pressure reference value ...
  • Page 22: Lcd Screen

    LCD SCREEN Summer time indicator Time Weekday Alarm icon Indoor temperature in Indoor humidity °C display in RH% Moon phase Calendar indicator Sunset time Sunrise time Weather Air pressure forecast icon history bar graph Weather tendency indicator Air pressure in hPa (relative or absolute) Low battery indicator (station)
  • Page 23: Lcd Contrast Setting

    LCD CONTRAST SETTING The LCD contrast can be set within 8 levels, from LCD 0 to LCD 7 (Default Digit flashing is LCD 3): The digit starts flashing Press the + button or MIN/MAX button to set the level of contrast desired. Press the SET button to enter the “Daylight saving time On/Off setting,”...
  • Page 24: Calendar Setting

    CALENDAR SETTING Weekday Year (flashing) Day. Month. The year digits will start flashing. Use the + button to increase or MIN/MAX button to decrease the value. The range runs from 2011 to 2025. Press the SET button to enter the month setting mode. The month digit will be flashing.
  • Page 25 Press and hold the SUN button for 3 seconds to enter the Location setting mode. The short form of country name will start flashing. Use the + button or MIN/MAX button to select the country. country code (flashing) Note: It can be chosen from among 26 European countries and 150 cities. Every country/city is displayed in short code.
  • Page 26: Alarm Setting

    ALARM SETTING Alarm time (flashing) Alarm On indicator To set the daily alarm: Press the ALARM button. ALM and the alarm time appear in the display. Press and hold ALARM button. The hour digits are flashing. Set the hour with the + or MAX/MIN button.
  • Page 27: Weather Tendency Indicator

    Common to weather forecasting, absolute accuracy cannot be guaranteed. The weather forecasting feature is estimated to have an accuracy level of about 75% due to the varying areas the weather station has been designed for use. In areas that experience sudden changes in weather (for example from sunny to rain), the weather station will be more accurate compared to use in areas where the weather is stagnant most of the time (for example mostly sunny).
  • Page 28: Absolute/Relative Air Pressure

    ABSOLUTE/RELATIVE AIR PRESSURE Press the SET button to toggle between relative (“rel”) and absolute (“abs”) air pressure displays. Absolute air pressure display Note: Absolute pressure is the actual atmospheric pressure measured by the main unit. Relative pressure is referred as sea level’s pressure and has to be adjusted first to your local altitude (see “Relative air pressure reference value setting).
  • Page 29 RESETTING THE MAXIMUM/MINIMUM RECORDS In normal display mode, press and hold the MIN/MAX button for 3 seconds. This will reset ALL minimum and maximum temperature records to current temperatures. THE MOON PHASE ICONS The weather station displays 8 different moon phase icons. The current moon phase is indicated with a bar segment according to the set calendar.
  • Page 30: Care And Maintenance

    POSITIONING THE WEATHER STATION: The weather station provides the option of table standing or wall mounting. Before wall mounting, please check that the outdoor data can be received from the desired locations. To wall mount: Fix a screw (not supplied) into the desired wall, leaving the head extended out by about 5mm.
  • Page 31: Waste Disposal

    TROUBLESHOOTING Problems Solutions  No indication on the Ensure batteries polarity are correct  weather station or Change batteries transmitter  No transmitter reception Check batteries of external transmitter (do not use rechargeable Display "---" batteries!)  Restart the transmitter and weather station as per the manual ...
  • Page 32 Maximum radio-frequency power : < 25mW Power consumption (Alkaline batteries recommended): Weather station 2 x C, IEC, LR14, 1.5V Battery life Approx. 24 months Thermo-hygro transmitter 2 x AAA, IEC, LR3, 1.5V Battery life Approx. 12 months Dimensions (L x W x H) Weather station 184 x 40 x 188 mm Thermo-hygro transmitter...
  • Page 33: Station Météo Sans Fil 868 Mhz

    STATION MÉTÉO SANS FIL 868 MHz Mode d'emploi Cat. No. 35.1144.01.IT Nous vous remercions d'avoir choisi la station météo radio-pilotée TFA. Avant d'utiliser l'appareil Lisez attentivement le mode d'emploi. Pour vous familiariser avec votre nouvel appareil, découvrez les fonctions et composants, notez les détails importants relatifs à...
  • Page 34: Pour Votre Sécurité

    POUR VOTRE SÉCURITÉ:  L'appareil est uniquement destiné à l'utilisation décrite ci-dessus. Ne l'utilisez jamais à d'autres fins que celles décrites dans le présent mode d'emploi.  Vous ne devez en aucun cas réparer, démonter ou modifier l'appareil par vous-même. Attention! Danger de blessure ...
  • Page 35: Installation Et Remplacement Des Piles Du Transmetteur Thermo- Hygromètre

    INSTALLATION ET REMPLACEMENT DES PILES DU TRANSMETTEUR THERMO- HYGROMÈTRE Le transmetteur thermo-hygro utilise 2 piles AAA, IEC LR3, 1,5V. Lorsque les piles sont usées, le témoin d’usure des piles s'affiche à l'écran LCD. Pour installer ou remplacer les piles, veuillez suivre les étapes ci- dessous : Retirez le couvercle Insérez les piles en respectant la polarité...
  • Page 36: Touches De Fonction

    TOUCHES DE FONCTION : Station météo La station météo dispose de cinq touches de fonction faciles à utiliser. Touche SET (réglages)  Permet d’accéder aux différents réglages des fonctions suivantes : contraste LCD, activation de l'heure d'été (DST), réglage manuel de l'heure, de l’année et de la date, pression atmosphérique relative ...
  • Page 37: Écran Lcd

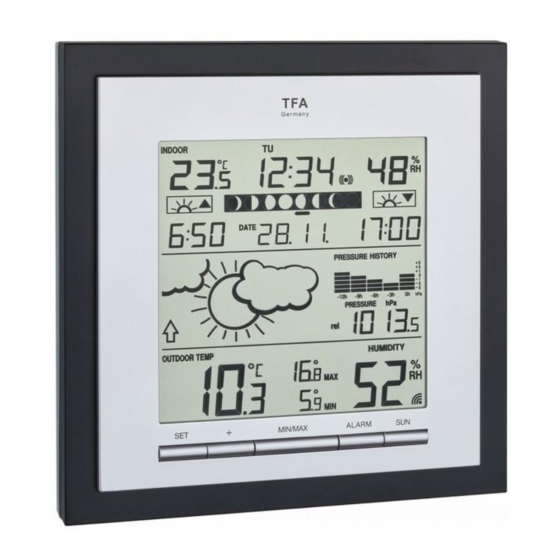
    ÉCRAN LCD: Jour de la Indicateur de l’heure d'été Heure semaine Icône alarme Température Intérieure Affichage de l’humidité en °C ambiante en %HR Indicateur des phases Calendrier lunaires Heure de coucher Heure de lever du soleil du soleil Icône météo Histogramme de pression atmosphérique Indicateur...
  • Page 38: Contraste De L'écran Lcd

    Appuyez sur la touche SET pendant environ 3 secondes pour accéder à ces différents réglages : CONTRASTE DE L’ÉCRAN LCD clignote Huit niveaux de contraste de l'écran LCD sont programmables. Par défaut : niveau LCD 3. Pour régler le niveau du contraste : L'écran ci-dessus s'affiche.
  • Page 39: Valeur De La Pression Atmosphérique Relative

    Appuyez sur la touche SET pour passer au réglage du “Calendrier”, ou fermer le mode “réglage” en appuyant sur la touche ALARM ou sur la touche SUN. CALENDRIER Jour de la semaine Année (clignote) Date. Mois. Après le réglage de l’heure, appuyez sur la touche SET pour passer au réglage du calendrier. L’année va clignoter.
  • Page 40: Sélection Pays/Ville Pour L'heure Du Lever Et Du Coucher Du Soleil

    SÉLECTION PAYS/VILLE POUR L'HEURE DU LEVER ET DU COUCHER DU SOLEIL : La station météo actualise automatiquement la durée du lever et du coucher du soleil à 00h00 en fonction de la ville, de la date, de l'heure et des réglages DST. Appuyez sur la touche SUN pendant 3 secondes pour accéder à...
  • Page 41: L'affichage De La Durée Du Jour

    L'AFFICHAGE DE LA DURÉE DU JOUR : A partir de l’affichage principal de la date, appuyez sur la touche SUN deux fois pour afficher la durée du jour(le nombre total d'heures de soleil de la journée). Appuyez sur la touche SUN encore une fois pour afficher la ville sélectionnée. (Voir « SELECTION PAYS/VILLE POUR L'HEURE DE LEVER ET DE COUCHER DU SOLEIL ») Appuyez de nouveau sur la touche SUN pour revenir à...
  • Page 42: Indicateur De Tendance

    A chaque changement brusque ou conséquent de la pression atmosphérique, les icônes seront mises à jour pour refléter le changement des conditions météo. Si les icônes ne changent pas, cela indique soit que la pression atmosphérique n'a pas changé soit que le changement a été trop lent pour être pris en compte par la station météo.
  • Page 43: Historique De La Pression Atmosphérique (Baromètre Électronique Avec Tendance De Pression Barométrique)

    HISTORIQUE DE LA PRESSION ATMOSPHÉRIQUE (BAROMÈTRE ÉLECTRONIQUE AVEC TENDANCE DE PRESSION BAROMÉTRIQUE) : La section de droite de la deuxième section du LCD montre le graphique à barres de l’historique de la pression atmosphérique Tendance de la pression atmosphérique des 12 dernières heures L'histogramme représente l'historique de la tendance de la pression atmosphérique des dernières 12 heures en 5 étapes : 0h, -3h, -6h, -9h, et -12h.
  • Page 44: Affichage De La Température/Humidité Ambiantes

    AFFICHAGE DE LA TEMPÉRATURE/HUMIDITÉ AMBIANTES La température et l’humidité ambiantes sont mesurées automatiquement et affichées dans la première section de l'écran LCD. Température Humidité ambiante ambiante en °C en HR% AFFICHAGE DE LA TEMPÉRATURE/HUMIDITÉ EXTÉRIEURES La dernière section de l'écran LCD affiche la température et l’humidité extérieures et un symbole de réception.
  • Page 45: Phases De La Lune

    PHASES DE LA LUNE : La station météo affiche 8 pictogrammes des différentes phases lunaires. La phase lunaire actuelle est indiquée par une barre sous le pictogramme. Gibbeuse décroissante Dernier Dernier Premier Premier Pleine Nouvelle Gibbeuse quartier croissant croissant quartier lune Lune croissante...
  • Page 46: Positionnement De La Station Météo

    POSITIONNEMENT DE LA STATION MÉTÉO : La station météo peut être positionnée sur socle ou fixée au mur. Avant de procéder à une fixation murale, vérifiez que les données extérieures peuvent être reçues depuis les emplacements sélectionnés. Fixation murale : Vissez une vis (non-fournie) dans le mur choisi, en laissant dépasser la tête d'environ 5 mm.
  • Page 47: Entretien Et Maintenance

    ENTRETIEN ET MAINTENANCE  Pour le nettoyage de l'appareil et de l'émetteur, utilisez un chiffon doux humide. N’utilisez pas de dissolvants ou d´agents abrasifs! Protégez-le contre l'humidité.  Enlevez les piles, si vous n'utilisez pas l'appareil pendant une période prolongée. DÉPANNAGE Problème Résolution...
  • Page 48 1% à 99% à 1% près (Affiche “- -” si la température extérieure est en-dehors de ce rayon; Extérieur affiche “1%” si < 1% et “99%” si > 99%) Intervalle de relevé des données : Intérieur (température/humidité) toutes les 16 secondes Extérieur (température/humidité) toutes les 4 secondes Intervalle de relève de la pression atmosphérique...
  • Page 49 DRAADLOOS 868 MHz WEERSTATION Gebruiksaanwijzing Cat. No. 35.1144.01.IT Hartelijk dank dat u voor dit radiografische weerstation van de firma TFA hebt gekozen. Voor u met het apparaat gaat werken, leest u a.u.b. de gebruiksaanwijzing aandachtig door. Zo raakt u vertrouwd met uw nieuw apparaat en leert u alle functies en onderdelen kennen, komt u belangrijke details te weten met het oog op het in bedrijf nemen van het apparaat en de omgang ermee en krijgt u tips voor het geval van een storing.
  • Page 50: Voor Uw Veiligheid

    VOOR UW VEILIGHEID:  Het product is uitsluitend geschikt voor de hierboven beschreven doeleinden. Gebruik het product niet anders dan in deze handleiding is aangegeven.  Het eigenmachtig repareren, verbouwen of veranderen van het apparaat is niet toegestaan. Opgelet! Letselgevaar: ...
  • Page 51 PLAATSEN EN VERVANGEN VAN BATTERIJEN IN DE THERMOHYGROZENDER De thermohygro-buitenzender werkt op 2 x AAA, IEC, LR3, 1.5V batterijen. Als de batterijen aan vervanging toe zijn verschijnt het batterijsymbool op het scherm. Volg onderstaande stappen om de batterijen te plaatsen of te vervangen: Open het batterijvakje door met de duim het deksel van het batterijvakje naar boven te schuiven.
  • Page 52: Functietoetsen

    FUNCTIETOETSEN: Weerstation Het weerstation heeft vijf praktische functietoetsen: SET-toets (Instellen)  Voor betreden van de regelstand voor volgende functies: schermcontrast, zomertijd (DST) functie, regelstand relatieve luchtdruk, handbediend instellen, jaar, datum  Alarm uitschakelen  Om de alarminstelmodus en de instelmodus voor land/stad te verlaten ...
  • Page 53 LCD-SCHERM: Zomertijd-indicator Tijd Weekdag Alarm-pictogram Binnentemperatuur Weergave in °C binnenvochtigheid in RV% Kalender Maanfase-indicator Tijdstip Tijdstip zonsondergang zonsopgang Pictogram Staafdiagram met weervoorspelling verlo op van de Weervoorspelling relatieve luchtdruk Luchtdruk (relatieve Pictogram batterij of absolute) indicator van Pictogram batterij indicator ontvanger (buitenzender) Buitentemperatuur...
  • Page 54 Houd de SET-toets ongeveer 3 seconden ingedrukt om verder te gaan naar de regelstand: REGELSTAND SCHERMCONTRAST knippert Het schermcontrast kan naar wens ingesteld worden op één van 8 mogelijke standen (standaard contrastwaarde is LCD 3). Stel het gewenste contrastniveau als volgt in: Bovenstaand scherm verschijnt.
  • Page 55 REGELSTAND KALENDER weekdag Jaar (knipperen) Datum. Maand. Het jaartal knippert. Het jaartal gaat knipperen. Stel met de toets + het gewenste jaar in. Gebruik de MIN/MAX-toets om de waarde te verlagen. Het bereik loopt van 2011 t/m 2025. Druk de SET-toets in om verder te gaan naar de regelstand van de maand. De cijfers van de maand gaan knipperen.
  • Page 56 INSTELLING VAN DE LOCATIE VOOR TIJDSTIP-WEERGAVE VAN ZONSOPGANG/ZONSONDERGANG: Afhankelijk van de locatie, datum, tijd, de tijd van zonsopgang en zonsondergang wordt de dagelijkse duur van de zonneschijn automatisch om middernacht op de actuele stand gebracht. Houd de SUN-toets gedurende 3 seconden ingedrukt om naar de locatie-instelmodus te gaan. De verkorte naam van het land begint te knipperen.
  • Page 57 WEERGAVE VAN HET DAGLENGTE: Druk, in de normale datummodus, de SUN-toets twee keer in om het daglengte (totaal aantal uren zonlicht per dag) weer te geven. Druk nogmaals op de SUN-toets om de geselecteerde stad weer te geven. (Zie "INSTELLING VAN DE LOCATIE VOOR DE TIJDSTIPWEERGAVE VAN HET TIJDSTIP VAN ZONSOPGANG/ZONSONDERGANG") Druk nogmaals op de SUN-toets om terug te gaan naar de normale datumweergave.
  • Page 58 Bij elke plotselinge of aanzienlijke luchtdrukverandering wijzigen de weersymbooltjes overeenkomstig de weersverandering. Als de weerplaatjes niet veranderen betekent dit dat de luchtdruk niet veranderd is, of dat de wijziging te traag is geweest om door het weerstation te kunnen worden geregistreerd. Als het vertoonde weersymbooltje een zon of regenwolk is, zal het niet veranderen als het weer beter (zonnetje) of slechter (regenwolkje) wordt, omdat de weersymbooltjes dan reeds in hun uiterste positie staan.
  • Page 59 LUCHTDRUKVERLOOP (ELECTRONISCHE BAROMETER): Het rechterdeel van het tweede deel van het LCD-scherm geeft het verloop van de luchtdruk weer in een staafdiagram. Luchtdrukverloop van de afgelopen 12 Het staafdiagram geeft een indicatie van het luchtdrukverloop van de afgelopen 12 uur in 5 stappen: 0u, -3u, -6u, -9u en –12u.
  • Page 60 BINNENTEMPERATUUR/ RELATIEVE BINNENVOCHTIGHEID De binnentemperatuur en vochtigheid worden automatisch geactualiseerd en weergegeven op het eerste deel van het LCD-scherm. Binnentemperatuur Relatieve binnen- in °C vochtigheid in RH% BUITENTEMPERATUUR/ RELATIEVE BUITENVOCHTIGHEID Het laatste deel van het scherm geeft de buitentemperatuur en buitenvochtigheid weer, en alsmede de ontvangstindicator.
  • Page 61: Batterij-Indicator

    DE MAANFASE: Het weerstation geeft 8 verschillende maanfase-pictogrammen weer. De huidige maanstand wordt aangegeven met een streepje volgens de ingestelde kalender. Nieuwe Volle Laatste Wassende Wassende maan Maan kwartier maan maansikkel Afnemende Eerste Afnemende maan kwartier maansikkell Een streepje geeft de huidige maanstand aan BATTERIJ-INDICATOR: Als het tijd wordt de batterijen te vervangen wordt de batterij-indicator op het scherm weergegeven.
  • Page 62 POSITIONEREN VAN HET WEERSTATION: Het weerstation kan aan de muur worden opgehangen of op tafel worden opgesteld. Ophangen aan de muur: Draai een schroef (niet meegeleverd) in de muur en laat de kop ongeveer 5mm uitsteken. Hang het weerstation op aan de schroef via het gaatje in de achterkant. Trek het weerstation voorzichtig naar beneden op de schroef.
  • Page 63: Schoonmaken En Onderhoud

    SCHOONMAKEN EN ONDERHOUD  Maak het apparaat en de voeler met een zachte, enigszins vochtige doek schoon. Geen schuur- of oplosmiddelen gebruiken! Tegen vocht beschermen.  Verwijder de batterijen, als u het apparaat langere tijd niet gebruikt. STORINGSWIJZER Probleem Oplossing ...
  • Page 64 Bereik buitenvochtigheid : 1% t/m 99% met 1% resolutie (“- -” wordt weergegeven als buitentemperatuur buiten weergavebereik ligt; 1% wordt weegegeven indien < 1% en 99% indien > 99%) Meetinterval gegevens Binnen Elke 16 seconden Buiten Elke 4 seconden Meetinterval luchtdruk Elke minuut Zendbereik Maximaal 100 meter (vrije veld)
  • Page 65: Prima Di Utilizzare L'apparecchio

    STAZIONE METEOROLOGICA WIRELESS A 868 MHz Istruzioni per l'uso Cat. No. 35.1144.01.IT Vi ringraziamo per aver scelto la stazione radiocontrollata della TFA. PRIMA DI UTILIZZARE L'APPARECCHIO leggete attentamente le istruzioni per l'uso. Avrete così modo di familiarizzare con il vostro nuovo apparecchio, di scoprire tutte le funzioni e le componenti, di apprendere importanti dettagli sulla sua messa in funzione, di acquisire dimestichezza nel suo utilizzo e di usufruire di alcuni validi consigli da seguire in caso di guasti.
  • Page 66 PER LA VOSTRA SICUREZZA:  Il prodotto è adatto esclusivamente agli utilizzi di cui sopra. Non utilizzate il prodotto in maniera diversa da quanto descritto in queste istruzioni.  Non sono consentite riparazioni, alterazioni o modifiche non autorizzate dell'apparecchio. Avvertenza! Pericolo di lesioni: ...
  • Page 67: Per Installare E Sostituire Le Batterie Nel Trasmettitore Igrotermico

    lla luce del sole PER INSTALLARE E SOSTITUIRE LE BATTERIE NEL TRASMETTITORE IGROTERMICO Il trasmettitore igrotermico esterno usa 2 batterie tipo AAA IEC LR3, da 1,5V. Quando le batterie sono scariche e devono essere sostituite, un simbolo appare sul display a cristalli liquidi LCD del trasmettitore. Per installare e sostituire le batterie, seguire i passaggi descritti qui di seguito.
  • Page 68: Tasti Di Funzione

    TASTI DI FUNZIONE Stazione meteorologica La stazione meteorologica dispone di cinque tasti facili da usare. Tasto SET (impostazione)  Per entrare nella modalità impostazione per le seguenti funzioni: contrasto del display LCD, dell'ora legale (DST), impostazione dell'ora manuale, calendario, valore della pressione relativa ...
  • Page 69: Schermo Lcd

    SCHERMO LCD Giorno della Indicatore dell'ora legale settimana Icona dell'allarme Temperatura Visualizzazione interna dell'umidità in °C interna in RH% Indicatore delle Calendario fasi lunari Ora del tramonto Ora dell'alba Icona delle Grafico a barre della previsioni cronologia della del tempo pressione dell'aria Icona delle relativa...
  • Page 70: Impostazione Dell'ora Legale

    IMPOSTAZIONE DEL CONTRASTO DEL DISPLAY A CRISTALLI LIQUIDI LCD Lampeggiante Il contrasto del display a cristalli liquidi LCD può essere impostato su 8 livelli diversi secondo la necessità dell'utente (impostazione del contrasto predefinita del display a cristalli liquidi è LCD 3). Per impostare il livello del contrasto desiderato: si visualizza il display di cui sopra.
  • Page 71 Le digitazioni dei minuti cominciano a lampeggiare. Premere il tasto + per regolare i minuti. Usare il tasto MIN/MAX per diminuire il valore. Premere e rilasciare il tasto SET per entrare nella modalità “Impostazione del calendario”, o uscire dalla modalità impostazione premendo il tasto ALARM key o il tasto SUN. IMPOSTAZIONE DEL CALENDARIO Giorno della settimana Anno (lampeggiante)
  • Page 72 Il valore della pressione relativa attuale inizia a lampeggiare Premere il tasto + per aumentare il valore, o il tasto MIN/MAX per diminuirlo. Tenere premuto il tasto per far avanzare le digitazioni velocemente Premere e rilasciare il tasto SET per uscire dalla modalità impostazione e tornare al display normale. IMPOSTAZIONE DELL'UBICAZIONE PER L'ORA DELL'ALBA/DEL TRAMONTO L’ora dell’alba, del tramonto e della durata del dì...
  • Page 73: Impostazione Dell'allarme

    VISUALIZZAZIONE DELLA LUNGHEZZA DEL GIORNO In modo data normale, premere il tasto SUN per visualizzare la lunghezza del giorno (numero totale di ore di luce solare di un giorno). Premere il tasto SUN per visualizzare la città selezionata. (Consultare “IMPOSTAZIONE DELL’UBICAZIONE PER L'ORA DELL'ALBA/DEL TRAMONTO) Premere il tasto SUN di nuovo per tornare a visualizzazione della data normale.
  • Page 74 stazione lo potesse registrare. Ad ogni modo, se l’icona visualizzata è quella del sole o della nuvola con la pioggia, la stazione non cambia la visualizzazione delle icone se il tempo migliora ancora (con l'icona del sole), o peggiora ancora (con l'icona della pioggia), dal momento che le icone del sole e della pioggia rappresentano già...
  • Page 75: Cronologia Della Pressione Dell'aria

    CRONOLOGIA DELLA PRESSIONE DELL'ARIA: La porzione destra della seconda sezione del display a cristalli liquidi LCD visualizza il grafico a barre della cronologia della pressione dell'aria. Pressione dell'aria nelle ultime 12 ore Il grafico a barre indica la tendenza della cronologia della pressione dell'aria nelle ultime 12 ore in 5 intervalli, 0h, -3h, -6h, -9h, and -12h.
  • Page 76: Dati Relativi All'umidità/Alla Temperatura Interna

    DATI RELATIVI ALL'UMIDITÀ/ALLA TEMPERATURA INTERNA I dati relativi alla temperatura e all'umidità interna sono automaticamente aggiornati e visualizzati sulla prima sezione del display a cristalli liquidi LCD. Temperatura Umidità relativa interna in °C interna in RH% DATI RELATIVI ALL'UMIDITÀ/ALLA TEMPERATURA ESTERNA L'ultima sezione LCD mostra la temperatura esterna e l’umidità, e l'indicatore di ricezione.
  • Page 77 SIMBOLI DELLE FASI LUNARI La figura mostra in 8 simboli diverse delle fasi lunari. La fase lunare attuale è indicata con un segmento a barre, secondo il calendario impostato. Luna piena Primo Gibboso Gibboso Ultimo Quarto Luna Quarto crescente quarto calante quarto calante...
  • Page 78 SISTEMAZIONE DELLA STAZIONE METEOROLOGICA La stazione meteorologica può essere facilmente appesa a una parete o montata su un piano d'appoggio. Per eseguire il montaggio a muro: Prima di effettuare il montaggio a muro, controllare che i dati della temperatura e umidità esterna possano essere ricevuti dalle posizioni desiderate.
  • Page 79: Cura E Manutenzione

    CURA E MANUTENZIONE  Per pulire l'apparecchio e il trasmettitore utilizzate solo un panno morbido leggermente inumidito. Non usate solventi o abrasivi. Proteggere dall’umidità.  Rimuovete le batterie se non utilizzate l’apparecchio per un periodo prolungato. GUASTI Problema Risoluzione del problema ...
  • Page 80 Intervalli di misurazione dei dati relativi alle misurazioni Interna ogni 16 secondi Esterna ogni 4 secondi Pressione atmosferica ogni minuto Raggio di trasmissione fino a 100 metri (in spazi aperti) Frequenza di trasmissione 868 MHz Massima potenza a radiofrequenza trasmessa <...
  • Page 81: Antes De Utilizar El Dispositivo

    ESTACIÓN METEOROLÓGICA INALÁMBRICA DE 868MHz Manual de Instrucciones Cat. No. 35.1144.IT Muchas gracias por haber adquirido esta estación meteorológica inalámbrica de TFA. ANTES DE UTILIZAR EL DISPOSITIVO Por favor, lea detenidamente las instrucciones de uso. De este modo se familiarizará con su nuevo dispositivo, conocerá todas las funciones y componentes, así como información relevante para la puesta en funcionamiento y el manejo del dispositivo y reciba consejos sobre cómo actuar en caso de avería.
  • Page 82 PARA SU SEGURIDAD:  El producto solo es adecuado para los ámbitos de utilización descritos anteriormente. No emplee el dispositivo de modo distinto al especificado en estas instrucciones.  No está permitido realizar por cuenta propia reparaciones, transformaciones o modificaciones por cuenta propia en el dispositivo.
  • Page 83: Puesta En Funcionamiento

    CÓMO INSTALAR Y SUSTITUIR LAS PILAS EN EL TRANSMISOR TERMO-HIGRO El transmisor termo-higro utiliza 2 pilas AAA, IEC LR3, 1.5V. Cuando las pilas necesiten ser cambiadas, el símbolo de las pilas bajas aparecerá en la pantalla del transmisor. Para instalar y cambiar las pilas, siga por favor los pasos siguientes: Abra el compartimento de las pilas empujando hacia arriba la tapa del compartimento con el pulgar.
  • Page 84: Teclas De Funcionamiento

    TECLAS DE FUNCIONAMIENTO: Estación meteorológica La estación meteorológica tiene 5 teclas de funcionamiento fáciles de utilizar: Tecla SET (Ajuste)  Mantenga pulsada la tecla para entrar en el modo manual de las siguientes funciones: contraste de la pantalla LCD, horario de verano e invierno, referencia del ajuste del valor de presión relativa, ajuste manual de la hora y del calendario ...
  • Page 85: Pantalla Lcd

    PANTALLA LCD Indicador de Día de la horario de verano semana Hora Icono de la alarma Temperatura Humedad en interiores en %RH Interior en °C Calendario Indicador de las Hora de puesta fases de la luna Hora de salida del sol del sol Icono pronóstico Gráfico de barras...
  • Page 86: Ajuste Manual De La Hora

     Ajuste de la presión atmosférica relativa Mantenga pulsado la tecla SET durante 3 segundos para entrar en el modo de ajuste manual: AJUSTE DEL NIVEL DE CONSTRASTE DE LA PANTALLA parpadeando El contraste de la pantalla puede ser ajustado en 8 niveles diferentes, para acomodarse a las necesidades del usuario (Preajustado en encendido de contraste de la pantalla está...
  • Page 87 Los minutos estarán parpadeando. Utilice la tecla + para aumentar los minutos o utilice la tecla MIN/MAX para reducir los minutos. Pulse la tecla SET para entrar en el modo de “Ajuste del calendario” o para salir del modo de ajuste pulse la tecla ALARM o la tecla SUN.
  • Page 88 Mantenga pulsada la tecla SUN durante 3 segundos para entrar en el modo de “Ajuste del lugar de ubicación”. Mantenga pulsada la tecla SUN durante 3 segundos para entrar en el modo de “Ajuste del lugar de ubicación”. El nombre abreviado de los países aparecerá parpadeando en la pantalla. Utilice la tecla + o la tecla MIN/MAX para seleccionar el país requerido: Código de los países (parpadeando)
  • Page 89: Ajuste De La Alarma

    VISUALIZACION DEL TIEMPO DE DURACION DEL DÍA En el modo de pantalla normal, pulse dos veces la tecla SUN para ver el tiempo de duración del día (es decir el número total de horas con luz solar durante el día). Pulse la tecla SUN nuevamente y aparecerá...
  • Page 90 no cambiará si el tiempo mejora (icono de tiempo soleado) o empeora (icono de tiempo lluvioso), ya que en este caso los iconos ya se encuentran en sus extremos. Los iconos visualizados representan un pronóstico del tiempo en términos si el tiempo mejorará o empeorará;...
  • Page 91 HISTORIAL DE PRESIÓN ATMOSFÉRICA (BARÓMETRO ELECTRÓNICO CON INDICACIÓN DE TENDENCIA DE PRESIÓN BAROMÉTRICA) La parte derecha de la segunda sección de la pantalla muestra a través de un gráfico de barras el historial de la presión atmosférica. Tendencias de la presión atmosférica durante las últimas 12 horas El gráfico de barras indica la tendencia del historial de presión atmosférica de las últimas 12 horas en 5 pasos: 0h, -3h, -6h, -9h y -12h.
  • Page 92 DATOS TEMPERATURA/HUMEDAD INTERIOR: Los datos de temperatura y humedad interior se actualizan automáticamente y se visualizan en la primera sección de la pantalla LCD. Temperatura interior en °C Humedad relativa interior en HR% DATOS TEMPERATURA/HUMEDAD EXTERIOR La sección inferior de la pantalla LCD muestra la temperatura exterior y humedad, recibido con el símbolo de datos al aire libre.
  • Page 93 SIMBOLOS DE LAS FASES DE LA LUNA La estación meteorológica muestra 8 diferentes iconos con las fases de la luna. La fase actual de la luna es indicada por la barra que aparece debajo del icono correspondiente de acuerdo al calendario fijado. Luna Cuarto Cuarto...
  • Page 94 INSTALACIÓN DE LA ESTACIÓN METEOROLÓGICA La estación meteorológica puede ser colgada en la pared o colocada libremente sobre una superficie plana. Escoja un lugar protegido. Evite que la unidad quede expuesta a la lluvia y sol directo. Para instalar el aparato en una pared: Antes de montar en la pared, por favor asegurase que los datos en exteriores puedan ser recibidos desde la ubicación deseada Fije un tornillo (no incluido) a la pared deseada, dejando que la cabeza del mismo...
  • Page 95: Cuidado Y Mantenimiento

    CUIDADO Y MANTENIMIENTO  Limpie el sensor y la estación básica con un paño suave, ligeramente humedecido. ¡No utilizar ningún medio abrasivo ni disolvente! Proteger de la humedad.  Extraiga las pilas si no va a usar el dispositivo por un largo período de tiempo. AVERÍAS Problema Solución de problemas...
  • Page 96 Margen de medición de la humedad: 20% a 95% con una resolución de 1% (Muestra este símbolo “- -” si la Rango de la humedad Interior : temperatura esta por fuera del intervalo OF.L; muestra 19% si es < 20% y 96% si es >...
  • Page 97 LISTE DER LÄNDER/STÄDTE-CODES LIST OF COUNTRY/CITY CODES LISTE DES CODES PAYS/VILLE LIJST VAN LAND/STADCODES ELENCO DEI CODICI DEI PAESI/DELLE CITTÀ LISTA DE PAÍSES/CÓDIGOS DE LAS CIUDADES AUSTRIA = A GERMANY = D GRAZ = GRZ AACHEN = AC INNSBRUCK = INN BERLIN = B LINZ = LNZ DUESSELDORF = D...
  • Page 98 COPENHAGEN = CPH NICE = NIC ODENSE = ODE ORLEANS = ORL PARIS = PAR SPAIN, ANDORRA = E PERPIGNAN = PER ALICANTE = ALI LILLE = LIL ANDORRA = AND ROUEN = ROU BADAJOZ = BAD STRASBOURG = STR BARCELONA = BAR TOULOUSE = TOU BILBAO = BIL...
  • Page 99 FIRENZE = FIR ROTTERDAM = ROT FOGGIA = FOG GENOVA = GEN PORTUGAL = P LECCE = LEC EVORA = AVO MESSINA = MES COIMBRA = COI MILANO = MIL FARO = FAR NAPOLI = NAP LEIRIA = LEI PALERMO = PAL LISBON = LIS PARMA = PAR PORTO = POR...

Table des Matières