
Manuels Connexes pour Honeywell Home PROA7PLUS Série


Sommaire des Matières pour Honeywell Home PROA7PLUS Série
- Page 1 PROA7PLUS Series Security Systems Systèmes de sécurité Quick User Guide Guide d'utilisation rapide 11:47 AM Disarmed 800-25081C 4/19 Rev. C Ref: PROA7PLUS...
- Page 2 SYSTEM COMPATIBILITY NOTICE Your Honeywell Home security system is designed for use with devices manufactured or approved by Resideo Technologies, Inc., through its subsidiary Ademco Inc. (“Resideo”). Your security system is not designed for use with any device that may be attached to your security system's touchpad or other communicating bus if Resideo has not approved such device for use with your security system.
- Page 3 IMPORTANT SECURITY NOTICE Your wireless key (key fob) is similar to your keys or access card. If lost or stolen, another person can compromise your security system. Immediately notify your Dealer/Installer of a lost or stolen key fob. The Dealer/Installer will then remove the wireless key programming from the security system.
- Page 4 National Fire Protection Association Recommendations on Smoke Detectors With regard to the number and placement of smoke/heat detectors, we subscribe to the recommendations contained in the National Fire Protection Association's National Fire Alarm Code (NFPA 72). Early warning fire detection is best achieved by the installation of fire detection equipment in all rooms and areas of the household as follows: A smoke detector installed outside of each separate sleeping area, in the immediate vicinity of the bedrooms and on each additional story of the family living unit, including basements and excluding crawl spaces...
- Page 5 Emergency Evacuation / Évacuation en cas d’urgence Establish and regularly practice a plan of escape in the event of fire. The following steps are recommended by the National Fire Protection Association: 1. Position your detector or your interior and/or exterior sounders so that they can be heard by all occupants.
-
Page 7: Table Des Matières
Table of Contents General Information / Information générale ............1 System Status LED Functions / Fonctions des DEL de l'état du système .. 7 Navigating Menus / Navigation à travers les menus........2 Function Icons / Icônes d’fonction .............. 3 Panic Icons / Icônes d’urgence .............. - Page 8 - ii -...
-
Page 9: General Information / Information Générale
General Information / Information générale The PROA7PLUS is a wireless Control Unit that allows you to perform system arming and disarming functions, as well as to monitor the status of your security system. Le PROA7PLUS est une unité de commande sans fil qui vous permet d’armer et de désarmer un système, ainsi que de surveiller l’état de votre système de sécurité. -
Page 10: Navigating Menus / Navigation À Travers Les Menus
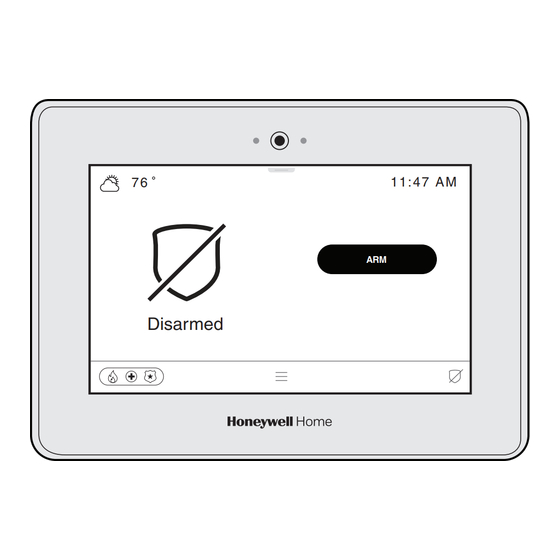
General Information / Information générale (Continued) Navigating Menus / Navigation à travers les menus System Status and arming option are displayed on the home screen. Local weather and time are displayed at the upper portion of the screen. Panic “icons” are displayed in the lower left corner. System alerts and system status icons are displayed on the lower right corner of the home screen. -
Page 11: Function Icons / Icônes D'fonction
General Information / Information générale (Continued) Function Icons / Icônes d’fonction Selection Function Indicates the system is armed in Away mode Indique que le système est en mode Armement total Arm Away (Arm Total) Indicates the system is armed in Home (Stay) mode Arm Home (Arm. - Page 12 General Information / Information générale (Continued) Function Icons / Icônes d’fonction Selection Function Indicates the system is disarmed Security Indique que le système est désarmé Future Use. Favorites Utilisation future Provides access to Z-Wave functions. Devices Donne accès aux fonctions Z-Wave Provides access to Zone information and options Sensors Fournit l’accès à...
-
Page 13: Panic Icons / Icônes D'urgence
General Information / Information générale (Continued) Panic Icons / Icônes d’urgence Selection Function Alerts the monitoring company that a fire condition exists. (Displays zone 995) Lorsque activée, avertit le centre de télésurveillance qu’une Fire (Feu) condition de feu existe. (Affiche zone 995) Alerts the monitoring company that a police emergency exists. - Page 14 General Information / Information générale (Continued) Keypads/Touchscreens Your system may be equipped with up to eight Wireless Keypads or Wireless Touchscreens. Information about the the PROSIXLCDKP Wireless Touchpad is provided below. The PROWLTOUCH Wireless Touchscreen duplicates the information provided by the Control’s touchscreen. For additional information about the PROWLTOUCH Wireless Touchscreen, refer to the Quick User Guide P/N 800-25192.
- Page 15 General Information / Information générale (Continued) Item or Key Function Display Window/ Liquid Crystal Display (LCD) displays protection point identification, system status, and messages. Fenêtre d'affichage L'écran à cristaux liquides (ACL) affiche l'identification du point de protection, l'état du système et les messages. No AC power or battery is very low.
- Page 16 General Information / Information générale (Continued) Item or Key Function OFF/ Off key Disarms burglary portion of the system, silences alarms ARRÊT and audible trouble indicators, and clears visual display after problem's correction. Touche Arrêt Désarme la partie cambriolage du système, désactive les alarmes et les indicateurs de problème sonores, et efface l'affichage après correction du problème.
- Page 17 General Information / Information générale (Continued) Item or Key Function CHIME/ Chime key CHIME Turns CHIME mode on and off. When on, the opening of CARRILON windows or doors while the system is disarmed will sound 3 beeps at the touchpad(s). Touche Carrilon Active et désactive le mode CARILLON.
-
Page 18: Rapide Des Fonctions Système Du Pavé Tactile Prosixlcdkp
General Information / Information générale (Continued) Quick Guide to PROSIXLCDKP Keypad System Functions For additional information regarding system functions refer to the full User Guide P/N 800-25152. Guide rapide des fonctions système du pavé tactile PROSIXLCDKP Pour plus d'informations sur les fonctions système, reportez-vous au Guide de l'utilisateur complet N/P 800-25152. - Page 19 General Information / Information générale (Continued) Press + Desired panic function within 10 secs. The (programmed) panic keys will illuminate. Appuyez la fonction d’urgence souhaitée dans les 10 secondes. Les touches de panique (programmées) s'allumeront. Keys/ Function/ Activating a Panic Zone/ Touches Zone Foncion...
-
Page 20: Arm The System / Armement Du Système
Arm the System / Armement du système Select ARM Select arming mode. ARM AWAY (when you’re out) OR ARM HOME (when you’ll be home) OR ARM NIGHT entry delay on/off Sélectionnez le mode d'armement. Arm. Total (lorsque vous êtes absent) OU Arm. -
Page 21: Disarm The System / Désarmement Du Système
Disarm the System / Désarmement du système Select DISARM. Sélectionnez Désarmer. Enter 4- digit user code. Entrez un code d’utilisateur. What Happens • System disarms • Entry Delay beeps stop (if beeps enabled) Ce qui se produit • Le système se désarme •... -
Page 22: Bypass Zones / Contournement De Zones
Bypass Zones / Contournement de zones NOTE: Bypassed zones are unprotected. NOTE : Les zones contournées ne sont pas protégées. Select Sensors. Sélectionnez sur l'icône Sensors. Select zones to bypass from list. Sélectionner parmi la liste les zones à contourner. Select . -
Page 23: Panic Alarms / Alarms De Pânico
Panic Alarms / Alarmes de pânico See your installer for types of Panic alarms programmed for your system. Consulte seu instalador sobre os tipos de alarme de pânico programados em seu sistema. Select the Panic Icon. Sélectionnez sur l'icône Urgence Select the desired panic icon. -
Page 24: Alerts / Aletes
Alerts / Alertes System alerts will be displayed at the lower right side of the Home Screen. The alerts will be displayed on a red banner when the fault occurs (Example: System AC Loss). If the fault clears (i.e.; System AC Loss or Low Battery) but has not been acknowleged, the banner is replaced by the alert icon that includes the number of active alerts. -
Page 25: Panel Options / Options Du Panneau
Panel Options / Options du panneau Select the Panel Options Pull Down tab at the top of the touchscreen. Sélectionnez l’onglet Déroulement des options du panneau au haut de l’écran tactile. Select from the following Options : Sound Modes Voice Commands Brightness Volume Clean Screen... -
Page 26: Menu Options / Options De Menu
Menu Options / Options de menu Select to display Menu options. Scroll through the displayed menu and select the desired option. Sélectionnez pour afficher les options de menu. Naviguez dans le menu qui s’affiche et sélectionnez l’option souhaitée. Favorites / Favoris Devices / Dispositifs Sensors/ des Capteurs Cameras / Caméras... -
Page 27: Favorites / Favorites
Favorites / Favoris Up to five Automation Devices can be added to a Favorites list. Refer to the User Guide (p/n 800-25080) for additional information regarding this feature. Jusqu’à cinq appareil d'automatisation peuvent être ajoutés à un répertoire de signets. Pour plus d’informations relatives à cette fonctionnalité, référez-vous au Guide d’utilisateur (p/n 800-25080). -
Page 28: Devices / Dispositifs
Devices / Dispositifs The enrollment procedures for Z-Wave devices can vary. Refer to the device’s instructions and refer to the User Guide (p/n 800-25080) for additional information. Les procédures d’enregistrement des dispositifs Z-Wave peuvent varier. Veuillez consulter les instructions du dispositif, ainsi que le guide de l’utilisateur (n pièce 800-25080) pour plus d’informations. -
Page 29: Sensors / Des Capteurs
Sensors / des capteurs The Sensors options allows you to view information about the enrolled sensors, select chime sounds and bypass zones. Refer to the device’s instructions and refer to the User Guide (p/n 800-25080) for additional information. Les options des capteurs vous permettent de visionner des informations concernant les capteurs enregistrés, de sélectionner les tonalités du carillon et de contourner des zones. - Page 30 Sensors / des capteurs More information The system displays the following information about the selected sensor as applicable: Serial Number Battery level Supervision Zone Type Loop Number Device Type Index Signal Strength Sensitivty Zone Number Alarm Report Le système affiche les informations suivantes sur le capteur sélectionné selon le cas : Numéro de série Niveau de charge de la batterie...
-
Page 31: Settings / Réglages
Settings / Réglages Several advanced User features are available. Refer to the full User Guide for additional information regarding these features. Plusieurs fonctions Utilisateur avancées sont disponibles. Consultez le guide de l'utilisateur complet pour obtenir des informations supplémentaires au sujet de cette fonction. -
Page 32: Wi-Fi- Networks / Réseaux Wi-Fi
Settings / Réglages Réseaux Wi-Fi Wi-Fi- Networks / a. Select the desired network. b. Enter the required information. Select a. Sélectionnez le réseau auquel vous voulez vous connecter. b. Saisissez les renseignements requis. c. Sélectionnez OK. Add Network Manually / Ajouter manuellement un réseau a. - Page 33 Settings / Réglages Select + to add a new User. Enter a name and select SAVE. Enter a four-digit Pin and select ADD Enter the four-digit Masert Code to save. Sélectionnez + pour ajouter un nouvel utilisateur : Entrez un nom et sélectionnez GARDER. Entrez un code NIP à...
-
Page 34: Voice Services / Services Vocaux
Settings / Réglages Select Authority Level for this User (if applicable). None User Guest Arm Only Select ADD. Sélectionnez le niveau d'autorité (s’il y a lieu) Utilisateur Invité Arm seulement Sélectionnez AJOUTER (Garder). Enter Master User code. Entrez un code d’utilisateur Voice Services / Services vocaux Select from the following Options: Amazon Alexa... -
Page 35: Tools / Outils
Tools / Outils Several advanced User tools are available. Refer to the full User Guide for additional information regarding these features. Plusieurs outils utilisateur avancés sont disponibles. Consultez le guide de l'utilisateur complet pour obtenir des informations supplémentaires au sujet de cette fonction. -
Page 36: Reboot System / Redémarrage Du Système
Tools / Outils Reboot System / Redémarrage du système and follow the prompts on the screen. Select Reboot System Sélectionnez Redémarrage du système et suivez les directives à l’écran Select OK or CANCEL Sélectionnez OK ou ANNULER Update Firmware / Mise à jour du firmware Select Update Firmware Sélectionnez Mise à... -
Page 37: Cameras / Caméras
Cameras / Caméras Images and videos taken by the system’s built-in camera or a Motion Viewer (if installed) can viewed on the touchscreen. Les images et les vidéos enregistrées par la caméra intégré ou par une visionneuse de mouvements (si installée) peuvent être visualisées sur le l’écran tactile. Select Cameras. -
Page 38: Smart Scenes / Aux Scènes Intelligentes
Smart Scenes / Aux scènes intelligentes Up to 20 Smart Scenes can be programmed using Total Connect 2.0. The scenes can be viewed and run from the Control Panel. Refer to the User Guide (p/n 800- 25080) for additional information regarding this feature. Jusqu’à... -
Page 39: Events Feature / Fonctions Activités
Events Feature / Fonctions Activités Select the Events Icon. The system Activity Log displays system events in order, by date. Sélectionnez sur l'icône Activités. Le journal des activités du système affiche les événements de système par ordre chronologique. Select the icon to choose between viewing options. -
Page 40: Help Videos / Vidéos D'aide
Help Videos / Vidéos d'aide Select Help. Sélectionnez Help. Select from the displayed options to play Help Videos associated with the Security System. Parmi les options affichées, faites une sélection pour lancer des vidéos d'aide associées au système de sécurité. - 32 -... -
Page 41: Test The System / Tester Le Système
Test the System (to be conducted weekly) Tester le système (à effectuer chaque semaine) Disarm the system and close all protected windows and doors. The status LED should be lit Green. NOTE: Alarm messages are NOT sent to your alarm monitoring company during these tests. Désarmez le système et fermez toutes les fenêtres et portes protégées. -
Page 42: Wireless Key (Key Fob) Functions/Fonction De La Télécommande
Wireless Key (Key Fob) Functions/ Fonction de la télécommande Each wireless key button has a preprogrammed function. Ask your installer to identify the functions assigned for each button. NOTES: • One or more buttons may have been programmed as a panic function. •... - Page 43 The Limitations of this Security System While this system is an advanced design security system, it does not offer guaranteed protection against burglary or other emergency. Any alarm system, whether commercial or residential, is subject to compromise or failure to warn for a variety of reasons. For example: •...
-
Page 44: The Limitations Of This Security System / Restrictions De Ce Système De Sécurité
Restrictions de ce système de sécurité Quoique ce système soit de conception avant-gardiste, il n’offre pas de garantie de protection contre le vol, le feu ou toute autre urgence. Tout système d’alarme, commercial ou résidentiel, peut faillir à la tâche pour plusieurs raisons. Par exemple : •... - Page 45 FEDERAL COMMUNICATIONS COMMISSION (FCC) & ISED STATEMENTS The user shall not make any changes or modifications to the equipment unless authorized by the Installation Instructions or User's Manual. Unauthorized changes or modifications could void the user's authority to operate the equipment.
- Page 46 - Notes - - 38 -...
- Page 47 - Notes - - 39 -...
- Page 48 The Honeywell Home trademark is used under license from Honeywell International Inc. This product is manufactured by Resideo Technologies, Inc. and its affiliates. 2 Corporate Center Drive P.O. Box 9040 Melville, NY 11747 © 2019 Resideo Technologies, Inc Ê800-25081COŠ 800-25081C 4/19 Rev C...