Publicité

Les langues disponibles
  • FR

Les langues disponibles

  • FRANÇAIS, page 27

Liens rapides

¡3 en 1! Armario · Secador · Tendedero
Manual de instrucciones
Instruction manual
Manual de instruções
Mode d'emploi
Manuale di istruzioni
Betriebsanleitung

Publicité

Table des Matières
loading

Sommaire des Matières pour Newteck Secadry XXL

  • Page 1 ¡3 en 1! Armario · Secador · Tendedero Manual de instrucciones Instruction manual Manual de instruções Mode d’emploi Manuale di istruzioni Betriebsanleitung...
  • Page 3: Table Des Matières

    SECADRY XXL NEWTECK SECADRY XXL NEWTECK ® ® Precauciones de seguridad Précautions dé sécurité Características Caractéristiques Partes y componentes Parties et composants Instrucciones de funcionamiento Instructions de fonctionnement Mantenimiento y limpieza Maintenance et nettoyage Solución de problemas Solution de problèmes Servicio de Asistencia Técnica/Garantía...
  • Page 4: Precauciones De Seguridad

    Lea atentamente las instrucciones antes de usar el Secadry XXL Newteck y guárdelas para usos futuros. Un uso no conforme con dichas ® instrucciones eximirá a Newteck de cualquier responsabilidad. ® PRECAUCIONES DE SEGURIDAD • Verifique el voltaje antes de conectarlo a la corriente (AC 220-240V, 50/60Hz). Conectar el aparato a una tensión incorrecta puede dañarlo. • No comparta la fuente la alimentación con otros electrodomésticos de alto consumo.
  • Page 5: Características

    CARACTERÍSTICAS SECADRY XXL Especificaciones técnicas • Ref.: 9289 [Secadora · Armario · Tendedero Secadry XXL] • Tamaño del producto: 715x450x1650 mm. • Capacidad de secado: 10 Kg. • Capacidad almacenaje: 15 Kg. • Temporizador: 180 min. • Tensión de entrada: 220-240V - 50/60Hz • Potencia: 1200W Características del producto Secadry XXL es un dispositivo multifuncional portátil, es un sólo aparato reúne las características de secadora, armario y tendedero. Adecuado para los climas más húmedos, fríos o lluviosos. Características: • Secado avanzado térmico cerámico PTC para prendas de ropa. El material principal es material ignífugo ABS. • Temporizador hasta 180 minutos. Auto-apagado al terminar el tiempo programado.
  • Page 6: Partes Y Componentes

    • Estructura de acero inoxidable. • Sistema de seguridad. El dispositivo tiene incorporado un enlace térmico de doble protección dentro del calentador: 1. Protección de temperatura: si la temperatura PTC supera los 108ºC, automáticamente cortará la alimentación y detendrá el funcionamiento. 2. Protección contra corriente: si la corriente eléctrica es superior a 10A, cortará la alimentación. Es aconsejable leer atentamente estas instrucciones. El uso correcto del dispositivo garantiza un uso seguro y alargará su vida útil.
  • Page 7: Instrucciones De Funcionamiento

    Diagrama del circuito del producto Terminal de sellado Terminal de sellado Temporizador Fusible térmico Enchufe Calentador de PTC Interruptor de temperatura AC250W 10/A15/A 220V DC Fan Switch Terminal de sellado INSTRUCCIONES DE FUNCIONAMIENTO Instalación 1. Sobre una superficie plana, monte el estante superior e inferior, conectando las piezas entre sí, siguiendo el dibujo que se muestra a continuación: Estante Superior Estante inferior fijo Conecte los tubos horizontales (A) y (B) Conecte al estante inferior (I) los tubos directamente en el agujero del estante de...
  • Page 8 3. Para montar la estructura, conecte los tubos verticales inferiores (G) y los estantes de plástico del nivel intermedio (F), como se muestra en el dibujo. Repita el mismo proceso con los tubos verticales superiores (D) y conecte el estante superior (C) (previamente montado en el paso 1). Por último, conecte los 8 tubos colgantes horizontales intermedios (E) en el estante intermedio e inferior. Nivel/estante superior Nivel/estante intermedio Nivel/estante inferior 4. Con la estructura finalmente montada, coloque suavemente la cubierta exterior de abajo hacia arriba. Coloque el dispositivo principal (H) en el centro del estante inferior fijo, la salida de aire del dispositivo debe coincidir con la entrada de aire de la cubierta exterior. Cierre la cubierta exterior para...
  • Page 9: Mantenimiento Y Limpieza

    Modo de uso 1. Conecte el enchufe de alimentación a la corriente eléctrica. 2. Coloque las prendas de ropa en los estantes, previamente bien escurridas y que no goteen. Cierre la cubierta exterior. 3. Encienda el dispositivo girando la Rueda de control (5) hacia la derecha: Salida de aire Escala de tiempo (temporizador) ON: Modo secado continuo OFF: Detener Rueda de control · Programar tiempo de secado: puede programar hasta 180 minutos, regule el tiempo deseado desde la rueda de control. El dispositivo se apagará automáticamente una vez transcurrido el tiempo programado. · Secado continuo: posicione la rueda de control en la opción “ON”, el dispositivo permanecerá encendido hasta que usted lo anule. El dispositivo no debe trabajar de manera continua más de 360 minutos.
  • Page 10: Solución De Problemas

    SOLUCIÓN DE PROBLEMAS PROBLEMA MOTIVO SOLUCIÓN El dispositivo no se • La unidad no está • Compruebe el enciende. enchufada. funcionamiento en otra • Problema del sistema toma de corrinte. eléctrico doméstico/ • Contacte con el Servicio fusible fundido. Técnico Oficial. El tiempo de secado es • La ropa es demasiado • Recoloque la cubierta muy largo (6h) gruesa.
  • Page 11: Activa La Garantía

    ACTIVA LA GARANTÍA Gracias por adquirir el Secadry XXL Newteck y haber depositado la confianza ® en nuestra compañía. Cada uno de nuestros productos tiene una garantía de 2 años desde la fecha de compra, siempre que se cumplan los requisitos citados en el manual de instrucciones del producto. En cualquier caso, le recomendamos que registre su producto para activar la garantía*. Nuestra garantía le da la tranquilidad de que su producto será reparado en caso de que tenga algún problema. DOS FORMAS DE ACTIVAR SU GARANTÍA: En caso de activar la garantía por correo postal, rellene este formulario y envíelo:...
  • Page 13: Safety Precautions

    Read the instructions carefully before using the Secadry XXL Newteck ® and save them for future use. Use which does not comply with said instructions will exempt Newteck from any responsibility. ® SAFETY PRECAUTIONS • Check the voltage before connecting to electricity (AC 220-240V, 50/60Hz). Connecting the device to an incorrect voltage may damage it. • Do not share the supply source with other high consumption electrical appliances.
  • Page 14: Technical Specifications

    SECADRY XXL CHARACTERISTICS Technical specifications • Ref.: 9289 [Dryer • Wardrobe • Secadry XXL clothes line] • P roduct size: 715x450x1650 mm. • Drying capacity: 10Kg. • S torage capacity: 15 Kg. • T imer: 180 min. • I nput voltage: 220-240V - 50/60Hz • P ower: 1200W Product characteristics Secadry XXL is a multi-functional, portable device. It is a single device which combines the characteristics of a dryer, wardrobe and clothes line. Suitable for humid, cold or wet climates. Characteristics: • Advanced thermal, ceramic PTC drying for items of clothing. The main material is fireproof ABS material.
  • Page 15: Parts And Components

    • S afety system. The device has an incorporated double protection thermic connection inside the heater: 1. Temperature protection: if the PTC temperature exceeds 108ºC, the supply will automatically be cut off and it will stop functioning. 2. Electrical protection: if the electrical current is above 10A, the supply will be cut off. It is advisable to carefully read these instructions. The correct use of the device guarantees safe use and will extend its life cycle. PARTS AND COMPONENTS Device structure Description Horizontal stainless steel connection tube (19ø x 695 mm.) Upper stainless steel horizontal suspended tube (19ø x 695 mm.) Upper level plastic shelf Upper stainless steel vertical support tube (25ø x 710 mm.) Middle stainless steel horizontal...
  • Page 16: Operating Instructions

    OPERATING INSTRUCTIONS Installation 1. On a flat surface, assemble the upper and lower shelfs, connecting the pieces to one another, following the drawing shown below: Upper shelf Lower fixed shelf Connect the horizontal tubes (A) and (B) Connect the lower shelf (I), the horizontal directly into the plastic shelf hole (C). tubes (A) and the four wheels (J) directly into the shelf hole. 2. Connect the lower vertical tubes (G) into the four corners of the lower shelf (I), following the drawing. Then, place the outer cover of the dryer using the four vertical tubes, using the four lower holes. Outer cover (case) Air vent Lower fixed shelf 3. To assemble the structure, connect the lower vertical tubes (G) and the middle level plastic shelves (F), as shown in the drawing. Repeat the same process for the upper vertical tubes (D) and connect the upper shelf (C) previously assembled in step 1). Finally, connect the 8 middle horizontal...
  • Page 17 Upper level/shelf Middle level/shelf Lower level/shelf 4. When the structure is finally assembled, gently pull the outer cover up from the bottom. Place the main device (H) in the centre of the lower fixed shelf, the air vent of the device should coincide with the air vent on the outer cover. Close the outer cover to finish assembling the dryer. Gently close the cover from bottom to top 5. Dismantling: to dismantle the device, follow the assembly steps in the reverse order. Mode of use 1. Connect the supply plug to the electrical current. 2. Place the items of clothing on the shelfs, which have firstly been wrung out and are not dripping. Close the outer cover. 3. Turn on the device by turning the control wheel (5) to the right:...
  • Page 18: Maintenance And Cleaning

    Air vent Time scale (timer) ON: Continuous drying mode OFF: Stop Control wheel · Programme drying time: you can programme up to 180 minutes, adjust the desired time using the control wheel. The device will turn off automatically once the programmed time has been reached. · Continuous drying: position the control wheel in the “ON” option, the device will remain turned on until you stop it. The device should not continuously run for more than 360 minutes. If this time has passed and you need to activate it again, leave a break of 30 minutes between each cycle. Do not touch or cover the air vent when the device is running. The air vent on the device and the air vent on the outer cover must be properly aligned, ensuring that the position is correct before activating the device to avoid air escaping and optimising performance.
  • Page 19: Solving Problems

    SOLVING PROBLEMS PROBLEM CAUSE SOLUTION The device will not turn on. • T he unit is not plugged in. • Check the functioning • Problem with the house- using another power hold electrical system/ outlet. blown fuse. • C ontact the Official Technical Service. The drying time is very • T he clothes are too bulky.
  • Page 20: Precauções De Segurança

    Leia atentamente as instruções antes de usar o Secadry XXL Newteck ® e guarde-as para utilizações futuras. Uma utilização não conforme a tais instruções isentará a Newteck de qualquer responsabilidade. ® PRECAUÇÕES DE SEGURANÇA • Verifique a tensão antes de ligar o aparelho à corrente (CA 220-240 V, 50/60 Hz). Ligá-lo a uma tensão incorreta pode danificá-lo. • Não partilhe a fonte de alimentação com outros eletrodomésticos de alto consumo.
  • Page 21: Especificações Técnicas

    CARACTERÍSTICAS DO SECADRY XXL Especificações técnicas • Ref.: 9289 [Secador · Armário · Estendal Secadry XXL] • D imensões do produto: 715 x 450 x 1650 mm. • C apacidade de secagem: 10 kg. • C apacidade de armazenamento: 15 kg. • T emporizador: 180 min. • T ensão de entrada: 220-240 V - 50/60 Hz • P otência: 1200 W Características do produto O Secadry XXL é um dispositivo multifuncional portátil que, num único aparelho, reúne as características de secador, armário e estendal. Adequado...
  • Page 22: Partes E Componentes

    • S istema de segurança. O dispositivo integra um circuito térmico de dupla proteção no interior do aquecedor: 1. Proteção de temperatura: se a temperatura do PTC exceder 108 ºC, a alimentação é cortada automaticamente e o aparelho deixa de funcionar. 2. Proteção contra corrente: se a corrente elétrica for superior a 10 A, a alimentação é cortada.
  • Page 23: Instruções De Funcionamento

    INSTRUÇÕES DE FUNCIONAMENTO Instalação 1. Sobre uma superfície plana, monte a prateleira superior e a inferior, ligando as peças entre si de acordo com o esquema que se apresenta em seguida: Prateleira superior Prateleira inferior fixa Insira os tubos horizontais (A) e (B) Na prateleira inferior (I), aplique os tubos diretamente no furo da prateleira de horizontais (A) e as quatro rodas (J) plástico (C). diretamente no furo da prateleira. 2. 2. Conecte os tubos verticais inferiores (G) nos quatro cantos da prateleira inferior (I), orientando-se pelo desenho. Depois, introduza a cobertura exterior do secador nos quatro tubos verticais pelos quatro furos inferiores.
  • Page 24: Modo De Utilização

    Nível/prateleira superior Nível/prateleira intermédio/a Nível/prateleira inferior 4. Com a estrutura finalmente montada, coloque suavemente a cobertura exterior de baixo para cima. Coloque o dispositivo principal (H) no centro da prateleira inferior fixa; a saída de ar do dispositivo deve coincidir com a entrada de ar da cobertura exterior. Feche a cobertura exterior para terminar a montagem do secador. Feche a cobertura suavemente de baixo para cima 5. Desmontagem: para desmontar o dispositivo, siga os passos de montagem pela ordem inversa. Modo de utilização 1. Ligue a ficha de alimentação à corrente elétrica. 2. Coloque as peças de roupa nas prateleiras, bem torcidas previamente, de modo a que não escorram. Feche a cobertura exterior. 3. Ligue o dispositivo, rodando o botão giratório de controlo (5) para a direita:...
  • Page 25: Manutenção E Limpeza

    Saída de ar Escala de tempo (temporizador) ON: Modo de secagem contínua OFF: Parar Botão giratório de controlo · Programar o tempo de secagem: pode programar até 180 minutos, regulando o tempo desejado mediante o botão giratório de controlo. O dispositivo desliga automaticamente depois de decorrido o tempo programado. · Secagem contínua: posicionando o botão giratório de controlo na opção “ON”, o dispositivo permanecerá ligado até ser desligado pelo utilizador. O dispositivo não deve trabalhar de forma contínua por mais de 360 minutos. Se, passado esse tempo, necessitar de o ativar novamente, deixe uma pausa de 30 minutos entre cada ciclo.
  • Page 26: Solução De Problemas

    SOLUÇÃO DE PROBLEMAS PROBLEMA MOTIVO SOLUÇÃO Não é possível ligar o • O aparelho não está • V erifique o funcionamento dispositivo. ligado à corrente. noutra tomada de • Problema do sistema elé- corrente. trico doméstico / fusível • Contacte o Serviço fundido. Técnico Oficial.
  • Page 27: Précautions Dé Sécurité

    Lisez attentivement les instructions avant d’utiliser le Secadry XXL Newteck et rangez-les pour de futures utilisations. Un usage non conforme ® de ces instructions exemptera Newteck de toute responsabilité. ® PRÉCAUTIONS DE SÉCURITÉ • Vérifiez le voltage avant de le brancher au courant électique (AC 220-240V, 50/60Hz). Connecter l’appareil à une tension incorrecte peut l’endommager. • Ne branchez pas l’appareil à une source d’alimentation fournissant déjà...
  • Page 28: Spécifications Techniques

    CARACTÉRISTIQUES SECADRY XXL Spécifications techniques • Réf. : 9289 [Sèche-linge · Armoire · Étendoir Secadry XXL] • Dimension du produit : 715x450x1650 mm. • Capacité de séchage : 10 Kg. • Capacité du tambour : 15 Kg. • Minuteur : 180 min. • Tension d’entrée : 220-240V - 50/60Hz • Puissance : 1200W Caractéristiques du produit Secadry XXL est un dispositif multifonctionnel portable. C’est un seul appareil qui réunit les caractéristiques de sèche-linge, d’armoire et d’étendoir. Approprié pour les climats les plus humides, froids ou pluvieux. Caractéristiques: • Séchage thermique avancé céramique PTC pour vêtements. Le matériau principal est ignifuge ABS. • Minuteur jusqu’à 180 minutes. Auto-arrêt à la fin du temps programmé. • 3 niveaux de séchage, grande capacité.
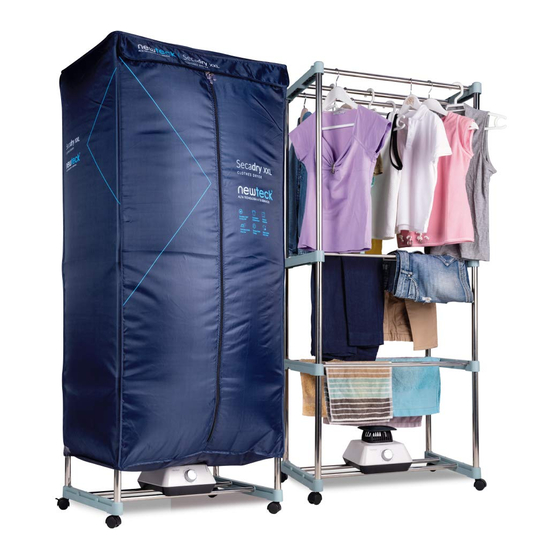
  • Page 29: Parties Et Composants

    • Système de sécurité. Le dispositif est pourvu d’un lien thermique de double protection dans le chauffe-eau : 1. P rotection de température : si la température PTC dépasse 108ºC, le courant sera automatiquement coupé et l’appareil cessera de fonctionner. 2. P rotección contre le courant : si la tension électrique est supérieure à 10A, le courant sera coupé. Il est recommandé de lire attentivement ces instructions. L’usage correct du dispositif garantit une utilisation sûre et allongera sa durée de vie utile. PARTIES ET COMPOSANTS Structure du dispositif Description Unités Tube de connexion en acier inoxydable (19ø x 695 mm.) Tube suspendu horizontal supérieur en acier inoxydable (19ø x 695 mm.) Étagère en plastique niveau supérieur Tube vertical de support supérieur en acier inoxydable (25ø x 710 mm.) Tube suspendu horizontal...
  • Page 30: Schéma Du Circuit Du Produit

    Schéma du circuit du produit Terminal d’étanchéité Terminal d’étanchéité Minuteur Fusible thermique Prise Chauffage PTC Interrupteur de température AC250W 10/A15/A 220V DC Fan Switch Terminal d’étanchéité INSTRUCTIONS DE FONCTIONNEMENT Installation 1. Sur une surface plate, montez les étagères supérieure et inférieure, en connectant les pièces entre elles et en suivant le dessin ci-dessous: Étagère supérieure Étagère inférieure fixe...
  • Page 31 3. Pour monter la structure, connectez les tubes verticaux inférieurs (G) et les étagères en plastique du niveau intermédiaire (F), comme indiqué dans le dessin. Répétez la même opération avec les tubes verticaux supérieurs (D) et connectez l’étagère supérieure (C) (préalablement montée lors du pas 1). Enfin, connectez les 8 tubes suspendus horizontaux intermédiaires (E) dans l’étagère intermédiaire et inférieure. Niveau/étagère supérieure Niveau/étagère intermédiaire Niveau/étagère inférieure 4. Une fois la structure enfin montée, placez doucement la couverture extérieure du bas vers le haut. Placez le dispositif principal (H) au centre de l’étagère inférieure fixe, la sortie d’air du dispositif doit coïncider avec l’entrée d’air de la couverture extérieure. Fermez la couverture extérieure pour finir de monter le sèche-linge. Fermez la couverture doucement du bas vers le haut 5.
  • Page 32: Maintenance Et Nettoyage

    Mode d’emploi 1. Branchez la prise au courant électrique. 2. Placez les vêtements sur les étagères, préalablement bien essorés, en veillant à ce qu’ils n’égouttent pas. Fermez la couverture extérieure. 3. Allumez le dispositif en tournant la roue de contrôle (5) vers la droite: Sortie d’air Échelle de temps (minuteur) ON: Mode séchage continu OFF: Arrêter Roue de contrôle · Programmation du temps de séchage : vous pouvez programmer jusqu’à 180 minutes, réglez le temps désiré à l’aide de la roue de contrôle. Le dispositif s’éteindra automatiquement une fois écoulé le temps programmé. · Séchage continu : placez la roue de contrôle sur l’option “ON”, le dispositif demeurera allumé jusqu’à ce que vous l’annuliez. Le dispositif ne doit pas travailler de façon continue plus de 360 minutes.
  • Page 33: Solution De Problèmes

    SOLUTION DE PROBLÈMES PROBLÈME RAISON SOLUTION Le dispositif ne s’allume • L’unité n’est pas bran- • Vérifiez le fonctionnement pas. chée. avec une autre prise de • Problème du système courant. électrique domestique/ • Contactez le Service fusible fondu. technique officiel. Le temps de séchage est • Les vêtements sont trop • Replacez la couverture très long (6h) épais.
  • Page 34: Misure Di Sicurezza

    Leggere attentamente le istruzioni prima di usare il Secadry XXL Newteck ® e conservare per usi futuri. L’utilizzo non consono a quello previsto, esimerà Newteck da ogni responsabilità. ® MISURE DI SICUREZZA • Controllare il voltaggio prima di collegare alla corrente (AC 220-240V, 50/60Hz). Collegare l’apparecchio a una tensione non idonea potrebbe...
  • Page 35: Specifiche Tecniche

    CARATTERISTICHE SECADRY XXL Specifiche tecniche • Rif.: 9289 [Asciugatrice · Armadio · Stendibiancheria Secadry XXL] • Dimensioni del prodotto: 715x450x1650 mm. • C apacità di asciugatura: 10 Kg. • C apacità di carico: 15 Kg. • T imer: 180 min. • T ensione di ingresso: 220-240V - 50/60Hz • P otenza: 1200W Caratteristiche del prodotto Secadry XXL è un apparecchio portatile multifunzionale che racchiude in un solo prodotto le caratteristiche di asciugatrice, armadio e stendibiancheria.
  • Page 36: Parti E Componenti

    • S istema di sicurezza. L’elettrodomestico è dotato di un collegamento termico a doppia protezione all’interno del riscaldatore: 1. Protezione della temperatura: se la temperatura PTC supera i 108ºC, interrompe automaticamente l’alimentazione e arresta il funzionamento. 2. Protezione della corrente: se la corrente elettrica è superiore a 10A, interrompe l’alimentazione. Si raccomanda di leggere attentamente le istruzioni. L’uso corretto dell’elettrodomestico garantisce un uso sicuro e ne allunga la vita utile.
  • Page 37: Funzionamento

    FUNZIONAMENTO Installazione 1. Montare il ripiano superiore e inferiore su una superficie piana, collegando le parti in base alla figura riportata di seguito: Ripiano Superiore Ripiano fisso inferiore Collegare i tubi orizzontali (A) e (B) Collegare al ripiano inferiore (I) i tubi direttamente nel foro del ripiano in orizzontali (A) e le quattro rotelle (J) plastica (C). direttamente nel foro del ripiano. 2. Collegare i tubi verticali inferiori (G) ai quattro angoli del ripiano inferiore (I), seguendo la figura. Inserire la copertura esterna dell’asciugatrice nei quattro tubi verticali, mediante i quattro fori inferiori.
  • Page 38 Livello/ripiano superiore Livello/ripiano intermedio Livello/ripiano inferiore 4. Con la struttura ormai montata, collocare delicatamente la copertura esterna dal basso verso l’alto. Posizionare il dispositivo principale (H) al centro del ripiano fisso inferiore, l’uscita dell’aria dell’apparecchio deve coincidere con l’ingresso dell’aria della copertura esterna. Chiudere la copertura esterna per finire di montare l’asciugatrice. Chiudere delicatamente la copertura dal basso verso l’alto 5. Smontaggio: per smontare l’apparecchio, seguire al contrario i passi indicati per il montaggio. Modalità d’uso 1. Collegare la presa alla corrente elettrica. 2. Collocare gli indumenti sui ripiani, precedentemente strizzati e senza gocciolare. Chiudere la copertura esterna. 3. Accendere l’apparecchio girando la Rotella di comando (5) verso destra.
  • Page 39: Manutenzione E Pulizia

    Uscita dell’aria Scala di tempo (timer) ON: Modalità asciugatura continua Rotella di comando · Programmare il tempo di asciugatura: è possibile programmare fino a 180 minuti dalla rotella di comando. L’apparecchio si spegnerà automaticamente dopo aver superato il tempo programmato. · Asciugatura continua: posizionare la rotella di comando su ON, l’apparecchio resterà acceso fino all’arresto. L’apparecchio non deve restare in modo ininterrotto per più di 360 minuti. Se, trascorso questo tempo, è necessario riaccenderlo, fare una pausa di 30 minuti tra un ciclo e l’altro. Non toccare e non coprire l’uscita dell’aria quando l’elettrodomestico è...
  • Page 40: Soluzione Di Problemi

    SOLUZIONE DI PROBLEMI PROBLEMA MOTIVO SOLUZIONE L'apparecchio non si • L’apparecchio non è • V erificare il funzionamento accende. collegato. in un’altra presa di • Problema dell’impianto corrente. elettrico domestico / • Contattare il Servizio fusibile fuso. Tecnico Ufficiale. Il tempo di asciugatura è • I capi sono troppo spessi. • Ricollocare la copertura molto lungo (6 ore).
  • Page 41 Lesen Sie diese Anweisungen sorgfältig durch, bevor Sie den Secadry XXL Newteck verwenden, und bewahren Sie diese für zukünftiges ® Nachschlagen auf. Eine unsachgemäße Verwendung des Geräts befreit Newteck von jeglicher Verantwortung. ® SICHERHEITSMASSNAHMEN • Prüfen Sie die Spannung, bevor Sie das Gerät an die Stromversorgung anschließen (AC 220-240V, 50/60Hz). Das Gerät an falsche Spannung zu...
  • Page 42: Eigenschaften

    • D ieses Gerät ist für das Trocknen von Wäsche, die hohe Temperaturen von mehr als 75º standhält, geeignet. WARNUNGEN! • L uftaustritt niemals verdecken. • W ringen Sie die Wäsche vor dem Einlegen in das Gerät gut aus, und stellen Sie sicher, dass sie nicht tropft. EIGENSCHAFTEN SECADRY XXL Technische Daten • R ef.: 9289 [Trockner · Schrank · Wäscheständer Secadry XXL] • P roduktgröße: 715x450x1650 mm. • T rockenleistung: 10 Kg. • L agerkapazität: 15 Kg. • Z eitschalter: 180 min.
  • Page 43: Teile Und Komponenten

    • Das Bügeln wird vereinfacht, die Wäsche kann auf Kleiderbügeln zum Trocknen gehängt werden, so dass sie nicht zerknittert. • W enn das Gerät nicht verwendet wird, kann es ebenfalls als tragbarer Schrank oder Wäscheständer verwendet werden. • E s verhindert eine sekundäre Verschmutzung und schützt die Wäsche während der Trocknung unter der Plane oder Hülle, weshalb sie vor Staub, Wind und Insekten geschützt wird. Die Kleidung wird sauberer gehalten.
  • Page 44: Betriebsanleitung

    Accessoires • Äußeres Gehäuse oder Abdeckung Schaltbild des Produkts Abdichtungsklemme Abdichtungsklemme Zeitschalter Schmelzsicherung Stecker PTC-Heizgerät Temperaturschalter AC250W 10/A15/A 220V DC Fan Switch Abdichtungsklemme BETRIEBSANLEITUNG Installation 1. Auf einer ebenen Fläche, montieren Sie das obere und untere Regal indem Sie die Teile, entsprechend der nachstehenden Zeichnung, miteinander verbinden: Oberes Regal Festes unteres Regal Stecken Sie die horizontalen Rohre Stecken Sie die horizontalen Rohre (A) (A) und (B) direkt in die Löcher des und die vier Rollen (J) direkt in die Löcher...
  • Page 45 Außenabdeckung Lufteintritt Festes unteres Regal 3. Um die Struktur zu montieren, verbinden Sie die unteren vertikalen Rohre (G) und die mittleren Kunststoffregale (F), wie in der Zeichnung gesehen wird. Wiederholen Sie den Vorgang mit den oberen vertikalen Rohren (D) und verbinden Sie den oberen Regal (C) (im 1. Schritt bereits montiert). Verbinden Sie abschließend die 8 horizontalen hängenden Zwischenrohre (R) mit dem mittleren und dem unteren Regal.
  • Page 46: Modo De Uso

    Schließen Sie die Abdeckung von unten nach oben mit besonderer Vorsicht 5. Abbau: Um das Gerät abzubauen, folgen Sie den Montageschritten in umgekehrter Reihenfolge. Modo de uso 1. Stecken Sie den Versorgungsstecker in die Stromsteckdose. 2. Legen Sie die Kleidungsstücke in die Regale, gut ausgewrungen, damit sie nicht tropfen. Schließen Sie die Außenabdeckung. 3. Schalten Sie das Gerät ein, indem Sie den Drehschalter (5) nach rechts drehen: Luftaustritt Zeitschalter...
  • Page 47: Wartung Und Reinigung

    WARTUNG UND REINIGUNG 1. Schalten Sie das Gerät aus und trennen Sie das Gerät von der Stromversorgung. Warten Sie bis das Gerät abgekühlt ist, bevor Sie mit der Reinigung beginnen. 2. Reinigen Sie die gesamte Oberfläche und sonstige Teile mit einem weichen Tuch, wenn erforderlich, mit etwas Wasser und Seife. Der Schmutz auf der Oberfläche muss entfernt werden, um eine Entfärbung und mögliche Schäden zu verhindern. 3. Wenn Sie das Gerät über eine längere Zeit nicht verwenden werden, lagern Sie es an einem sauberen und trockenen Ort.

Table des Matières