Publicité

Les langues disponibles
  • FR

Les langues disponibles

  • FRANÇAIS, page 1

Liens rapides

Piège photographique / Trail camera
Cámara trampa / Fotofalle / Fotocamera da esplorazione
PIE1028
Guide d'utilisation ........................................................................ 2
User's guide ............................................................................... 26
Manual de instrucciones ............................................................ 48
Gebrauchsanleitung ................................................................... 72
Manuale d'uso ........................................................................... 96
PIE1028 - indice A - avril 2018
1/120

Publicité

Table des Matières
loading

Sommaire des Matières pour Num'axes PIE1028

  • Page 1: Table Des Matières

    Piège photographique / Trail camera Cámara trampa / Fotofalle / Fotocamera da esplorazione PIE1028 Guide d’utilisation ................ 2 User’s guide ................26 Manual de instrucciones ............48 Gebrauchsanleitung ..............72 Manuale d’uso ................96 PIE1028 – indice A – avril 2018 1/120...
  • Page 2: Face Avant

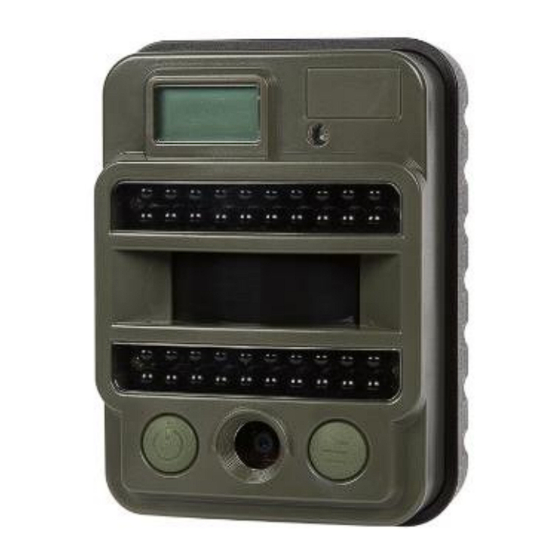
    FACE AVANT Capteur de luminosité Ecran LCD Témoin lumineux 20 LEDS infrarouges Capteur infrarouge 20 LEDS passif (PIR) infrarouges Bouton DROIT : Bouton GAUCHE : Marche/Arrêt MENU Objectif Navigation (NEXT) OK (SET) PIE1028 – indice A – avril 2018 2/120...
  • Page 3: Appareil Ouvert

    FACE ARRIERE A dévisser pour ouvrir l’appareil Passage de sangle A dévisser pour ouvrir l’appareil Port USB APPAREIL OUVERT Emplacement carte micro SD Emplacement piles (4 x AA) PIE1028 – indice A – avril 2018 3/120...
  • Page 4 (nombre de fichiers) Ecran LCD – Mode Vidéo Heure Résolution Mode Vidéo vidéo Nombre de Nombre vidéos d’images par enregistrées seconde Date Estimation (année/mois/jour) Niveau de pile espace disponible (nombre de fichiers) PIE1028 – indice A – avril 2018 4/120...
  • Page 5 Retirer les piles alors que l’appareil est en marche peut endommager le produit.  Ne mélangez pas des piles ayant déjà servi et des piles neuves. Ne mélangez pas des piles alcalines, standard ou rechargeables. PIE1028 – indice A – avril 2018 5/120...
  • Page 6 Allumer l’appareil et entrer dans le mode Fonctionnement Automatique PIR : Appuyez sur le bouton GAUCHE pendant 3 secondes, le témoin lumineux va clignoter 5 fois et l’appareil va entrer en mode Fonctionnement Automatique PIR. PIE1028 – indice A – avril 2018 6/120...
  • Page 7 + vidéos en fonction des réglages de l'appareil.  Pour arrêter l'enregistrement vidéo (en mode Vidéo ou Photo + Vidéo), appuyez à nouveau sur le bouton GAUCHE. PIE1028 – indice A – avril 2018 7/120...
  • Page 8 Menu de configuration PIE1028 – indice A – avril 2018 8/120...
  • Page 9 Photo  OK apparaît sur l’écran LCD. PHOTO Réglage par défaut b) Prendre une photo Appuyez sur le bouton DROIT pendant 3 secondes pour retourner à l’écran d’information puis appuyez sur le bouton GAUCHE pour prendre une photo. PIE1028 – indice A – avril 2018 9/120...
  • Page 10: Configuration

    (Operation setup) Voir tableau ci-dessous pour le détail des paramètres et des réglages. CONFIGURATION Réglage des Appuyez sur le bouton DROIT pour entrer dans le paramètres de menu de configuration. fonctionnement de l’appareil PIE1028 – indice A – avril 2018 10/120...
  • Page 11 Attention : Les fichiers effacés ne peuvent pas être restaurés. Veillez à télécharger et sauvegarder tous les fichiers que vous désirez conserver. EXIT Appuyez sur le bouton DROIT pour retourner à SORTIR l’écran d’information. PIE1028 – indice A – avril 2018 11/120...
  • Page 12 SD (qui se remplit plus vite). BURST (pictures per trigger) RAFALE (nombre de photos par déclenchement) Appuyez sur le bouton DROIT pour entrer. 1P (réglage par défaut) PIE1028 – indice A – avril 2018 12/120...
  • Page 13: Resolution Video

    Appuyez sur le bouton DROIT pour entrer. Réglage par défaut : 5 secondes Appuyez sur le bouton GAUCHE pour choisir la durée souhaitée puis appuyez sur le bouton DROIT pour enregistrer le réglage et sortir. PIE1028 – indice A – avril 2018 13/120...
  • Page 14 Quand le paramètre « Horaires Fixes » est réglé sur ON, l’appareil peut être programmé pour fonctionner uniquement pendant une certaine plage horaire de la journée. Le reste du temps, l’appareil ne se déclenchera pas. PIE1028 – indice A – avril 2018 14/120...
  • Page 15 Nota : ne pas régler sur « ON » TIME LAPSE et INTERVALLE PIR en même temps. DELAY Appuyez sur le bouton DROIT pour entrer. (5 sec. to 24 hr.) OFF (réglage par défaut) INTERVALLE PIR (de 5 secondes à 24 heures) PIE1028 – indice A – avril 2018 15/120...
  • Page 16 ENREGISTREMENT puis sur le bouton DROIT pour enregistrer le EN BOUCLE sur la réglage et sortir. carte micro SD _______________________________ Sélectionnez ON pour activer l’enregistrement en boucle sur la carte micro SD. PIE1028 – indice A – avril 2018 16/120...
  • Page 17 4) rend plus facile le déclenchement de la caméra. Dans un environnement avec une forte température, la chaleur du corps des sujets est PIE1028 – indice A – avril 2018 17/120...
  • Page 18 0 0 0 0 0 0 (6 chiffres) Appuyez sur le bouton GAUCHE pour choisir le chiffre souhaité puis appuyez sur le bouton DROIT pour confirmer et passer au chiffre suivant. PIE1028 – indice A – avril 2018 18/120...
  • Page 19 Appuyez sur le bouton GAUCHE pour choisir connexion DC (alimentation) ou PC (ordinateur). Appuyez sur le bouton DROIT pour valider votre choix.  Connexion DC pour l’alimentation L’appareil entre en mode Test. PIE1028 – indice A – avril 2018 19/120...
  • Page 20 / moyenne / faible Flash infrarouge 940 nm – 40 LEDS Portée du flash infrarouge Environ 10 m Carte mémoire Carte micro SD jusqu’à 32 GB Enregistrement en boucle Oui - programmable PIE1028 – indice A – avril 2018 20/120...
  • Page 21 190 mA (+1920 mA avec flash Consommation infrarouge) Interface Port USB, port carte micro SD Dimensions 115 x 84 x 54 mm Poids 224 g Etanchéité IP54 Température de fonctionnement -20°C à +60°C PIE1028 – indice A – avril 2018 21/120...
  • Page 22 Une somme forfaitaire de 25 € TTC sera facturée en cas de retour SAV non justifié (par exemple piles hors service ou mises en place dans le mauvais sens). PIE1028 – indice A – avril 2018 22/120...
  • Page 23 Les informations contenues dans ce guide peuvent faire l’objet de modifications sans préavis. Photos et dessins non contractuels. PIE1028 – indice A – avril 2018 23/120...
  • Page 24 Ce produit est conforme aux normes européennes. Directive 2014/30/UE relative à l’harmonisation des législations des Etats membres concernant la compatibilité électromagnétique EN 55032 : 2015, EN 55024 : 2010 EN 61000-3-2 : 2014, EN 61000-3-3 : 2013 PIE1028 – indice A – avril 2018 24/120...
  • Page 25 ANNEXE C IEC 62321-8 : 2017 Z.A.C. des Aulnaies 745 rue de la Bergeresse C.S. 30157 45161 OLIVET CEDEX FRANCE Tél. +33 (0)2 38 63 64 40 Fax +33 (0)2 38 63 31 00 www.numaxes.com info@numaxes.com PIE1028 – indice A – avril 2018 25/120...
  • Page 26: Front View

    Presentation of the product FRONT VIEW Light sensor LCD screen Indicator light 20 infrared LEDS Passive Infrared sensor (PIR) 20 infrared LEDS RIGHT button: MENU LEFT button: Power OK (SET) Lens Navigation (NEXT) PIE1028 – indice A – avril 2018 26/120...
  • Page 27: Back View

    BACK VIEW Unscrew to open the device Strap hole Unscrew to open the device USB port INTERNAL VIEW Micro SD card slot Battery slots (4 x AA) PIE1028 – indice A – avril 2018 27/120...
  • Page 28 Battery level (number of files) LCD screen– Video Mode Time Video Video Mode resolution Number of Frame per recorded second video clips Date Estimated (year/month/day) Battery level available space (number of files) PIE1028 – indice A – avril 2018 28/120...
  • Page 29  WARNING: ALWAYS have the camera in the OFF position when installing or removing batteries. Removing while the camera is ON may damage the product.  Do not mix old and new batteries. Do not mix alkaline, standard or rechargeable batteries. PIE1028 – indice A – avril 2018 29/120...
  • Page 30 Enter Test mode: In PIR Auto Working mode, press the RIGHT button once to wake up the camera LCD screen and enter Test mode.  Turn Off the device: Press the LEFT button for 5 seconds to turn off the camera. PIE1028 – indice A – avril 2018 30/120...
  • Page 31 In Test mode, press the LEFT button to shoot photos, videos or photos + videos based on camera settings.  To stop video recording (in Video or Photo + Video mode), press the LEFT button again. PIE1028 – indice A – avril 2018 31/120...
  • Page 32 Setting menu PIE1028 – indice A – avril 2018 32/120...
  • Page 33 Press the RIGHT button for 3 seconds to go back to the information screen then the LEFT button to take a picture. VIDEO Set up Press the RIGHT button to enter Video mode  OK appears on the LCD screen. PIE1028 – indice A – avril 2018 33/120...
  • Page 34 EXIT Press the LEFT button to navigate then the RIGHT button to confirm your choice. Press the LEFT button to select Yes or No then the RIGHT button to confirm and exit. PIE1028 – indice A – avril 2018 34/120...
  • Page 35 Press the LEFT button to navigate then the RIGHT button to save the setting and exit. _______________________________ Selects resolution for still photos from 2 to 8 megapixels. Higher resolution produces better quality photos, but creates larger files that take PIE1028 – indice A – avril 2018 35/120...
  • Page 36: Video Resolution

    _______________________________ Selects video resolution. Higher resolution produces better quality videos, but creates larger files that take up more of the micro SD card capacity (fills up faster). PIE1028 – indice A – avril 2018 36/120...
  • Page 37 RIGHT button to confirm and move to the next digit. Once the start and end time are programmed, press the RIGHT button again to exit. _______________________________ When “Timer” is set to ON, the camera can be set PIE1028 – indice A – avril 2018 37/120...
  • Page 38 30 minutes. Note: please don’t turn “ON” TIME LAPSE and DELAY simultaneously. DELAY Press the RIGHT button to enter. (PIR INTERVAL) OFF (default setting) (5 sec. to 24 hr.) PIE1028 – indice A – avril 2018 38/120...
  • Page 39 _______________________________ Select “ON” to activate cycle recording. When the micro SD card will be full, the camera will continue to record photos/videos by deleting earliest photos or video clips. PIE1028 – indice A – avril 2018 39/120...
  • Page 40: System Time

    It is recommended to use low sensitivity for environments with lots of interference like hot wind, smoke, near window, etc. SYSTEM TIME Press the RIGHT button to enter. (Date & Time) 04.22.2018 00:00 MM.DD.YYYY HH:MM PIE1028 – indice A – avril 2018 40/120...
  • Page 41 No (default setting) Press the LEFT button to navigate then the RIGHT button to save the setting and exit. _______________________________ Select “Yes” to restore all parameters to the original factory settings (default settings). PIE1028 – indice A – avril 2018 41/120...
  • Page 42 SD card via your computer. By pressing the RIGHT button again, you will turn the camera into a webcam. The LCD screen will show the interface below. Press the RIGHT button again to exit. PIE1028 – indice A – avril 2018 42/120...
  • Page 43 Programmable from 5 to 60 seconds Audio recording Trigger speed Approximately 0,8 second Date, time, temperature, moon Time stamp on photos phase, battery level, camera ID (if the user programmed one) White balance Automatic PIE1028 – indice A – avril 2018 43/120...
  • Page 44  the proof of purchase (invoice or sales receipt) If you omit one of these items, the After Sales Service will have to invoice you for any repair costs incurred. PIE1028 – indice A – avril 2018 44/120...
  • Page 45 The information contained in this guide may be subject to amendment without prior notice. Photos and drawings are not contractual. PIE1028 – indice A – avril 2018 45/120...
  • Page 46 This equipment is in compliance with EC standards. Directive 2014/30/EU on the harmonisation of the laws of the Member States relating to electromagnetic compatibility EN 55032: 2015, EN 55024: 2010 EN 61000-3-2: 2014, EN 61000-3-3: 2013 PIE1028 – indice A – avril 2018 46/120...
  • Page 47 ANNEX C IEC 62321-8: 2017 Z.A.C. des Aulnaies 745 rue de la Bergeresse C.S. 30157 45161 OLIVET CEDEX FRANCE Tél. +33 (0)2 38 69 96 27 Fax +33 (0)2 38 63 31 00 www.numaxes.com export@numaxes.com PIE1028 – indice A – avril 2018 47/120...
  • Page 48: Manual De Instrucciones

    Presentación del producto VISTA FRONTAL Sensor de luz Pantalla LCD Indicador luminoso 20 LEDS infrarrojos Sensor de infrarrojos pasivo (PIR) 20 LEDS infrarrojos Botón DERECHO: Botón IZQUIERDO: MENÚ Encendido/Apagado OK (SET) Lente Navegación (NEXT) PIE1028 – indice A – avril 2018 48/120...
  • Page 49 Desenrosque para abrir el dispositivo Orificio para la correa Desenrosque para abrir el dispositivo Puerto USB VISTA DESDE EL INTERIOR Ranura para tarjeta micro SD Compartimento de las pilas (4 x AA) PIE1028 – indice A – avril 2018 49/120...
  • Page 50 (cantidad de archivos) Nivel de batería Pantalla LCD – Modo Vídeo Hora Resolución Modo Vídeo vídeo Cantidad de Cuadros por videos grabados segundo Fecha Estimación espacio Nivel de (año/mes/día) disponible batería (cantidad de archivos) PIE1028 – indice A – avril 2018 50/120...
  • Page 51 Retirar las pilas mientras la cámara está encendida podría dañar el producto.  No mezcle pilas nuevas y usadas. No mezcle pilas de distintos tipos; utilícelas todas de litio o todas alcalinas. PIE1028 – indice A – avril 2018 51/120...
  • Page 52 5 veces y la unidad ingresará al modo Operación Automática PIR.  Ingresar al modo Test: En modo Operación Automática PIR, presione el botón DERECHO una vez para activar la pantalla LCD del dispositivo e ingresar al modo Test. PIE1028 – indice A – avril 2018 52/120...
  • Page 53 + videos de acuerdo con la configuración de la cámara.  Para detener la grabación de vídeo (en modo Vídeo o Foto + Vídeo), presione el botón IZQUIERDO de nuevo. PIE1028 – indice A – avril 2018 53/120...
  • Page 54 Menú de configuración PIE1028 – indice A – avril 2018 54/120...
  • Page 55 Foto  OK aparece en la pantalla LCD. FOTO Ajuste de fábrica Tomar una fotografía Presione el botón DERECHO durante 3 segundos para regresar a la pantalla de información y luego presione el botón IZQUIERDO para tomar una fotografía. PIE1028 – indice A – avril 2018 55/120...
  • Page 56 SETTING Consulte la tabla a continuación para obtener (Operation setup) detalles de los parámetros y configuraciones. Presione el botón DERECHO para entrar en el AJUSTES menú de configuración. PIE1028 – indice A – avril 2018 56/120...
  • Page 57 Asegúrese primero de haber descargado o realizado una copia de seguridad de todos los archivos que desea conservar. EXIT Presione el botón DERECHO para regresar a la SALIR pantalla de información. PIE1028 – indice A – avril 2018 57/120...
  • Page 58 FOTOS EN SERIE (imágenes por disparo) Presione el botón DERECHO para entrar. 1P (ajuste de fábrica) Presione el botón IZQUIERDO para navegar y luego el botón DERECHO para guardar la configuración y salir. PIE1028 – indice A – avril 2018 58/120...
  • Page 59 Presione el botón DERECHO para entrar. Ajuste de fábrica: 5 segundos Presione el botón IZQUIERDO para seleccionar la duración deseada del vídeo y luego presione el botón DERECHO para guardar la configuración y salir. PIE1028 – indice A – avril 2018 59/120...
  • Page 60 Cuando “Horarios fijos” está activado (ON), la cámara puede configurarse para funcionar sólo en una determinada franja horaria del día. El resto del tiempo, la cámara estará apagada y no registrará ningún disparo por movimiento. PIE1028 – indice A – avril 2018 60/120...
  • Page 61 00:30:00, la cámara hará una foto o un vídeo automáticamente cada 30 minutos. Nota: no ponga en “ON” simultáneamente el INTERVALO PIR y el INTERVALO DE TIEMPO. DELAY (5 sec. to 24 hr.) Presione el botón DERECHO para entrar. PIE1028 – indice A – avril 2018 61/120...
  • Page 62 (oldest pic. OFF (ajuste de fábrica) overwrite) GRABACION EN Presione el botón IZQUIERDO para navegar y BUCLE en la tarjeta luego el botón DERECHO para guardar la micro SD configuración y salir. PIE1028 – indice A – avril 2018 62/120...
  • Page 63 2) ofrece una mayor distancia de detección, 3) facilita al sensor la detección de una diferencia de temperatura entre el cuerpo y la temperatura ambiente, 4) facilita el disparo de la cámara. PIE1028 – indice A – avril 2018 63/120...
  • Page 64 0 0 0 0 0 0 (6 cifras) Presione el botón IZQUIERDO para seleccionar la cifra deseada, luego presione el botón DERECHO para confirmar y pasar a la siguiente cifra. PIE1028 – indice A – avril 2018 64/120...
  • Page 65 Presione el botón IZQUIERDO para elegir la conexión DC (alimentación) o PC (ordenador). Presione el botón DERECHO para validar su elección.  DC conexión para el poder El dispositivo ingresa al modo Test. PIE1028 – indice A – avril 2018 65/120...
  • Page 66 940 nm – 40 LEDS Alcance flash infrarrojo Alrededor de 10 m Tarjeta memoria Tarjeta micro SD hasta 32 GB Grabación en bucle Sí - programable Modos de captura Foto / Vídeo / Foto + Vídeo PIE1028 – indice A – avril 2018 66/120...
  • Page 67 Puerto USB, ranura para tarjeta Interfaz micro SD Dimensiones 115 mm x 84 mm x 54 mm Peso 224 g Estanqueidad IP54 Temperatura de funcionamiento -20°C hasta +60°C Humedad de funcionamiento 5% - 90% PIE1028 – indice A – avril 2018 67/120...
  • Page 68 Garantía NUM’AXES garantiza el producto contra cualquier fallo de fabricación durante los dos años posteriores a la compra. Todos los gastos de envío y embalaje corren a cargo del comprador. PIE1028 – indice A – avril 2018 68/120...
  • Page 69 La información incluida en estas instrucciones puede ser objeto de modificaciones sin previo aviso. Las fotos y los dibujos no son contractuales. Registre su producto Su producto puede registrarse en nuestra página web www.numaxes.com. PIE1028 – indice A – avril 2018 69/120...
  • Page 70 Anexo II RoHS2.0 Directiva (UE) 2015/863 IEC 62321-3-1: 2013 IEC 62321-5: 2013 IEC 62321-4: 2013 IEC 62321-6: 2015 IEC 62321-7-1: 2015 IEC 62321: 2008 ANEXO C IEC 62321-8: 2017 PIE1028 – indice A – avril 2018 70/120...
  • Page 71 Z.A.C. des Aulnaies 745 rue de la Bergeresse C.S. 30157 45161 OLIVET CEDEX FRANCE Tél. +33 (0)2 38 69 96 27 Fax +33 (0)2 38 63 31 00 www.numaxes.com export@numaxes.com PIE1028 – indice A – avril 2018 71/120...
  • Page 72: Gebrauchsanleitung

     Fotofalle  Befestigungsgurt  USB-Kabel  Bedienungsanleitung Präsentation des Produkts VORDERANSICHT LCD-Bildschirm Lichtsensor Leuchtanzeige 20 Infrarot- LEDS PIR-Sensor 20 Infrarot- LEDS RECHTE Taste: MENÜ LINKE Taste: Ein/Aus OK (SET) Objektiv Navigation (NEXT) PIE1028 – indice A – avril 2018 72/120...
  • Page 73 RÜCKANSICHT Schrauben Sie ab, um das Gerät zu öffnen. Öffnung für den Befestigungsgurt Schrauben Sie ab, um das Gerät zu öffnen. USB-Port INNENANSICHT Micro-SD- Kartensteckplatz Batteriefach (4 x AA) PIE1028 – indice A – avril 2018 73/120...
  • Page 74 Datum verfügbarer (Jahr/Monat/Tag) Speicherplatz Batterieladezustand (Anzahl der Dateien) LCD-Bildschirm – Video-Modus Uhrzeit Video-Modus Anzahl der aufgenommenen Videoauflösung Videos Anzahl der Bilder pro Geschätzter Sekunde Datum verfügbarer (Jahr/Monat/Tag) Speicherplatz Batterieladezustand (Anzahl der Dateien) PIE1028 – indice A – avril 2018 74/120...
  • Page 75 Batterien einlegen oder herausnehmen. Die Fotofalle kann beschädigt werden, wenn Batterien bei eingeschaltetem Gerät entfernt werden.  Verwenden Sie nicht alte und neue Batterien zusammen. Verwenden Sie nicht Alkaline- und Standardbatterien oder wiederaufladbare Batterien zusammen. PIE1028 – indice A – avril 2018 75/120...
  • Page 76 Schalten Sie das Gerät ein und gehen Sie in den automatischen PIR- Betriebsmodus: Drücken Sie die LINKE Taste für 3 Sekunden, die Leuchtanzeige blinkt 5 Mal und das Gerät wechselt in den PIR Auto- Betriebsmodus. PIE1028 – indice A – avril 2018 76/120...
  • Page 77 Im Testmodus, drücken Sie die LINKE Taste, um abhängig von den Kameraeinstellungen Fotos, Videos oder Standbilder und Videos aufzunehmen.  Um die Videoaufnahme (im Video- oder Foto + Video-Modus) zu beenden, drücken Sie erneut die LINKE Taste. PIE1028 – indice A – avril 2018 77/120...
  • Page 78 Konfigurationsmenü PIE1028 – indice A – avril 2018 78/120...
  • Page 79 Fotomodus aufzurufen  OK erscheint auf dem FOTO Standard- LCD-Bildschirm. einstellung Mach ein Foto Drücken Sie die RECHTE Taste für 3 Sekunden, um zum Informationsbildschirm zurückzukehren, und drücken Sie dann die LINKE Taste, um ein Bild aufzunehmen. PIE1028 – indice A – avril 2018 79/120...
  • Page 80: Konfiguration

    SETTING Einzelheiten zu den Parametern und (Operation setup) Einstellungen finden Sie in der folgenden Tabelle. KONFIGURATION Drücken Sie die RECHTE Taste, um in das Einstellen der Konfigurationsmenü zu gelangen. Betriebs-parameter des Geräts PIE1028 – indice A – avril 2018 80/120...
  • Page 81 EXIT Drücken Sie die RECHTE Taste, um zum AUSFAHRT Informationsbildschirm zurückzukehren. SETTING (operation setup) KONFIGURATION (Einstellen der Betriebsparameter des Geräts) PICTURE (setup) Drücken Sie die RECHTE Taste zum Eingeben. FOTO (Einstellung) PIE1028 – indice A – avril 2018 81/120...
  • Page 82 (Anzahl der Fotos pro Auslösung) Drücken Sie die RECHTE Taste zum Eingeben. 1P (Standardeinstellung) Drücken Sie die LINKE Taste, um zu navigieren, und dann die RECHTE Taste, um die Einstellung zu speichern und zu beenden. PIE1028 – indice A – avril 2018 82/120...
  • Page 83 Drücken Sie die RECHTE Taste zum Eingeben. Standardeinstellung: 5 Sekunden Drücken Sie die LINKE Taste, um die gewünschte Länge auszuwählen, und drücken Sie dann die RECHTE Taste, um die Einstellung zu speichern und zu beenden. PIE1028 – indice A – avril 2018 83/120...
  • Page 84 Ziffer auszuwählen, und dann die RECHTE Taste, um zu bestätigen und zur nächsten Ziffer zu gehen. Wenn die Anfangs- und Endzeit programmiert sind, drücken Sie die RECHTE Taste erneut, um zu beenden. _______________________________ PIE1028 – indice A – avril 2018 84/120...
  • Page 85 Wenn das Zeitintervall programmiert ist, drücken Sie die RECHTE Taste erneut, um zu beenden. _______________________________ Anhand der Funktion Zeitintervall kann die Fotofalle auch ohne Bewegungserkennung Bilder oder Videos zu einem voreingestellten Zeitintervall automatisch aufnehmen. PIE1028 – indice A – avril 2018 85/120...
  • Page 86 Fotofalle zu viele Fotos oder Videos aufnimmt. Beispiel: Wenn der PIR-Intervall auf 00:01:00 beträgt, wartet die Fotofalle 1 Minute zwischen den Foto/Video-Aufnahmen mit Bewegung. Hinweis: TIME LAPSE und PIR-INTERVALL nicht gleichzeitig auf „ON“ stellen. PIE1028 – indice A – avril 2018 86/120...
  • Page 87: Pir- Empfindlichkeit

    Drücken Sie die LINKE Taste, um zu navigieren, und dann die RECHTE Taste, um die Einstellung zu speichern und zu beenden. _______________________________ Hohe Empfindlichkeit 1) höhere Empfindlichkeit für Bewegungen durch kleinere Objekte; 2) bietet PIE1028 – indice A – avril 2018 87/120...
  • Page 88: Datum & Uhrzeit

    Das Zeitformat ist Stunde:Minute. PASSWORD Drücken Sie die RECHTE Taste zum Eingeben. (camera lock) OFF (Standardeinstellung) PASSWORT Drücken Sie die LINKE Taste, um ON auszuwählen, (6 Ziffern) und dann die RECHTE Taste, um die PIE1028 – indice A – avril 2018 88/120...
  • Page 89 Wählen Sie „Ja“, um sämtliche Parameter auf die ursprüngliche werksseitige Standardeinstellung zurückzusetzen. USB-Verbindung Wenn das Gerät über USB angeschlossen ist, drücken Sie die LINKE Taste, bis die rote Leuchtanzeige aufleuchtet; dann erscheint die folgende Schnittstelle: PIE1028 – indice A – avril 2018 89/120...
  • Page 90 Webcam umgewandelt. Der LCD-Bildschirm zeigt die folgende Schnittstelle. Drücken Sie die RECHTE Taste erneut, um zu beenden. Technische Spezifikationen Bildsensor 1,3 Megapixels Farbe CMOS F = 3,0 Objektiv FOV = 49° Auto IR-cut-remove PIR-Reichweite Ungefähr 15 m PIE1028 – indice A – avril 2018 90/120...
  • Page 91 Ja - Programmierbar LCD-Bildschirm 1’’ (2,5 cm) – Einfarbig Versorgung 4 Batterien AA LR06 (nicht enthalten) Energie 5-6 V DC (12 A) Stromverbrauch 190 mA (+1920 mA mit Infrarotblitz) Schnittstelle USB-Anschluss, Micro SD-Kartensteckplatz PIE1028 – indice A – avril 2018 91/120...
  • Page 92 Reparatur an den Kundendienst zurücksenden müssen. Bitte senden Sie uns für jede Reparatur:  das vollständige Produkt  den Kaufbeleg (Rechnung oder Kassenbon) Falls Sie eines dieser Elemente weglassen, muss Ihnen der Kundendienst die ausgeführten Reparaturen berechnen. PIE1028 – indice A – avril 2018 92/120...
  • Page 93 NUM’AXES behält sich das Recht vor, Eigenschaften seiner Produkte zu ändern, um technische Verbesserungen daran vorzunehmen oder um neuen Vorschriften zu entsprechen. Die in dieser Anleitung enthaltenen Informationen können ohne vorherige Ankündigung geändert werden. PIE1028 – indice A – avril 2018 93/120...
  • Page 94 Ressourcen und zum Schutz der menschlichen Gesundheit bei. CE-Kennzeichnung Dieses Gerät entspricht den EG-Normen. Richtlinie 2014/30/EU zur Harmonisierung der Rechtsvorschriften der Mitgliedstaaten über die elektromagnetische Verträglichkeit EN 55032: 2015, EN 55024: 2010 EN 61000-3-2: 2014, EN 61000-3-3: 2013 PIE1028 – indice A – avril 2018 94/120...
  • Page 95 ANHANG C IEC 62321-8: 2017 Z.A.C. des Aulnaies 745 rue de la Bergeresse C.S. 30157 45161 OLIVET CEDEX FRANCE Tél. +33 (0)2 38 69 96 27 Fax +33 (0)2 38 63 31 00 www.numaxes.com export@numaxes.com PIE1028 – indice A – avril 2018 95/120...
  • Page 96: Vista Frontale

    VISTA FRONTALE Sensore luminsosità (giorno/notte) Schermo LCD Indicatore 20 LED a luminoso infrarossi Sensore infrarosso 20 LED a passivo (PIR) infrarossi Pulsante SINISTRO: Pulsante DESTRO: Accensione/Spegnimento MENU Lente Navigazione (NEXT) OK (SET) PIE1028 – indice A – avril 2018 96/120...
  • Page 97: Vista Interna

    VISTA POSTERIORE Svitare per aprire il dispositivo Passaggio per la cinghia Svitare per aprire il dispositivo Porta USB VISTA INTERNA Alloggiamento per scheda micro SD Vano pile (4 x AA) PIE1028 – indice A – avril 2018 97/120...
  • Page 98 (numero di file) Livello pile Schermo LCD – Modalità Video Modalità Risoluzione Video video Numero di Numero di video presi fotogrammi al secondo Data Stima dello (anno/mese/giorno) Livello pile spazio disponibile (numero di file) PIE1028 – indice A – avril 2018 98/120...
  • Page 99 La rimozione delle batterie mentre l'unità è in funzione può danneggiare il prodotto.  Evitare di utilizzare insieme batterie vecchie e nuove. Evitare di utilizzare insieme diversi tipi di batterie (alcaline, al litio...). PIE1028 – indice A – avril 2018 99/120...
  • Page 100  Accendere il dispositivo e accedere alla modalità Funzionamento Automatico PIR: Premere il pulsante SINISTRO per 3 secondi, il indicatore luminoso lampeggerà 5 volte e l'unità entrerà nella modalità Funzionamento Automatico PIR. PIE1028 – indice A – avril 2018 100/120...
  • Page 101 In modalità Test, premere il pulsante SINISTRO per scattare foto, video o foto + video in base alle impostazioni della fotocamera.  Per interrompere la registrazione video (in modalità Video o Foto + Video), premere di nuovo il pulsante SINISTRO. PIE1028 – indice A – avril 2018 101/120...
  • Page 102 Menu delle funzionalità PIE1028 – indice A – avril 2018 102/120...
  • Page 103 Foto  OK compare sullo schermo LCD. Impostazione Fare una foto predefinita Premere il pulsante DESTRO per 3 secondi per tornare al schermo di informazione, e poi premere il pulsante SINISTRO per scattare una foto. PIE1028 – indice A – avril 2018 103/120...
  • Page 104 SETTING Vedere la tabella seguente per dettagli su (Operation setup) parametri e impostazioni. CONFIGURAZIONE Premere il pulsante DESTRO per accedere al dei parametri menu di configurazione. operativi del dispositivo PIE1028 – indice A – avril 2018 104/120...
  • Page 105 EXIT Premere il pulsante DESTRO per tornare al USCIRE schermo di informazione. SETTING (operation setup) CONFIGURAZIONE (impostazione dei parametri operativi del dispositivo) PICTURE (setup) Premere il pulsante DESTRO per accedere. FOTO Impostazione PIE1028 – indice A – avril 2018 105/120...
  • Page 106: Risoluzione Foto

    Premere il pulsante DESTRO per accedere. 1P (impostazione predefinita) Premere il pulsante SINSITRO per navigare e poi il pulsante DESTRO per salvare le impostazioni e uscire. Seleziona quante foto in serie per ogni scatto. PIE1028 – indice A – avril 2018 106/120...
  • Page 107: Risoluzione Video

    DESTRO per salvare le impostazioni e uscire. FRAME (video frame speed) FOTOGRAMMI AL SECONDO Premere il pulsante DESTRO per accedere. 30 FPS (impostazione predefinita) 15 FPS PIE1028 – indice A – avril 2018 107/120...
  • Page 108 Esempio: Se l’ora di inizio impostata è 15:00:00 e l’ora di fine 18:00:00, la videocamera funzionerà esclusivamente tra le 15:00 (03:00 PM) e le 18:00 (06:00 PM) di ogni giorno. PIE1028 – indice A – avril 2018 108/120...
  • Page 109 (5 sec. to 24 hr.) OFF (impostazione predefinita) INTERVALLO PIR Premere il pulsante SINISTRO per selezionare ON (da 5 secondi a 24 e poi il pulsante DESTRO per impostare ore) l’intervallo PIR. PIE1028 – indice A – avril 2018 109/120...
  • Page 110 DESTRO per salvare le impostazioni e CICLICA uscire. _______________________________ Selezionare ON per attivare la registrazione ciclica. Quando la scheda micro SD sarà piena, la videocamera continuarà a registrare foto/video cancellando le foto e i video più vecchi. PIE1028 – indice A – avril 2018 110/120...
  • Page 111 In un ambiente ad alta temperatura, il calore del corpo dei soggetti e la temperatura dell’ambiente sono difficilmente distinguibili per la videocamera: si consiglia di impostare la sensibilità su alta. PIE1028 – indice A – avril 2018 111/120...
  • Page 112: Data & Ora

    DESTRO per confermare e passare alla cifra successiva. Quando i 6 numeri sono programmati, premere di nuovo il pulsante DESTRO per confermare il password e uscire. RESET Premere OK/SET per accedere. (default setting) PIE1028 – indice A – avril 2018 112/120...
  • Page 113 Il dispositivo entra in modalità Test.  Connessione PC per leggere la scheda micro SD Lo schermo LCD del dispositivo mostra l'interfaccia seguente. È ora possibile leggere il contenuto della scheda micro SD tramite il computer. PIE1028 – indice A – avril 2018 113/120...
  • Page 114 940 nm – 40 LED Distanza flash IR Circa 10 m Scheda di memoria Scheda micro SD max. 32 GB Registrazione ciclica Sì – programmabile Modalità di cattura Foto / Video / Foto + Video PIE1028 – indice A – avril 2018 114/120...
  • Page 115 Porta USB, alloggiamento scheda micro SD Dimensioni 115 x 84 x 54 mm Peso 224 g Livello impermeabilità IP54 Temperature di utilizzo -20°C a +60°C Livello di umidità operativo 5% - 90% PIE1028 – indice A – avril 2018 115/120...
  • Page 116 NUM’AXES, sono a carico dell’utilizzatore. Condizioni di garanzia La garanzia è riconosciuta solo se il prodotto inviato in riparazione è corredato di prova di acquisto (fattura o biglietto di cassa), senza alcuna manomissione. PIE1028 – indice A – avril 2018 116/120...
  • Page 117 Le informazioni del presente manuale possono essere oggetto di modifica senza preavviso. Fotografie e disegni non contrattuali. Registrazione del prodotto Il prodotto può essere registrato sul nostro sito web www.numaxes.com. PIE1028 – indice A – avril 2018 117/120...
  • Page 118 Allegato II RoHS2.0 Direttiva (EU) 2015/863 IEC 62321-3-1: 2013 IEC 62321-5: 2013 IEC 62321-4: 2013 IEC 62321-6: 2015 IEC 62321-7-1: 2015 IEC 62321: 2008 ALLEGATO C IEC 62321-8: 2017 PIE1028 – indice A – avril 2018 118/120...
  • Page 119 Z.A.C. des Aulnaies 745 rue de la Bergeresse C.S. 30157 45161 OLIVET CEDEX FRANCE Tél. +33 (0)2 38 69 96 27 Fax +33 (0)2 38 63 31 00 www.numaxes.com export@numaxes.com PIE1028 – indice A – avril 2018 119/120...
  • Page 120 Z.A.C. des Aulnaies 745 rue de la Bergeresse C.S. 30157 45161 OLIVET CEDEX FRANCE Tél. +33 (0)2 38 63 64 40 Fax +33 (0)2 38 63 31 00 www.numaxes.com info@numaxes.com PIE1028 – indice A – avril 2018 120/120...

Table des Matières