Publicité

Les langues disponibles
  • FR

Les langues disponibles

  • FRANÇAIS, page 1

Liens rapides

Gaia Nova
Installation handbook
Manuel d'installation
Manual de instalación
Manuale di installazione
Installationshandbuch
www.poolstar.fr

Publicité

Table des Matières
loading

Sommaire des Matières pour poolstar HL-B200C

  • Page 1 Gaia Nova Installation handbook Manuel d’installation Manual de instalación Manuale di installazione Installationshandbuch www.poolstar.fr...
  • Page 3: Avertissements

    Avertissements Lisez attentivement ce manuel avant d’utiliser votre sauna pour la première fois. Nous vous recommandons de le conserver précieusement pour de futures consultations. • Le bois est un élément vivant, pour conserver son aspect initial, il est important de traiter l’extérieur du bois contre l’humidité. Utilisez un saturateur uniquement sur la partie extérieure du sauna.
  • Page 4 Sécurité ATTENTION : Veuillez lire attentivement les consignes de sécurité avant d’installer et d’utiliser votre cabine de sauna. Elles sont essentielles pour votre sécurité, veuillez les respecter rigoureusement. Attention à l’hyperthermie, insolation et coup de chaleur qui peuvent être provoqués ou accentués par le non respect des consignes de sécurité.
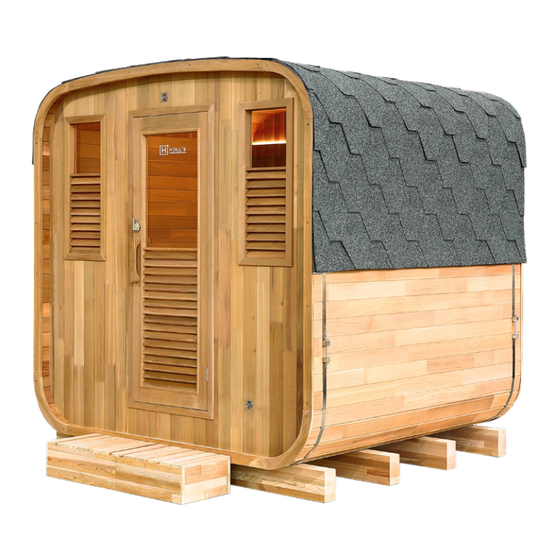
  • Page 5: Description Du Sauna

    Description du sauna Caractéristique technique Modèle HL-B200C Bois cèdre rouge canadien Voltage 230 V - 50 Hz (hors poële) N° Qantité Name Dimensions Support sauna Ø 5 x 50 Latte inférieure spéciale (convexe des deux côtés) Ø 4 x 40 lattes latérales spéciale (avec trous de vis)
  • Page 6 Installation Panneau de banc supérieur (pliable) Support de banc Banc bas Banc latéral Support de poêle pour sauna (avec bac à eau) Protection du poêle (trois pièces par jeu) marche d'entrée Poignée de porte Shingle (gris) Nez d'eau Bardeau d'asphalte (gris) Couverture de fil Boîtier de commande Latte de remplissage supérieure (10 mm)
  • Page 7: Assemblage

    Assemblage Étapes de l’assemblage du sauna étape 1: Étape 2: Ø 4 x 40 Ø 4 x 40...
  • Page 8 Assemblage Étape 3: Ø 4 x 25 Ø 4 x 40 Étape 4: Ø 4 x 40 Ø 4 x 40...
  • Page 9 Assemblage Étape 5: Ø 4 x 40 31 x32 Étape 6:...
  • Page 10 Assemblage Étape 7: Étape 8: 10-3 Ø 4 x 40 10-2 10-4 10-4 10-1...
  • Page 11 Assemblage Étape 9: Ø 4 x 40 Ø 4 x 40 Cache câble Ø 4 x40 Ø 3 x18 Étape 10: Ø 5 x50 Ø 5 x50...
  • Page 12 Assemblage Étape 11: 450mm 420mm Ø 4 x 40 Étape 12: Ø 4 x 40...
  • Page 13 Assemblage Étape 13: Ø 5 x 50 Ø 4 x 40 Étape 14: Ø 6 x 70...
  • Page 14 Assemblage IMPORTANT : La couverture de toit est indispensable pour assurer l’étanchéité du sauna, il faut l’adapter selon l’environnement. Étape 15: Ø 4 x 40 Étape 16: Ø 3 x 15...
  • Page 15 Assemblage Étape 17: Étape 18: Ø 4 x 25 Ø 4 x 40 1: connect 2: fix...
  • Page 16: Maintenance, Entretien

    Les informations et explications nécessaires à leur installation seront fournies par l’un de nos technicien. Les frais liés à l’emploi d’une main d’œuvre tierce ne pourront être pris en charge par Holl’s. IMPORTANT Ne retournez pas le produit au magasin Contactez votre centre de service après-vente local sur www.holls.fr ou POOLSTAR 960 Avenue Olivier Perroy, 13790 ROUSSET - FRANCE...
  • Page 17: Commande Led

    Commande LED boitier de commande LED Télécommande Température de fonctionnement -30°C / 60°C -30°C / 60°C Alimentation CD5V / 12/24V DC 2 piles NO7 - 3V Sortie 3 channels N-MOS drain open output Consommation électrique 0.5W 0.09mW Sortie 6A 3 canaux : 18A 6A Dimensions du boitier 83 x 79 x 33cm Fonctions :...
  • Page 19 Recommendations Read this manual carefully before using your sauna for the first time. We recommend you keep it in a safe place for future reference. • Wood is a living element, to maintain its original appearance, it is important to treat the outside of the wood against moisture. Use a saturator only on the outside of the sauna.
  • Page 20 Safety IMPORTANT: Please read the safety instructions carefully before installing and using your sauna cabin. They are essential for your safety, so please adhere strictly to them. Beware of hyperthermia, heat stroke or heat exhaustion which can be caused or aggravated by noncompliance with the safety instructions.
  • Page 21: Technical Data

    Description sauna Technical data Model HL-B200C Cabin Material Canadian red cedar Voltage 230 V - 50 Hz (excluding stove) N° Quantity Name Size Barrel Cradles Ø 5 x 50 Special bottom slat (convex on both sides) Ø 4 x 40 special bottom slat (with screws holes) Ø...
  • Page 22 Installation Top bench panel (foldable) Low bench braket Low bench Side bench Sauna stove support bracket (with water tray) Sauna stove grill (three parts per set) entrance step Door handle Rain coat (gray) Water nose Asphalt shingle (grey) Wire cover Control box Top filling slat (10mm) Top filling slat (15mm)
  • Page 23 Assemble instructions Assemble steps Step 1: Step 2: Ø 4 x 40 Ø 4 x 40...
  • Page 24 Assemble instructions Step 3: Ø 4 x 25 Ø 4 x 40 Step 4: Ø 4 x 40 Ø 4 x 40...
  • Page 25 Assemble instructions Step 5: Ø 4 x 40 31 x32 Step 6:...
  • Page 26 Assemble instructions Step 7: Step 8: 10-3 Ø 4 x 40 10-2 10-4 10-4 10-1...
  • Page 27 Assemble instructions Step 9: Ø 4 x 40 Ø 4 x 40 Cable cover Ø 4 x40 Ø 3 x18 Step 10: Ø 5 x50 Ø 5 x50...
  • Page 28 Assemble instructions Step 11: 450mm 420mm Ø 4 x 40 Step 12: Ø 4 x 40...
  • Page 29 Assemble instructions Step 13: Ø 5 x 50 Ø 4 x 40 Step 14: Ø 6 x 70...
  • Page 30 Assemble instructions IMPORTANT: The roof cover is essential for sauna waterproof, adapt it to according to the environment. Step 15: Ø 4 x 40 Step 16: Ø 3 x 15...
  • Page 31 Assemble instructions Step 17: Step 18: Ø 4 x 25 Ø 4 x 40 1: connect 2: fix...
  • Page 32: Maintenance/Servicing

    Costs linked to the use of subcontract labour provided by a third party cannot be covered by Holl’s. IMPORTANT Do not return the product to the store Contact your local after sales service on www.holls.fr or POOLSTAR 960 Avenue Olivier Perroy, 13790 ROUSSET - FRANCE...
  • Page 33 LED Controler LED control box Remote control Operating temperature -30°C / 60°C -30°C / 60°C Tension CD5V / 12/24V DC 2 piles NO7 - 3V output 3 channels N-MOS drain open output Power consumption 0.5W 0.09mW Output 6A 3 canaux : 18A 6A Dimensions of the box 83 x 79 x 33cm Fonctions :...
  • Page 35 Advertencias Lea detenidamente este manual antes de utilizar su sauna por primera vez. Le aconsejamos que lo guarde en un lugar seguro para futuras consultas. • La madera es un elemento vivo, para mantener su apariencia original, es importante tratar el exterior de la madera contra la humedad.
  • Page 36 Seguridad ATENCIÓN: Lea detenidamente las instrucciones de seguridad antes de instalar y utilizar la cabina de la sauna. Son fundamentales para su seguridad, por lo que debe asegurarse de respetarlas en todo momento. En caso contrario, podría provocarse o acentuarse una hipertermia, una insolación o un golpe de calor. Entre sus síntomas se incluyen fiebre, aceleración del pulso, vértigo, desmayos, letargia y entumecimiento del cuerpo o de alguna parte del cuerpo.
  • Page 37: Características Técnicas

    Descripción de la sauna Características técnicas Modelo HL-B200C Madera Canadian red cedar Tensión 230 V - 50 Hz (excluyendo estufa) N° CANT. Name Tamaño CANT. Cunas de barril Ø 5 x 50 Listón inferior especial (convexo en ambos lados) Ø 4 x 40 listón inferior especial (con orificios para tornillos)
  • Page 38 Instalación Panel superior de banco (plegable) Braket de banco bajo Banco bajo Banco lateral Soporte de estufa para sauna (con bandeja de agua) Parrilla para estufa de sauna (tres partes por juego) paso de entrada Manija de la puerta Chubasquero (gris) Nariz de agua Teja de asfalto (gris) Cubierta de alambre...
  • Page 39 Ensamblaje Etapas del montaje Etapa 1: Etapa 2: Ø 4 x 40 Ø 4 x 40...
  • Page 40 Ensamblaje Etapa 3: Ø 4 x 25 Ø 4 x 40 Etapa 4: Ø 4 x 40 Ø 4 x 40...
  • Page 41 Ensamblaje Etapa 5: Ø 4 x 40 31 x32 Etapa 6:...
  • Page 42 Ensamblaje Etapa 7: Etapa 8: 10-3 Ø 4 x 40 10-2 10-4 10-4 10-1...
  • Page 43 Ensamblaje Etapa 9: Ø 4 x 40 Ø 4 x 40 Cubierta de cable Ø 4 x40 Ø 3 x18 Etapa 10: Ø 5 x50 Ø 5 x50...
  • Page 44 Ensamblaje Etapa 11: 450mm 420mm Ø 4 x 40 Etapa 12: Ø 4 x 40...
  • Page 45 Ensamblaje Etapa 13: Ø 5 x 50 Ø 4 x 40 Etapa 14: Ø 6 x 70...
  • Page 46 Ensamblaje ATENCIÓN: El techo es esencial para garantizar la estanqueidad de la sauna, debe adaptarse de acuerdo con el entorno. Etapa 15: Ø 4 x 40 Etapa 16: Ø 3 x 15...
  • Page 47 Ensamblaje Etapa 17: Etapa 18: Ø 4 x 25 Ø 4 x 40 1: connect 2: fix...
  • Page 48: Mantenimiento Y Cuidados

    PRECAUCIÓN No le devuelva el producto a la tienda Póngase en contacto con su centro de servicio posventa local sobre www.holls.fr o POOLSTAR 960 Avenue Olivier Perroy, 13790 ROUSSET - FRANCE...
  • Page 49 LED Controler Caja de control LED Control remoto Temperatura de funcionamiento -30 ° C / 60 ° C -30 ° C / 60 ° C Tensión CD5V / 12 / 24V DC 2 pilas NO7 - 3V salida Salida abierta de drenaje N-MOS de 3 canales El consumo de energía 0.5W...
  • Page 51: Avvertenze

    Avvertenze Leggere attentamente questo manuale prima di utilizzare la sauna per la prima volta. Si raccomanda di conservare con cura il presente manuale per eventuali consultazioni future. • Il legno è un elemento vivente, per mantenere il suo aspetto originale, è importante trattare l’esterno del legno dall’umidità. Utilizzare un saturatore solo all’esterno della sauna.
  • Page 52 Sicurezza ATTENZIONE: Si prega di leggere attentamente le istruzioni di sicurezza prima di installare ed utilizzare la vostra cabina sauna. Tali istruzioni sono fondamentali per la vostra sicurezza, si prega di rispettarle in maniera scrupolosa. Si prega di fare attenzione ad ipertermia, insolazioni e colpi di calore che possono essere provocati o aggravati dal mancato rispetto delle istruzioni di sicurezza.
  • Page 53: Caratteristiche Tecniche

    Descrizione della sauna Caratteristiche tecniche Modello HL-B200C Legno Canadian red cedar Voltaggio 230 V - 50 Hz (esclusa la stufa) N° QTÀ Nome Dimensioni QTÀ Culle a botte Ø 5 x 50 Speciale stecca inferiore (convessa su entrambi i lati) Ø...
  • Page 54 Installazione Pannello superiore del banco (pieghevole) Staffa da banco bassa Panca bassa Panca laterale Staffa supporto stufa sauna (con vassoio dell'acqua) Griglia per stufa sauna (tre parti per set) gradino d'ingresso Maniglia Cappotto da pioggia (grigio) Naso d'acqua Asfalto ghiaia (grigio) Copertura del filo Scatola di controllo Stecca di riempimento superiore (10 mm)
  • Page 55 Assemblaggio Fasi di assemblaggio Fase 1: Fase 2: Ø 4 x 40 Ø 4 x 40...
  • Page 56 Assemblaggio Fase 3: Ø 4 x 25 Ø 4 x 40 Fase 4: Ø 4 x 40 Ø 4 x 40...
  • Page 57 Assemblaggio Fase 5: Ø 4 x 40 31 x32 Fase 6:...
  • Page 58 Assemblaggio Fase 7: Fase 8: 10-3 Ø 4 x 40 10-2 10-4 10-4 10-1...
  • Page 59 Assemblaggio Fase 9: Ø 4 x 40 Ø 4 x 40 Copricavo Ø 4 x40 Ø 3 x18 Fase 10: Ø 5 x50 Ø 5 x50...
  • Page 60 Fase 11: 450mm 420mm Ø 4 x 40 Fase 12: Ø 4 x 40...
  • Page 61 Fase 13: Ø 5 x 50 Ø 4 x 40 Fase 14: Ø 6 x 70...
  • Page 62 Assemblaggio ATTENZIONE: Il tetto è essenziale per garantire la tenuta stagna della sauna, deve essere adattato in base all’ambiente. Fase 15: Ø 4 x 40 Fase 16: Ø 3 x 15...
  • Page 63 Manutenzione Fase 17: Fase 18: Ø 4 x 25 Ø 4 x 40 1: connect 2: fix...
  • Page 64 Le spese legate all’uso di una manodopera di parti terze non saranno prese in carico da Holl’s. IMPORTANTE Non restituire il prodotto al negozio Rivolgersi al centro di assistenza post-vendita su www.holls.fr o POOLSTAR 960 Avenue Olivier Perroy, 13790 ROUSSET - FRANCE...
  • Page 65 Controller LED Scatola di controllo a LED Telecomando Temperatura di esercizio -30 ° C / 60 ° C -30 ° C / 60 ° C Tensione CD5V / 12 / 24V DC 2 pile NO7 - 3V produzione Uscita aperta di drenaggio N-MOS a 3 canali Consumo di energia 0.5W...
  • Page 67 Warnungen Lesen Sie vor der Erstbenutzung Ihrer Sauna aufmerksam diese Gebrauchsanweisung. Wir raten Ihnen die Gebrauchsanweisung für spätere Nutzungsempfehlungen sicher aufzubewahren. • Holz ist ein lebendiges Element, um sein ursprüngliches Aussehen zu erhalten, ist es wichtig, die Außenseite des Holzes gegen Feuchtigkeit zu behandeln.
  • Page 68 Sicherheit ACHTUNG: Lesen Sie vor der Installation und Nutzung Ihrer Sauna-Kabine aufmerksam die Sicherheitsanweisungen. Diese sind wesentli- cher Bestandteil zu Ihrer Sicherheit und müssen unbedingt eingehalten werden. Vorsicht vor Hyperthermie, Bestrahlung und Hitzschlag, die durch die Nicht-Einhaltung der Sicherheitsanweisungen ausgelöst oder verschärft werden können.
  • Page 69: Technische Merkmale

    Beschreibung der Sauna Technische Merkmale Modell HL-B200C Holz Canadian red cedar Voltzahl 230 V - 50 Hz (ohne Herd) N° MENGE Name Größe MENGE Fasswiegen Ø 5 x 50 Spezielle Bodenlatte (beidseitig konvex) Ø 4 x 40 spezielle Bodenlatte (mit Schraubenlöchern) Ø...
  • Page 70 Installation Obere Bankplatte (faltbar) Niedrige Bankhalterung Niedrige Bank Seitenbank Halterung für Saunaofen (mit Wasserschale) Saunaofengrill (drei Teile pro Set) Eingangsstufe Türschnalle Regenmantel (grau) Wassernase Asphaltschindel (grau) Kabelabdeckung Kontrollkasten Oberfülllatte (10mm) Oberfülllatte (15mm) Oberfülllatte (20mm) Spezielle Ecklatte (70x38mm) Lesen Sie aufmerksam die Montageanleitung bevor Sie mit dem Zusammenbau beginnen. Wahl des Aufstellorts Holl’s Saunen sind ausschließlich für den äußere-Aufbau geeignet.
  • Page 71: Montage

    Montage Montageschritte Schritt 1: Schritt 2: Ø 4 x 40 Ø 4 x 40...
  • Page 72 Montage Step 3: Ø 4 x 25 Ø 4 x 40 Step 4: Ø 4 x 40 Ø 4 x 40...
  • Page 73 Montage Step 5: Ø 4 x 40 31 x32 Step 6:...
  • Page 74 Montage Step 7: Step 8: 10-3 Ø 4 x 40 10-2 10-4 10-4 10-1...
  • Page 75 Montage Step 9: Ø 4 x 40 Ø 4 x 40 Kabelabdeckung Ø 4 x40 Ø 3 x18 Step 10: Ø 5 x50 Ø 5 x50...
  • Page 76 Step 11: 450mm 420mm Ø 4 x 40 Step 12: Ø 4 x 40...
  • Page 77 Step 13: Ø 5 x 50 Ø 4 x 40 Step 14: Ø 6 x 70...
  • Page 78 Montage WICHTIG: Die Dacheindeckung ist unerlässlich, um die Wasserdichtigkeit der Sauna zu gewährleisten, sie muss der Umgebung ange- passt werden. Step 15: Ø 4 x 40 Step 16: Ø 3 x 15...
  • Page 79 Instandhaltung & Pflege Step 17: Step 18: Ø 4 x 25 Ø 4 x 40 1: connect 2: fix...
  • Page 80: Garantie

    Die zur Installation notwendigen Informationen und Erläuterungen werden von einem unserer Techniker bereitgestellt. Die Kosten zur Beschäftigung einer dritten Arbeitskraft können von Holl‘s nicht übernommen werden. WICHTIG Schicken Sie das Produkt nicht zu Ihrem Händler zurück Kontaktieren Sie Ihr örtliches Kundendienst-Center auf www.holls.fr oder POOLSTAR 960 Avenue Olivier Perroy, 13790 ROUSSET - FRANCE...
  • Page 81 Controlador LED LED-Steuerbox Fernbedienung Betriebstemperatur -30 ° C / 60 ° C. -30 ° C / 60 ° C. Stromspannung CD5V / 12 / 24V DC 2 NO7 - 3V Batterien Ausgabe 3 Kanäle N-MOS Drain Open Ausgang - - Energieverbrauch 0,5 W.
  • Page 84 Technical assistance - Assistance technique Asistencia técnica - Assistenza tecnica Technische Unterstützung +33 (0)4 91 51 01 99 Distribution POOLSTAR FRANCE | www.poolstar.fr | 960avenue Olivier Perroy, 13790 ROUSSET - FRANCE www.poolstar.fr...

Table des Matières