Publicité
Les langues disponibles
Les langues disponibles
Liens rapides
IT
MANUALE
D'UTILIZZO
Guida rapida utilizzo Art. VEDOKP / VEDOKPR / VEDOKP200 / VEDOKPR200
Quick-start user guide to Art. VEDOKP / VEDOKPR / VEDOKP200 / VEDOKPR200
Guide rapide à l'utilisation des art. VEDOKP / VEDOKPR / VEDOKP200 / VEDOKPR200
Snelgids voor art. VEDOKP / VEDOKPR / VEDOKP200 / VEDOKPR200
Guía rápida de uso arts. VEDOKP / VEDOKPR / VEDOKP200 / VEDOKPR200
Il presente manuale descrive le operazioni principali per l'uso del sistema d'allarme VEDO da parte dell'utente finale. Sul sito
https://pro.comelitgroup.com/ è disponibile il manuale d'uso completo.
This manual describes the main procedures for the end user of the VEDO alarm system. The full user manual is available to
download from the website https://pro.comelitgroup.com/
Ce manuel décrit les opérations principales permettant à un usager d'utiliser le système d'alarme VEDO. Le manuel complet avec
les consignes d'utilisation est disponible sur le site https://pro.comelitgroup.com/.
Deze handleiding beschrijft de belangrijkste handelingen voor het gebruik van het alarmsysteem VEDO door de eindgebruiker. Op
de website https://pro.comelitgroup.com/ is de complete handleiding beschikbaar.
En este manual se describen las principales operaciones que puede realizar el usuario final del sistema de alarma VEDO. En el sitio
web https://pro.comelitgroup.com/ se puede consultar el manual de uso completo.
IT
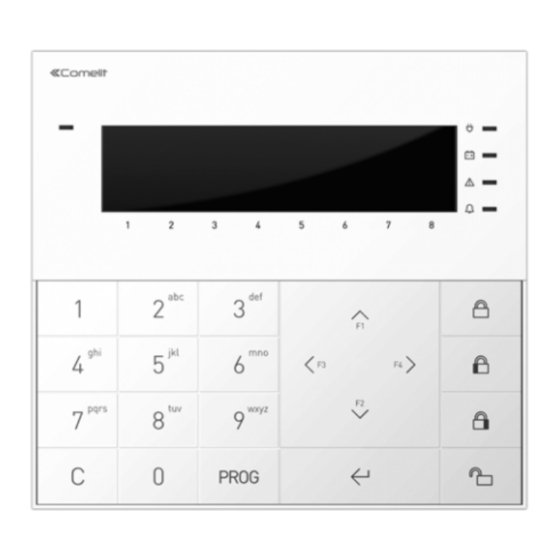
1
Sensore di luminosità
Display LCD a 16 x 2
2
caratteri
3
Indicatori LED
4
Legenda aree
5
Tastiera di navigazione
6
Area lettore RFID
7
Tastiera alfanumerica
Tasti di inserimento/
8
disinserimento
Tasto Indietro /Annulla/
9
Elimina
10
Tasto Invio/Conferma
11
Tasto menu
EN
USER
MANUEL
MANUAL
UTILISATEUR
EN
Light sensor
Détecteur de luminosité
16 x 2-character LCD
Écran LCD à 16 x 2
display
caractères
LED indicators
Témoins à led
Key to areas
Légende des secteurs
Navigation keys
Touches de navigation
Section lecteur de
RFID reader area
proximité
Alphanumeric keypad
Clavier alphanumérique
Arming/disarming
Touches d'insertion/
buttons
désinsertion
Back/Cancel/Delete
Touche Arrière/Annuler/
button
Supprimer
Touche Entrée/
Enter/Confi rm button
Confi rmation
Menu key
Touche menu
FR
NL
GEBRUIKS-
HANDLEIDING
FR
Lichtsensor
Lcd-scherm met 16 x
2 tekens
Led-indicatielampjes
Legenda van de
partities
Navigatietoetsen
Gebied RFID-lezer
Alfanumeriek keypad
Inschakel-/
uitschakeltoetsen
Toets Terug/Annuleren/
Verwijderen
Toets Enter/Bevestigen
Menutoets
ES
MANUAL
DE USO
Passion.Technology. Design.
NL
ES
Sensor de luminosidad
Pantalla LCD de 16 x 2
caracteres
Indicadores led
Leyenda de las áreas
Teclas de navegación
Área lector RFID
Teclado alfanumérico
Teclas de activación/
desactivación
Tecla Atrás/Cancelar/
Eliminar
Tecla Enter/Confi rmar
Tecla menú
Publicité

Manuels Connexes pour Comelit VEDOKP


Sommaire des Matières pour Comelit VEDOKP
- Page 1 Guida rapida utilizzo Art. VEDOKP / VEDOKPR / VEDOKP200 / VEDOKPR200 Quick-start user guide to Art. VEDOKP / VEDOKPR / VEDOKP200 / VEDOKPR200 Guide rapide à l’utilisation des art. VEDOKP / VEDOKPR / VEDOKP200 / VEDOKPR200 Passion.Technology. Design. Snelgids voor art. VEDOKP / VEDOKPR / VEDOKP200 / VEDOKPR200 Guía rápida de uso arts. VEDOKP / VEDOKPR / VEDOKP200 / VEDOKPR200...
- Page 6 SIGNIFICATION DES LEDS DU CLAVIER Couleur État Fonction Éteinte Tension de réseau absente Allumée Tension de réseau présente Vert Tension de réseau OK, mais installation non prête pour l’activation ou présence de zones Clignot. lent (non exclues) ouvertes. Éteinte Batterie OK Jaune Allumée Indique une anomalie à...
-
Page 7: Zones Ouvertes
ACTIVATION AVEC ZONES OUVERTES En présence de zones ouvertes durant la phase d'insertion du système, avant de confirmer l'action, le clavier affichera : ↵ ZONES OUVERTES FORÇAGE ? L'activation peut se faire de plusieurs façons : A. Annuler l'opération en appuyant sur la touche « C », fermer la zone ouverte et réessayer l'activation. B.