Publicité
Les langues disponibles
Les langues disponibles
Liens rapides
FR INSTRUCTIONS D'UTILISATION ET AVIS DE MONTAGE
EN INSTALLATION, USE AND MAINTENANCE INSTRUCTION
IT ISTRUZIONI PER INSTALLAZIONE USO E MANUTENZIONE
DE BEDIENUNGSANLEITUNG MIT MONTAGEANWEISUNGEN
ES INSTRUCCIONES DE USO Y DE MONTAJE
Hotte encastrable
Built in Hood
Cappa da incasso
Eingebaute Dunstabzugshaube
Campana encastrable
DHG7501X
Publicité

Manuels Connexes pour De Dietrich DHG7501X


Sommaire des Matières pour De Dietrich DHG7501X
- Page 1 FR INSTRUCTIONS D’UTILISATION ET AVIS DE MONTAGE EN INSTALLATION, USE AND MAINTENANCE INSTRUCTION IT ISTRUZIONI PER INSTALLAZIONE USO E MANUTENZIONE DE BEDIENUNGSANLEITUNG MIT MONTAGEANWEISUNGEN ES INSTRUCCIONES DE USO Y DE MONTAJE Hotte encastrable Built in Hood Cappa da incasso Eingebaute Dunstabzugshaube Campana encastrable DHG7501X...
- Page 5 Le symbole sur le produit ou son emballage indique que ce produit ne peut être traité comme déchet ménager. Il doit plutôt être remis au point de ramassage concerné, se chargeant du re- cyclage du matériel électrique et électronique. En vous assurant que ce produit est éliminé cor- rectement, vous favorisez la prévention des conséquences négatives pour l’environnement et la santé humaine qui, sinon, seraient le résultat d’un traitement inapproprié des déchets de ce produit. Pour obtenir plus de détails sur le recyclage de ce produit, veuillez prendre contact avec le bureau municipal de votre région, votre service d’élimination des déchets ménagers ou le ma- gasin où vous avez acheté le produit. Cet appareil est commercialisé en accord avec la directive européenne 2012/19/EC sur les dèchets del équipments èlectriques et èlctroniques (WEEE). The symbol on the product or on its packaging indicates that this product may not be treated as household waste. Instead it shall be handed over to the applicable collection point for the recycling of electrical and electronic equipment. By ensuring this product is disposed of correctly, you will help prevent potential negative consequences for the environment and human health, which could otherwise be caused by inappropriate waste handling of this product. For more detailed informa- tion about recycling of this product, please contact your local city office, your household waste disposal service or the shop where you purchased the product. This appliance is marked accor- ding to the European directive 2012/19/EC on waste electrical and electronic equipment (WEEE). Il simbolo sul prodotto o sulla confezione indica che il prodotto non deve essere conside- rato come un normale rifiuto domestico, ma deve essere portato nel punto di raccolta ap- propriato per il riciclaggio di apparecchiature elettriche ed elettroniche. Provvedendo a smaltire questo prodotto in modo appropriato, si contribuisce a evitare potenziali conse- guenze negative per l’ambiente e per la salute, che potrebbero derivare da uno smaltimen-...
- Page 6 INDEX Attention Version de l’appareil Installation Fonctionnement Entretien...
- Page 7 * Pour évacuer l’air qui doit ATTENTION être éliminé respectez les pre- scriptions des autorités com- pétentes. Avant de procéder à l’installation, * Prévoyez une aération de la vérifier que tous les composants pièce adéquate quand une hot- soient en bon état; dans le cas te et des appareils alimentés par contraire, contacter le revendeur une énergie autre que l’énergie et interrompre l’installation.
-
Page 8: Versions De L'appareil
votre appareil n’a VERSIONS DE L’APPAREIL câble pouvant être débranché, prise d’autre dispositif rantisse débranchement L’appareil peut être utilisé en version recyclage ou tous pôles réseau,avec aspirante. distance d’ouverture entre contacts d’au moins 3mm., *Dans la version recyclage (Fig. 1), l’air et les dispositif séparation réseau vapeurs convoyés par l’appareil sont épurés par une grille anti-graisse et par un panneau en fibre doivent alors... -
Page 9: Fonctionnement
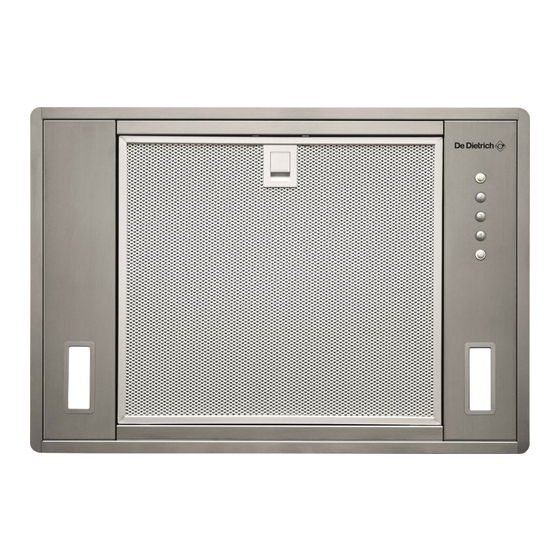
Pour installer l’appareil, régler la position des res- FONCTIONNEMENT sorts latéraux de fixation avec les vis appropriées (fig. 5) par rapport à l’épaisseur du panneau percé précedemment sur lequel l’appareil sera fixé. Insérez le groupe encastrable dans l’ ouverture faite dans le meuble, jusqu’au déclenchement COMMANDE MANUELLE FIG. 7 d’arrêt des ressort latéraux . A : MOTEUR ON/OFF (PREMIÈRE VITESSE) Utiliser les vis fournies pour le blocage définitif par B : DEUXIÈME VITESSE les trous à l’intérieur de l’appareil (Fig.6). C : TROISIÈME VITESSE D : QUATRIÈME VITESSE Attention! E : ÉCLAIRAGE ON/OFF Avant de connecter le flexible d’évacuation au moteur, s’assurer que le clapet anti-retour, qui se Les produits sont dotés d’un dispositif électroni- trouve sur la sortie d’air du moteur, puisse tourner. -
Page 10: Entretien
ENTRETIEN * Un entretien soigné est une garantie de bon fon- ctionnement et de bon rendement de votre appa- reil dans le temps. * Faites très attention surtout au filtre anti- graisse. Pour retirer le filtre anti-graisse, pous- sez la poignée vers l’arrière de la hotte et faites tourner le filtre vers le bas, en le retirant de sa place. - Page 11 CONTENTS Warnings Uses Installation Working Maintenance...
- Page 12 ning rules given by competent WARNINGS authorities. * Provide the room with an ade- quate aeration when a cooker Before installing the appliance, hood and appliances fed by make sure that none of the parts energy other than electric power is damaged in any way. In case (gas-, oil-, or coal- stoves, etc.) of damaged parts, contact your are used simultaneously. The retailer and do not proceed with cooker hood, when evacuating...
- Page 13 or with another device ensuring INSTALLATION omnipolar disconnections from the grid, with an opening distance between the contacts of at least 3 mm, then such disconnecting de- Before installing the appliance, make sure that vices must be supplied within the none of the parts is damaged in any way. In case of damaged parts, contact your retailer and do not fixed installation. proceed with installation. Read all of the following instructions with care be- If the fixed appliance is endowed fore installing the appliance. with a supply cord and a plug, the - Use an air outlet pipe of the shortest possible length. appliance has to be put in a place - Limit the number of pipe bends.
- Page 14 Exausting version WORKING Connect the flange to the exhausting hole with an appropriate pipe. Connect the appliance with the electrical mains through the supply cord. Filtering version PUSH BUTTON FIG. 7 Connect the flange with a pipe suitable to convey A: Motor switch on/off (1st rate level) the air to the top of the cabinet. Connect the ap- B: 2nd rate level switch pliance with the electrical mains through the sup- C: 3rd rate level switch ply cord. D: 4th rate level switch E: Light switch on/off The products are endowed with an electronic de vice which allows the automatic switching off after 4 hours working from the last operation.
- Page 15 TIMING As a result of the new EU65 “Energy label” and MAINTENANCE EU66 “ Ecodesign” regulations issued by the Eu- ropean Commission, which came into force as from January 1 , 2015 , our products have been adapted to comply with these new requirements. * An accurate maintenance guarantees good fun- All of the models complying with the energy label ctioning and long-lasting performance. requirements, are equipped with new electronics including a timer device for suction speeds con- * Particular care is due to the grease filter panel. It trol, when the air capacity exceeds 650m³/h.
- Page 16 INDICE Avvertenze Versioni d’uso Installazione Funzionamento Manutenzione...
-
Page 17: Avvertenze
(impianti di riscaldamento cen- AVVERTENZE tralizzati, termosifoni, scalda- bagni, ecc.). * Per lo scarico dell’aria da eva- Verificare che tutti i componenti cuare rispettare le prescrizioni non siano danneggiati, in caso delle autorità competenti. contrario contattare il rivenditore e non proseguire con l’installazio- * Prevedere un’adeguata area- zione del locale quando una cap- Prima di installare il prodotto leg- pa ed apparecchi alimentati con... - Page 18 i valori di tensione corrispondono VERSIONI D’USO con quelli indicati nella targhetta all’interno dell’apparecchio. * Prima di procedere a qualsiasi L’apparecchio è già predisposto sia per la versio- operazione di pulizia o manuten- ne filtrante sia per la versione aspirante. zione è necessario togliere l’ap- * Nella versione filtrante (dis. 1) l’aria ed i vapori parecchio dalla rete. convogliati dall’apparecchio, vengono depurati sia da un filtro antigrasso sia da un filtro al car- Se l’apparecchio non è provvisto bone attivo e rimessi in circolazione nell’ambiente attraverso un foro praticato nella parte superiore di cavo flessibile non separa- del pensile.
- Page 19 * Predisporre l’alimentazione elettrica. FUNZIONAMENTO * Predisporre, sia in versione filtrante, sia in ver- sione aspirante, il foro evacuazione aria. Per istallare l’apparecchio regolare la posizione delle molle laterali di aggancio tramite le apposite PULSANTIERA FIG. 7 viti (dis. 5), in rapporto allo spessore del pannello A: ON/OFF MOTORE (PRIMA VELOCITA’) forato su cui andrà ancorato. B: SECONDA VELOCITA’ Inserire il gruppo nella sede praticata nel pensile C: TERZA VELOCITA’ fino al completo bloccaggio delle molle laterali. D: QUARTA VELOCITA’ Utilizzare le viti in dotazione per il definitivo bloc- E: ON/OFF ILLUMINAZIONE caggio tramite i fori interni dell’apparecchio (dis. Il prodotto prevede lo spegnimento automatico dopo 4 ore di funzionamento ininterrotto, dall’ulti- Bloccaggio valvola ma funzione impostata.
- Page 20 TEMPORIZZAZIONI Con l’entrata in vigore dal 1° Gennaio 2015 dei MANUTENZIONE nuovi regolamenti della Commissione Europea EU65 “Energy label” e EU66 “ Ecodesign”, ab- biamo reso conforme i prodotti in base ai requisiti richiesti. * Un’accurata manutenzione garantisce un buon Tutti i modelli nelle versioni energy label dispon- funzionamento ed un buon rendimento nel tempo.
- Page 21 INHALTSVERZEICHNIS Hinweise Geräteausführung Installation Betrieb Wartung...
- Page 22 ALLGEMEINE SICHERHEITSHINWEISE * Ein Anschluss der Vor der Installation muss ü b erprü Abluftleitungen ft werden, dass keine Bauteile an Verbrennungs- beschä d igt sind. Andernfalls muss Abgaskamine die Installation abgebrochen und (z.B. der Zentralheizung usw.) Kontakt mit dem Hä n dler ist nicht zulässig aufgenommen werden.
- Page 23 * Dies kann erreicht werden, VERSIONI D’USO wenn durch nicht verschließbare Öffnungen, die Verbrennungsluft Das Gerät ist sowohl Abluft als auch nachströmen Umluft festgelegt. kann. * Im Umluftbetrieb (Abb.1) wird die Luft zusätzlich durch den einzusetzenden Aktivkohlefilter * Beim elektrischen Anschluss geleitet und durch den Hängeschrank müssen die Spannungswerte des in den Raum zurückgeführt.
- Page 24 Zur Montage sind die Achtung! Vor der Befestigung Metallfettfilter herauszunehmen. des Luftkanals ist in jedem Fall Dazu werden diese am zu prüfen, ob sich die entsprechenden Griff leicht nach Rückstauklappe im Luftauslass- oben gedrückt und nach unten aus Stutzen des Motorgehäuses frei der Halterung gezogen (Abb.3).
- Page 25 TIMER BETRIEB Die Produkte des Herstellers sind an die neuen Verordnungen der Europäischen Kommission (gültig DRUECKTASTEN FIG. 7 ab 1. Januar 2015) EU65 “Energielabel Schalter A: ON/OFF DES MOTORS ” und EU66 “ Ökodesign” angepasst. (ERSTE STUFE) Die neue Elektronik schaltet die Geräte Schalter B: ZWEITE STUFE Schalter C: DRITTE STUFE mit Energielabel nach einer...
- Page 26 Soweit das Gerät im Umluftbetrieb WARTUNG eingesetzt wird, sind die Kohlefilter regelmäßig auszutauschen und durch neue zu ersetzen. Um an Nur eine sorgfältige Pflege die Kohlefilter zu gelangen, sind garantiert auf Dauer eine zunächst die Metallfettfilter, gute Leistung und Funktion des wie bereits beschrieben, Geräts abzunehmen.
- Page 27 ÍNDICE Advertencias Versiones de uso Instalación Funcionamiento Mantenimiento...
- Page 28 El aire aspirado no debe ADVERTENCIAS canalizarse a través de un conducto que permita eliminar Antes de proceder a la los humos producidos por los instalación, compruebe que aparatos alimentados por todos los componentes estan fuentes de energía distintas de en buenas condiciones;...
- Page 29 compruebe también que los VERSIONES valores de tensión correspondan a los indicados en la placa de el aparato se puede utilizar en la características del aparato en el versión de reciclaje o de vacío. interior del mismo. En la versión de reciclaje (Fig. 1), el antes de efectuar cualquier aire y los vapores transportados por la operación de mantenimiento o...
-
Page 30: Cómo Funciona
Para la instalación del grupo, ajustar la Cómo funciona posición de los resortes de fijación laterales con los tornillos adecuados (fig. 5) en función del espesor del Mando manual fig. 7 panel previamente perforado al que se fijará el grupo. Inserte la unidad A: MOTOR ON/OFF (primera incorporada en la abertura del velocidad) - Page 31 TEMPORIZACIÓN Mantenimiento A partir del 1° de enero 2015, con la entrada en vi- gor de la nueva normativa de la Comisión Europea Un mantenimiento cuidadoso es una garantía EU65 “Energy label” y EU66 “ Ecodesign”, he- de un funcionamiento y rendimiento adecuados mos adaptado los productos conforme a los requisi- de su dispositivo a lo largo del tiempo.
- Page 33 90001050905 - 05/19...