
Manuels Connexes pour Gigabyte BRIX Extreme GB-BER3-7335


Sommaire des Matières pour Gigabyte BRIX Extreme GB-BER3-7335
- Page 1 BRIX Extreme Ultra Compact PC Kit GB-BER3-7335/GB-BER5-7535/GB-BER7-7840/ GB-BER5H-7535/GB-BER5HS-7535 Quick Start Guide Rev. 1.0...
- Page 2 BRIX Extreme Ultra Compact PC Kit BRIX Extreme GB-BER Ultrakompaktes PC Kit / Kit PC ultra compact BRIX Extreme GB-BER / Kit de PC ultra compacto BRIX Extreme GB-BER / Kit PC BRIX Extreme GB-BER Ultra Compact / Kit per PC BRIX Extreme GB-BER Ultra Compatto / Ультракомпактный...
- Page 3 You will then be directed to the corresponding page for your region. For a list of tested memory, M.2 SSD, wireless adapters and OS supported, go to: https://www.gigabyte.com To download the latest drivers and BIOS updates, go to https://www.gigabyte.com: For product support, go to https://www.gigabyte.com:...
- Page 4 Para uma lista de memória testada, M.2 SSD, adaptadores sem fios e SO suportado, ir para: https://www.gigabyte.com Para transferir as drivers mais recentes e atualizações BIOS, ir para: https://www.gigabyte.com: Para suporte de produto, ir para: https://www.gigabyte.com Supporto Visitate https://www.gigabyte.com/support-downloads/customer-service per informazioni sul vostro BRIX dal menù a scorrimento, o cliccando sulla mappa.
- Page 5 üzerine tıklayarak BRIX garantiniz hakkında daha fazla bilgi edinin. Daha sonra bölgenize uygun sayfaya yönlendirileceksiniz. Test edilmiş hafıza listesi, M.2 SSD, kablosuz adaptörler ve desteklenen OS sürümleri hakkında bilgi almak için: https://www.gigabyte.com sayfasına gidin En son sürücüleri ve BIOS güncellemelerini indirmek için: https://www.gigabyte.com sayfasına gidin Ürün desteği için: https://www.gigabyte.com 援 https://www.gigabyte.com/support-downloads/customer-service , 單...
- Page 6 지 원 https://www.gigabyte.com/support-downloads/customer-service BRIX 롭 증 지 지 , M.2 SSD, https://www.gigabyte.com 트 지 트 BIOS https://www.gigabyte.com: 최 트 트 https://www.gigabyte.com 품 지 트...
- Page 7 Safety and Regulatory Information This product must be grounded with the plug on the adapter's power cord connected to a power socket with a grounding connection. Risk of explosion if the battery is replaced with an incorrect type. Batteries should be recycled where possible. Disposal of used Batteries, must be in accordance with local environmental regulations.
- Page 8 Informazioni di sicurezza e sui regolamenti Sostituire la batteria con una di tipo non corretto può comportare rischio di esplosione. Se possibile, e batterie vanno riciclate. Lo smaltimento delle batteria usate effettuato secondo le regole ambientali in vigore nella regione in cui ci si trova.
- Page 9 信 正 类 的 换 的 的 ⻛ 当 的 机 换 部 GB-BER 的 器 報 タ イ プ バ ッ テ リ ー 発 バ ッ テ リ ー リ サ イ ク ル バ ッ テ リ ー を...
- Page 10 Conventions The following conventions are used in this user's guide: NOTE! Gives bits and pieces of additional information related to the current topic. CAUTION! Gives precautionary measures to avoid possible hardware or software problems. WARNING! Alerts you to any damage that might result from doing or not doing specific actions.
- Page 11 Symbol Statement At the end of its serviceable life, this product should not be treated as household or general waste. It should be handed over to the applicable collection point for the recycling of electrical and electronic equipment, or returned to the supplier for disposal. This device complies with part 15 of the FCC Rules.
- Page 12 義 鋼 司...
- Page 13 Table of Contents Chapter 1 System Information 14 1-1 Installation Precautions 14 1-2 Product Specifications 15 1-3 Package Contents 17 1-3-1 GB-BER Bare-bone 17 1-3-2 135W Adapter & Power Cord (19.5 Vdc, 6.92 A ) 18 1-3-3 Quick Start Guide 18 1-3-4 Thermal Pad 18 1-3-5 VESA Mount Bracket 18 Chapter 2 System Appearance 19...
- Page 14 Chaptor 1 System Information 1-1 Installation Precautions The system contain numerous delicate electronic circuits and components which can become damaged as a result of electrostatic discharge (ESD). Prior to installation, carefully read the user manual and follow these procedures: Prior to installation, do not remove or break motherboard S/N (Serial Number) sticker or warranty sticker provided by your dealer.
- Page 15 1-2 Product Specifications Note: We reserve the right to make any changes to the product specifications and product-related information without prior notice. GB-BER3-7335, GB-BER5-7535, GB-BER7-7840 4 8.3 mm x 134.2 mm x 139.1 mm (1.9" x 5.3" x 5.4") Dimension GB-BER3H-7335, GB-BER5H-7535, GB-BER5HS-7535 52 mm x 134.2 mm x 139.1 mm (2.0"...
- Page 16 Mini DP Mini DP / USB Type-C DP supports : DP1.4 Max Resolution 3840x2160@60Hz Resolution (Max.) GB-BER7-7840, GB-BER5-7535, GB-BER3-7335 1 x M.2 M.2 2280 slot (PCI-e Gen4 x 4 / SATA) GB-BER3H-7335, GB-BER5H-7535 1 x M.2 M.2 2280 slot (PCI-e Gen4 x 4 / SATA) 1 x 2.5"...
- Page 17 1-3 Package Contents Lieferumfang / Contenu du colis / Contenido del paquete / Conteúdo da embalagem / Contenuto della confezione / Комплект поставки / Zawartość opakowania / Paket İçeriği / 物 内 梱 키 지 함 품 1-3-1 GB-BER Bare-bone NOT Include any of the following: M.2 (2280), SO-DIMM memory Folgendes ist NICHT enthalten: M.2 (2280), SO-DIMM Arbeitsspeicher N'inclut PAS les éléments suivants : M.2 (2280), mémoire SO-DIMM...
- Page 18 1-3-2 135W Adapter & Power Cord (19.5 Vdc, 6.92 A ) The product should be used with the included power cord. The included power cord should not be used with other products. 製 梱 コ ー ド セ ッ ト を 梱...
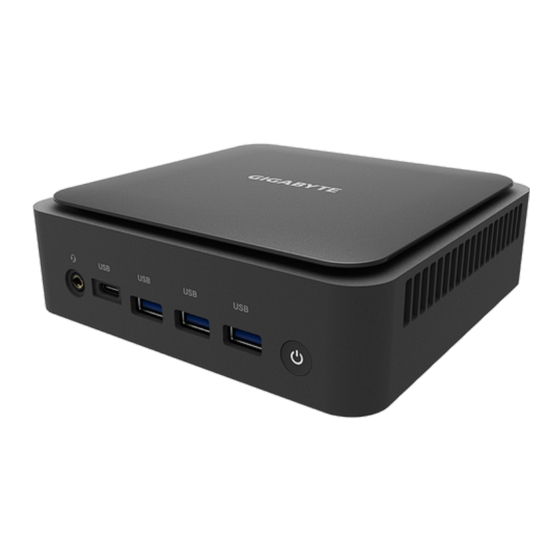
- Page 19 Chaptor 2 System Appearance Getting Familiar with Your Unit Erste Schritte mit Ihrem Gerät / Se familiariser avec votre appareil / Familiarizándose con su unidad / Familiarizar-se com a unidade / Imparare a conoscere la propria unità / Знакомство с изделием / Zapoznanie się z jednostką / Cihazınız Hakkında Bilgi Sahibi Olun / (※...
- Page 20 2-2 Rear View Chaptor 2 System Appearance 2-2-1 Slim Version GB-BER3-7375, GB-BER5-7535, GB-BER7-7740 2-1-1 Tall Version GB-BER3H-7375, GB-BER3HS-7375, GB-BER5H-7535, GB-BER5HS-7535, GB-BER7HS-7840 Description Description USB 3.2 Gen2 with Type C Mini DisplayPort Alt Mode Thunderbolt 4 (5V/3A) HDMI 2.1 FRL10 8K (7680 x 4320) RJ-45 (10/100/1000/2500Mbps) HDMI 2.1 FRL10 8K (7680 x 4320) Kensington Lock Slot (...
- Page 21 2-3 Left View Chaptor 2 System Appearance 2-2-1 Slim Version GB-BER3-7375, GB-BER5-7535, GB-BER7-7740 2-1-1 Tall Version GB-BER3H-7375, GB-BER3HS-7375, GB-BER5H-7535, GB-BER5HS-7535, GB-BER7HS-7840 Description Description USB 3.2 Gen2 with Type C Mini DisplayPort Alt Mode Thunderbolt 4 (5V/3A) HDMI 2.1 FRL10 8K (7680 x 4320) RJ-45 (10/100/1000/2500Mbps) HDMI 2.1 FRL10 8K (7680 x 4320) Kensington Lock Slot (...
- Page 22 2-3 Right View Chaptor 2 System Appearance 2-2-1 Slim Version GB-BER3-7375, GB-BER5-7535, GB-BER7-7740 2-1-1 Tall Version GB-BER3H-7375, GB-BER3HS-7375, GB-BER5H-7535, GB-BER5HS-7535, GB-BER7HS-7840 Description Vent Hole ( System Appearance...
- Page 23 2-5 Bottom View Chaptor 2 System Appearance Description VESA Bracket Screw Holes ( 絲 System Appearance...
- Page 24 2-6 PIN Definition Chaptor 2 System Appearance Description M.2 2280 SSD Connector DDR SO-DIMM slot Wi-Fi Connector SATA connector for LAN/COM/M.2 Upgrade Kit ( *Super SKU ) Note: Wireless module inclusion may vary based on local distribution. 注 意 据 市...
- Page 25 Chaptor 3 System Hareware Installation Pre-installation Instructions Computer components and electronic circuit boards can be damaged by electrostatic discharge. Working on computers that are still connected to a power supply can be extremely dangerous. Follow the simple guidelines below to avoid damage to your computer or injury to yourself.
- Page 26 Reinstall the bottom cover to system. 器 3-2 Installing the M.2 SSD M.2 SSD: Installation der M.2 2280 SSD / SSD M.2 : Comment installer le SSD M.2 2280 / SSD M.2: Como instalar el SSD M.2 2280 / M.2 SSD: Como instalar o M.2 2280 SSD / SSD M.2: Come installare l'SSD M.2 2280 / M.2 SSD: Установка...
- Page 27 Carefully insert the M.2 SSD into slot. M.2 SSD Insert the tab on the thermal plate into the slit near the connector, then secure the thermal plate and M.2 SSD in place with the previously removed screw. 的 M.2 SSD 的...
- Page 28 3-3 Installing the Memory Arbeitsspeicher Installation: SO-DIMM DDR4 / Installation de la mémoire : SO-DIMM DDR4 / Instalación de la memoria: SO-DIMM DDR4 / Instalação de memória: SO-DIMM DDR4 / Installazione della memoria: SO-DIMM DDR4 / Установка модулей памяти: SO-DIMM DDR4 / Instalacja pamięci: SO-DIMM DDR4 / Hafıza Yüklemesi: SO-DIMM DDR4 / SO-DIMM DDR4 / SO-DIMM DDR4 /...
- Page 29 Carefully insert SO-DIMM memory modules. 重 Push down until the modules click into place. 當 再 WARNING! Please ensure a thermal pad is attached on the motherboard before installing the SO- DIMM device into the system. Installing a SO-DIMM device without any thermal pad may result in the system overheating or system performance being throttled.
- Page 30 3-4 Remove the Wireless Module Drahtlosmodul: Sicheres Entfernen des Moduls / Module sans fil : Comment retirer le module en toute sécurité / Módulo inalámbrico: Cómo quitar el módulo de forma segura / Módulo sem fios: Como remover com segurança o modulo / Modulo senza cavi: Come rimuovere il modulo in sicurezza / Беспроводной...
- Page 31 3-5 Installing the LAN/COM/M.2 Kit This system does not support the installation of both LAN/COM kit and 2.5" HDD; also the M.2 module here cannot be equipped with a thermal plate due to the space limitation. Follow these instructions to remove the WiFi Module: Unscrew and remove the bracket, and then disconnect the SATA cable.
- Page 32 Reinstall the bracket with upgrade kit to bottom panel. 套 的 WARNING! Please ensure a thermal pad is attached on the motherboard before installing the M.2 into the upgrade kit. Installing a M.2 without any thermal pad may result in the system overheating or system performance being throttled.
- Page 33 3-6 Installing the VESA Bracket VESA Halterung / Support VESA / Soporte VESA / Suporte VESA / Staffa VESA / Кронштейн VESA / Wspornik VESA / VESA Braketi / VESA / VESA / VESA / VESA ブ ラ ケ ッ ト 래...
- Page 34 The system can now be mounted by sliding the device into place. VESA VESA 的 的 Note: The illustrations of the VESA bracket installation shown are for reference only. Please follow the installation steps of actual purchased bracket. VESA 注 意 僅...
- Page 35 4-1 UEFI Shell Follow these instructions to update BIOS: Go to the Gigabyte website (https://www.gigabyte.com/us/Mini-PcBarebone) and key in the model name in the search bar to access the product page. Go to "Support" page and look for the latest BIOS file. Click "Download".
- Page 36 Copy BIOS Package into the BIOS folder. Power on BRIX and press “DEL” to enter the BIOS setting page. Go to Boot Option #1 and choose your USB Flash device accordingly. System Hardware Installation...
- Page 37 Click "Save Changes and Reset" to save configuration and exit, then select "Yes". All the devices will be displayed on the screen, then type "fs0" to select your USB drive. System Hardware Installation...
- Page 38 Enter the BIOS folder and type “flash.nsh” to start the BIOS update process. After a few minutes, you will see the following screen during the update. System Hardware Installation...
- Page 39 Removed AC adaptor and power on the device then you'll fine the BIOS version has been updated accordingly. System Hardware Installation...