Table des Matières

Publicité

Les langues disponibles
  • FR

Les langues disponibles

  • FRANÇAIS, page 26

Liens rapides

Lovibond
Tintometer
®
Labor-Kühlschränke EX-Serie
Kühlschrank mit Innenraum Ex-geschützt
Vor Inbetriebnahme die Gebrauchsanweisung lesen
Refrigerator with explosion-proof interior container
Read the operating instructions before switching on for the first time
Koelkast met explosieveilige binnenkuip
Voor de inbedrijfstelling de gebruiksaanwijzing lezen
EX 160 / EX 220 / EX 300 / EX 490
Bedienungsanleitung
DE
Seite 2
Instruction Manual
GB
Page 10
Gebruiksaanwijzing
NL
Pagina 18
Mode d'emploi
FR
Page 26
www.lovibond.com
Water Testing
®
Group
Réfrigérateur avec cuve intérieure antidéflagrante
Lire le mode d'emploi avant la mise en service
Frigorifero con vano interno a prova di esplosione
Prima di mettere in funzione l'apparecchio leggere le istruzioni d'uso
Frigorífico con espacio interior a prueba de explosión
Leer las instrucciones de manejo antes de la puesta en servicio
Frigorífico com compartimento interior à prova de explosão
Antes da colocação em funcionamento, ler o manual de utilização
IT
Istruzione d'uso
Pagina 34
Instrucciones
ES
Página 42
Manual de instruções
PT
Página 50
Technical Specifications
Page 58

Publicité

Table des Matières
loading

Sommaire des Matières pour Tintometer Lovibond EX-Serie

  • Page 1 Lovibond Water Testing ® Tintometer Group ® Labor-Kühlschränke EX-Serie Kühlschrank mit Innenraum Ex-geschützt Réfrigérateur avec cuve intérieure antidéflagrante Vor Inbetriebnahme die Gebrauchsanweisung lesen Lire le mode d'emploi avant la mise en service Refrigerator with explosion-proof interior container Frigorifero con vano interno a prova di esplosione...
  • Page 2 Entsorgungshinweis Einsatzbereich des Gerätes Das Gerät enthält wertvolle Materialien und ist einer Der von Zündquellen freie Innenraum dient zur La- vom unsortierten Siedlungsabfall getrennten Erfassung gerung von brennbaren Stoffen in geschlossenen zuzuführen. Die Entsorgung von ausgedienten Geräten Gefäßen und wird daher als explosionsgefährdeter muss fach- und sachgerecht nach den örtlich geltenden Vorschriften und Gesetzen erfolgen.
  • Page 3: Sicherheits- Und Warnhinweise

    Sicherheits- und Warnhinweise Klimaklasse Die Klimaklasse gibt an, bei welcher • Um Personen- und Sachschäden zu vermeiden, sollte Raumtemperatur das Gerät betrieben werden darf, um die volle Kälteleistung zu das Gerät von zwei Personen ausgepackt und aufge- erreichen. stellt werden. Die Klimaklasse ist am Typenschild aufge- •...
  • Page 4: Temperatur Einstellen

    Gerätemaße (mm) Temperatur einstellen Die Temperatur im Gerät über den Regelknopf einstellen. Je näher der Regler in Richtung max. gedreht wird, desto kälter wird es im Innenraum. Je nach Bedarf den Regler zwischen 0 und max. einstellen. EX 160 EX 220 / EX 300 / EX 490 EX 160 1151 EX 220...
  • Page 5: Außer Betrieb Setzen

    Abtauen Störung Das Abtauen erfolgt automatisch. Sollte eine Störung auftreten, so prüfen Sie bitte, ob ein Bedien- fehler vorliegt. Das Tauwasser tropft Folgende Störungen können Sie selbst beheben: in eine Schale unter- halb des Verdampfers. • Das Gerät arbeitet nicht. Prüfen Sie, ob Diese Schale muss zeit- –...
  • Page 6: Türanschlag Wechseln

    Türanschlag wechseln EX 160 Türanschlag wechseln EX 220 / EX 300 / EX 490 Der Wechsel des Türanschlags sollte nur von ausgebildetem Fachpersonal durchgeführt werden. Für den Umbau sind zwei Personen erforderlich. 1. Scharnierwinkel abschrauben. 2. Tür nach unten abnehmen. 1.
  • Page 7 7. Schlüssel hineindrücken. Schlüssel um 90° drehen. 13. Schloss herausziehen. 8. Abdeckung abnehmen. 9. Schraube herausdrehen. 14. Abdeckungen auf Gegensei- te umsetzen. 10. Schloss ca. 3° im Uhrzeiger- sinn drehen. 11. Bolzen entnehmen. 12. Schloss 90° im Uhrzeigersinn drehen. 15. Schloss wie in der Abbildung gezeigt einsetzen.
  • Page 8 16. Schloss 90° gegen den Uhr- zeigersinn zurückdrehen. 21. Bolzen herausdrehen. Beiliegenden Schlüssel verwenden. 22. Bolzen auf der Gegenseite wieder eindrehen. 17. Schloss im Uhrzeigersinn ca. 3° weiterdrehen. 18. Bolzen einsetzen. Hinweis zu Punkt 18 23. Schar nierwinkel ab- Der querliegende Stift im Bolzen muss schrauben.
  • Page 9 Seitliche Neigung der Tür einstellen Wenn die Tür schräg steht, die Neigung einstellen. 26. Bolzen in das linke Lager der Tür einsetzen. Den Bolzen während des Montierens der Tür mit dem Zeigefinger halten. 27. Die Tür wie in der Abbildung gezeigt auf den oberen Bolzen aufstecken und 30.
  • Page 10: Disposal Notes

    Disposal notes Range of appliance use The appliance contains reusable materials and should be The interior, which is free from sources of ignition, disposed of properly - not simply with unsorted household is used for storing flammable substances in closed refuse.
  • Page 11: Safety Instructions And Warnings

    Safety instructions and warnings Climate rating The climate rating indicates the room tem- • To prevent injury or damage to the unit, the appliance perature at which the appliance may be operated in order to achieve full refrigera- should be unpacked and set up by two people. tion performance.
  • Page 12: Setting The Temperature

    Appliance dimensions (mm) Setting the temperature Set the temperature inside the appliance using the temperature control. The nearer the temperature control is to the The nearer the temperature control is to the max. max. setting, the setting, the colder the interior temperature. colder the interior temperature.
  • Page 13: Shutting Your Appliance Down

    Defrosting Malfunctions The refrigerator compartment defrosts automatically. If a malfunction occurs during operation, check whether it is due to an operating error. The defrost water You may be able to rectify the following faults yourself: drains into a tray situ- ated below the evapo- •...
  • Page 14: Changing Over Door Hinges

    Changing over door hinges EX 160 Changing over door hinges EX 220 / EX 300 / EX 490 Door hinges should only be changed by a trained expert. Changing the door hinges must be done by two people. 1. Unscrew the hinge bracket. 2.
  • Page 15 7. Insert the key. Turn the key 90°. 13. Remove lock. 8. Remove cover. 9. Remove screw. 14. Transfer covers to the opposite side. 10. Turn the lock approx. 3° clockwise. 11. Remove pin. 12. Turn the lock 90° clockwise. 15.
  • Page 16 16. Turn back the lock 90° anticlockwise. 21. Unscrew the pin. Use the spanner provided. 22. Screw in the pin on the opposite side. 17. Turn the lock further - approx. 3° clockwise. 18. Insert pin. Note on point 18 23.
  • Page 17 Adjusting the lateral tilt of the door If the door is at an angle, adjust the angle. 26. Insert the pin into the left-hand door mounting. Use your index finger to hold the pin while you are assembling the door. 27.
  • Page 18: Aanwijzing M.b.t. Afdanken

    Aanwijzing m.b.t. afdanken Toepassingen van het apparaat Het apparaat bevat waardevolle materialen en mag niet De binnenruimte, die vrij is van ontstekingsbron- met het gewoon huis- of grofvuil worden meegegeven. nen, dient voor de opslag van brandbare stoffen in Het recyclen van afgedankte apparaten moet vakkundig gesloten reservoirs en wordt daarom als explosief gebeuren overeenkomstig de plaatselijk geldende voor- schriften en wetten.
  • Page 19: Veiligheidsinstructies En Waarschuwingen

    Veiligheidsinstructies en waarschuwingen Klimaatklasse Met de klimaatklasse wordt aangegeven, • Voorkom blessures en beschadigingen: pak het ap- op welke kamertemperatuur het apparaat gebruikt mag worden, om de volledige paraat altijd met twee personen uit en stel het samen koeling te bereiken. De klimaatklasse wordt op het typeplaatje •...
  • Page 20: Temperatuur Instellen

    Afmetingen van het apparaat (mm) Temperatuur instellen Stel de temperatuur in het apparaat in via de regelknop. Des te dichter de thermostaat in de richting van Des te dichter de thermostaat in de richting van max. max. wordt ge- wordt ge- draaid, des te kouder wordt het in het binnenste van het apparaat.
  • Page 21 Ontdooien Storingen Het koelgedeelte ontdooit automatisch. Als er een storing optreedt, controleer dan of er een bedieningsfout is gebeurd. Het dooiwater drupt De volgende storingen kunt u zelf verhelpen: in een schaal onder de verdamper. Deze • Het apparaat werkt niet. Controleer: schaal moet af en toe –...
  • Page 22: Draairichting Deur Veranderen

    Deur ombouwen EX 160 Draairichting deur veranderen EX 220 / EX 300 / EX 490 De wisseling van de deurscharniering mag alleen door op- geleid vakpersoneel worden doorgevoerd. Voor de ombouw zijn twee personen noodzakelijk. 1. Schroef het scharnier eraf. 2.
  • Page 23 7. Sleutel naar binnen duwen. Sleutel 90° draaien. 13. Slot uittrekken. 8. Afdekking eraf halen. 9. Schroef eruit draaien. 14. Afdekplaaten naar de andere kant overzetten. 10. Slot ca 3° rechtsom draaien. 11. Bout uitnemen. 12. Slot 90° rechtsom draaien. 15.
  • Page 24 16. Slot 90° linksom terug- draaien. 21. Pen eruit draaien. De bijgevoegde sleutel gebruiken. 22. Pen er aan de andere kant weer indraaien. 17. Slot ca 3° rechtsom verder draaien. 18. Bout inzetten. Aanwijzing bij punt 18 23. Scharnier eraf De dwarsliggende pin in de bout moet schroeven.
  • Page 25 Zijwaartse helling van de deur instellen Wanneer de deur schuin staat, de helling instellen. 26. Pen in het linkerlager van de deur plaatsen. Pen tijdens het monteren van de deur met de wijs- vinger vasthouden. 27. Deur overeenkomstig de afbeelding op de bovenste pen plaatsen en beneden 30.
  • Page 26: Protection De L'environnement

    Protection de l'environnement Domaine d'utilisation de l'appareil L'appareil contient des matériaux de valeur et est à ame- L'espace intérieur sans sources d'allumage est conçu ner à un lieu de recyclage spécial. L'élimination d'anciens pour la conservation de matières combustibles dans appareils est à...
  • Page 27: Recommandations Et Consignes De Sécurité

    Recommandations et consignes de sécurité Classe climatique La classe climatique indique la température • Afin d'éviter tout accident matériel ou corporel, nous ambiante à laquelle l'appareil doit être utilisé pour atteindre la performance frigorifique vous recommandons de faire appel à une deuxième maximale.
  • Page 28: Raccordement Électrique

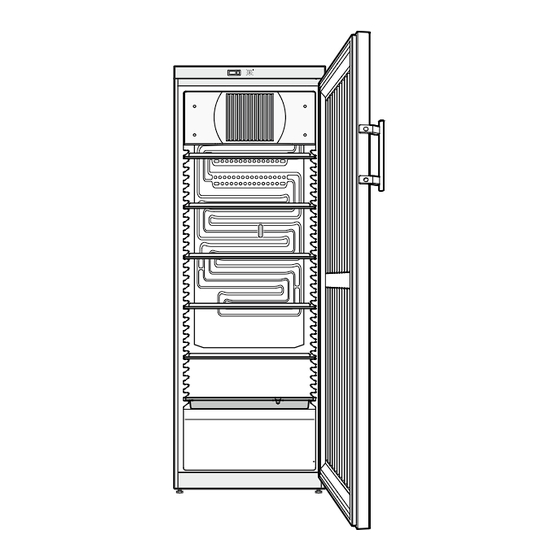
    Dimensions de l'appareil (mm) Réglage de la température Régler la température dans l'appareil à l'aide du bouton de réglage. Plus le régulateur est tourné vers la position Plus le régulateur est tourné vers la position max. max., plus la tempé- , plus la tempé- rature est basse à...
  • Page 29: Dégivrage

    Dégivrage Pannes éventuelles Le compartiment réfrigérateur de votre appareil est à dégivrage En cas de panne, veuillez vérifier si elle n'est pas due à une erreur automatique. de manipulation. Vous pouvez remédier vous-même aux pannes suivantes : L'eau de dégivrage s'écoule dans un bac •...
  • Page 30: Inversion Du Sens D'ouverture De La Porte Ex

    Inversion du sens d'ouverture de la porte EX 160 Inversion du sens d'ouverture de la porte EX 220 / EX 300 / EX 490 L'inversion du sens d'ouverture de la porte ne peut être effectuée que par un personnel spécialisé. Pour procéder à...
  • Page 31 7. Insérer la clé. Tourner la clé à 90°. 13. Retirer la serrure. 8. Retirer le cache. 9. Sortir la vis. 14. Poser les caches sur le côté opposé. 10. Tourner la serrure d'environ 3° dans le sens horaire. 11. Sortir la cheville. 12.
  • Page 32 16. Tourner de nouveau la serrure de 90° dans le sens anti-horaire. 21. Dévisser le pivot. Utiliser la clé fournie. 22. Visser le pivot sur le côté opposé. 17. Tourner encore la serrure d'environ 3° dans le sens horaire. 18. Mettre la cheville en place. Remarque concernant le point 18 23.
  • Page 33: Régler L'inclinaison Latérale De La Porte

    Régler l'inclinaison latérale de la porte Si la porte est penchée, régler l'inclinaison. 26. Introduire le pivot dans le palier gauche de la porte. Maintenir le pivot enfoncé avec l'index pendant le montage de la porte. 27. Faire glisser la porte sur le pivot supérieur et l'amener vers le support inférieur de 30.
  • Page 34: Indicazioni Per Lo Smaltimento

    Indicazioni per lo smaltimento Campo d'impiego dell'apparecchio L'apparecchio contiene materiali utili e non va smaltito Il vano interno, se libero da fonti infiammabili, serve nella raccolta indifferenziata dei rifiuti, ma portato in alla conservazione di materiali combustibili in reci- appositi centri. Gli apparecchi fuori uso devono essere pienti chiusi e quindi è...
  • Page 35: Indicazioni Ed Avvertenze Per La Sicurezza

    Indicazioni ed avvertenze per la sicurezza Classe climatica La classe climatica indica la temperatura • L'apparecchio dovrebbe venire sballato ed installato ambiente a cui può funzionare l'apparecchio per raggiungere la potenza di raffredda- da due persone allo scopo di evitare danni a persone mento totale.
  • Page 36: Dimensioni Dell'apparecchio (Mm)

    Dimensioni dell'apparecchio (mm) Impostare la temperatura Regolare la temperatura nell'apparecchio con l'apposita manopola. Più si gira il regolatore in direzione Più si gira il regolatore in direzione max. max., più diminuisce la tempe- , più diminuisce la tempe- ratura nel vano interno. ratura nel vano interno.
  • Page 37: Mettere Fuori Servizio

    Sbrinamento Guasti Il vano frigorifero si scongela automaticamente. Se subentra un'anomalia di funzionamento, verificare innanzitutto che non ci siano errori nell'utilizzo. L'acqua di sbrinamen- Le seguenti anomalie possono essere facilmente risolte to gocciola in una dall'utente stesso: vaschetta al di sotto dell'evaporatore.
  • Page 38: Modificare L'incernieratura Sportello Ex

    Modificare l'incernieratura sportello EX 160 Modificare l'incernieratura dello sportello EX 220 / EX 300 / EX 490 La modifica dell'incernieratura dello sportello deve essere effettuata solo da personale specializzato. Tale modifica richiede l'intervento di due persone. 1. Svitare il cantonale cerniera. 2.
  • Page 39 7. Infilare la chiave. Girare la chiave di 90°. 13. Estrarre la serratura. 8. Togliere la copertura. 9. Allentare la vite. 14. Spostare sul lato opposto le piastre di copertura. 10. Ruotare la serratura di ca. 3° in senso orario. 11.
  • Page 40 16. Ruotare ulteriormente la serratura di 90° in senso antiorario. 21. Allentare il perno e toglierlo. Utilizzare la chiave in dotazione. 22. Riavvitare il perno sul lato opposto. 17. Ruotare ancora la serratura di ca. 3° in senso orario. 18. Inserire il perno. Nota per il punto 18 23.
  • Page 41 Regolazione dell'inclinazione laterale dello sportello Se lo sportello è storto, regolare l'inclinazione. 26. Inserire il perno nel supporto sinistro dello sportello. Durante il montaggio dello sportello tenere il perno con l'indice. 27. Posare lo sportello sul perno superio- re e guidarlo in basso sul cantonale cerniera come indicato nella figura.
  • Page 42 Sugerencias para la eliminación de aparatos y Ámbito de uso del aparato material de embalaje El espacio interior exento de fuentes de ignición sirve El aparato contiene materiales valiosos y se debe llevar a para almacenar sustancias inflamables en recipientes un punto de recogida separado de los residuos domés- cerrados y, por lo tanto, se clasifica como espacio ticos sin clasificar.
  • Page 43: Advertencias Concernientes A La Seguridad

    Advertencias concernientes a la seguridad Clase climática La clase climática indica a qué temperatura • El desembalaje y el emplazamiento del aparato deberá ambiente se puede poner en funcionamien- to el aparato para poder alcanzar toda la llevarse a cabo por dos personas, a fin de evitar daños capacidad frigorífica.
  • Page 44: Ajuste De Temperatura

    Medidas del aparato (mm) Ajuste de temperatura Ajustar la temperatura en el aparato mediante el botón de regulación. Cuanto más cerca de Cuanto más cerca de max. max. se gire el regulador, más frío estará el se gire el regulador, más frío estará el espacio interior.
  • Page 45: Descongelación

    Descongelación Anomalías El frigorífico está equipado con un sistema de descongelación En caso de que se presente una anomalía, por favor, comprobar si automático. existe un error de manejo. Las siguientes anomalías las puede subsanar usted mismo: El agua de desescarche cae en un recipiente •...
  • Page 46 Cambio de goznes (apertura de puerta) El cambio de goznes debería ser realizado únicamente por perso- 7. Introducir presionando la llave. nal profesional especializado. Girar la llave 90°. Para la modificación se precisan dos personas. 1. Destornillar el tornillo del soporte de bisagra inferior.
  • Page 47 16. Girar la cerradura 90° en sentido antihorario. 13. Sacar la serradura. 17. Girar la cerradura aprox. 3° más en sentido horario. 18. Introducir el bulón. 14. Cambiar las tapas protectoras al lado opuesto. Nota acerca del punto 18 Tras la colocación, la espiga transversal del bulón debe quedar encajada en la ranura del gancho de la cerradura.
  • Page 48 26. Colocar el eje en la bisagra izquierda de la puerta. Durante el montaje de la puerta, mantener pulsado el eje 21. Destornillar el eje. con el dedo índice. Utilizar la llave adjunta. 22. Atornillar nuevamente el eje en el lado opuesto.
  • Page 49 Ajustar la inclinación lateral de la puerta Si la puerta está torcida, ajustar la inclinación. 30. Destornillar el tornillo central del soporte de bisagra. Este tornillo ya no se volverá a necesitar. 31. Aflojar los tornillos y desplazar el soporte de bisagra hacia la derecha o hacia la izquierda.
  • Page 50 Indicações para proteção do meio ambiente Campo de utilização do aparelho O aparelho possui materiais de valor e deve ser eliminado O compartimento interior livre de fontes de inflama- separadamente, como lixo municipal de carácter especial. ção serve para guardar substâncias inflamáveis em A eliminação de aparelhos usados deverá...
  • Page 51: Classe Climática

    Conselhos e instruções de segurança Classe climática A classe climática indica a que temperatura • Afim de evitar danos pessoais e materiais, o desem- ambiente o aparelho deve funcionar, para conseguir a potência de frio plena. pacotamento e a instalação do aparelho deverão ser feitos por duas pessoas.
  • Page 52 Medidas do aparelho (mm) Regulação da temperatura Regular a temperatura no aparelho usando o botão de regulação. Quanto mais o regulador de temperatura é rodado na direcção Quanto mais o regulador de temperatura é rodado na direcção max. max., mais frio se torna o interior. , mais frio se torna o interior.
  • Page 53: Anomalias De Funcionamento

    Descongelação Anomalias de funcionamento O compartimento frigorífico descongela automaticamente. Em caso de anomalia, por favor verifique se é mostrado um erro de comando. A água resultante da As seguintes anomalias podem ser corrigidas por si mesmo. descongelação goteja para uma bandeja •...
  • Page 54 Inversão do sentido de abertura da porta 7. Empurrar a chave. A inversão do sentido de abertura da porta só deve ser realizada por pessoal especializado na matéria. Rodar a chave 90°. Para efetuar a inversão são necessárias dois pessoas. 1.
  • Page 55 16. Mover para trás a fechadura 90° em sentido contrário dos ponteiros do relógio. 13. Retirar a fechadura. 17. Continuar girando a fecha- dura aprox. 3° no sentido dos ponteiros do relógio. 18. Introduzir o perno. 14. Transferir as coberturas para o lado contrário.
  • Page 56 26. Aplicar o pino no assentamento esquerdo da porta. Durante a montagem da porta, segurar o pino com o 21. Desaparafusar o pino. dedo indicador. Utilizar a chave que se encontra em anexo. 22. Voltar a apertar o pino no lado oposto. 27.
  • Page 57 Ajuste da inclinação lateral da porta Se a porta não ficar reta, regular a inclinação. 30. Desapertar o parafuso do meio da charneira angular. Este parafuso já não é necessário. 31. Desapertar os parafusos e deslocar a charneira angular para a direita ou para a esquerda.
  • Page 58: Technical Specifications

    Technical Specifications EX 160 EX 220 EX 300 EX 490 Operation Mechanic control system with rotary controller Power Supply 220 – 240 V / 50 Hz Display LED-Display Net Capacity 160 l 221 l 307 l 520 l Consumption 0.898 kWh / 24 h 0.786 kWh / 24 h 0.947 kWh / 24 h 0.983 kWh / 24 h...
  • Page 59 EX 160 / EX 220 / EX 300 / EX 490_1 03/2014...
  • Page 60 Fax: +44 (0)1980 625412 sales@lovibond.com water.sales@lovibond.uk www.lovibond.us www.lovibond.com www.lovibond.com Spain Germany Tintometer China Tintometer South East Asia Tintometer Brazil Tintometer Indien Pvt. Ltd. Room 1001, China Life Tower Unit B-3-12, BBT One Boulevard, Caixa Postal: 271 Door No: 7-2-C-14, 2 & 4 Floor...

Ce manuel est également adapté pour:

Ex 160Ex 220Ex 300Ex 490

Table des Matières