Table des Matières

Publicité

Les langues disponibles

Les langues disponibles

Liens rapides

PLEASE SAVE THIS OWNERS MANUAL AND READ BEFORE EACH USE.
This manual will explain how to use the battery charger safely and effectively.
Please read and follow these instructions and precautions carefully.
POR FAVOR CONSERVE ESTE MANUAL DEL USUARIO Y LEALO ANTES
DE CADA USO. En este manual le explica cómo utilizar el cargador de batería
de manera segura y confiable. Por favor, lea y siga las siguientes instrucciones
y precauciones.
GARDER LE MANUEL D'INSTRUCTION ET LISEZ LE AVANT CHAQUE
UTILISATION. Ce manuel explique comment utiliser le chargeur de batterie
d'une façon securitaire et efficace. S'il vous plaît lisez et suivez ces instructions
et precautions.
MODEL / MODELO / MODÈLE:
FR01335
Automatic Battery Charger
Cargador de baterías automático
Chargeur de batterie automatique
OWNERS MANUAL / MANUAL DEL USUARIO /
MANUEL D'UTILISATION
0099001822-00

Publicité

Table des Matières
loading

Sommaire des Matières pour Farm&Ranch Schumacher FR01335

  • Page 1 MODEL / MODELO / MODÈLE: FR01335 Automatic Battery Charger Cargador de baterías automático Chargeur de batterie automatique OWNERS MANUAL / MANUAL DEL USUARIO / MANUEL D’UTILISATION PLEASE SAVE THIS OWNERS MANUAL AND READ BEFORE EACH USE. This manual will explain how to use the battery charger safely and effectively. Please read and follow these instructions and precautions carefully.
  • Page 2: Table Des Matières

    CONTENTS IMPORTANT SAFETY INSTRUCTIONS ..................4 PERSONAL SAFETY PRECAUTIONS ..................4 PREPARING TO CHARGE ......................5 CHARGER LOCATION .........................5 DC CONNECTION PRECAUTIONS ....................5 FOLLOW THESE STEPS WHEN BATTERY IS INSTALLED IN VEHICLE ........5 FOLLOW THESE STEPS WHEN BATTERY IS OUTSIDE VEHICLE ........6 GROUNDING AND AC POWER CORD CONNECTIONS ............6 ASSEMBLY INSTRUCTIONS ......................6 CONTROL PANEL ........................6 OPERATING INSTRUCTIONS .....................7...
  • Page 3 TABLE DES MATIÈRES CONSIGNES DE SÉCURITÉ IMPORTANTES................24 MESURES DE SÉCURITÉ PERSONNELLE ................24 PRÉPARATION POUR LE CHARGEMENT ................25 EMPLACEMENT DU CHARGEUR ....................25 PRÉCAUTIONS SUR LA CONNEXION C.C................25 ÉTAPES À SUIVRE QUAND LA BATTERIE EST INSTALLÉE DANS UN VÉHCULE .....25 ÉTAPES À SUIVRE QUAND LA BATTERIE EST INSTALLÉE HORS DU VÉHICULE ....26 MISE À...
  • Page 4: Important Safety Instructions

    1. IMPORTANT SAFETY INSTRUCTIONS SAVE THESE INSTRUCTIONS. 1.1 SAVE THESE INSTRUCTIONS – 1.8 Do not operate charger if it has received This manual contains important safety a sharp blow, been dropped, or otherwise and operating instructions. damaged in any way; take it to a qualified serviceman.
  • Page 5: Preparing To Charge

    3. PREPARING TO CHARGE 3.1 If necessary to remove battery from battery without removable cell caps, such vehicle to charge, always remove as valve regulated lead acid batteries, grounded terminal from battery first. Make carefully follow manufacturer’s recharging sure all accessories in the vehicle are off, instructions.
  • Page 6: Follow These Steps When Battery Is Outside Vehicle

    7. FOLLOW THESE STEPS WHEN BATTERY IS OUTSIDE VEHICLE WARNING: A SPARK NEAR THE 7.4 Position yourself and free end of cable as BATTERY MAY CAUSE A BATTERY far away from battery as possible – then EXPLOSION. TO REDUCE THE RISK OF connect NEGATIVE (BLACK) charger clip A SPARK NEAR THE BATTERY: to free end of cable.
  • Page 7: Operating Instructions

    CHARGED/MAINTAINING (green) DISPLAY BUTTON LED lit: The battery is fully charged and Use this button to set the function of the the charger is in maintain mode. digital display to one of the following: NOTE: See Operating Instructions for a (Battery %) –...
  • Page 8 8. Connect the battery cable assembly to CHARGE/MAINTAIN MODE the charger with the quick-connector on To select this mode, press the Rate the back of the unit. Selection button until the green 2<>6A 9. Connect the battery cable assembly to Charge/Maintain LED lights.
  • Page 9 NOTE: After 3 minutes in Engine Start COMPLETION OF CHARGE mode, the charger will enter into a cool- Charge completion is indicated by the down period of 180 seconds, to allow the CHARGED/MAINTAINING (green) charger and the battery to cool down. LED.
  • Page 10: Display Messages

    12. DISPLAY MESSAGES 0.0V – No battery is detected. • There is a large draw on the battery and the charger has to supply its maximum CONNECT CLAMPS (Voltage LED lit) – maintain current for a 12 hour period to Plugged into the AC outlet without the keep the battery at full charge.
  • Page 11 PROBLEM POSSIBLE CAUSE SOLUTION Battery clamps do not The charger is equipped with a No problem; this is a normal spark when touched START/STOP button. It will not condition. together. supply current to the battery clamps until the START/STOP button is pressed. The battery is connected The charger is in tester mode, Press the START/STOP button to...
  • Page 12: Before Returning For Repairs

    15. BEFORE RETURNING FOR REPAIRS If these solutions do not eliminate the problem, or for more information about troubleshooting, contact customer service for assistance: services@schumacherelectric.com www.batterychargers.com or call 1-800-621-5485 Monday-Friday 7:00 to 5:00 For REPAIR OR RETURN, contact Customer Service at 1-800-621-5485. DO NOT SHIP UNIT until you receive a RETURN MERCHANDISE AUTHORIZATION (RMA) number from Customer Service at Schumacher Electric Corporation.
  • Page 13: Instrucciones Importantes De Seguridad

    1. INSTRUCCIONES IMPORTANTES DE SEGURIDAD GUARDE ESTAS INSTRUCCIONES. 1.1 GUARDE ESTAS INSTRUCCIONES – 1.8 No utilice el cargador si el mismo recibió Este manual contiene instrucciones un golpe fuerte, si se cayó o si sufrió operativas y de seguridad de importancia. daños de cualquier otra forma;...
  • Page 14: Preparación Para La Carga

    ácido puede producir una corriente de de un motor de arranque. No utilice este cortocircuito lo suficientemente elevada cargador de batería para cargar baterías como para soldar un anillo o provocar de pila seca que por lo general se utilizan efectos similares sobre el metal, con artefactos domésticos.
  • Page 15: Siga Estos Pasos Cuando La Batería Esté Colocada En El Vehículo

    6. SIGA ESTOS PASOS CUANDO LA BATERÍA ESTÉ COLOCADA EN EL VEHÍCULO ADVERTENCIA: POSITIVO (ROJO) del cargador de UNA CHISPA PROVOCADA CERCA batería al borne POSITIVO (POS, P, +) sin DE LA BATERÍA PUEDE CAUSAR LA descarga a tierra de la batería. Conecte EXPLOSIÓN DE LA BATERÍA.
  • Page 16: Conexiones A Tierra Y Energía De Ca

    8. CONEXIONES A TIERRA Y ENERGÍA DE CA 8.1 Este cargador de batería está destinado a El uso de un enchufe como adaptador un uso en un circuito con tensión nominal no se recomienda y no debe ser utilizado de 120 V y posee un enchufe con descarga Estados Unidos.
  • Page 17: Botón De Battery Type

    BOTÓN DE SELECCIÓN BOTÓN DE BATTERY TYPE DE VELOCIDAD (TIPO DE BATERÍA) Utilice este botón para establecer una de Utilice este botón para seleccionar el tipo las siguientes selecciones. de batería. 2<>6A CARGA /MANTENIMIENTO – – Este tipo de batería generalmente Para la carga de baterías pequeñas se utiliza en automóviles, camiones y y grandes.
  • Page 18 A continuación, conecte la pinza 10. Al desconectar el cargador, ajuste NEGATIVA (NEGRO) del cargador el interruptor a la posición OFF, al chasis del vehículo o bloque del desconecte el cargador de la corriente motor, lejos de la batería. CA, desconecte la pinza del chasis del vehículo y quite la abrazadera de la 7.
  • Page 19 batería por 5 minutos antes de poner en del cargador se apaga, la pantalla se marcha el motor. monstará CHARGE ABORTED - BAD BATTERY. No continúe tratando de NOTA: Si usted ya ha cargado la batería cargar esta batería. Compruebe la batería y aún no arranca el auto, no utilice la y reemplazar si es necesario.
  • Page 20: Muestra De Mensajes

    TIEMPOS DE CARGA CCA = Amperaje de arranque en frío RC = Capacidad de reserva Ah = Amp/hora ĺNDICE / TIEMPO DE CARGA TAMAÑO / ÍNDICE DE LA BATERÍA 2<>6A 6-12 Ah 1½-2½ h BATERÍAS PEQUEÑAS Motocicleta, tractor de jardín, etc. 12-32 Ah 2½-7 h 200-315 CCA...
  • Page 21: Mantenimiento Y Cuidado

    13. MANTENIMIENTO Y CUIDADO Con cuidados mínimos puede mantener • Enrolle los cables de entrada y salida el cargador de baterías funcionando cuidadosamente cuando almacene el correctamente durante años. cargador. Esto ayudará a evitar daños accidentales a los cables y el cargador. •...
  • Page 22: Antes De Devolver A Reparaciones

    PROBLEMA CAUSA POSIBLE SOLUCIÓN La pantalla muestra La batería está sulfatada Revise la batería y reemplácela si CHARGE ABORTED - y no se pudo completar la es necesario. BAD BATTERY. desulfatación. La batería es demasiado Usted necesita un cargador con grande para el cargador.
  • Page 23: Especificaciones

    16. ESPECIFICACIONES Entrada ......120V AC @ 60Hz, 10A max. continuous, 48A max. intermittent Salida ............6/12V CC, 6A; 60 seg. max en, 120 seg. min off 6/12V CC, 150/200A int., 5 seg. max. en, 180 seg. min. off 17. GARANTÍA LIMITADA GARANTIA LIMITADA NO VALIDA EN MEXICO.
  • Page 24: Consignes De Sécurité Importantes

    1. CONSIGNES DE SÉCURITÉ IMPORTANTES CONSERVER CES INSTRUCTIONS. 1.1 CONSERVER CES INSTRUCTIONS – 1.8 Ne pas faire fonctionner le chargeur s’il a Ce manuel contient des instructions reçu un choc violent, est tombé par terre importantes concernant la sécurité et le ou a été...
  • Page 25: Préparation Pour Le Chargement

    recommandé de 24Ah (6V) et 22-59Ah 2.9 NE JAMAIS charger une batterie gelée. (12V). Il n’est pas conçu pour alimenter un 2.10 AVERTISSEMENT : Ce produit contient système électrique à basse tension autre un ou plusieurs produits chimiques que dans une application d’un démarreur. reconnus par l’État de Californie pour Ne pas utiliser ce chargeur de batterie causer cancer, des malformations...
  • Page 26: Étapes À Suivre Quand La Batterie Est Installée Hors Du Véhicule

    du chargeur à la borne POSITIVE (POS, au châssis du véhicule ou au moteur, P, +) non mise à la masse de la batterie. loin de la batterie. Ne pas raccorder la Raccorder la pince NÉGATIVE (NOIRE) pince au carburateur, aux canalisations au châssis du véhicule ou au moteur, d’essence ni aux pièces de la carrosserie loin de la batterie.
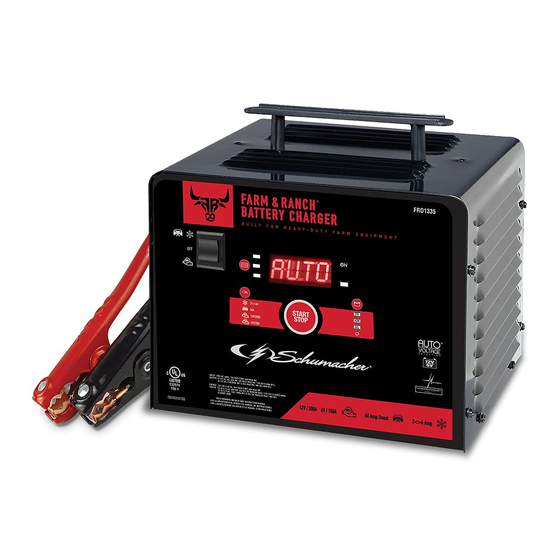
  • Page 27: Panneau De Contrôle

    10. PANNEAU DE CONTRÔLE SELECTEUR MARCHE / ARRÊT BOUTON DE SÉLECTION DU TAUX Utilisez ce sélecteur pour choisir entre la Utilisez ce bouton pour sélectionner l’une Charge / Maintien, Boost ou le mode de des options suivantes : Aide-Démarrage. 2<>6A CHARGE / MAINTIEN – OFF (ARRÊT) –...
  • Page 28: Consignes D'utilisation

    de s’ancrer ou de se raidir. La tension – La construction de Glass Mat du chargement de ce type d’élément absorbée permet à l’électrolyte à être est plus basse que celle des autres suspendu à proximité de matière active de styles d’accumulateurs au plomb.
  • Page 29: Utiliser La Fonction Demarrage Du Moteur

    OFF, débrancher le chargeur de le réglage Boost pendant 5 minutes avant l’électricité, débranchez la pince de démarrer le moteur. négative, et enfin la pince positive. NOTE : Si vous avez chargé la batterie 11. Une batterie marine (bateau) doit être et il sera toujours pas démarrer votre retirée et chargée sur le rivage.
  • Page 30: Maintenir Une Batterie

    CHARGE AVORTE actuel maintenir pour une période d’une Si la charge ne peut être achevé heure en continu 12, il se met en mode normalement, la charge avorté. Lorsque abort (voir la section Charge Avorte). Cela la charge est abandonnée, la sortie du est généralement causé...
  • Page 31: Affichage Des Messages

    12. AFFICHAGE DES MESSAGES 0.0V – Aucune batterie n’est détectée. Circonstances qui pourraient entraîner une situation d’abandon pendant maintenir : CONNECT CLAMPS (La DEL de tension • La batterie est fortement sulfaté ou a une est allumée) – Branchement effectué à la cellule faible et ne tiendra pas une charge.
  • Page 32: Dépannage

    14. DÉPANNAGE PROBLÈME CAUSE POSSIBLE SOLUTION Le chargeur ne s’allume La prise de courant CA Vérifiez si un fusible est coupé pas quand il est est morte. ou le disjoncteur pour cette prise correctement branché. de courant. Mauvaise connexion Vérifiez le cordon d’alimentation électrique.
  • Page 33: Avant De Retourner Pour Les Réparations

    PROBLÈME CAUSE POSSIBLE SOLUTION Cycle de démarrage court Pas de courant à la prise. Vérifiez si un fusible est coupé ou non existant quand on ou le disjoncteur pour cette prise lance le moteur. de courant. Mauvais branchement du Vérifiez le cordon d’alimentation cordon CA ou de la rallonge.
  • Page 34: Garantie Limitée

    17. GARANTIE LIMITÉE GARANTIE N’EST PAS VALIDE AU MEXIQUE. SCHUMACHER ELECTRIC CORPORATION, 801 BUSINESS CENTER DRIVE, MOUNT PROSPECT, IL 60056-2179, DONNE CETTE GARANTIE LIMITÉE POUR PREMIER ACHETEUR DE CE PRODUIT. CETTE GARANTIE LIMITÉE N’EST PAS TRANSFÉRABLES NI CESSIBLES. Schumacher Electric Corporation (le « Fabricant ») garantit ce unité pour deux (2) ans à...
  • Page 35 WARRANTY CARD / TARJETA DE GARANTÍA SAVE ON POSTAGE! ACTIVATE YOUR WARRANTY ONLINE – THE QUICK AND EASY WAY! Go to www.batterychargers.com to register your product online. (No internet access? Send in the completed warranty card.) 2 YEAR LIMITED WARRANTY PROGRAM REGISTRATION MODEL: _____________________ DESCRIPTION: ________________________ This is the only express limited warranty, and the manufacturer neither assumes...
  • Page 36: Carte De Garantie

    CARTE DE GARANTIE PAS BESOIN DE VOIE POSTAL ! ACTIVEZ VOTRE GARANTIE SUR INTERNET – LA VOIE PLUS RAPIDE ET FACILE! Aller sur www.batterychargers.com pour enregistrer votre produit en ligne. (Pas d’accès internet? Envoyer la carte de garantie par poste.) INSCRIPTION AU PROGRAMME DE GARANTIE LIMITÉE DE DEUX ANS...

Table des Matières