Publicité

Les langues disponibles
  • FR

Les langues disponibles

  • FRANÇAIS, page 11

Liens rapides

Quipon SKY 70 × 50
2
Montage- und Bedienungsanleitung
5
Assembly and Operating instructions
8
Instrucciones de montaje y uso
11
Instructions de montage et mode d'emploi
14
Istruzioni di montaggio e uso
17
Monterings- och bruksanvisning
1

Publicité

Table des Matières
loading

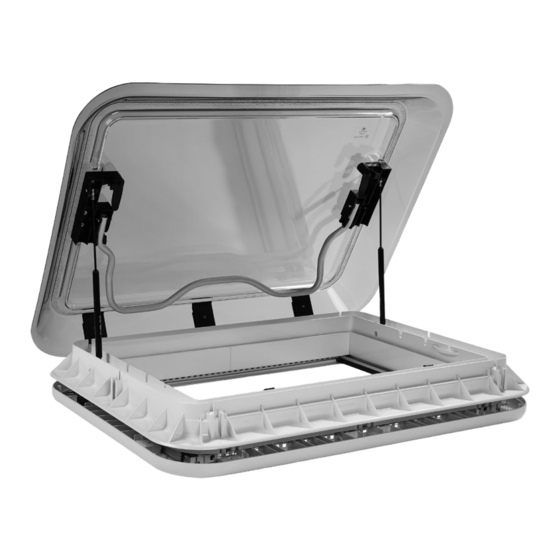
Sommaire des Matières pour Quipon SKY 70 x 50

  • Page 1 Quipon SKY 70 × 50 Montage- und Bedienungsanleitung Assembly and Operating instructions Instrucciones de montaje y uso Instructions de montage et mode d’emploi Istruzioni di montaggio e uso Monterings- och bruksanvisning...
  • Page 2: Allgemeine Hinweise

    Quipon SKY 70 × 50 Montageanleitung 1. Einbau nur in Freizeitfahrzeuge bzw. Anhänger. 2. Quipon SKY für max. 120 km/h geeignet. 3. Einbaulage längs (Scharnierseite zeigt rechts bzw. links in Fahrtrichtung) oder quer (Scharnierseite zeigt nach vorn in Fahrtrichtung). Allgemeine Hinweise Achtung: Beim Austausch von Dachhauben ist darauf zu achten, dass es nicht zu einer Reduzierung der Dauer- lüftung im Fahrzeug kommt.
  • Page 3 Installationsschritte Hinweis: Drehmoment des Elektrowerkzeugs gemäß Montageschrauben. Schritt 1: Schritt 2: Öffnung 700 × 500 mm (R60) ausschneiden. Rund herum Dichtstoff / Dichtschnur auftragen. Dachstärke 25–60 mm Mit Seife reinigen. 25–60 mm 502 mm 702 mm Hinweis: Vor dem Auftrag des Dichtstoffes reinigen. Hinweis: Nut für Kabel berücksichtigen. Keinen Alkohol verwenden. Schritt 3: Schritt 4: Dichtstoff auf die äußere Rahmennut geben. Rahmen in Montageöffnung positionieren, überschüssigen Dichtstoff entfernen.
  • Page 4 Bedienungsanleitung Hinweis: Drehmoment des Elektrowerkzeugs gemäß Montageschrauben. 1. Schalter: Griffposition LED-Steuerung: „–“: OFFEN „O“: GESCHLOSSEN LED-Schalter 2. Verriegeln: Strom Öffnungswinkel: 2° Verriegelung 3. Griff: Öffnungswinkel: 20° Griff Max. Öffnungswinkel: 70° Leistung: max. 15 W 1) Lüftungsstellungen a) Geschlossen: Glas liegt auf der Dichtung auf, Verschlussriegel sind in der tiefsten Stellung eingerastet. b) Lüftung: Glas leicht geöffnet, Verschlussriegel sind in Lüfterstellung.
  • Page 5: General Information

    Quipon SKY 70 × 50 Assembly instructions 1. Installation only in recreational vehicles or trailers. 2. Quipon SKY suitable for max. 120 km/h. 3. Installation location longitudinal (hinge side points to right or left in direction of travel) or transverse (hinge side points forwards in direction of travel).
  • Page 6: Installation Steps

    Installation steps Note: Rotational torque of the electrical tool according to mounting screws. Step 1: Step 2: Cut out opening of 700 x 500 mm (R60). Apply sealant / sealing cord around it. Roof thickness 25–60 mm Clean with soap. 25–60 mm 502 mm 702 mm Note: Clean before applying the sealant. Note: Consider groove for cable. Do not use any alcohol. Step 3: Step 4: Apply sealant to the outer frame groove.
  • Page 7: Ventilation Positions

    Operating instructions Note: Rotational torque of the electrical tool according to mounting screws. 1. Switch: Handle position LED control: “–”: OPEN “O”: CLOSED LED switch 2. Lock: Current Opening angle: 2° Lock 3. Handle: Opening angle: 20° Handle Max. opening angle: 70° Power: max. 15 W 1) Ventilation positions a) Closed: The glass is positioned on the sealant, locking bolts are engaged in their deepest position.
  • Page 8: Posición De Instalación

    Quipon SKY 70 × 50 Instrucciones de montaje 1. Instalación solo en vehículos de ocio o remolques. 2. Quipon SKY es adecuado para un máximo de 120 km/h. 3. Posición de montaje longitudinal (el lado de las bisagras apunta a la derecha o a la izquierda en la dirección de la marcha) o transversal (el lado de las bisagras apunta hacia adelante en la dirección de la marcha).
  • Page 9: Pasos De Instalación

    Pasos de instalación: Sugerencia: Ajuste el par de la herramienta eléctrica según los tornillos de montaje. Paso 1: Paso 2: Abertura de corte 700 × 500 mm (R60). Aplicar sellador / cordón de sellado alrededor. Grosor del techo 25–60 mm Limpiar con jabón. 25–60 mm 502 mm 702 mm Sugerencia: Limpiar antes de aplicar el sellador. Sugerencia: Considere la ranura para el cable. No utilice alcohol.
  • Page 10 Instrucciones de uso Sugerencia: Ajuste el par de la herramienta eléctrica según los tornillos de montaje. 1. Interruptor: Posición del mango Control LED: «–»: ABIERTO «O»: CERRADO Interruptor LED 2. Bloqueo: Electricidad Ángulo de apertura: 2° Bloqueado 3. Mango: Ángulo de apertura: 20° Mango Máx. Ángulo de apertura: 70°...
  • Page 11: Instruction De Montage

    Quipon SKY 70 × 50 Instruction de montage 1. Montage uniquement sur les véhicules de loisirs ou remorques. 2. Quipon SKY adapté pour une vitesse max. de 120 km/h. 3. Position de montage longitudinale (le côté de la charnière est orienté vers la droite ou la gauche dans le sens de la marche) ou transversale (le côté de la charnière est orienté vers l’avant dans le sens de la marche).
  • Page 12: Étapes De Montage

    Étapes de montage Remarque : Couple de serrage de l’outil électrique en fonction des vis de fixation. Étape 1 : Étape 2 : Découpe dimensions d’ouverture 700 × 500 mm (R60). Appliquer un mastic d’étanchéité / cordon d’étanchéité Épaisseur de toit 25–60 mm sur le pourtour. Nettoyer avec du savon. 25–60 mm 502 mm 702 mm Remarque : Bien nettoyer avant l’application du mastic Remarque : Prendre en compte la rainure pour le câble. d’étanchéité.
  • Page 13: Caractéristiques Produit

    Mode d’emploi Remarque : Couple de serrage de l’outil électrique en fonction des vis de fixation. 1. Interrupteur : Position de la poignée Commande LED : « – » : OUVERT « O » : FERMÉ Interrupteur LED 2. Verrouillage : Angle d’ouverture : 2° Verrouillage Courant 3. Poignée : Angle d’ouverture : 20° Poignée max. Angle d’ouverture : 70°...
  • Page 14: Istruzioni Di Montaggio

    Quipon SKY 70 × 50 Istruzioni di montaggio 1. L’installazione è consentita solo all’interno di veicoli per il tempo libero e rimorchi. 2. Quipon SKY è adatto a veicoli che raggiungono la velocità massima di 120 km/h. 3. È possibile eseguire l’installazione in senso longitudinale (lato della cerniera rivolto a destra e a sinistra nella direzione di marcia) o trasversale (lato della cerniera rivolto in avanti nella direzione di marcia).
  • Page 15: Passaggi Per L'installazione

    Passaggi per l’installazione Avvertenza: definire la coppia dell’utensile elettrico in base alle viti utilizzate. 1° passaggio: 2° passaggio: ritagliare un’apertura di 700 × 500 mm (R60). Applicare un sigillante / cordoncino di guarnizione Spessore oblò 25–60 mm intorno all’apertura. Pulire con sapone. 25–60 mm 502 mm 702 mm Avvertenza: pulire prima dell’applicazione del sigillante. Avvertenza: considerare lo spazio della scanalatura per il cavo. Non utilizzare alcol. 3° passaggio: 4° passaggio: Applicare il sigillante sulla scanalatura del telaio esterno.
  • Page 16: Dati Prodotto

    Istruzioni d’uso Avvertenza: definire la coppia dell’utensile elettrico in base alle viti utilizzate. 1. Interruttore: Posizione maniglia Regolazione luci LED: «–»: ACCESE «O»: SPENTE Interruttore luci LED 2. Bloccare: Corrente Angolo di apertura: 2° Bloccaggio 3. Maniglia: Angolo di apertura: 20° Maniglia Angolo di apertura Angolo di apertura: 70° Potenza: max. 15 W 1) Posizioni per la ventilazione a) Chiusa: Il vetro è poggiato sulla guarnizione, i blocchi di chiusura si trovano nella posizione più bassa. b) Ventilazione: Vetro leggermente aperto, blocchi di chiusura in posizione di ventilazione.
  • Page 17: Allmän Information

    Quipon SKY 70 × 50 Monteringsanvisning 1. Får endast monteras i fritidsfordon eller släpfordon. 2. Quipon SKY är lämpad för högst 120 km/h. 3. Montering i längsriktningen (sidan med gångjärnen pekar åt höger eller vänster sett från färdriktningen) eller montering på tvären (sidan med gångjärnen pekar framåt i färdriktningen).
  • Page 18 Installationssteg Information: elverktygets vridmoment ska vara i enlighet med monteringsskruvarna. Steg 1: Steg 2: gör ett hål på 700 × 500 mm (R60). sätt dit tätningsmassa / en tätningslist runt hålet. Taktjocklek 25–60 mm Rengör med tvål. 25–60 mm 502 mm 702 mm Viktigt: rengör noga innan du applicerar tätningsmaterialet. Viktigt: tänk på spåret till kabeln. Använd inte alkohol. Steg 3: Steg 4: applicera tätningsmaterialet på...
  • Page 19 Bruksanvisning Information: elverktygets vridmoment ska vara i enlighet med monteringsskruvarna. 1. Brytare: Handtagsposition LED-styrning: ”–”: PÅ ”O”: AV LED-brytare 2. Låsning: Ström Öppningsvinkel: 2° Låsning 3. Handtag: Öppningsvinkel: 20° Handtag Max. öppningsvinkel: 70° Effekt: max. 15 W 1) Vädringsställningar a) Stängd: Glaset ligger mot tätningen, låsregeln är ihakad i det nedersta läget. b) Vädring: Glaset är lite öppet, låsregeln sitter i vädringsläget.
  • Page 20 Erläuterungen / Declarations / Comentarios / Explications / Note / Förklaringar: – E rklärung des Herstellers, dass das Produkt den produktspezifisch geltenden IP55: – staub- und strahlwassergeschützt europäischen Richtlinien entspricht. – dust and hose water protection – Manufacturer declaration that the product meets the European standards – protección contra el polvo y el agua para el acero applicable to the product.

Table des Matières