Table des Matières
Publicité
Les langues disponibles
Les langues disponibles
Liens rapides
Publicité
Table des Matières

Sommaire des Matières pour Numark WS100
- Page 1 User Guide English ( 2 – 5 ) Guía del usuario Español ( 6 – 9 ) Guide d'utilisation Français ( 10 – 13 ) Guida per l'uso Italiano ( 14 – 17 ) Benutzerhandbuch Deutsch ( 18 – 21 ) Appendix English ( 22 –...
- Page 2 For additional product support, visit numark.com/support. Setup Connection Here is just an example of how to use your WS100 in your setup. Items not listed in Introduction > Box Contents are sold separately. Power Mixer...
- Page 3 Setting Up the Microphone Transmitter Remove the microphone transmitter’s battery compartment cover and insert 2 AA batteries into compartment. Make sure the polarities of the batteries (+ and –) are correct. Reattach the battery compartment cover. Slide the power switch into the on position. The power indicator will flash briefly to indicate the microphone transmitter is on.
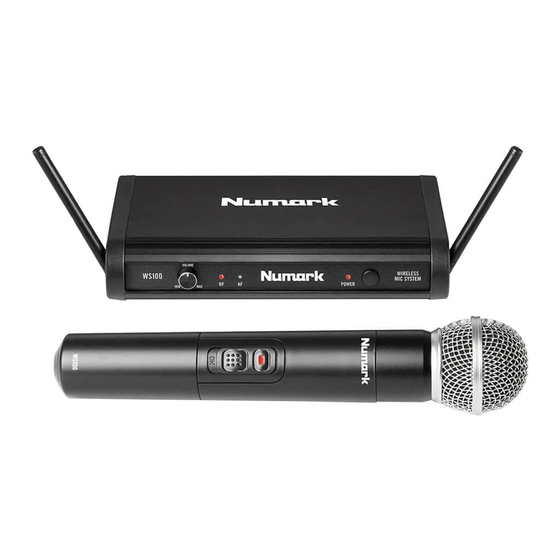
- Page 4 Receiver Front Panel Power Button: Press this button to turn the receiver on or off. Power Indicator: When lit, this LED indicates the receiver is powered on. RF Indicator: When lit, this LED indicates that the receiver is receiving a signal from the transmitter.
- Page 5 Troubleshooting Problem Solution The receiver does not produce Make sure the receiver’s power adapter is properly any sound. connected to the power input and a power source. Make sure the microphone transmitter’s batteries are properly inserted and that their polarities (+ and –) are correct.
- Page 6 Para soporte adicional del producto, visite numark.com/support. Configuración Diagrama de conexión He aquí un ejemplo de cómo utilizar su WS100 en su configuración. Los productos que no figuran en el Introducción > Contenido de la caja se venden por separado. Alimentación...
-
Page 7: Características
Preparación del transmisor del micrófono Extraiga la puerta del compartimiento para pilas del transmisor del micrófono e inserte 2 pilas AA en el mismo. Asegúrese de que las polaridades de las pilas (+ y –) sea la correcta. Vuelva a colocar la puerta del compartimiento para pilas. Coloque el interruptor de encendido en la posición on. - Page 8 Receptor Panel frontal Botón de encendido: Pulse este botón para encender o apagar el receptor. Indicador de encendido: Al encenderse, este LED indica que el receptor está encendido. Indicador RF: Al encenderse, este LED indica que el receptor está recibiendo una señal proveniente del transmisor.
-
Page 9: Solución De Problemas
Solución de problemas Problema Solución El receptor no produce ningún Asegúrese de que el adaptador de corriente del sonido. receptor esté conectado correctamente a la entrada de corriente y a la fuente de corriente. Asegúrese de que las pilas del transmisor estén insertadas apropiadamente y que sus polaridades (+ y –) sean correctas. -
Page 10: Présentation
Pour toute assistance supplémentaire, veuillez visiter le site numark.com/support. Installation Schéma de connexion Voici un exemple de la façon d'utiliser votre WS100 dans votre configuration. Articles non mentionnés dans Présentation > Contenu de la boîte sont vendus séparément. Alimentation Console de mixage WS100 00 Haut–parleurs... -
Page 11: Caractéristiques
Installation de l'émetteur de microphone Retirez le couvercle du compartiment des piles de l’émetteur de microphone et insérez 2 piles de format AA. Assurez-vous que les polarités (+ et –) des piles sont correctes. Remettez le couvercle du compartiment des piles en place. Faites glisser l'interrupteur d'alimentation en position marche (On). - Page 12 Récepteur Panneau avant Touche d'alimentation : Cette touche permet de mettre le récepteur sous et hors tension. Indicateur d’alimentation : Cette DEL s'allume lorsque le récepteur est sous tension. Indicateur de fréquences radio : Cette DEL s'allume lorsque le récepteur reçoit un signal transmis par l’émetteur.
-
Page 13: Dépannage
Dépannage Problème Solution Le récepteur ne produit aucun Veuillez vous assurer que le câble d’alimentation son. secteur du récepteur est correctement branché à l’entrée d’alimentation et à une prise secteur. Veuillez vous assurer que les piles de l'émetteur de microphone sont correctement insérées et que leurs polarités (+ et –) sont correctes. - Page 14 Per ulteriore assistenza, recarsi alla pagina numark.com/support. Configurazione Schema dei collegamenti Ecco un esempio di come utilizzare il vostro WS100 nella propria configurazione. Voci non elencati in Introduzione > Contenuti della confezione sono venduti separatamente. Alimentazione Mixer...
- Page 15 Configurazione del trasmettitore del microfono Rimuovere il coperchio dello scomparto batterie del trasmettitore del microfono e inserire 2 batterie AA nello scomparto stesso. Assicurarsi che le polarità delle batterie (+ e –) siano corrette. Riposizionare il coperchio dello scomparto batterie. Far scorrere l'interruttore di alimentazione su on.
- Page 16 Ricevitore Pannello anteriore Tasto di alimentazione: premere questo tasto per accendere e spegnere il ricevitore. Indicatore di alimentazione: quando è acceso, questo LED indica che il ricevitore è alimentato. Indicatore RF: quando è acceso, questo LED indica che il ricevitore sta ricevendo un segnale dal trasmettitore.
-
Page 17: Risoluzione Di Problemi
Risoluzione di problemi Problema Soluzione Il ricevitore non produce alcun Assicurarsi che l'adattatore di alimentazione del suono. ricevitore sia collegato adeguatamente all'ingresso di alimentazione e a una fonte di alimentazione. Assicurarsi che le batterie del trasmettitore siano inserite correttamente e che le loro polarità (+ e –) siano rispettate. - Page 18 Kompatibilität etc.) und zur Produktregistrierung besuchen Sie numark.com. Um weitere Unterstützung zu Ihrem Produkt zu erhalten, besuchen Sie numark.com/support. Setup Anschlussdiagramm Hier ist ein Beispiel, wie Sie die WS100 in Ihrer Konfiguration verwenden. Positionen, die nicht in der Einführung > Lieferumfang aufgeführt sind separat erhältlich. Steckdose Mixer...
- Page 19 Einrichtung des Mikrofon-Senders Nehmen Sie die Abdeckung des Batteriefaches des Mikrofon-Senders ab und legen Sie 2 AA-Batterien in das Fach ein. Stellen Sie sicher, dass die Polaritäten der Batterien (+ und –) korrekt sind. Befestigen Sie die Abdeckung des Batteriefaches erneut. Schieben Sie den An/Aus-Schalter in die An (On)-Position.
- Page 20 Receiver Vorderseite Ein/Aus-Taste: Drücken Sie diese Taste, um den Receiver ein- oder auszuschalten. Leistungsanzeige: Ein Leuchten dieser LED-Lampe zeigt an, dass der Receiver eingeschaltet ist. RF-Anzeige: Ein Leuchten dieser LED-Lampe zeigt an, dass der Receiver ein Signal vom Sender empfängt. AF-Anzeige: Ein Leuchten dieser LED-Lampe zeigt den aktuellen, vom Sender empfangenen Audio-Signalpegel an.
- Page 21 Problembehebung Problem Lösung Der Receiver erzeugt keinen Ton. Stellen Sie sicher, dass das Netzteil des Receivers korrekt an einen Netzeingang und eine Stromquelle angeschlossen ist. Stellen Sie sicher, dass die Batterien des Mikrofon- Senders richtig eingesetzt sind und dass deren Polaritäten (+ und –) korrekt sind.
-
Page 22: Appendix (English)
Appendix (English) Technical Specifications Specifications are subject to change without notice. Receiver UHF Band Operation 500–980 MHz (region-specific) Transmission System PLL-Synthesized DQPSK Modulation Reception Range 200 feet / 60 meters Signal-to-Noise Ratio > 96 dB (A–weighted) Reception Sensitivity < -90 dBm AF Response 50 Hz–18 kHz THD+N... -
Page 23: Trademarks And Licenses
(width x depth x height) Weight 0.60 lbs. 0.27 kg Trademarks and Licenses Numark is a trademark of inMusic Brands, Inc., registered in the U.S. and other countries. All other product or company names are trademarks or registered trademarks of their respective owners. - Page 24 Manual Version 1.2...