Publicité
Les langues disponibles
Les langues disponibles
Liens rapides
FENCING
Installation Instructions
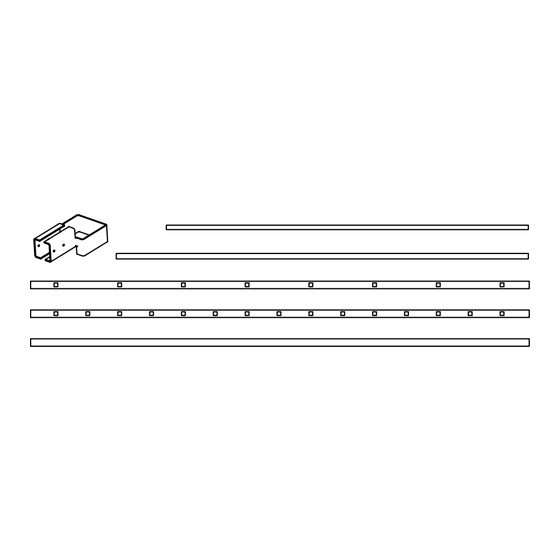
FENCING SECTION COMPONENTS
This package contains the components for a 48" (121.9 cm) or 60" (152.4 cm) high by
72" (182.9 cm) length fencing section.
- 8 Long spindles
- 7 Short spindles
- 6 Post mounting brackets
- 3 Cross-bars
- Self tapping screws
ITEMS SOLD SEPARATELY
POST
GATE KITS
WALL AND ANGULAR MOUNTING BRACKET
Ligne de la clôture
INSTALLING YOUR FENCE
1.
DETERMINE THE FENCE LINE
Périmètre de
la propriété
Maison
1.1
Verify the property line. Make sure the fence is set
back from the property line as required by local codes.
1.2
Establish the fence line by installing stakes & string.
Fence Line
Property Line
House
2. ASSEMBLE THE FENCE SECTION
2.1
Pick a level area, then take a cross bar with 8 holes and
insert long spindles and short spindles. Make sure the
opening of the U-Channel is facing down. Begin with
a long spindle and work your way across alternating
from long spindles to short spindles.
2.2
Place the second cross bar with 15 holes with the
U-Channel facing down.
2.3
Place the cross bar with no holes and U-Channel
facing down on the top. Fasten with screws. Make
sure that all the screws in the fence section and posts
are inserted on the same side.
Ligne de la clôture
Périmètre de
la propriété
Fence Line
Property Line
40, Industrial Park St., Richibucto, NB
Canada E4W 4A4
Item#: PR0862 DEC2017
3.
POST INSTALLATION OPTIONS
In-ground installation (See 3A Option)
Installation of post using a spike (See 3B Option)
Installation using mounting plate to concrete (See 3C Option)
Ligne de la clôture
3A. IN-GROUND INSTALLATION (100"
POSTS)
Périmètre de
la propriété
3A.1
Dig the posts holes with an auger or shovel. Holes
should be 3' deep. If shallower holes are desired, the
posts will need to be cut.
Fence Line
6"
6"
3'
3'
Property Line
NOTE: For gate sections, make sure to allow an extra 1¾"
between posts to make sure that the gate can swing freely.
Example: The distance between the centre of the post to the
centre of the post for a 4' gate should be 4' 3 ¾" or 4'1 ¾" from
6"
post to post.
3A.2
Mix concrete and pour concrete into the hole leaving a
3'
maximum of 6" gap from top of ground.
3A.3
Insert the post in concrete and centre. Make sure the
post is level and plumb.
IMPORTANT NOTE: Make sure the posts are installed at a
maximum of 74" from the centre of one post to the centre of
the other post. If the distance is greater, you may not be able
to attach the fence section. On uneven ground, it is possible to
take a 100" post to the appropriate height. If a short section is
required, use a hack saw to cut the section to the desired length.
Place cut section into the ground to hide any imperfections.
3A.4
Once the post is in position, tamp down concrete to
ensure that it completely surrounds the post.
3A.5
Install all posts and wait for the concrete to cure
before installing the fence sections.
3B.
INSTALLATION OF POST USING A
SPIKE
Ligne de la clôture
Périmètre de
la propriété
Maison
Maison
Fence Line
Property Line
House
House
3B.1
Drive spike into the ground using sledge hammer and
piece of wood. (see figure 3B.1).
Maison
6"
3'
6"
3'
1
"
/
3
4
House
Ligne de la clôture
Périmètre de
la propriété
Maison
Fence Line
3B.1
Property Line
House
BEFORE INSTALLING YOUR FENCE
ASK YOUR LOCAL UTILITY COMPANY TO CHECK FOR
UNDERGROUND UTILITIES. CHECK WITH LOCAL BUILDING
AUTHORITIES FOR ANY NECESSARY BUILDING PERMITS
AND TO VERIFY ANY AND ALL CODES.
TOOLS REQUIRED
- Stakes
- Level
- Rubber Mallet
- String
- Hacksaw
- Measuring tape
- Hammer
- Drill, Bit 3/32
* For In-Ground installation option
** For spike installation option
3B.2
Once spike is in place, slide post over the top portion.
Level your post using the bolts at the four corner of
the spike plate. Once post is level and plumb secure
into position by tightening the center bolt below the
mounting plate. (see figure 3B.2)
3C. INSTALLATION USING MOUNTING PLATE
TO CONCRETE
3C.1
Position and attach the mounting plate to the post.
Place post, mark and drill holes in concrete.
3C.2
Place post with mounting base over holes, and secure
with concrete screws. (see figure3C.2)
4.
INSTALLING THE FENCE SECTION
Figure 4A
Figure 4B
4.1
To install the fence section to the post, simply insert all
three brackets onto the post, then slide fence section
into the brackets (see figure 4A).
NOTE: For inline and corner post make sure to alternately
flip brackets in order to have fencing level section lined up
horizontally (see figure 4B and 4C).
4.2
Adjust the fence section until it is approximately 4"
Ligne de la clôture
Ligne de la clôture
maximum from the ground. This will prevent the family
pet from escaping or unwanted intruders from entering
and will make for a 5' high fence.
Périmètre de
Périmètre de
la propriété
la propriété
4.3
Repeat instructions 4.1 and 4.2 until fence is properly
installed.
4.4
Adjust the section until it is centered between the posts.
NOTE: Make sure that your section is centered to allow for a
proper installation. There should be a space of approximately
3-3/8" between the post and the first spindle
Fence Line
Fence Line
4.5
Fasten fencing sections to the brackets using 4
self-tapping screws on each bracket.
4.6
Property Line
Attach bracket to post using self-tapping screw
Property Line
enclosed. Screw only needs to be placed on one of
three sides of the bracket.
3B.2
4.7
Install post caps and tap them in place using rubber mallet.
4.8
Step-down installation is also manageable (see figure 4D)
6"
6"
3'
3'
- Robertson screwdriver #1
- Shovel or post hole digger/
auger (Can be leased at
most hardware stores)*
- Concrete mix or back fill
material of choice*
- Sledgehammer**
- 6" length of 4"x 4" wood**
3C.2
6"
3'
Figure 4C
Figure 4D
Maison
Maison
House
House
Publicité

Manuels Connexes pour Imperial Kool-Ray

Sommaire des Matières pour Imperial Kool-Ray
- Page 1 FENCING Installation Instructions FENCING SECTION COMPONENTS BEFORE INSTALLING YOUR FENCE ASK YOUR LOCAL UTILITY COMPANY TO CHECK FOR This package contains the components for a 48” (121.9 cm) or 60” (152.4 cm) high by UNDERGROUND UTILITIES. CHECK WITH LOCAL BUILDING 6”...
- Page 2 CLÔTURE Instructions d’installation COMPOSANTES POUR SECTION DE CLÔTURE AVANT D’INSTALLER VOTRE CLÔTURE CONSULTEZ LES SERVICES D’UTILITÉ PUBLIQUE DE VOTRE RÉGION POUR VÉRIFIER LA PRÉSENCE DE CANALISATIONS Cet emballage contient les composantes pour une section de clôture SOUTERRAINES. VÉRIFIEZ AVEC LA DIRECTION DE L’URBANISME 6”...