Table des Matières
Publicité
Les langues disponibles
Les langues disponibles
Liens rapides
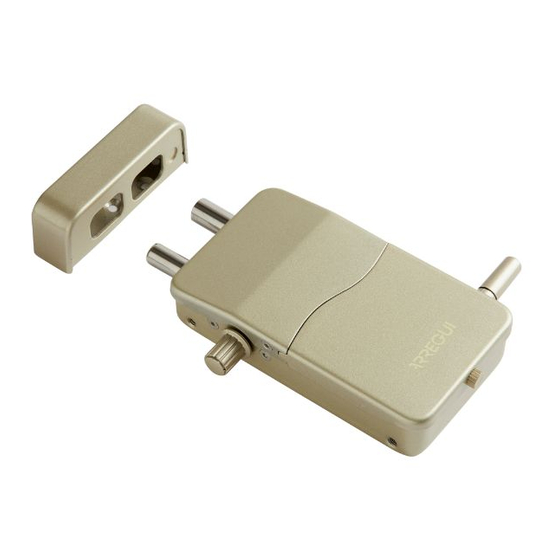
CI10-AL
arregui.es
I
arregui.it
ES
Cerradura de seguridad invisible para puertas, con
mando a distancia y detección anticipada al robo.
IT
Serratura di sicurezza invisibile per porte, con
telecomando e rilevamento anticipato dei furti.
PT
Ferrolho de segurança invisível para portas, com
comando à distancia e deteção antecipada do roubo.
EN
Invisible safety lock for doors, with remote control and
early theft detection.
FR
Verrou de sécurité invisible pour portes, avec
télécommande et détection anticipée du vol.
DE
Unsichtbares Sicherheitsschloss für Türen, mit
Fernbedienung und frühzeitiger Einbrucherkennung.
130db
I
arregui.biz
I
arregui.fr
Publicité
Table des Matières

Manuels Connexes pour Arregui CI10-AL

Sommaire des Matières pour Arregui CI10-AL
- Page 1 CI10-AL arregui.es arregui.it arregui.biz arregui.fr Cerradura de seguridad invisible para puertas, con mando a distancia y detección anticipada al robo. Serratura di sicurezza invisibile per porte, con telecomando e rilevamento anticipato dei furti. Ferrolho de segurança invisível para portas, com comando à...
- Page 2 CI10-AL COMPONENTES / COMPONENTI / COMPONENTES / COMPONENTS / COMPOSANTS / BESTANDTEILE Función de alarma por vibración Antena Funzione di allarme a vibrazione Antenna Função de alarme de vibração Antena Função de alarme de vibração Antenna Interrupteur alarme de vibration...
- Page 3 CI10-AL IMÁN, NO RETIRAR: Necesario para un correcto funcionamiento de la cerradura. Debe colocarse siempre enfrentado a los bulones. MAGNETE NON RIMUOVERE: Necessario per il corretto funzionamento della serratura. Deve sempre essere posizio- nato davanti ai catenacci. IMÃ NÃO RETIRAR: Necessário para o correto funcionamento da fechadura. Deve ser sempre colocado em frente às trancas.
- Page 5 CI10-AL INSTRUCCIONES PUESTA EN MARCHA INSTRUCCIONES DE USO CIERRE Cerrar Para cerrar la cerradura pulse el botón ( ) del mando a distancia. Una vez cerrado se escuchará 1 pitido. (A) Apertura cerradura IMPORTANTE: cuando las pilas se estén agotando, la cerradura emitirá 4 pitidos y no se realizará...
- Page 6 CI10-AL INSTRUCCIONES DE MONTAJE DE SUPERFICIE 1. Calcule en qué posición quiere instalar la 2. Al lado del distanciador adhesivo (H)coloque 3. Fije las bandas adhesivas (I) en la trasera cerradura, siempre por el interior de la puerta. el alojamiento de bulones (E) sobre el marco de de la placa base (B) o en las calzas (C), para Coloque el distanciador adhesivo (H) según...
- Page 7 CI10-AL INSTRUCCIONES DE MONTAJE PARA EMBUTIR 1. Calcule en qué posición quiere instalar 2. Al lado del distanciador adhesivo ( H) 3. Fije las bandas adhesivas (I) en la tra- la cerradura, siempre por el interior de la coloque el embellecedor (F) sobre el marco sera de la placa base (B) o en las calzas puerta.
-
Page 8: Cambio Della Batteria
CI10-AL ISTRUZIONI AVVIAMENTO ISTRUZIONI D’USO CHIUSURA Chiudi Per chiudere la serratura, premere il tasto ( ) sul telecomando. Una volta chiusa, si sentirà 1 bip. (A) Apertura serratura IMPORTANTE: quando le batterie sono scariche, la serratura emette 4 segnali acustici e la serratura non si chiude. -
Page 9: Istruzioni Per Il Montaggio A Parete
CI10-AL ISTRUZIONI PER IL MONTAGGIO A PARETE 1. Calcolare in quale posizione si desidera 2. Accanto al distanziatore adesivo (H) 3. Fissare le strisce adesive (I) sul retro della installare la serratura, sempre all’interno della posizionare il portabullone (E) sul telaio della piastra di supporto (B) o sugli spessori (C), porta. - Page 10 CI10-AL ISTRUZIONI DI MONTAGGIO PER L’INCASSO 1. Calcolare in quale posizione si desidera 2. Accanto al distanziatore adesivo (H) 3. Fissare le strisce adesive (I) sul retro installare la serratura, sempre all’interno posizionare il profilo (E) sul telaio della porta.
-
Page 11: Troca Das Pilhas
CI10-AL INSTRUÇÕES COLOCAÇÃO EM FUNCIONAMENTO INSTRUÇÕES DE UTILIZAÇÃO FECHO Para fechar a fechadura pressione o botão ( ) do comando à distância. Uma vez fechado ouve-se 1 apito. Fechar IMPORTANTE: quando as pilhas estiverem gastas, a fechadura emitirá 4 apitos e não realizará o fecho. - Page 12 CI10-AL INSTRUÇÕES DE MONTAGEM DE SUPERFÍCIE 1. Calcule em que posição pretende instalar a 2. Ao lado do separador adesivo (H), coloque o 3. Fixe as bandas adesivas (I) na parte fechadura, sempre pelo interior da porta. Colo- alojamento das trancas (E) sobre o aro da porta.
- Page 13 CI10-AL INSTRUÇÕES DE MONTAGEM PARA EMBUTIR 1. Calcule em que posição pretende 2. Ao lado do separador adesivo (H), coloque o 3. Fixe as bandas adesivas (I) na instalar a fechadura, sempre pelo interior acabamento (F) sobre o aro da porta. O separador parte posterior da placa base (B) ou da porta.
-
Page 14: Start Up Instructions
CI10-AL START-UP INSTRUCTIONS USAGE INSTRUCTIONS CLOSING Close To close the lock, press the ( ) button on the remote control. Once closed, you will hear a single beep. (A) Open lock IMPORTANT: When the batteries are about to run out, the lock will beep four times and will not close. - Page 15 CI10-AL SURFACE ASSEMBLY INSTRUCTIONS 1. Calculate the position where you want to 2.Next to the adhesive spacer (H), position the 3. Fix the adhesive strips (I) to the rear of the install the lock, always inside the door. Place bolt storage part (E) on the door frame. The...
- Page 16 CI10-AL BUILT-IN ASSEMBLY INSTRUCTIONS 1. Calculate the position where you want 2. Next to the adhesive spacer (H), position 3. Fix the adhesive strips (I) to the rear to install the lock, always inside the door. the trim (F) on the door frame. The spacer...
-
Page 17: Changer Les Piles
CI10-AL INSTRUCTIONS DE MONTAGE INSTRUCTIONS D’UTILISATION FERMETURE Fermeture Pour fermer la serrure appuyez sur le bouton () de la télécommande. 1 bip émis une fois fermé. (A) Ouverture du verrou IMPORTANT : Lorsque les piles sont à court, la serrure émet 4 bips et le verrou ne se ferme pas. - Page 18 CI10-AL INSTRUCTIONS DE MONTAGE - GÂCHE EN SURFACE 1. Calculer la position que vous souhaitez pour 2.À côté du distanciateur adhésif (H) placez le 3. Coller les bandes adhésives (I) à l’arrière du installer la serrure, toujours à l’intérieur de la por- cadre de la gâche (E) sur le cadre de la porte.
-
Page 19: Important
CI10-AL INSTRUCTIONS DE MONTAGE - GÂCHE A ENCASTRER 1.Calculer la position que vous souhaitez 2. À côté du distanciateur adhésif (H) placez 3. Coller les bandes adhésives (I) à pour installer la serrure, toujours à l’inté- la plaque de la gâche (F) sur le cadre de la l’arrière du cadre de la serrure (B) ou sur... -
Page 20: Auswechseln Der Batterien
CI10-AL ANLEITUNG FÜR DIE INBETRIEBNAHME GEBRAUCHSANWEISUNGEN VERRIEGELN Betätigen Sie die Taste ( ) auf der Fernbedienung, um das Schloss zu verriegeln. Sobald Verriegeln das Schloss verriegelt ist, ertönt ein Signalton. WICHTIG: Wenn die Batterien fast leer sind, gibt das Schloss vier Signaltöne ab und (A) Schloss entriegeln verriegelt nicht. - Page 21 CI10-AL ANWEISUNGEN FÜR DIE OBERFLÄCHENMONTAGE 1. Ermitteln Sie, in welcher Position Sie das 2.Platzieren Sie den Bolzenhalter (E) neben dem 3. Bringen Sie die Klebestreifen (I) an der Rück- Schloss anbauen wollen, immer auf der Klebeabstandhalter (H) am Türrahmen. Der Abs- seite der Basisplatte (B) oder an den Unterlegs- Innenseite der Tür.
- Page 22 CI10-AL ANWEISUNGEN FÜR DIE EINBAUMONTAGE 1. Ermitteln Sie, in welcher Position Sie 2. Platzieren Sie die Blende (F) neben dem 3. Bringen Sie die Klebestreifen (I) an das Schloss anbauen wollen, immer auf Klebeabstandhalter (H) am Türrahmen. Der der Rückseite der Basisplatte (B) oder der Innenseite der Tür.
- Page 23 CI10-AL...
- Page 24 DECLARACIÓN UE DE CONFORMIDAD SIMPLIFICADA SEGÚN LAS DIRECTIVAS 2014/53/EU (EMC) Y 2015/863/EU (ROHS) Por la presente, ARREGUI Buzones y Sistemas de Seguridad S.L declara que la Cerradura de Seguridad Invisible ref. CI10-AL, es conforme con la directiva 2014/53/UE.