Publicité

Les langues disponibles

Les langues disponibles

Liens rapides

Pundit P1-PH1
Barebone System
Quick Installation Guide

Publicité

Table des Matières
loading

Sommaire des Matières pour Asus Pundit P1-PH1 Barebone System

  • Page 1 Pundit P1-PH1 Barebone System Quick Installation Guide...
  • Page 2: Front Panel Features

    Front panel features C l o s e C l o s e C l o s e C l o s e C l o s e O p e n O p e n O p e n O p e n O p e n O p t i c a l d r i v e...
  • Page 3: Internal Components

    4 4 4 4 4 8 8 8 8 8 7 7 7 7 7 6 6 6 6 6 5.25-inch optical drive and ASUS motherboard 3.5 inch hard disk drive cage DIMM sockets Front panel cover LGA775 socket (under the CPU...
  • Page 4 Removing the front panel cover Lift the front panel cover 1 1 1 1 1 2 2 2 2 2 hooks outward. Carefully remove the front panel cover, then set it aside. Removing the storage drive assembly Lay the system on its side, Lift the storage drive then locate and remove three assembly, then set aside.
  • Page 5 Installing the CPU Unlock the load lever, then lift Lift the load plate, then to a 90º-100º angle. remove the PnP cap. R e t e n t i o n t a b R e t e n t i o n t a b L o a d l e v e r L o a d l e v e r R e t e n t i o n t a b...
  • Page 6 Installing an expansion card Lift the PCI riser card Remove the metal cover assembly to remove. opposite the slot that you intend to use. Insert the card connector to Reinstall the PCI riser card the slot, then press the card assembly.
  • Page 7 Reinstalling the storage drive assembly Before reinstalling the storage drive assembly, connect the IDE and power plugs to the IDE and power connectors at the back of the drives. Connect the black plug of the IDE cable to the optical drive, then the gray plug to the hard disk drive.
  • Page 8 Reinstalling the front panel cover Insert the front panel cover 1 1 1 1 1 2 2 2 2 2 tabs to the holes at the right side of the chassis, then close. Insert the front panel cover hooks to the chassis tabs until the front panel cover fits in place.
  • Page 9 Pundit P1-PH1 Système barebone Guide d’installation rapide...
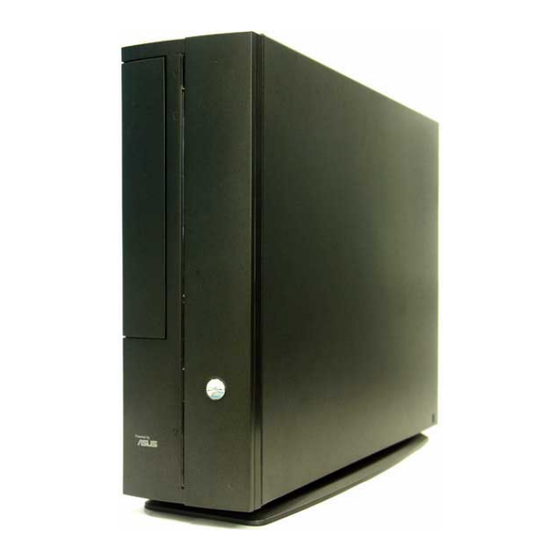
  • Page 10: Caractéristiques De La Façade

    Caractéristiques de la façade Fermé Fermé Fermé Fermé Fermé Ouvert Ouvert Ouvert Ouvert Ouvert B o u t o n d ’ e j e c t i o n B o u t o n d ’ e j e c t i o n B o u t o n d ’...
  • Page 11: Composants Internes

    4 4 4 4 4 8 8 8 8 8 7 7 7 7 7 6 6 6 6 6 Bloc du lecteur optique 5.25’’ Carte mère ASUS et du lecteur de disque dur 3.5’’. Sockets DIMM Façade Socket LGA775 (sous le Alimentation système de refroidissement du...
  • Page 12: Retirer Le Capot De La Façade

    Retirer le capot de la façade Levez les crochets du capot 1 1 1 1 1 2 2 2 2 2 avant vers l’extérieur. Retirez avec précaution le capot, puis mettez-le de côté. Retirer l ’ensemble de stockage Posez le système sur le côté, Soulevez l’ensemble de puis localisez et retirez les stockage, puis mettez-le de...
  • Page 13: Installer Un Cpu

    Installer un CPU Soulevez le levier dans la Soulevez la plaque, puis retirez direction de la flèche à un le couvercle PnP. angle de 90º-100º . O n g l e t d e r é t e n t i o n O n g l e t d e r é...
  • Page 14: Installer Une Carte D'extension

    Installer une carte d’extension Soulevez l’ensemble PCI Riser Retirez la protection Card pour le retirez du châssis. métallique faisant face au slot que vous désirez utiliser. Insérez le connecteur de la Réinstallez l’ensemble PCI Riser carte dans le slot et pressez Card.
  • Page 15: Réinstaller L'ensemble De Stockage

    Réinstaller l’ensemble de stockage Avant de réinstaller l’ensemble de stockage, connectez les prises IDE et d’alimentation aux connecteurs IDE et d’alimentation situés à l’arrière des lecteurs. Connectez la prise noire du câble IDE au lecteur optique, puis la prise grise au disque dur. Connectez la prise d’alimentation 4 broches aux connecteurs d’alimentation situés à...
  • Page 16: Réinstaller Le Capot De La Façade

    Réinstaller le capot de la façade Insérez les onglets du capot 1 1 1 1 1 2 2 2 2 2 dans les ouvertures situées à droite du châssis, puis refermez-le. Insérez les crochets du capot de la façade dans les onglets du châssis jusqu’à...
  • Page 17 Pundit P1-PH1...
  • Page 18 Reset CompactFlash S/PDIF In S/PDIF Out 6-pin IEEE 1394 4-pin IEEE 1394 USB 2.0 * Memory Stick Pro SecureDigital MultiMediaCard S-Video PS/2 PS/2 LAN (RJ-45) USB 2.0 100-127V 115V 200-240V 230V 2 2 2 2 2...
  • Page 19 5.25 DIMM LGA775 CPU 3 3 3 3 3...
  • Page 20 4 4 4 4 4...
  • Page 21 90-100 DDR DIMM 5 5 5 5 5...
  • Page 22 6 6 6 6 6...
  • Page 23 4-pin 7 7 7 7 7...
  • Page 24 8 8 8 8 8...
  • Page 25 Pundit P1-PH1...
  • Page 26 Reset CompactFlash S/PDIF In S/PDIF Out 6-pin IEEE 1394 4-pin IEEE 1394 USB 2.0 * Memory Stick Pro SecureDigital MultiMediaCard S-Video PS/2 PS/2 LAN (RJ-45) USB 2.0 100- 127V 115V 200-240V 230V 2 2 2 2 2...
  • Page 27 5.25 DIMM LGA775 CPU 3 3 3 3 3...
  • Page 28 4 4 4 4 4...
  • Page 29 90-100 DDR DIMM 5 5 5 5 5...
  • Page 30 6 6 6 6 6...
  • Page 31 4-pin 7 7 7 7 7...
  • Page 32 8 8 8 8 8...
  • Page 33 Pundit P1-PH1...
  • Page 34 ® ® ™ ™ 2 2 2 2 2...
  • Page 35 3 3 3 3 3 1 1 1 1 1 2 2 2 2 2 5 5 5 5 5 4 4 4 4 4 8 8 8 8 8 7 7 7 7 7 6 6 6 6 6 1 1 1 1 1 2 2 2 2 2 3 3 3 3 3...
  • Page 36 1 1 1 1 1 2 2 2 2 2 4 4 4 4 4...
  • Page 37 5 5 5 5 5...
  • Page 38 3 3 3 3 3 2 2 2 2 2 6 6 6 6 6...
  • Page 39 3 3 3 3 3 4 4 4 4 4 7 7 7 7 7...
  • Page 40 1 1 1 1 1 2 2 2 2 2 3 3 3 3 3 8 8 8 8 8...
  • Page 41 Pundit P1-PH1...
  • Page 42 ® ™ ™ ®...
  • Page 45 º º...
  • Page 49 Pundit P1-PH1 Barebone Sistemleri H›zl› Kurulum K›lavuzu...
  • Page 50 Ön panel özellikleri Kapat Aç Optik sürücü açma S›f›rlama dü¤mesi dü¤mesi HDD LED Göstergesi CompactFlash ® kart Optik sürücü yuvas› yuvas›n›n kapa¤› Ön panel kapa¤› 3-in-1 kart okuyucusu* Ön panel kapa¤›n› açmak için bas›n S/PDIF Girifl portu S/PDIF Ç›k›fl portu 6-pimli IEEE 1394 portu Güç...
  • Page 51 Dahili bileflenler 5.25 inç optic sürücü ve 3.5 inç ASUS anakart sabit disk sürücü kafesi DIMM soketleri Ön panel kapa¤› LGA775 soketi (CPU fan› ve ›s› Güç beslemesi ünitesi alma komplesi alt›nda) PCI kart› kald›rma deste¤i CPU fan› ve ›s› alma komplesi (anakart PCI yuvas›na...
  • Page 52 Ön panel kapa¤›n›n ç›kar›lmas› Panel kapa¤› çengellerini d›flar›ya do¤ru kald›r›n. Ön panel kapa¤›n› dikkatli bir flekilde ç›kar›n, ard›ndan kenara koyun. Saklama sürücüsü komplesinin ç›kar›lmas› Sistemi yan taraf›na koyun, Saklama sürücü komplesini ard›ndan üç adet saklama kald›r›n, ard›ndan kenara koyun. sürücüsü montaj vidalar›n› bulun ve ç›kar›n.
  • Page 53 CPU'nun tak›lmas› Yük kolunun kilidini aç›n, Yük plakas›n› kald›r›n, ard›ndan ard›ndan 90 - 100 aç› yapacak PnP flapkas›n› ç›kar›n. flekilde kald›r›n. Tutma sekmesi Yük kolu CPU'yu tak›n. CPU sadece bir Yük plakas›n› kapat›n, ard›ndan yönde oturur. yük kolunu kilitleyin. CPU fan›n› ve ›s› alma komplesini yeniden kurun, ard›ndan CPU fan kablosunu anakarttaki CPU fan konektörüne yeniden ba¤lay›n.
  • Page 54 Geniflletme kart›n›n tak›lmas› Ç›karmak için PCI kald›rma kart› Yuvan›n karfl›s›nda bulunan metal komplesini kald›r›n. kapa¤› ç›kar›n, böylece amaçland›¤› gibi kullanabilmelisiniz. Kart konektörünü yuvaya tak›n, PCI kald›rma kart› komplesini ard›ndan yerine oturuncaya yeniden kurun. Kald›rma kart› kadar karta düzgün bir flekilde konektörünün anakart PCI bast›r›n.
  • Page 55 Saklama sürücüsü komplesinin yeniden kurulmas› Saklama sürücü komplesini yeniden kurmadan önce, IDE ve güç tapalar›n› IDE'ye ve güç konektörlerini sürücülerin arkas›na ba¤lay›n. IDE kablosunun siyah renkteki fiflini optik sürücüye ba¤lay›n, ard›ndan gri renkteki fifli ise sabit disk sürücüsüne ba¤lay›n. 4 pimli güç fifllerini sürücülerin arkas›nda bulunan güç konektörlerine ba¤lay›n.
  • Page 56 Ön panel kapa¤›n›n yeniden tak›lmas› Ön panel kapa¤› sekmelerini flasenin sa¤ taraf›ndaki deliklere yerlefltirin, ard›ndan kapa¤› kapat›n. Ön panel kapa¤› çengellerini ön panel kapa¤› yerine oturuncaya kadar flase sekmelerine tak›n. Kapa¤›n yeniden tak›lmas› Kapa¤› flaseye tak›n. Kapak sekmelerinin flase raylar›na oturdu¤undan emin olun.

Table des Matières