Publicité

Les langues disponibles

Les langues disponibles

Liens rapides

Kodak
F600 Zoom
Camera
ENGLISH/ESPAÑOL/FRANÇAIS

Publicité

Table des Matières
loading

Sommaire des Matières pour Kodak ADVANTIX F600 Zoom

  • Page 1 Kodak F600 Zoom Camera ENGLISH/ESPAÑOL/FRANÇAIS...
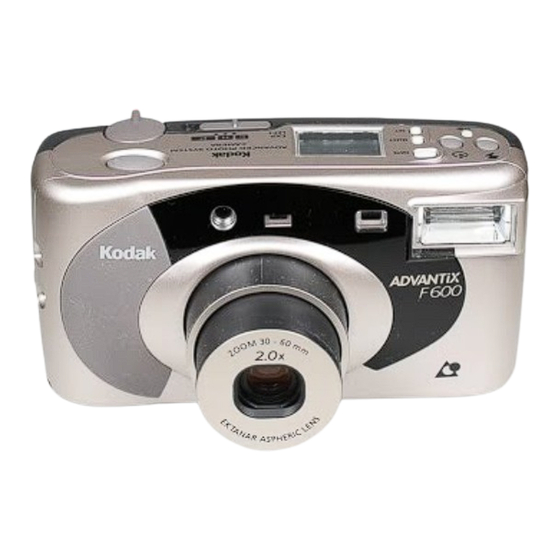
  • Page 2: Camera Identification

    Camera Identification...
  • Page 3 Camera Identification...
  • Page 4 LCD Panel AUTO OFF...
  • Page 5 This device complies with part 15 of the FCC Rules. Operation is subject to the following two conditions: (1) this device may not cause harmful interference, and (2) this device must accept any interference received, including interference that may cause undesired operation.
  • Page 6 F600 Zoom Camera NEED HELP WITH YOUR CAMERA OR MORE INFORMATION ABOUT THE ADVANCED PHOTO SYSTEM? Visit our web site at http://www.kodak.com or call: Kodak (USA only) from 9:00 a.m. to 7:00 p.m. (Eastern time) Monday through Friday at 1 (800) 242-2424.
  • Page 7 ADVANCED PHOTO SYSTEM Date and time imprinting FEATURES AVAILABLE • You can choose to have date WITH THIS CAMERA and time information printed on the back of your prints. Triple format selection See your photofinisher for a • You can take three different full description of available size pictures: Classic (C), services.
  • Page 8 Picture quality information Safety-interlock film door exchange (PQix) • The safety interlock on the film • Your camera features magnetic door prevents the door from information exchange that opening before the film is records information about completely rewound. lighting conditions and exposure on the film cassette to assist the photofinishing lab with color correction and...
  • Page 9 Look for this logo to be certain that the film you buy is made for this camera. Look for this logo to select a certified photofinishing service for developing your film and to assure that you get all the features of the Advanced Photo System. Film Status Indicator (FSI) UNEXPOSED A highlighted indicator advances...
  • Page 10 CONTENTS INFINITY-FOCUS MODES ....19 Red-eye reduction ......19 CAMERA IDENTIFICATION ....6 Auto flash without ATTACHING THE STRAP ..... 7 red-eye reduction ......20 Control-button activator....7 Fill flash ........21 Flash off ........22 LOADING THE BATTERY ..... 8 Low-battery indicator ......
  • Page 11 CAMERA IDENTIFICATION (see inside cover flaps for camera diagrams) SELF TIMER STRAP POST REDUCTION LAMP FILM DOOR LATCH FLASH INDICATOR LAMP SHUTTER BUTTON VIEWFINDER EYEPIECE ZOOM DIAL LEVER OFF BUTTON FORMAT SELECTOR SWITCH FILM CHAMBER LCD PANEL FILM DOOR DATE SELECT BUTTON TRIPOD SOCKET DATE...
  • Page 12: Attaching The Strap

    2. Thread the longer end of the INFINITY FOCUS INDICATOR strap through the shorter loop. BATTERY SYMBOL 3. Pull the strap tight. FILL FLASH INDICATOR NIGHTVIEW INDICATOR AUTO FLASH INDICATOR Control-button activator FLASH OFF INDICATOR Use the knob on the clasp of the ATTACHING THE STRAP camera strap to activate the smaller-sized control buttons on...
  • Page 13: Loading The Battery

    LOADING THE BATTERY 2. Insert the battery into the chamber as shown. This camera uses one 3-volt lithium KODAK K123LA (or equivalent) Battery that supplies power for all camera operations. 1. Open the (24). BATTERY DOOR 3. Snap the battery door closed.
  • Page 14 Low-battery indicator sponsors of that program for details). It’s time to replace the battery • Remember to keep a spare when— battery with you at all times. • the (31) BATTERY SYMBOL • Read and follow all warnings “blinks” on the LCD PANEL and instructions supplied by the battery manufacturer.
  • Page 15: Loading The Film

    LOADING THE FILM You can load film into the Power shutdown camera with the camera ON To reduce battery power, the or OFF. camera will automatically go into 1. Turn the FILM DOOR LATCH a sleep mode when it is not to open the (22).
  • Page 16 2. Insert the film cassette 3. Close the film door to start completely into the the auto-film advance. The FILM (21). (28) on the CHAMBER FRAME COUNTER (6) will show the LCD PANEL number of frames remaining on the film cassette. •...
  • Page 17: Taking Pictures

    TAKING PICTURES 2. Move the FORMAT SELECTOR (5) to select desired SWITCH You can take Classic (C), Group/ format (C, H, or P). The HDTV (H)*, and Panoramic (P) viewfinder will change to show pictures on the same film cassette. the selected field of view.
  • Page 18 3. Frame your subject within the 4. Press the SHUTTER (19). For a (3) to take VIEWFINDER EYEPIECE BUTTON sharp picture, stand at least the picture. 2 ft (0.6 m) from your subject. • If you stand closer than 2 ft (0.6 m), the camera will lock and the flash-indicator lamp will blink.
  • Page 19 Using the focus lock 1. Place the AF circle on the subject that you want focused This camera automatically in the picture. focuses on whatever is within the auto-focus (AF) circle of the viewfinder eyepiece. To get a AF CIRCLE sharp picture, make sure the AF circle is on your main subject.
  • Page 20 3. While still partially depressing Using the zoom lens the shutter button, move the This camera has a motorized camera until your subject is zoom lens that lets you select where you want it within the the ideal lens-focal length for (19).
  • Page 21 2. Move the 4. Press the ZOOM DIAL LEVER SHUTTER BUTTON to the right to the telephoto to take the picture. position to zoom closer to • The lens barrel will the subject. Move the lever to automatically return to the the left to the wide-angle wide-angle position after position to zoom away from...
  • Page 22: Taking Flash Pictures

    such as a waterfall, 1. Press the (20) OFF BUTTON skyscraper,or a single person. to turn the camera on and to uncover the (16). • Add interest to your picture LENS by framing it with a tree branch, a window, or even the rails of a fence.
  • Page 23 3. Partially depress the Flash-to-subject distance SHUTTER (3). When the BUTTON FLASH ISO film Wide Telephoto (18) glows INDICATOR LAMP speed (30 mm) (60 mm) green, fully depress the shutter button to take 2 to 13 ft 2 to 7 ft the picture.
  • Page 24 SELECTING THE FLASH AND The flash modes will remain INFINITY-FOCUS MODES selected after you take the picture. To change the flash-mode selection, Besides the auto-flash mode with press the flash-select button, or turn red-eye reduction, you can select the camera off then back on to return auto-flash without red-eye to the flash-default mode.
  • Page 25: Lcd Panel

    1. Press the (20) 5. Partially depress the OFF BUTTON SHUTTER to turn the camera on and to (3). When the BUTTON FLASH uncover the (16). (18) glows LENS INDICATOR LAMP green, fully depress the 2. Press the FLASH SELECT shutter button to take (11) repeatedly until BUTTON...
  • Page 26 1. Press the (20) Fill flash OFF BUTTON to turn the camera on and to When bright light indoors or uncover the (16). LENS outdoors comes from behind the 2. Press the subject (backlighting), dark FLASH SELECT (11) repeatedly until shadows (especially on faces) BUTTON (34)
  • Page 27: Flash - Select

    4. Partially depress the Use a tripod or place the camera SHUTTER (3). When the on other firm support, and use BUTTON FLASH (18) glows green, high-speed film because the INDICATOR LAMP fully depress the shutter shutter speed in these situations button to take the picture.
  • Page 28 Infinity focus 3. Frame your subject within the (19). VIEWFINDER EYEPIECE Capture sharp, distant scenery at any zoom position (for 4. Press the SHUTTER BUTTON daylight and outdoor use only). to take the picture. 1. Press the (20) OFF BUTTON to turn the camera on and to uncover the (16).
  • Page 29: Using The Self-Timer

    Night-view 3. Frame your subject within the (19). VIEWFINDER EYEPIECE In this mode, the camera balances the flash and existing 4. Partially depress the SHUTTER light exposure so you can take (3). When the BUTTON FLASH beautiful pictures of people at (18) glows INDICATOR LAMP sunset or at night.
  • Page 30 2. Press the (20) • To cancel the self-timer OFF BUTTON to turn the camera on and to selection before the uncover the (16). shutter releases, turn LENS the camera off. 3. Press the (9). SELF TIMER BUTTON • The self-timer automatically 4.
  • Page 31: Date And Time Imprinting

    DATE AND TIME IMPRINTING Setting the date and time 1. Press the Traditional cameras print date DATE MENU (12) repeatedly to and/or time information directly BUTTON scroll and select desired onto the film. Your camera uses date or time format. the film’s magnetic data-recording capability to record date and 2.
  • Page 32: Unloading The Film

    UNLOADING THE FILM 3. Press the DATE SET BUTTON to change the “blinking” number(s). Automatic rewind The camera automatically rewinds the film into the cassette after the last exposure. 1. Wait for the film to completely rewind into the film cassette. •...
  • Page 33 3. Remove the film cassette Manual rewind from the camera and reload If you don’t want to take with new KODAK ADVANTIX pictures on the entire film, you Film. can manually activate the automatic rewind. 1. Gently press the FILM...
  • Page 34: Caring For Your Camera

    2. Follow steps 1–3 from with a soft, lintless cloth or a Automatic Rewind. camera lens-cleaning tissue. Never wipe a dry lens. NOTE: You cannot reload a partially exposed film into this camera CAUTION: Do not use to continue picture-taking. solvents or solutions not designed for cleaning camera lenses.
  • Page 35 TROUBLESHOOTING What happened Probable cause Solution Camera will There are no more Remove the film not operate pictures remaining Battery weak, dead, Replace or reload missing, or the battery improperly loaded Film does not Battery weak, dead, Replace or reload advance or rewind missing, or the battery...
  • Page 36 What happened Probable cause Solution LCD panel is blank Camera in sleep mode Press any control (continued) button to awaken camera Camera turned off Turn on/off switch ON LCD panel No film in camera Load new film into flashes “E” the camera Camera locks and Subject too close...
  • Page 37 C, H,& P format display Weight: 7.2 oz. (205 g) without film Film speed: DXIX (ISO) 50–1600 for and battery color or black-and-white films Flash unit: KODAK SENSALITE™ Flash Kodak, Sensalite, “e” mark, Advantix, and the Advanced Photo System symbol and logotype are trademarks.
  • Page 38 SOBRE EL ADVANCED PHOTO SYSTEM? Visite nuestro sitio en la red mundial electrónica (worldwide web) a la dirección http://www.kodak.com o llame a: Kodak (en los Estados Unidos solamente), llamada sin cargo al número 1 (800) 242-2424, de lunes a viernes de 9:00 a.m.
  • Page 39 Este dispositivo cumple con la parte 15 de las reglamentaciones de la FCC. El manejo está supeditado a las siguientes dos condiciones: (1) Este dispositivo puede no causar interferencia dañina, y (2) este dispositivo debe aceptar cualquier interferencia recibida, incluyendo interferencia la cual pudiese causar un funcionamiento indeseable. NOTA: El modelo de su cámara ha sido aprobado y cumple con las limitaciones establecidas para un dispositivo digital Clase B, de acuerdo con la Parte 15 de las reglamentaciones de la FCC.
  • Page 40 Busque este logotipo para asegurarse que la película que usted compre esté hecha para esta cámara. Busque este logotipo para seleccionar un servicio de fotoacabado certificado para revelar su rollo y para asegurarse de aprovechar todos los beneficios del Advanced Photo System. NO EXPUESTA Indicador del estado de la película (FSI)
  • Page 41 CARACTERÍSTICAS DEL y hora sea impresa en la parte de atrás de sus fotografías. ADVANCED PHOTO SYSTEM Vea a su servicio de DISPONIBLES CON fotoacabado para una ESTA CÁMARA descripción total de los Selección triple de formato servicios disponibles. • Usted puede tomar, en el Protección en contra de doble mismo rollo, fotografías en exposición (DEP)
  • Page 42 Intercambio de información Traba de seguridad en la puerta sobre la calidad de la fotografía del compartimiento de película (PQix) • La traba de seguridad en la • Su cámara tiene la puerta del compartimiento de característica de intercambio película previene que la puerta de información magnética la se pueda abrir antes de que la cual registra información, en el...
  • Page 43 CONTENIDO Consejos útiles para obtener mejores fotografías ..... 50 IDENTIFICACIÓN DE LA CÁMARA ..39 COMO TOMAR FOTOGRAFÍAS COMO AJUSTAR LA CORREA CON FLASH ........51 DE LA CÁMARA ......40 Distancia del sujeto al flash ..53 Activador de botón de control ..41 COMO SELECCIONAR LOS MODOS DE COMO CARGAR LA BATERÍA ....
  • Page 44: Identificación De La Cámara

    COMO IMPRIMIR LA FECHA Y HORA .. 61 BOTÓN DEL DISPARADOR Como fijar la fecha y hora ..62 PALANCA DEL DISCO SELECTOR DEL ZOOM INTERRUPTOR DE SELECCIÓN DE FORMATO COMO DESCARGAR LA PELÍCULA ..63 PANEL LCD Rebobinado automático .... 63 BOTÓN DE SELECCIÓN DE FECHA Rebobinado manual ....
  • Page 45: Como Ajustar La Correa De La Cámara

    BOTÓN DE ENCENDER APAGAR SÍMBOLO DE BATERÍA COMPARTIMIENTO DE PELÍCULA INDICADOR DE FLASH DE RELLENO PUERTA DEL COMPARTIMIENTO INDICADOR DE VISTA DE NOCHE DE PELÍCULA INDICADOR DE FLASH AUTOMÁTICO MONTAJE PARA TRÍPODE INDICADOR DE FLASH APAGADO PUERTA DEL COMPARTIMIENTO DE BATERÍA COMO AJUSTAR LA CORREA DE LA CÁMARA Panel LCD...
  • Page 46: Como Cargar La Batería

    2. Ponga el extremo largo de la correa a través del corto. Esta cámara utiliza una batería 3. Tire de la correa hasta que de litio de 3 voltios KODAK quede ajustada. K123LA (o su equivalente) que proporciona la energía necesaria Activador de botón de control...
  • Page 47: Panel Lcd

    2. Coloque la batería en su Indicador de batería débil compartimiento como aquí Debe cambiar la batería se indica. cuando — • el (31) SÍMBOLO DE LA BATERÍA “parpadea” en el PANEL LCD • todos los indicadores en el panel LCD desaparecen y el (3) no BOTÓN DEL DISPARADOR 3.
  • Page 48 consulte al patrocinador de Características de la conservación ese programa). automática de energía • Acuérdese de llevar una Apagado automático batería de repuesto con usted Cuando la cámara no se usa por en todo momento. aproximadamente 3 minutos, ésta • Lea y siga todas las se apagará...
  • Page 49: Como Cargar La Película

    • Cuando no vaya a usar la para abrir la PUERTA DEL cámara por un período de (22). COMPARTIMIENTO DE PELÍCULA tiempo prolongado, use el 2. Ponga completamente el botón de encender/apagar cartucho de película dentro del para apagar completamente (21).
  • Page 50: Como Tomar Fotografías

    COMO TOMAR FOTOGRAFÍAS • No fuerce el cartucho de película dentro del Puede tomar fotografías compartimiento de película. Clásicas (C), Grupo/HDTV (H)*, y Panorámicas (P) usando el mismo 3. Cierre la puerta del cartucho de película. El costo del compartimiento de película revelado de sus fotografías para comenzar el avance puede estar basado en el/los...
  • Page 51 1. Para encender la cámara y El visor cambiará y mostrará destapar el (16), oprima el campo de vista seleccionado. LENTE BOTÓN DE ENCENDER (20). APAGAR 3. Encuadre a su sujeto dentro (19). OCULAR DEL VISOR Para una fotografía nítida, 2.
  • Page 52 • Si se sitúa a menos de la 4. Oprima el BOTÓN DEL distancia mínima de 2 pies (3) para tomar DISPARADOR (0,6 m) la cámara no la fotografía. funcionará y la lámpara indicadora del flash parpadeará. Tamaños típicos de impresión de fotografías (formatos) Cl á...
  • Page 53 Como usar el cerrojo de enfoque 1. Coloque el círculo de enfoque automático (AF) sobre el Esta cámara se enfoca sujeto que quiera enfocar en automáticamente en cualquier la fotografía. objeto que aparezca en el círculo de enfoque automático (AF) del ocular del visor.
  • Page 54 3. Con el disparador parcialmente Como usar el lente de zoom oprimido, mueva la cámara Esta cámara tiene un lente hasta que el sujeto se motorizado de zoom que le encuentre en la posición que permite seleccionar la distancia usted desee dentro del ideal de enfoque del lente al (19).
  • Page 55 2. Deslice hacia la derecha la 4. Oprima el BOTÓN DEL (3) para tomar PALANCA DEL DISCO SELECTOR DISPARADOR (4), a la posición de la fotografía. DEL ZOOM telefotográfico, para acercarse • Después de aproximadamente al sujeto. Deslice la palanca 3 minutos, el cilindro del lente hacia la izquierda, a la regresará...
  • Page 56: Como Tomar Fotografías Con Flash

    • Haga tomas verticales de flash. Su cámara incluye un flash sujetos altos y angostos, automático el cual se dispara como cascadas, rascacielos o cuando es necesario. una persona sola. 1. Para encender la cámara y des- • Agregue interés a sus tapar el (16), oprima el LENTE...
  • Page 57 3. Oprima parcialmente el 4. Mantenga el sujeto a BOTÓN (3). Cuando la fotografiar dentro del alcance DEL DISPARADOR indicado para la sensibilidad LÁMPARA DE INDICADOR DE (18) brille verde, oprima de la película en su cámara FLASH completamente el disparador (vea Distancia del sujeto al para tomar la fotografía.
  • Page 58 Distancia del sujeto al flash Sensibilidad ISO Gran angular Telefotográfico de la película (30 mm) (60 mm) 2 a 13 pies (0,6 a 3,9 m) 2 a 7 pies (0,6 a 2,1 m) 2 a 18 pies (0,6 a 5,5 m) 2 a 10 pies (0,6 a 2,9 m) 2 a 25 pies (0,6 a 7,7 m) 2 a 14 pies (0,6 a 4,1 m)
  • Page 59 COMO SELECCIONAR LOS Los modos de flash se mantendrán encendidos después MODOS DE FLASH Y que se tome la fotografía. Para ENFOQUE INFINITO cambiar la selección de modos de Además del modo de flash flash, oprima el botón de selección automático con reducción de ojos de flash o apague la cámara y rojos, puede seleccionar los...
  • Page 60 característica de un flash DE REDUCCIÓN DE OJOS automático con reducción de ojos (26) aparezcan en el ROJOS rojos. Para reducir al mínimo los (6). PANEL LCD ojos rojos en fotografías con • Omita este paso si al flash, encienda todas las luces encender la cámara el modo en el cuarto y siga las siguientes de reducción de ojos rojos ya...
  • Page 61: Lente Botón De Encender Apagar

    (3). Cuando la destapar el (16), DEL DISPARADOR LENTE oprima el LÁMPARA DE INDICADOR DE BOTÓN DE (18) brille verde, oprima (20). FLASH ENCENDER APAGAR completamente el disparador para 2. Oprima repetidamente el tomar la fotografía. BOTÓN DE SELECCIÓN DE •...
  • Page 62 disparador para tomar la 1. Para encender la cámara y fotografía. destapar el (16), oprima LENTE • La cámara cambiará al modo BOTÓN DE ENCENDER (20). de flash automático sin APAGAR reducción de ojos rojos. 2. Oprima repetidamente el BOTÓN DE SELECCIÓN DE (11) hasta que el FLASH Flash de relleno...
  • Page 63 Flash apagado 1. Para encender la cámara y destapar el (16), oprima LENTE Cuando no quiera usar el flash, BOTÓN DE ENCENDER especialmente en interiores (20). APAGAR donde el uso del flash está prohibido, como en teatros y 2. Oprima repetidamente el museos, o cuando quiera BOTÓN DE SELECCIÓN DE fotografiar escenas en...
  • Page 64 Enfoque infinito 3. Encuadre su sujeto dentro del (19). OCULAR DEL VISOR Capture fotografías nítidas de escenas a mucha distancia en 4. Oprima el BOTÓN DEL cualquiera posición del zoom (3) para tomar la DISPARADOR (para uso en exteriores a la luz fotografía.
  • Page 65: Como Usar El Disparador Automático

    COMO USAR EL 1. Para encender la cámara y destapar el (16), oprima LENTE DISPARADOR AUTOMÁTICO BOTÓN DE ENCENDER Use esta característica para (20). APAGAR incluirse en las fotografías. 2. Oprima repetidamente el 1. Use el MONTAJE PARA BOTÓN DE SELECCIÓN DE (23) para montar la TRÍPODE (11) hasta que el...
  • Page 66: Como Imprimir La Fecha Y Hora

    COMO IMPRIMIR LA 5. Oprima el BOTÓN DEL (3). La DISPARADOR LÁMPARA FECHA Y HORA (17) DE DISPARADOR AUTOMÁTICO Las cámaras tradicionales en el frente de la cámara imprimen la información de la parpadeará por 8 segundos y fecha y/u hora directamente en la entonces brillará...
  • Page 67 formatos distintos: (año/mes/día, BOTÓN DE SELECCIÓN mes/día/año, o día/mes/año) y un (7) para seleccionar DE FECHA formato para la hora (hora/ el mes, día, año, u hora o minuto). minuto “parpedeantes”. 3. Oprima el BOTÓN DE FIJAR LA Como fijar la fecha y hora (8) para cambiar el/los FECHA 1.
  • Page 68 COMO DESCARGAR 4. Oprima el botón de selección de fecha para guardar el/los LA PELÍCULA número(s) seleccionado(s) y Rebobinado automático para activar el/los próximo(s) número(s) “parpadeante(s)” Esta cámara automáticamente rebobina la película una vez que 5. Repita los pasos del 3 al 5 se haya tomado la última para continuar su selección o fotografía.
  • Page 69 BOTÓN DE REBOBINADO DE cargarla con un (10) usando el PELÍCULA rollo nuevo de activador película KODAK ADVANTIX. de botón • El FSI en el cartucho de película completamente control el expuesto estará en (posición #3) cual se y el panel LCD demostrará...
  • Page 70: Cuidado De La Cámara

    CUIDADO DE LA CÁMARA en la hebilla de la correa de la cámara. 1. Proteja la cámara del polvo, 2. Siga los pasos 1–3 del humedad, golpe repentino, y Rebobinado automático. calor excesivo. NOTA: Para la toma continua de Precaución: No use fotografías, no puede volver a solventes o soluciones cargar película parcialmente...
  • Page 71 diseñado para la limpieza de 3. Remueva la batería cuando lentes. Nunca limpie el lente vaya a guardar la cámara por en seco. un largo período. Precaución: No use Precaución: Para prevenir la solventes o soluciones que posibilidad de daño y choque no hayan sido diseñadas para eléctrico, no trate, usted la limpieza de lentes de...
  • Page 72: Problemas Y Soluciones

    PROBLEMAS Y SOLUCIONES Problema Causa probable Solución La cámara no No quedan más fotografías Retire la película funciona La batería está débil, Reemplace o vuelva a descargada, mal cargar la batería colocada, o falta colocarla La película no La batería está débil, Reemplace o vuelva a avanza o se descargada, mal...
  • Page 73 Problema Causa probable Solución El panel LCD está La cámara está en el modo Oprima cualquier botón de en blanco de apagado automático control para activar la cámara El panel LCD No hay película en la cámera Ponga película nueva brilla “E”...
  • Page 74 1/4 a 1/360 segundos Sistema de enfoque: 87 zonas AF Fuente de energía: Primaria: una batería Enfoque (luz del día) : Gran angular/ de litio de 3 voltios KODAK K123LA telefotografico: 2 pies (0,6 m) (o su equivalente) a infinito...
  • Page 75 El símbolo y logotipo de Kodak, Sensalite, marca “e”, Advantix, y el Advanced Photo System son marcas registradas.
  • Page 76: Appareil Photo

    OU DE RENSEIGNEMENTS SUR LE SYSTÈME APS? Visitez notre site Web à l’adresse http://www.kodak.com, ou appelez Kodak, au Canada seulement, du lundi au vendredi, de 8 h à 17 h (heure de l’Est) au numéro 1 800 465-6325, poste 36100.
  • Page 77: Fonctions Aps Offertes Avec Cet Appareil-Photo

    FONCTIONS APS OFFERTES dos de vos photos. Consultez votre laboratoire de traitement AVEC CET APPAREIL-PHOTO photo pour connaître les Choix de trois formats services offerts. • Vous avez le choix de trois Protection contre la double formats différents : exposition classique (C), groupe/HDTV (H) •...
  • Page 78 Échange d’information pour Dispositif de verrouillage du l’amélioration de la qualité de compartiment du film l’image • Le dispositif de verrouillage du • Votre appareil est doté de la compartiment du film empêche fonction d’échange l’ouverture du couvercle avant d’information magnétique, qui que le film ne soit permet d’enregistrer sur la complètement rembobiné...
  • Page 79 Indicateur de l’état du film Ce symbole sur Un voyant passe d’un symbole à l’emballage de film l’autre pour indiquer l’état du film à vous garantit qu’il est l’intérieur de la cassette. compatible avec cet appareil-photo. NON EXPOSÉ Assurez-vous que le PARTIELLEMENT laboratoire de traitement EXPOSÉ...
  • Page 80 TABLE DES MATIÈRES POUR PRENDRE DES PHOTOS AU FLASH ..88 Distances entre le sujet et le flash .... 90 DESCRIPTION DE L’APPAREIL-PHOTO .... 76 SÉLECTION DES MODES FLASH ET MISE AU FIXATION DE LA DRAGONNE ......77 POINT À L’INFINI ..........91 Activateur du bouton de contrôle ....
  • Page 81: Description De L'appareil-Photo

    RETRAIT DU FILM ........... 100 BOUTON DE SÉLECTION DE LA DATE BOUTON DE RÉGLAGE DE LA DATE Rembobinage automatique ......100 BOUTON DU RETARDATEUR Rembobinage manuel ........ 101 BOUTON DE REMBOBINAGE DU FILM ENTRETIEN DE VOTRE APPAREIL-PHOTO .. 102 BOUTON DE SÉLECTION DU MODE FLASH DÉPANNAGE .............
  • Page 82: Fixation De La Dragonne

    FIXATION DE LA DRAGONNE COUVERCLE DU COMPARTIMENT DE LA PILE 1. Enfilez une extrémité de la Panneau ACL dragonne sous la TIGE DE LA AFFICHAGE DATE ET HEURE (1), puis tirez-la DRAGONNE SENSIBILITÉ ISO vers le haut. INDICATEUR DE RÉDUCTION DES YEUX ROUGES INDICATEUR DE LA PRÉSENCE ’...
  • Page 83: Installation De La Pile

    2. Insérez la pile dans le INSTALLATION DE LA PILE compartiment de la façon illustrée. Cet appareil-photo utilise 1 Pile au lithium KODAK K123LA (ou l’équivalent) de 3 volts qui fournit l’alimentation nécessaire à toutes les fonctions de l’appareil.
  • Page 84 3. Refermez bien la porte du Conseils au sujet des piles compartiment de la pile. • Jetez les piles épuisées • Après avoir chargé une normalement avec vos nouvelle pile, vous devez déchets domestiques, à moins régler la date et l’heure que votre communauté...
  • Page 85 • Gardez les piles hors de la d’inactivité pour préserver portée des enfants. l’énergie de la pile. Pour réactiver l’appareil, il suffit d’appuyer sur • N’essayez pas de démonter, l’un des boutons suivants : de recharger ou de court- (3), circuiter les piles, ou de les DÉCLENCHEUR BARILLET DU...
  • Page 86: Chargement Du Film

    CHARGEMENT DU FILM 2. Insérez complètement la cassette de film dans le Vous pouvez charger le film dans (21). COMPARTIMENT DU FILM l’appareil-photo, que ce dernier soit SOUS TENSION ou HORS TENSION. 1. Faites glisser le LOQUET DU (2) pour COMPARTIMENT DU FILM ouvrir le COUVERCLE DU...
  • Page 87: Pour Prendre Des Photos

    POUR PRENDRE DES PHOTOS cassette dans le compartiment du film. Vous pouvez prendre des photos 3. Refermez le couvercle du de formats classique (C), groupe/ compartiment du film pour HDTV (H)* et panoramique (P) sur déclencher le mécanisme la même cassette de film. Vos d’avance automatique du film.
  • Page 88 (5) pour • Si vous vous placez à moins FORMAT DE PHOTO choisir le format désiré (C, H de 0,6 m (2 pi), l’appareil se ou P). Le cadre du viseur verrouillera et le témoin du s’ajustera pour délimiter la flash clignotera.
  • Page 89: Formats Des Photos

    Formats des photos Classique Groupe (HDTV) Panoramique 88,9 mm x 127 mm ou 88,9 mm x 152 mm ou 88,9 mm x 216 mm à 102 mm x 152 mm 102 mm x 178 mm 102 mm x 292,7 mm (3 ½...
  • Page 90 Mémorisation de la mise 1. Centrez votre sujet principal à au point l’intérieur du cercle de mise au point. L’appareil-photo effectue automatiquement la mise au point sur tout ce qui se trouve à CERCLE DE l’intérieur du cercle de mise au MISE AU point automatique de l’oculaire du POINT...
  • Page 91 3. Toujours en maintenant le Utilisation de l’objectif zoom déclencheur partiellement Doté d’un objectif zoom motorisé, enfoncé, déplacez l’appareil cet appareil-photo vous permet jusqu’à ce que votre sujet se de choisir la longueur focale de trouve à l’endroit voulu dans l’objectif convenant le mieux à...
  • Page 92: Oculaire Du Viseur

    2. Faites glisser le 4. Puis, appuyez sur le BARILLET DU (4) vers la droite en (3) pour prendre ZOOM DÉCLENCHEUR position téléobjectif pour vous la photo. rapprocher du sujet; ou faites • Le barillet de l’objectif se glisser le barillet vers la replace automatiquement en gauche en position grand- position grand-angulaire après...
  • Page 93: Pour Prendre Des Photos Au Flash

    POUR PRENDRE DES PHOTOS photographiez des enfants ou des animaux, agenouillez-vous. AU FLASH • Tenez votre appareil à la Dans des conditions de lumière verticale pour mettre en valeur faible, à l’intérieur, ou à l’extérieur les sujets de forme allongée, dans des lieux ombragés ou par par exemple les chutes d’eau, temps couvert, il vous faut...
  • Page 94 l’appareil-photo sous tension 4. Assurez-vous que votre sujet et découvrir l’ (16). se trouve à une distance qui OBJECTIF soit appropriée pour la • Le témoin du flash « clignote » sensibilité du film chargé dans lorsque le flash n’est pas prêt. votre appareil (voir Distances 2.
  • Page 95: Distances Entre Le Sujet Et Le Flash

    Distances entre le sujet et le flash Sensibilité Grand-angulaire Téléobjectif ISO du film (30 mm) (60 mm) 0,6 m à 3,9 m (2 pi à 13 pi) 0,6 m à 2,1 m (2 pi à 7 pi) 0,6 m à 5,5 m (2 pi à 18 pi) 0,6 m à...
  • Page 96: Sélection Des Modes Flash Et Mise Au Pointà L'infini

    SÉLECTION DES MODES recherché apparaisse sur (6). FLASH ET MISE AU POINT PANNEAU ACL À L’INFINI Une fois la photo prise, les modes flash demeureront actifs. Outre le mode flash automatique Pour modifier le mode flash, il avec réduction des yeux rouges, suffit d’appuyer sur le bouton de vous pouvez choisir les modes sélection du mode flash, ou de...
  • Page 97: Bouton De Sélection Du Mode Flash

    appareil-photo est doté d’un flash que l’ INDICATEUR DE FLASH automatique avec option de (34) et AUTOMATIQUE réduction des yeux rouges par l’ INDICATEUR DE RÉDUCTION DES défaut. Vous pouvez minimiser le (26) s’affichent YEUX ROUGES phénomène des yeux rouges sur le (6).
  • Page 98 (3). Lorsque le de la façon suivante : DÉCLENCHEUR (18) passe au TÉMOIN DU FLASH 1. Appuyez sur l’ INTERRUPTEUR vert, appuyez complètement (20) pour mettre MARCHE ARRÊT sur le déclencheur pour l’appareil-photo sous tension prendre la photo. et découvrir l’ (16).
  • Page 99: Interrupteur

    (18) passe au (20) pour mettre TÉMOIN DU FLASH MARCHE ARRÊT vert, appuyez complètement l’appareil-photo sous tension sur le déclencheur pour et découvrir l’ (16). OBJECTIF prendre la photo. 2. Appuyez à plusieurs reprises • L’appareil-photo est maintenant sur le BOUTON DE SÉLECTION DU réglé...
  • Page 100 Flash désactivé vraisemblablement plus lente dans ces situations. Lorsque vous ne voulez pas utiliser le flash, notamment à 1. Appuyez sur l’ INTERRUPTEUR l’intérieur dans les endroits où on (20) pour mettre MARCHE ARRÊT l’interdit (comme les musées et l’appareil-photo sous tension les théâtres), pour photographier et découvrir l’...
  • Page 101 Mise au point à l’infini 3. Cadrez bien votre sujet dans l’ (19). OCULAIRE DU VISEUR Saisissez nettement des scènes éloignées, et ce, à n’importe 4. Enfoncez partiellement le quelle position zoom (seulement (3) pour prendre DÉCLENCHEUR en lumière du jour et à l’extérieur). la photo.
  • Page 102: Utilisation Du Retardateur

    que la vitesse d’obturation sera (18) passe au TÉMOIN DU FLASH vraisemblablement plus lente vert, enfoncez complètement la nuit. le déclencheur pour prendre la photo. 1. Appuyez sur l’ INTERRUPTEUR (20) pour mettre MARCHE ARRÊT UTILISATION DU l’appareil-photo sous tension RETARDATEUR et découvrir l’...
  • Page 103: Impression De La Date Et De L'heure

    3. Appuyez sur le déclencheur relâché et revient BOUTON DU (9). à sa position de départ. RETARDATEUR 4. Cadrez bien votre sujet dans IMPRESSION DE LA DATE l’ (19). OCULAIRE DU VISEUR ET DE L’HEURE 5. Enfoncez le (3). DÉCLENCHEUR Les appareils-photo traditionnels (17) TÉMOIN DU RETARDATEUR...
  • Page 104: Bouton De Sélection De La Date

    automatique allant jusqu’en l’année, le mois, le jour, l’heure l’an 2039. Vous pouvez inscrire la ou les minutes clignotants. date sous trois formats différents 3. Appuyez sur le BOUTON DE (année/mois/jour, jour/mois/année RÉGLAGE DE LA ou mois/jour/année), et l’heure (8) pour DATE sous un seul format (heure/minutes).
  • Page 105: Retrait Du Film

    Rembobinage automatique de l’appareil- L’appareil-photo rembobinera photo, puis automatiquement le film dans la rechargez-le cassette une fois la dernière avec une photo prise. nouvelle 1. Attendez que le film soit cassette de Film complètement rembobiné dans KODAK ADVANTIX. la cassette.
  • Page 106: Rembobinage Du Film

    • L’indicateur de l’état du film au moyen de l’activateur du d’une cassette de film bouton de contrôle du fermoir entièrement exposé sera vis-à- de la dragonne pour activer le (position 3); le panneau dispositif de rembobinage ACL affiche « E ». automatique.
  • Page 107: Entretien De Votre Appareil Photo

    ENTRETIEN DE VOTRE jamais un objectif à sec. APPAREIL-PHOTO ATTENTION : N’utilisez pas de solvants ni de produits qui ne 1 . Préservez votre appareil-photo sont pas spécialement conçus de la poussière, de l’humidité, pour nettoyer les objectifs des chocs et de la chaleur d’appareil-photo.
  • Page 108: Dépannage

    DÉPANNAGE Problème Cause probable Solution L’appareil-photo ne Il ne reste plus de Retirez le film. fonctionne pas. photos à prendre. La pile est faible, Remplacez ou épuisée, manquante réinstallez la pile. ou mal installée. Le film n’avance La pile est faible, Remplacez ou pas ou ne se épuisée, manquante...
  • Page 109 Problème Cause probable Solution Le panneau ACL L’appareil-photo est en Appuyez sur n’importe quel est vierge (suite) . mode veille. bouton de contrôle. L’appareil-photo est Mettez l’appareil-photo hors tension. sous tension. Le panneau ACL L’appareil-photo ne Chargez un nouveau film affiche un «...
  • Page 110: Caractéristiques

    C, H et P Poids : 205 g (7,2 oz) sans pile ni film Sensibilités de film : Films pour photos Kodak, Sensalite, « e », Advantix et les symbole et logo Advanced Photo System sont des marques de commerce.
  • Page 111 Consumer Imaging EASTMAN KODAK COMPANY Rochester, NY 14650 © Eastman Kodak Company, 1999 Pt. No. 918 1157 Printed in U.S.A.

Table des Matières