Gerber D300934T Installation
Masquer les pouces
Voir aussi pour D300934T:
- Instructions d'installation (8 pages) ,
- Manuel d'installation (8 pages) ,
- Manuel d'installation (7 pages)
Liens rapides
D300934T
D300922T
D306957T
Need Help?
USA
In
Please call our toll-free Customer service line at
CA
In
Please call our toll-free Customer service line at
Besoin d'aide pour?
États-Unis
Aux
supplémentaire. Au
Canada
, veuillez appeler notre ligne de Service à la clientèle sans frais au
¿Necesita ayuda?
En
Estados Unidos
adicional. En
Canada
, favor de llamar a nuestra línea de servicio al cliente gratuita al
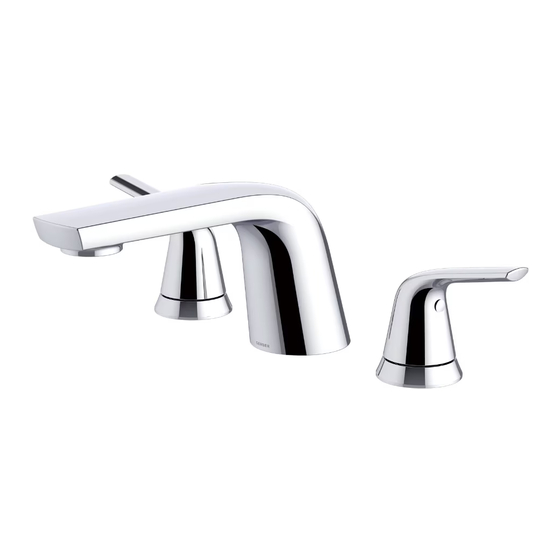
Trim Only Two Handle Roman Tub Faucet
Mélangeur 3 trous pour robinet de baignoire
Griferia solo para grifo de dos manijas de
D300915T
D300928T
D305658T
1-888-328-2383
1-800-487-8372
WWW.GERBERONLINE.CA
or
, veuillez appeler notre ligne de Service à la clientèle sans frais au
, favor de llamar a nuestra línea de servicio al cliente gratuita al
1-800-487-8372
de style roman à double poignée
D300918T
D300930T
D300962T
WWW.GERBERONLINE.COM
or
for additional assistance or service.
for additional assistance or service.
1-888-328-2383
ou de visiter
1-800-487-8372
ou de visiter
WWW.GERBERONLINE.CA
1-888-328-2383
o visitenos en
o visitenos en
WWW.GERBERONLINE.CA
bañera romana
D300919T
D302044T
D300987T
WWW.GERBERONLINE.COM
pour obtenir de l'aide ou un service
pour obtenir de l'aide ou un service supplémentaire.
WWW.GERBERONLINE.COM
para obtener asistencia o servicio
para obtener asistencia o servicio adicional.

Manuels Connexes pour Gerber D300934T


Sommaire des Matières pour Gerber D300934T
- Page 1 Trim Only Two Handle Roman Tub Faucet Mélangeur 3 trous pour robinet de baignoire de style roman à double poignée Griferia solo para grifo de dos manijas de bañera romana D300934T D300915T D300918T D300919T D300922T D300928T D300930T D302044T D306957T D305658T...
-
Page 2: Tools You Will Need
Faucet Installation Procedures Tools You Will Need Procédures d’installation du robinet Outils dont vous aurez besoin Instalación del Grifo Herramientas Necesarias This product might be required to be installed with an automatic temperature compensating device to reduce the risk of scalding and thermal shock. -
Page 3: Enregistrement De La Garantie
Shut off the main water supply before installation by turning the valves clockwise. Fermez l'alimentation principale en eau avant l'installation en tournant les valves d'alimentation dans le sens horaire. Antes de realizar la instalación, cierre el suministro principal de agua girando las válvulas en sentido horario. - Page 4 2.3 Using the supplied Allen Wrench, back out the set screw a few turns. Place the spout over the spout hub and insert the pin into the small hole in the spout escutcheon and then tighten the set screw. Finish installation by inserting the set screw hole cover into the access hole in the back the of the spout.
- Page 5 4.2 Remove the plug from the bottom of the spout tube. Apply thread sealant tape to threaded end of the hose. Thread hose from top through the spray holder, and install tightly to the spout tube. Attach the spray head with final trim installation. Enlever le bouchon au bas du tube de bec.
- Page 6 Diverter Replacement / réparation de l’inverseur / service reemplazo del cambiador de flujo de agua replacement Shut off the main water supply before installation by turning the valves clockwise. Fermez l'alimentation principale en eau avant l'installation en tournant les valves d'alimentation dans le sens horaire.
- Page 7 Insert the replacement diverter assembly into the spout tube. Press down firmly to assure proper seating. Reinstall the spout hub assembly. Insérer l’inverseur de rechange dans le tube du bec. Presser fermement vers le bas pour s’assurer qu’il est bien placé. Réinstaller le moyeu du bec. Coloque el nuevo cambiador dentro del tubo del vertedor.
- Page 8 Handle Assembly Installation / Installation de la poignée / Instalación del conjunto de manija Type 1: Attach the handle assembly towards the cartridge stem. Tighten the set screw on the bottom, install the set screw cap. Fixez la poignée sur la tige de la cartouche. Serrez la vis de réglage dans le bas, puis installez le capuchon de la vis de réglage. Coloque el conjunto de manija en el vástago del cartucho.
- Page 9 Type 3: Attach the handle assembly towards the cartridge stem. Tighten the screw clock wise, install the handle cap. Fixez la poignée sur la tige de la cartouche. Serrez les vis dans le sens horaire, puis installez le capuchon de la poignée. Coloque el conjunto de manija en el vástago del cartucho.