Publicité

Les langues disponibles
  • FR

Les langues disponibles

Liens rapides

QUICKSTART OWNER'S MANUAL
(ENGLISH) 1 – 8
MANUAL DE INICIO RÁPIDO DEL USUARIO
(ESPAÑOL) 9 – 16
GUIDE D'UTILISATION SIMPLIFIÉ
(FRANÇAIS) 17 – 24
KURZBEDIENUNGSANLEITUNG
(DEUTSCH) 25 – 32
MANUALE RAPIDO DI UTILIZZO
(ITALIANO) 33 – 40

Publicité

Table des Matières
loading

Sommaire des Matières pour Alesis M1 Active 320 USB

  • Page 1 QUICKSTART OWNER’S MANUAL (ENGLISH) 1 – 8 MANUAL DE INICIO RÁPIDO DEL USUARIO (ESPAÑOL) 9 – 16 GUIDE D’UTILISATION SIMPLIFIÉ (FRANÇAIS) 17 – 24 KURZBEDIENUNGSANLEITUNG (DEUTSCH) 25 – 32 MANUALE RAPIDO DI UTILIZZO (ITALIANO) 33 – 40...
  • Page 3 READ THE SAFETY & WARRANTY INFORMATION BEFORE USING THIS PRODUCT! INTRODUCTION Thanks for choosing the Alesis M1Active 320 USB desktop monitors – the perfect audio monitoring solution for desktop based audio systems. Our M1Active line of speakers were engineered from the ground up to be the perfect studio monitor.
  • Page 4: Hookup Diagram

    HOOKUP DIAGRAM Refer to the possible connection scenario for hooking up the M1 Active 320 USB speakers. LAPTOP KEYBOARD OR SOUND MODULE TURNTABLE OR OTHER DEVICE POWER SOURCE CD PLAYER OR OTHER DEVICE FRONT PANEL OVERVIEW VOL/POWER – This knob is used to turn the speakers on and adjust their volume.
  • Page 5: Rear Panel Overview

    REAR PANEL OVERVIEW POWER – Use the included power cable to connect the speakers to a live power source. Make sure your AC Voltage Selector (see item #2 below) is set to the correct voltage for your country. AC VOLTAGE SELECTOR – This 2-position switch sets the AC input voltage for the speaker.
  • Page 6: Speaker Placement

    SPEAKER PLACEMENT The placement of your speakers has a huge impact on how well they will perform in your studio. Although nearfield studio monitors are designed to be more forgiving when it comes to placement, you should do your best to make sure they form an equilateral triangle relative to your head.
  • Page 7 CONFIGURATION UNDER WINDOWS The M1Active 320 USB speakers are plug-and-play under Windows XP/Vista so there is no special driver installation necessary. Simply power on the speakers, connect them to your computer’s USB port and all the necessary drivers will be automatically installed. When you first plug the speakers into your computer, you will see a few messages similar to the one shown on the left.
  • Page 8 CONFIGURATION UNDER MAC OSX The M1Active 320 USB speakers are plug-and-play under Mac OSX so there is no special driver installation necessary. Simply power on the speakers, connect them to your computer’s USB port and the speakers should be ready to use immediately. You may choose to use the M1Active 320 USB speakers as the default audio output for your computer.
  • Page 9 TROUBLESHOOTING Please refer to the following list of common troubleshooting scenarios if you run into problems. PROBLEM CAUSE SOLUTION Speakers do not work. Speakers not plugged in. Make sure that the speakers are connected to a live power source. Speakers not turned on. Make sure that the speakers are turned on.
  • Page 10: Technical Specifications

    TECHNICAL SPECIFICATIONS Woofer: 3” lightweight, magnetically-shielded, polypropylene cone with rubber surround and high power handling voice coil. 4 Ohm impedance. Tweeter: 1” silk dome Frequency Response: 80 Hz – 20 kHz Bass Boost: 4.8dB at 100Hz Power: 10 W per channel RMS Signal-to-Noise Ratio: 88dB weighted Inputs:...
  • Page 11: Contenido De La Caja

    PRESENTE PRODUCTO! INTRODUCCIÓN Gracias por elegir los altavoces USB para escritorio Alesis M1Active 320 – la solución de monitoreo de audio perfecta para sistemas de sonido de escritorio. Nuestra línea de altavoces M1Active fueron diseñados por nuestros ingenieros desde cero para crear el monitor de estudio perfecto.
  • Page 12: Diagrama De Conexión

    DIAGRAMA DE CONEXIÓN Refiérase al escenario posible de conexión para conectar sus altavoces USB M1 Active 320. LAPTOP TECLADO O MÓDULO DE SONIDO TORNAMESA U OTRO DISPOSITIVO FUENTE DE ALIMENTACIÓN REPRODUCTOR DE CD U OTRO DISPOSITIVO DESCRIPCIÓN DEL PANEL FRONTAL VOL/POWER –...
  • Page 13: Descripción Del Panel Posterior

    DESCRIPCIÓN DEL PANEL POSTERIOR POWER – Use el cable de alimentación incluido para conectar los altavoces a una fuente de alimentación viva. Asegúrese que su selector de Voltaje de Corriente Alterna (vea el elemento #2 debajo) esté ajustado al voltaje correcto para su país. AC VOLTAGE SELECTOR –...
  • Page 14: Colocación De Altavoces

    COLOCACIÓN DE ALTAVOCES La colocación de sus altavoces tiene un gran impacto en el desempeño que tendrán en su estudio. Aunque los monitores de estudio están diseñados para ser mas complacientes en lo que toca a su colocación, usted debe asegurarse de que formen un triángulo equilátero con respecto a su cabeza.
  • Page 15 CONFIGURACIÓN EN WINDOWS Los altavoces USB M1Active 320 son del tipo “plug-and-play” bajo Windows XP/Vista, por lo que no se requiere instalar ningún controlador especial. Simplemente encienda los altavoces, conéctelos a algún puerto USB de su computadora, y los controladores necesarios se instalarán automáticamente.
  • Page 16 CONFIGURACIÓN EN MAC OSX Los altavoces USB M1Active 320 son dispositivos tipo “plug-and-play” en el sistema operativo Mac OSX, por lo que no es necesario instalar ningún controlador especial. Simplemente encienda los altavoces en algún puerto USB de su computadora, y podrá usar sus altavoces de inmediato.
  • Page 17: Solución De Problemas

    SOLUCIÓN DE PROBLEMAS Por favor consulte la siguiente lista de escenarios si se le presenta algún problema. PROBLEMA CAUSA SOLUCIÓN Los altavoces no funcionan. altavoces están Asegúrese altavoces están conectados. conectados a una toma de corriente viva. altavoces están Revise altavoces estén encendidos.
  • Page 18: Especificaciones Técnicas

    ESPECIFICACIONES TÉCNICAS Woofer: Cono de polipropileno ligero de 3”, ligero, blindado magnéticamente con suspensión de hule y bobina de alta potencia. Impedancia de 4 Ohms. Tweeter: Domo de seda de 1” Respuesta en frecuencia: 80 Hz – 20 kHz Refuerzo de bajos: 4.8dB a 100Hz Potencia: 10 W RMS por canal...
  • Page 19 ET L'INFORMATION CONCERNANT LA GARANTIE. INTRODUCTION Merci d'avoir choisi les enceintes USB M1Active 320 d'Alesis pour bureau, la solution idéale comme solution de monitoring pour systèmes audio de bureau. Notre gamme d'enceintes M1Active est conçue de façon a être le moniteur studio idéal.
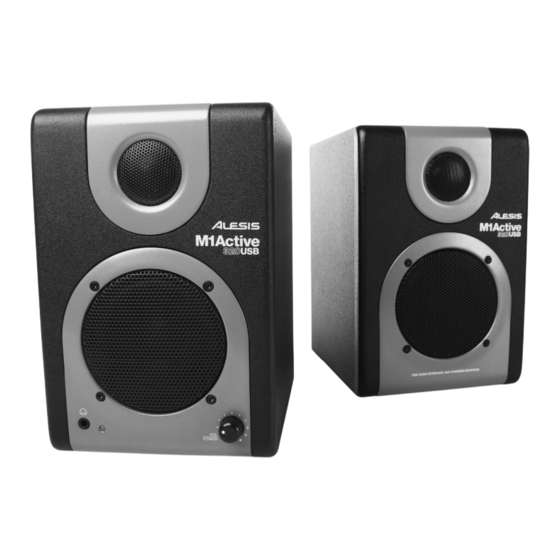
  • Page 20: Schéma D'installation

    SCHÉMA D’INSTALLATION Veuillez consulter le schéma ci-dessous pour installer les enceintes USB M1Active 320. ORDINATEUR PORTABLE CLAVIER OU MODULE DE SON PLATINE OU AUTRE APPAREIL ALIMENTATION LECTEUR CD OU AUTRE APPAREIL CARACTÉRISTIQUES DU PANNEAU AVANT VOL/POWER – Ce bouton permet de mettre les enceintes sous tension et d'ajuster leur volume.
  • Page 21: Caractéristiques Du Panneau Arrière

    CARACTÉRISTIQUES DU PANNEAU ARRIÈRE POWER – Utilisez le câble d’alimentation fourni pour brancher cette entrée de l'enceinte à une source d’alimentation. Assurez-vous que le sélecteur de tension c.a. (voir item nº 2 ci-dessus) est réglé à la tension appropriée pour votre pays. AC VOLTAGE SELECTOR –...
  • Page 22: Emplacement Des Enceintes

    EMPLACEMENT DES ENCEINTES L’emplacement des enceintes a une grande influence sur leur performance dans votre studio. Même si les enceintes de proximité procurent une grande latitude quant au positionnement, vous devriez tout faire pour qu'elles forment un triangle équilatéral par rapport à votre tête. En d’autres termes, assurez-vous la distance qui sépare les deux enceintes est égale à...
  • Page 23: Configuration Sous Windows

    CONFIGURATION SOUS WINDOWS Sous WIndows XP/Vista, les enceintes USB M1Active 320 sont prêtes à l’utilisation (PnP), il n’y a donc pas de pilote à installer. Vous n'avez qu'à mettre les enceintes sous tension, branchez-les au port USB de votre ordinateur et tous les pilotes nécessaires s’installeront automatiquement. Lors que vous branchez les enceintes pour la première fois, des messages semblables à...
  • Page 24: Configuration Sous Mac Osx

    CONFIGURATION SOUS MAC OSX Sous Mac OSX, les enceintes USB M1Active 320 sont prêtes à l’utilisation (PnP), il n’y a donc pas de pilote à installer. Vous n’avez qu'à mettre les enceintes sous tension, branchez-les au port USB de votre ordinateur et elles sont prêtes à utiliser. Vous pouvez sélectionner...
  • Page 25: Dépannage

    DÉPANNAGE Veuillez consulter les scénarios suivants si vous avez des problèmes. PROBLÈME CAUSE SOLUTION Les enceintes ne fonctionnent enceintes ne sont pas Assurez-vous que les enceintes sont pas. branchées. branchées à une source d’alimentation active. Les enceintes sont hors tension. Assurez-vous que les enceintes sont sous tension.
  • Page 26: Spécifications Techniques

    SPÉCIFICATIONS TECHNIQUES Haut-parleur des graves : 3 po, ultra léger, blindage magnétique, cône en polypropylène et contour en caoutchouc avec une bobine acoustique haute performance. Impédance de 4 ohms Haut-parleur des aigus : Dôme en soie de 1 po Réponse en fréquence : 80 Hz –...
  • Page 27: Inhalt Der Verpackung

    LESEN SIE BITTE DIE SICHERHEITS- UND GARANTIEINFORMATIONEN, BEVOR SIE DAS PRODUKT VERWENDEN! EINFÜHRUNG Für Ihre Entscheidung, sich mit den Alesis M1Active 320 USB Desktop Monitore für die perfekte Audiomonitorlösung für Computer-gestützte Recordingsysteme zu entscheiden, möchten wir und herzlich bedanken. Unsere M1Active Monitore wurden von Grund auf als professionelle Studiomonitore entwickelt.
  • Page 28: Anschlussübersicht

    ANSCHLUSSÜBERSICHT Bitte studieren Sie in der unteren Abbildung die vorhandenen Anschlussmöglichkeiten der M1 Active 320 USB Monitore. LAPTOP KEYBOARD ODER SOUNDMODUL TURNTABLE ODER ANDERES AUDIOGERÄT NETZANSCHLUSS CD PLAYER ODER ANDERES AUDIOGERÄT ÜBERBLICK ÜBER DIE VORDERSEITE VOL/POWER – Dieser Regler wird zum Einschalten der Monitore und zur Lautstärkeanpassung...
  • Page 29: Übersicht Über Die Rückseite

    ÜBERSICHT ÜBER DIE RÜCKSEITE POWER – Verbinden Sie diese Buchse über das beiliegende Netzkabel mit einer Stromquelle. Achten Sie unbedingt darauf, dass der Spannungswahlschalter (AC Voltage Selector – siehe #2) auf der für Ihr Land richtigen Spannungseinstellung steht. AC VOLTAGE SELECTOR – Dieser Schalter bestimmt die Eingangsspannung für die Monitore.
  • Page 30 AUFSTELLUNG DER MONITORE Wie jedes Lautsprechersystem müssen auch Ihre M1Active 320 USB möglichst optimal in einem passenden akustischen Umfeld aufgestellt werden, damit das klangliche Potential ganz genutzt werden kann. Die korrekte Aufstellung ist meistens einfach zu bewerkstelligen, doch selbst Nahfeldmonitoren werden Aufstellposition Raumverhältnisse zu oft vernachlässigt.
  • Page 31 KONFIGURATION UNTER WINDOWS Die M1Active 320 USB Monitore werden als Plug-and-Play Gerät direkt unter Windows XP/Vista erkannt, somit entfällt die Installation spezieller Treiber. Schalten Sie die Monitore einfach ein, verbinden Sie den USB Port der Monitore mit dem Computer und alle notwendigen Treiber werden automatisch geladen.
  • Page 32 KONFIGURATION UNTER MAC OSX Die M1Active 320 USB Monitore werden als Plug-and-Play Gerät direkt unter MAC OS X erkannt, somit entfällt Installation spezieller Treiber. Schalten Sie die Monitore einfach ein, verbinden Sie den USB Port der Monitore mit dem Computer und alle notwendigen Treiber werden automatisch geladen..
  • Page 33 FEHLERHILFE Bitte verwenden Sie diese Übersicht, wenn Sie auf Probleme stoßen sollten. PROBLEM URSACHE LÖSUNG Monitore Kein Strom. Überprüfen Sie, dass die Monitore mit einer funktionieren nicht. funktionierenden Stromquelle verbunden sind. Monitore sind nicht eingeschaltet. Schalten Sie die Lautsprecher ein. Die blaue LED leuchtet, wenn die Lautsprecher in Betrieb sind.
  • Page 34: Technische Daten

    TECHNISCHE DATEN Basslautsprecher: 3” magnetisch abgeschirmter Polypropylene- Konus mit Gummiumrandung und High-Power Spule. 4 Ohm Impedanz. Hochtöner: 1” Seidenhochtöner Frequenzgang: 80 Hz – 20 kHz Bass Boost: 4.8dB bei 100Hz Leistung: 10 W pro Kanal RMS Rauschabstand: 88dB gewichtet Eingänge: 6,3 mm Klinke, RCA, 3,5 mm Stereo, USB1.1 Eingangsimpedanz: 20k Ohm...
  • Page 35: Contenuti Della Confezione

    SICUREZZA E GARANZIA! INTRODUZIONE Grazie per aver scelto le casse USB da desktop M1Active 320 di Alesis: la perfetta soluzione di monitoraggio audio per gli impianti audio da desktop. La nostra linea M1Active è stata progettata da cima a fondo per offrire le casse da studio perfette.
  • Page 36: Schema Dei Collegamenti

    SCHEMA DEI COLLEGAMENTI Far riferimento al seguente possibile scenario per il collegamento delle casse USB M1 Active 320. LAPTOP TASTIERE O MODULO SONORO GIRADISCHI O ALTRO DISPOSITIVO SORGENTE DI ALIMENTAZIONE LETTORE CD O ALTRO DISPOSITIVO PANORAMICA PANNELLO ANTERIORE VOL/ALIMENTAZIONE – Questa manopola serve ad accendere le casse e a regolarne il volume.
  • Page 37: Panoramica Pannello Posteriore

    PANORAMICA PANNELLO POSTERIORE ALIMENTAZIONE – Servirsi del cavo di alimentazione in dotazione per collegare le casse ad una sorgente di alimentazione funzionante. Assicurarsi che il selettore di voltaggio CA (vedi elemento n. 2 di cui sotto) sia impostato sul voltaggio corrispondente a quello del vostro paese.
  • Page 38 DISPOSIZIONE DELLE CASSE La disposizione delle casse ha un notevole impatto sulle loro prestazioni nel vostro studio. Nonostante le casse “nearfield” (a campo vicino) siano progettate per essere piuttosto adattabili in fatto di posizionamento, bisogna fare il possibile affinché formino un triangolo equilatero con la testa.
  • Page 39 CONFIGURAZIONE IN WINDOWS Le casse USB M1Active 320 sono plug-and-play con Windows XP/Vista, dunque non è necessaria l’installazione di driver particolari. Accendere le casse, collegarle alla porta USB del computer e tutti i driver necessari verranno installati automaticamente. La prima volta che si collegano le casse al computer apparirà un messaggio simile a quello illustrato a sinistra.
  • Page 40 CONFIGURAZIONE CON MAC OSX Le casse USB M1Active 320 sono plug-and-play con Mac OSX, dunque non è necessaria l’installazione di driver particolari. Accendere le casse, collegarle alla porta USB del computer e le casse saranno pronte da usare immediatamente. Si può scegliere di utilizzare le casse USB M1Active 320 come uscita audio predefinita computer.
  • Page 41: Risoluzione Di Problemi

    RISOLUZIONE DI PROBLEMI In caso di problemi, fare riferimento al seguente elenco di comuni scenari di risoluzione di problemi. PROBLEMA CAUSA SOLUZIONE Le casse non funzionano. Le casse non sono inserite. Assicurarsi che le casse siano collegate ad una sorgente di alimentazione funzionante. Le casse non sono accese.
  • Page 42: Specifiche Tecniche

    SPECIFICHE TECNICHE Woofer: cono in propilene da 3” leggero, schermato magneticamente, dotato di bordi in gomma e gestione circuiti vocali ad elevata potenza. 4 Ohm di impedenza. Tweeter: silk dome da 1” Risposta di frequenza: 80 Hz – 20 kHz Bass Boost (amplificazione dei bassi): 4,8 dB a 100 Hz Alimentazione:...
  • Page 43 7-51-0246-B...
  • Page 44 www.alesis.com...

Table des Matières