Moulinex odacio Mode D'emploi
Table des Matières
Les langues disponibles
Les langues disponibles
Liens rapides
Table des Matières

Manuels Connexes pour Moulinex odacio


Sommaire des Matières pour Moulinex odacio
- Page 1 6 - 19 p. 20 - 33 p. 34 - 45 p. 46 - 57 8080014535 - 12/14...
- Page 2 www.moulinex.com...
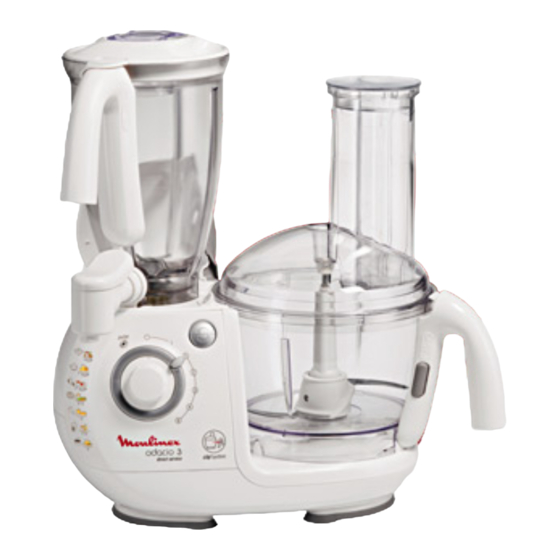
- Page 10 Nous vous remercions d’avoir choisi un produit de la gamme MOULIN X exclusivement prévu pour la préparation des aliments. DESCRIPTION A Bloc moteur f2. Fouet a1 Capot de sortie haute g. Disque émulsionneur a2 Sortie haute h. Presse-agrumes a3 Sortie basse h1.
-
Page 11: Mise En Service
o2. Plateau amovible o3. Vis o4. Couteau 4 branches o5. Grilles o5-1. Grille petits trous : haché fin o5-2. Grille gros trous : haché gros o6. Ecrou o7. Poussoir p. Entonnoir à saucisses q. Filière à gâteaux q1. Support q2. Moule r. -
Page 12: Les Fonctions De Votre Robot
Modèle Bi-Vitesses : - Pulse (marche intermittente) : tournez le bouton (a7) sur la position «Pulse» par impulsions successives pour un meilleur contrôle de certaines préparations. - Marche continue : tournez le bouton (a7) sur la position «1» ou «2» suivant la préparation. - Arrêt : tournez le bouton (a7) sur la position «0». - Page 13 Vitesses Préconisées Modèle Modèle Fonction Électronique Bi-vitesses Mixer 3-4-5 Hacher 5-Pulse 2-Pulse Pétrir Mélanger Conseils Mixer - Vous pouvez mixer jusqu’à 1 litre de potage, soupe, compote en 20 s. Hacher - En 15 à 30 s, vous hachez jusqu’à 600 g d’aliments : •...
- Page 14 - Placez la tige d’entraînement (c) dans le trou central du disque (d1). - Placez l’ensemble sur l’entraîneur du bol (b3-1), cet ensemble doit reposer sur le support- disque (d5). - Placez le couvercle (d4) sur le bol. - Fermez le capot de la sortie haute (a1). Vous devez entendre un « clic ». - Introduisez les aliments dans la cheminée et guidez-les à...
- Page 15 Vitesses Préconisées Modèle Modèle Fonction Électronique Bi-vitesses Battre / Fouetter 1 à 5 / Emulsionner Conseils - N’utilisez jamais ces accessoires pour pétrir des pâtes lourdes ou mélanger des pâtes légères. Vous pouvez préparer : mayonnaise, aïoli, sauces, blancs en neige (1 à 6), crème fouettée, chantilly (jusqu’à...
- Page 16 Nettoyez le robinet (k6) sous l’eau courante. Remontez le capot en appuyant sur sa partie centrale, puis encliquetez l’axe métallique sous les crochets (fig.6a-1). Montage du robinet (k6) sur le bol mixer (k3) Engagez à fond le joint (k5) sur le goulot du bol, puis verrouillez d’un quart de tour le robinet assemblé...
- Page 17 MONTAGE DES ACCESSOIRES Modèle Direct Service avec le bec verseur (m5). Appuyer sur la touche d’ouverture (a4) pour ouvrir le capot de sortie haute (a1). Placez le filtre (m3) au centre du corps réceptacle (m4), tournez et verrouillez le couvercle (m2) sur le corps (m4).
- Page 18 HACHER TRES FINEMENT DES PETITES QUANTITES (selon modèle) ACCESSOIRE UTILISÉ - Mini-hachoir (i) ou Broyeur (j) MONTAGE DE L’ACCESSOIRE Appuyez sur la touche d’ouverture (a4) pour ouvrir le capot de sortie haute (a1). Mettez les ingrédients dans le bol (i2 ou j2), puis verrouillez le couvercle (i1 ou j1) sur le bol. - Placez l’accessoire sur la sortie haute (a2).Vous devez entendre un «...
-
Page 19: Avant Une Première Utilisation
Vitesses Préconisées Modèle Fonction Électronique Mouliner / Presser / Écraser Conseils Vous pouvez préparer avec la grille : • Gros trous (l2-1) : des purées (jusqu’à 1 kg de légumes ou fruits cuits), pommes de terre, carottes, chou-fleur. • Petits trous (l2-2) : des coulis ou compotes de fruits dénoyautés (jusqu’à 500 g), tomates, raisins, fraises, framboises, groseilles, abricots, pêches. -
Page 20: Utilisation
Mise en place de la tête hachoir sur l’appareil. - Face au réducteur (bloc moteur robot débranché), présentez la tête hachoir (o) cheminée inclinée vers la droite. Engagez la tête hachoir à fond sur le réducteur (n). - Ramenez la cheminée à la verticale jusqu’au blocage. La tête hachoir (o) se verrouillera automatiquement sur le réducteur (n), dès sa mise en fonctionnement. - Page 21 Remarque : cet accessoire s’utilise sans grille, ni couteau. UTILISATION Cet accessoire est à utiliser une fois que vous avez haché votre viande et que vous avez assaisonné votre hachis selon votre goût. - Après avoir laisssé le boyau tremper dans de l’eau tiède pour qu’il retrouve son élasticité, enfilez le sur l’entonnoir (p) en laissant dépasser 5 cm environ.
-
Page 22: Nettoyage
Manipulez-les avec précaution. RANGEMENT Votre robot Odacio est muni selon modèle : - d’une boîte de rangement (t), qui vient se positionner à l’intérieur de l’ensemble bol (b). Vous pouvez y ranger les disques coupe-légumes (d1), le support-disque (d5), le couteau métal (e1), le pétrin plastique (e2) ainsi que la tige d’entraînement (c). -
Page 23: Accessoires
(a1) est bien fermé. Votre appareil ne fonctionne toujours pas ? Adressez-vous à un centre service agréé Moulinex (voir liste dans le livret “Moulinex Service”). ACCESSOIRES Vous pouvez personnaliser votre appareil et vous procurer auprès de votre revendeur habituel ou d’un centre service agréé... - Page 38 ö ? ± F ‰ e « ô ¥ ¢ π ± M § l ( ¸ « O M J ± u ∞ Æ ∂ q ± s ± F ¢ ± W î b Ø e ± d ≈...
- Page 39 e ¥ « ∞ L º • ∞ J ∂ o « ∫ ± K ¢ F º « ∞ L ‹ K ∫ « ∞ L d  « ∞ H ” ¸ √ « Æ W º u «...
- Page 40 e … . « ∞ ∫ e « ¡ _ § l « ¸ ± ∫ c q ° F U ± - ¢ U ¥ W . ° F M § H Ë « ® Ê . U ° u Ë...
- Page 41 " ” ° d º Ø ± U … " • b Ë p Ò Ë ≠ ¢ M b Ë ¥ « ∞ ¢ u ¸ ± ∫ ´ s • W ∞ K u / « A ∂ «...
- Page 42 ‹ K ∫ « ∞ L Ø O ¢ d O U ¸ ∞ K ¢ Í ∞ F K q « b î ∞ L ¡ « ¨ H ¢ ) ∞ ¢ ` « ∞ H “ ¸ ´...
- Page 43 ‹ K ∫ « ∞ L Ø O ¢ d O U ¸ ∞ K ¢ Í ∞ F K q « b î ∞ L ¡ « ¨ ∞ H ¢ ¢ ` « ∞ H “ ¸ ´ K ( «...
- Page 44 ∂ v § U ≤ ¥ q ß U Ê Ë Ø d « ¸ ß u ≥ O ¸ ) ≠ ô ( ° U § Ë î d ‘ d Ä ß Ê Ø d ° U “ È...
- Page 45 Ê ( º u ∞ « ± ¢ O ° U » ≥ O b d « ¸ ) Æ ß t Ø U M b Á î U ≤ Ç d Ë È « ¸ ) ¸ M b Á î...
- Page 46 ≤ ∂ § U ¥ q ß U Ë e Ê ¸ Ø u « ß ≥ O ¸ ) ≠ ô ( ° U § Ë î d ‘ d Ä ß Ê Ø d ° U “ È °...
- Page 47 È d Ö î Ê Ø d Ç d e Ê d Ø º ± O e Ê “ o ≥ r ∑ ‰ ) ± b º • ( ° d e Á H U o ß e « ¸...
- Page 48 È « “ « ≤ b ¸ « Á ∑ ∑ Æ u Ç U ® Æ U ‰ , Ç M ß U Ê « ≤ ~ « “ Ö e ≥ d Ø M O e Á H U o «...
- Page 49 F U Â ∞ D O d « ∫ U ∞ ∑ î L Ò r Å c Í Ë « ∞ u ∞ O W ± J O K ¢ A ± s M ∑ Z « ∞ L ≥...
- Page 50 b Ø ° U ¥ Ç t ≤ J U ¸ Á Ø ¢ ~ U ß « Ö d Ø M O ß ° d ¸ ¸ « “ ¥ d È ≥ U º L , Æ ≤ J d Ø...
- Page 51 O t : Å ¢ u ® b ° U ± v ª ¸ ° ¸ Ã ± M b « È ´ ¢ t ß d Ê Â ≥ ô “ È ≥ U ´ X ß d ‰ ) ±...
- Page 52 ≠ A ™ d ® ± U e ¸ « o ) ¸ d Á ± N ) Ë ≥ U ∂ J ® ¢ O ê Ä O ≤ t ° b ¥ F d Ç ß ‡ O b . b ≥...
- Page 53 1 « ∞ È « “ « ≤ b ¸ « Á ‹ ¸ ° U È ¸ Ë b Á ≥ M I K O s ¢ ® Ö c « Ø U ¸ e ≥ O ¸ o ) ≠...
- Page 54 ≥ U Å ¢ u « ≤ O ¢ u ‡ ± Ç J Á Ø Ø M Ç d J ‡ Ø L ° t , . . . ≤ U Ê Ö d U Ê , ‡ , ≤ î...
- Page 55 Á ¢ H U « ß Ê , Ê ¬ ® b ß d È ° d « ~ U Á ß ¢ Ê Ø d Ê Æ b Ë Ë ° Ë Â ± b « u ¸ ° D u ¸...
- Page 56 6 « p å ∞ n u ¥ d ¢ Ë ¸ ¥ Ê ¬ O d Ë ¸ « ° ‘ Ä u ß d Ë e Á « o U ¸ ≠ A È ò ¸ Ë u z O °...
- Page 57 b Á ® Å ¢ u È ≥ U d ´ ß ´ ß d ‰ ° ± b ≤ O d Ë ∞ J ∑ ‰ « ± b œ K J d ´ L Ö U ≤ œ Ë ≥...
- Page 58 u ¥ b b ° ° U ¥ ¸ « J ‡ å Ø K O È ò b « Å M b ¥ « ° ∂ ) ¸ U ô v ° Ë § î d ‘ d Ä u ‡...
- Page 59 ≥ O b d « ¸ ) Æ U z O v Ä Ë § î d Ë È « ¸ ) ¸ ß t ‡ Ø U ≥ O b d « ¸ ) Æ ß t Ø U M b Á...
- Page 60 È « “ « ≤ b ¸ « Á Æ u Ç U ® Æ U ‰ , Ç M ß U Ê A ¢ ≤ ~ “ « e « d Ö , ≥ M O b Á Ø ¢...
- Page 61 Ø M O d ± X ¢ ß Á « ® b î ¢ ß U ¥ v ¨ c « e Á H U o ß ¢ È « ° d « d ≠ U Î Å Ø t O M J ±...
- Page 64 MOULINEX INTERNATIONAL GUARANTEE Date of purchase: ....../ Date d'achat / Fecha de compra / Data da compra / Data d'acquisto / Kaufdatum / Aankoopdatum / Købsdato / Inköpsdatum / Kjøpsdato /...