Publicité
Les langues disponibles
Les langues disponibles
Publicité
Chapitres

Manuels Connexes pour Pro-Tronik PTR-6A

Sommaire des Matières pour Pro-Tronik PTR-6A
- Page 1 MODE D’EMPLOI RADIOCOMMANDE PTR-6A V 2.0...
-
Page 2: Table Des Matières
1 TABLE DES MATIERES 2 CARACTERISTIQUES 1 / TABLE DES MATIERES…………….……………………………………………………………………………………………….2 2 / INTRODUCTION….………………………………………………………………………………………………………………….3 3 / CARACTERISTIQUES ..…………………………………………………………………………………………………………….4 EMETTEUR / DISPOSITION DES ORGANES DE COMMANDE.………………………………..5 RECEPTEUR……………………………….…………………………………………………………………………6 4 / INFORMATIONS GENERALES………………………………………………………………………………………………….7 LA BATTERIE DE L’EMETTEUR……………………………………………………………………………….7 POSITIONNEMENT DE L’ANTENNE DE L’EMETTEUR………………………………………….….7 POSITIONNEMENT DE L’ANTENNE DU RECEPTEUR……………………………………………...8 LES BRANCHEMENTS DU RECEPTEUR…………………………………………………………………..8 ALIMENTATION DE LA RECEPTION………………………………………………………………..……..8 SECURITE DE LA LIAISON (FAILSFE)……………………………………………………………..……….9... -
Page 3: Introduction
Fédération Française d'Aéro-Modélisme (FFAM). Votre ensemble PTR-6A doit être tenu à l'écart de toute source d'humidité, de chaleur ou de froid excessif, de produits chimiques, d'environnements salins (embruns), ou de toute autre atmosphère susceptible de dégrader son fonctionnement ou sa fiabilité... -
Page 4: Caracteristiques
3 CARACTERISTIQUES 2 CARACTERISTIQUES Votre ensemble PTR-6A se compose d'un émetteur, d'un récepteur et de la présente notice. L'EMETTEUR PTR-6A (Ref. : 70200) Appareil digital programmable offrant 6 voies et capable de contrôler efficacement des modèles d'avions ou de planeur. -
Page 5: Emetteur / Disposition Des Organes De Commande
3 CARACTERISTIQUES (suite) 2 CARACTERISTIQUES 3 mixages préprogrammés de type "double ailerons", 'aile delta" et "empennage en vé". Puissance d'émission réglable permettant de réaliser aisément un test de portée ou de voler en intérieur en réduisant la consommation électrique. ... -
Page 6: Caracteristiques (Fin)
3 CARACTERISTIQUES (fin) 2 CARACTERISTIQUES LE RECEPTEUR R6X (Ref. : 70216) Appareil digital offrant 6 voies et capable de contrôler efficacement des modèles d'avions ou de planeur. Alimentation sur batterie rechargeable 4,8 V à 8,4 V (LiPo 2S). ... -
Page 7: Recepteur
3/ reliez le cordon de la batterie à votre cordon de charge 4/ chargez la batterie avec un chargeur approprié. Nous vous recommandons l’un des chargeurs suivants : - Chargeur Radio Pro-Tronik Ref : 12750 - AP6 Pocket Pro-Tronik Ref : 7707 5/ une fois la charge terminée, débranchez la batterie du cordon de charge et rebranchez-la sur l'émetteur en veillant à... -
Page 8: Positionnement De L'antenne Du Recepteur
2 CARACTERISTIQUES 4 INFORMATIONS GENERALES (suite) Puissant. niveau des ondes émises est élevé. Faible. Le niveau des ondes émises est réduit. 4.3 POSITIONNEMENT DE L’ANTENNE DU RECEPTEUR La sensibilité de l’antenne du récepteur est similaire à celle de l’émetteur. Les ondes sont reçues de manière optimale sur les côtés de la partie active de l’antenne (partie mesurant 30 mm à... -
Page 9: Securite De La Liaison (Failsfe)
2 CARACTERISTIQUES 4 INFORMATIONS GENERALES (fin) Alimentation par une batterie de réception. Une telle batterie d’alimentation est typiquement composée de 4 ou 5 éléments NiMH assemblés en série. Elle délivre une tension comprise entre 5 et 6 V en fonctionnement. La capacité... -
Page 10: Appairage Ou " Binding " Entre Emetteur Et Recepteur
5 APPAIRAGE OU « BINDING » ENTRE EMETTEUR ET RECEPTEUR 2 CARACTERISTIQUES Votre ensemble de radiocommande Pro-Tronik établit une liaison dans la bande des 2,4 GHz entre l’émetteur et le récepteur. Cette bande dite ISM (Industry, Science and Medical care) n’est pas dédiée aux radiocommandes. Elle est également utilisée par de très nombreux autres appareils tels que le WiFi, le Bluetooth, certains fours, jeux, domotique,... -
Page 11: Test De Portee
Il n’est en effet pas toujours facile de disposer d’une telle distance sur le terrain, et un aide n’est pas toujours disponible. C’est la raison pour laquelle votre ensemble Pro-Tronik est doté d’un système permettant de réaliser un test de portée de manière beaucoup plus simple, rapide et autonome. -
Page 12: Menu Système
7 MENU SYSTEME 2 CARACTERISTIQUES Les fonctionnalités communes de votre émetteur sont regroupées dans le menu SYSTEME, qui donne accès aux deux sous-menus suivants : - Réglage du chronomètre de chaque mémoire de modèle - Réglage de la puissance d'émission de l'émetteur Pour accéder au menu SYSTEME, maintenez la touche ENTER pressée puis mettez simultanément l'émetteur sous tension. -
Page 13: Reglage De La Puissance D'emission
7 MENU SYSTÈME (fin) 2 CARACTERISTIQUES 7.2 REGLAGE DE LA PUISSANCE D’EMISSION Votre émetteur offre un réglage de sa puissance d'émission. Cela permet par exemple de réduire la consommation électrique si vous volez à courte distance (vol indoor) ou encore de réaliser un test de portée sans devoir vous éloigner démesurément de votre modèle. -
Page 14: Menu Mode
8 MENU MODE 2 CARACTERISTIQUES Votre émetteur vous permet de définir la répartition des fonctions sur les manches grâce au menue MODE de pilotage. Pour accéder à cette fonctionnalité, maintenez les touches ENTER et EXIT pressées puis mettez simultanément l'émetteur sous tension. Le menu MODE s'affiche alors sur l'écran. -
Page 15: Utilisation De L'emetteur
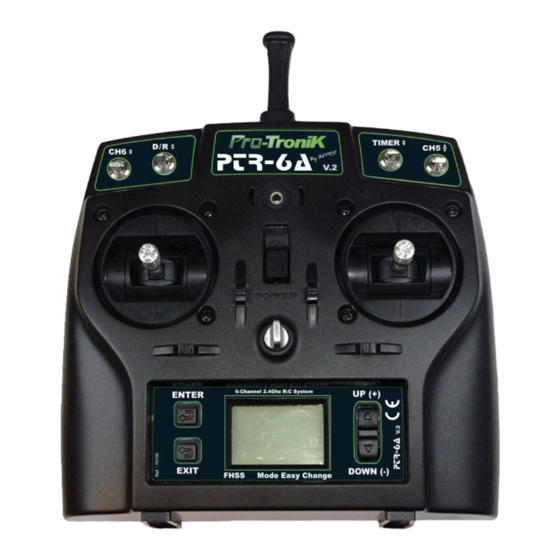
9 UTILISATION DE L’EMETTEUR 2 CARACTERISTIQUES Ce chapitre va vous permettre de bien identifier et connaître le rôle de chaque organe de votre émetteur afin de l’exploiter au mieux. 9.1 LES ORGANES DE COMMANDE Les organes de commande permettent de contrôler le vol des modèles grâce aux 6 voies ou fonctions distinctes de votre émetteur. -
Page 16: Menu Fonctionalites
10 MENU FONCTIONNALITES 2 CARACTERISTIQUES Ce chapitre décrit l’ensemble des fonctionnalités offertes par votre émetteur. Il est important de vous familiariser avec chacune d’elle afin d’en tirer le meilleur profit en toute circonstance. Avant d’entrer en détail dans chacune des fonctionnalités de l’émetteur, nous vous proposons de vous familiariser avec l’écran principal de votre émetteur. -
Page 17: Selection De La Mémoire De Modele
10 MENU FONCTIONNALITES (suite) 2 CARACTERISTIQUES Une fois la touche ENTER pressée, l’écran du menu des fonctionnalités s’affiche ainsi : ENTER 10.1 SELECTION DE LA MÉMOIRE DE MODELE 1/ Depuis l’écran principal, pressez la touche ENTER pendant 3 secondes pour afficher le menu des fonctionnalités. 2/ Pressez l’une des touches UP ou DOWN pour faire défiler les mémoires 1 à... -
Page 18: Mixages
10 MENU FONCTIONNALITES (suite) 2 CARACTERISTIQUES 4/ Pressez la touche EXIT pour sélectionner la voie 2 (CH2) puis répéter les étapes 2 et 3 pour ajuster le débattement des voies 3 puis 4. La touche EXIT permet de sélectionner la voie à régler. 5/ pressez ENTER puis EXIT pour revenir à... -
Page 19: Processus D'appairage (Bind)
10 MENU FONCTIONNALITES (fin) 2 CARACTERISTIQUES 1 - 6 mixage Volets donne Ailerons (uniquement si le mixage Flaperons est activé) a/ Depuis l’écran de mixage 1 - 6, pressez la touche EXIT pour accéder au réglage du taux de mixage Volet donne Aileron. -
Page 20: Menu Fin De Courses/ Exponentiel
11 MENU FIN DE COURSES/ EXPONENTIEL 2 CARACTERISTIQUES Votre émetteur propose les fonctionnalités avancées de réglage de Fin de course (End Point) de chaque voie ainsi que d’Exponentiel (Expo), regroupées dans le menu EP:EX. Pour accéder à ce menu, maintenez la touche EXIT pressée puis mettez simultanément l'émetteur sous tension. Le menu EP:EX s'affiche alors sur l'écran, indiquant que vous pouvez régler soit les fins de courses de chaque voie, soit la courbe de réponse des 3 axes (voies 1, 2 et 4). -
Page 21: 12/ Mode De Fonctionnement Du Recepteur
12 CONFIGURATION DU MODE PPM DU RECEPTEUR 2 CARACTERISTIQUES Il existe sur le marché des matériels utilisant un signal PPM positif (c’est le cas de votre ensemble Protronik) et d’autres utilisant un signal PPM négatif. Afin d’offrir une compatibilité la plus large possible, notamment pour l’écolage sans fil, votre récepteur propose les deux types de polarité... -
Page 22: 13/ Garantie Et Sav
2 CARACTERISTIQUES 13.1 GARANTIE Votre ensemble de radiocommande Pro-Tronik a été fabriqué selon les méthodes les plus modernes et avec le plus grand soin. La garantie d’une durée de 12 mois à compter de la date d’achat figurant sur la facture couvre exclusivement une panne survenant durant cette période dans le cadre d’une utilisation normale des produits. - Page 24 USER MANUAL PTR-6A Transmitter V 2.0...
-
Page 25: Table Des Matières
1 TABLE OF CONTENTS 2 CARACTERISTIQUES TABLE OF CONTENTS………………………………………………………………………………………………………………….25 INTRODUCING…………………………………………..……………………………………………………………………………….26 FEATURES……………………………………………………………….………………………………………………………………….27 Tx………………………………………………………………………………………………………………………..27 Tx diagram….……………………………………………………………………………………………………….28 Rx………………………………………………………………………………..………………………………………29 OVERALL FEATURES…………………………………………………………………………………………………………………….30 Tx battery……………………………………………….……………………………………………………………30 Tx Antenna position………………………………………………………………………..…………………..30 Rx Antenna position…………………………………………………………………………………………..31 Rx wiring……………………………………………………………………………………………………………...31 Rx power………………………………………………………………..…………………………………………...31 Binding security……………………………………………………………..…………………………………..32 BINDING……………………………………………………………………………………………………………………..……………..33 Binding Process…………………………………………………………………….…………………………….34 RANGE TEST………………………………………………………………………………………………………….……………………34 SYSTEM MENU…………………………………………………………………………………………………………………………..35 Timer setting…..…………………………………………………………………………………………………35 Tx power setting….…………………………………………………………………………………………….36 STICK MODE SETTING.…………………………………..……………………………………………………….……………….…37 Stick mode..……………………………………………………………………………………………………….37... -
Page 26: Introducing
Your PTR-6A set should be kept away from any source of moisture, excessive heat or cold, chemicals, saline environments (mist), or any other atmosphere may degrade the operation or reliability in time. -
Page 27: Features
3 FEATURES 2 CARACTERISTIQUES Your PTR-6A set consists of a transmitter, a receiver and this manual. The PTR-6A Transmitter (#70200) Digital programmable transmitter with 6-channel able to effectively control model airplanes or gliders. Rechargeable 4.8 V / 800 mA NiMH Battery offering optimum security and a very comfortable autonomy (more than 8 hours depending on the operating mode and power). -
Page 28: Tx Diagram
3 FEATURES 2 CARACTERISTIQUES 3 pre-programmed mixes "double ailerons" delta wing "and" V-tail ". Adjustable transmission power to achieve easily range test or fly indoor reducing power consumption. 2S LiPo possible for power supply. Channel 5 is controlled by a 3 positions switch. ... -
Page 29: Dimensions Weight
3 FEATURES 2 CARACTERISTIQUES R6X Receiver (#70216) Digital receiver with 6-channel able to effectively control model airplanes or gliders. Power supply from 4,8 V to 8,4 V (2S LiPo). Reverse polarity protection. Very low Amp draw. ... -
Page 30: Tx Battery
4 OVERALL FEATURES 2 CARACTERISTIQUES 4.1 TRANSMITTER BATTERY Your transmitter is equipped with a NiMH battery ensuring optimum safety of use and a very reduced cost of ownership of your set. After reading the manual in its entirety, charge the Tx battery with a suitable charger (not supplied). To perform this operation : 1/ Open the battery bay 2/ Get the free connector running out of the battery... -
Page 31: Rx Antenna Position
2 CARACTERISTIQUES 4 OVERALL FEATURES Strong. Level of emitted waves is high. Weak. Level of emitted waves is low. 4.3 RECEIVER ANTENNA POSTION The sensitivity of the receiver antenna is similar to the transmitter antenna. The waves are received optimally on the sides of the active part of the antenna (part measuring 30 mm at the end of the black extension measuring about 11 cm). -
Page 32: Binding Security
2 CARACTERISTIQUES 4 OVERALL FEATURES Rx battery power supply. Such a battery pack is typically composed of 4 or 5 NiMH cells assembled in series. It supplies a voltage of between 5 and 6 V in operation. The capacity of this battery should be chosen depending on the number and type of servos involved in the model. The higher the number, the greater the consumption of servos is important, and the battery capacity must be high. -
Page 33: Binding
2 CARACTERISTIQUES Your Pro-Tronik radio control system establishes a connection in the 2.4 GHz band between the transmitter and the receiver. This band called ISM (Industry, Science and Medical care) is not dedicated to remote controls. It is also used by many other devices such as WiFi, Bluetooth, some ovens, games, home automation, etc.. -
Page 34: Binding Process
2 CARACTERISTIQUES Like any radio control system, set your Pro-Tronik requires to perform a range check before each use in the field. The range test is intended to verify that the scope of the connection heavily dependent on the quality of the installation on the model is ensured at all times. -
Page 35: System Menu
7 SYSTEM MENU 2 CARACTERISTIQUES Common features of your transmitter are grouped in the SYSTEM menu, which gives access to two sub-menus: - Setting the timer for each model memory - Adjusting the transmit power of the emitter To access the System Menu, maintain ENTER button pressed and turn the transmitter on. The System Menu appears on the screen, indicating that you can set either the timer (Timer letter T), or power (letter P for Power). -
Page 36: Tx Power Setting
7 SYSTEM MENU 2 CARACTERISTIQUES 7.2 SETTING THE EMITTING POWER Your transmitter offers adjusting its transmission power. This allows for example to reduce power consumption if you fly short distances (indoor flight) or to perform a range check without having to move away your model disproportionately. SETTING PROCEDURE 1/ maintain ENTER button pressed and turn the transmitter on 2/ Once in the SYSTEM menu, press the EXIT button to enter the POWER sub-menu. -
Page 37: Stick Mode
8 STICK MODE SETTING 2 CARACTERISTIQUES 8.1 CONTROL MODE SETTING Your transmitter offers 4 different control modes named MODE 1 to MODE 4. The control mode of a transmitter sets the distribution of the four axes of control on both sticks as follows : The transition from Mode 1 to Mode 2 or Mode 3 Mode 4 causes a reversal of Gas and Ailerons. -
Page 38: The Switches
9 USING YOUR TRANSMITTER 2 CARACTERISTIQUES This chapter will help you to clearly identify and understand the role of each organ of your transmitter to exploit it at best. 9.1 STICKS The control organs used to control the flying models due to the 6 channels or distinct functions of your transmitter. ... -
Page 39: Functions
10 FUNCTIONS 2 CARACTERISTIQUES This chapter describes all the features offered by your transmitter. It is important to familiarize yourself with each of them in order to get the best in all circumstances. Before entering in detail every feature of the transmitter, we suggest you familiarize yourself with the main screen of your transmitter. -
Page 40: Dual Rates And Expos
10 FUNCTIONS 2 CARACTERISTIQUES Once the ENTER key is pressed, the menu screen is displayed and features : ENTER 10.1 MEMORY SELECTION 1/ From the main screen, press the ENTER button for 3 seconds to display the features menu. 2/ Press one of the UP or DOWN keys to scroll through the 1 to 8 memory. 3/ Once the desired memory number is displayed, press ENTER and EXIT to return to the main screen and use the selected model memory. -
Page 41: Mix
10 FUNCTIONS 2 CARACTERISTIQUES 4/ Press the EXIT button to select channel 2 (CH2) and repeat steps 2 and 3 to adjust the travel of channels 3 and 4. EXIT button to select the channel to be adjusted. 5/ press ENTER and then EXIT to return to the main screen and use the selected model memory. 10.4 MIXES Your transmitter offers 4 types of different mixes, identified by the numbers of the mixed channels. -
Page 42: Battery Type Selection
10 FUNCTIONS 2 CARACTERISTIQUES 1 – 6 Flaps to Ailerons mix (Only when the FLAP mix is enabled) a/ From the 1 – 6 mix screen, press the EXIT button to enter the flaps to Aileron mixing ratio setting. EXIT UP/DOWN 3.2/ Press UP or DOWN to adjust the mixing ratio upward or downward (positive or negative depending on the... -
Page 43: Exponentiel
11 END POINTS / EXPONENTIAL 2 CARACTERISTIQUES Your transmitter offers advanced End Point settings for each channel as well as Exponential settings, grouped in the EP:EX menu. To access this menu, press the EXIT button and turn on the transmitter. The EP:EX menu is displayed on the screen, indicating that you can adjust EXPO and End Points for each channel (channels 1, 2 and 4). -
Page 44: Setting The Standard Mode
2 CARACTERISTIQUES There are hardware on the market using a positive PPM signal (this is the case your Pro-Tronik set) and others using a negative PPM signal. To provide the widest compatibility, especially for wireless training, the receiver offers two types of polarity. -
Page 45: Warranty And After Sale
The warranty covers exclusively the RC system to the exclusion of any other equipment, or accessories embedded in a model. Pro-Tronik can not assume any liability for any injury caused by the use of this set (work stoppage, loss of business due to the unavailability of the device, compensation in case of incapacity, ...).