
Manuels Connexes pour Greentouch SCOTT LIVING 1037IM-28-245


Sommaire des Matières pour Greentouch SCOTT LIVING 1037IM-28-245
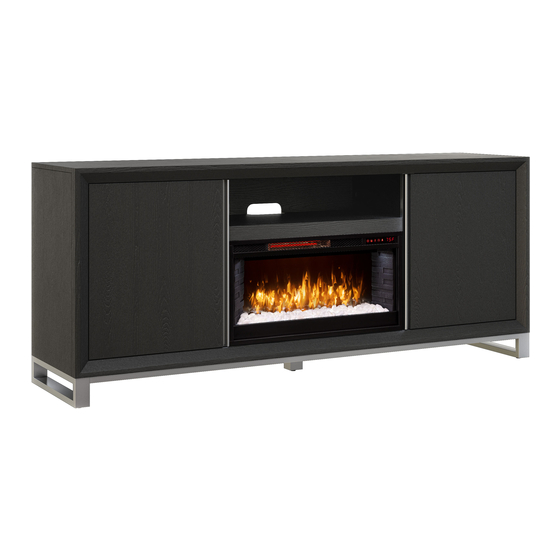
- Page 1 72” Interchangeable Français p. 10 Español p. 19 Fireplace/Media Console ASSEMBLY, CARE & USE INSTRUCTIONS MODEL # 1037IM-28-245 Date Purchased _______________________ www.greentouchhome.com...
- Page 2 PACKAGE CONTENTS PART DESCRIPTION QUANTITY Main Cabinet Center Media Shelf Side Shelf Bottom Back Panel Insert Remote Control Battery Center Support Leg Wooden Insert Bracket Crystals Pebbles...
- Page 3 HARDWARE CONTENTS (NOT SHOWN ACTUAL SIZE) PART DESCRIPTION QUANTITY Shelf Pin Long Bolt Washer Touch-up Pen...
- Page 4 PREPARATION Before beginning assembly of product, make Estimated Assembly Time: 45 minutes sure all parts are present. Compare parts with Tools Required for Assembly (not included): package contents list and hardware contents list. If any part is missing or damaged, do not attempt Phillips screwdriver to assemble the product.
- Page 5 CABINET INSTALLATION 1. With 2 people, place the main cabinet on its back on a flat, scratch free surface. Locate the center support leg (J) and screw into the base of the main cabinet. once complete, lift the main cabinet (A) back up into the upright position.
- Page 6 CABINET INSTALLATION 3. If you need to adjust the doors, do so in the following manner. To adjust door up or down, loosen screws (a) on both hinges, adjust door, and retighten screws. To adjust door left or right, turn screws (b) on both hinges, in or out. To adjust door in or out, loosen screws (c) on both hinges, adjust door, and retighten screws.
- Page 7 ELECTRICAL FIREPLACE ASSEMBLY INSTRUCTIONS (OPTIONAL) 1. Take out the center media shelf (B). 2. From behind the assembly, remove the bottom back panel (D) by unscrewing those screws on back panel.
- Page 8 ELECTRICAL FIREPLACE ASSEMBLY INSTRUCTIONS (OPTIONAL) Note: Before proceeding to the next step, with the help of another person, move the mantel close to the final desired location. 3. With the help of another person, position insert (E) into opening of mantel assembly. CAUTION: DO NOT slide insert on top of wood to avoid scratching wood surface.
- Page 9 ONE-YEAR LIMITED WARRANTY The manufacturer warrants that your new Electric fireplace is free from manufacturing and material defects for a period of one year from date of purchase, subject to the following conditions and limitations. Install and operate this Electric fireplace in accordance with the installation and operating instructions furnished with the product at all times.
- Page 10 Console interchangeable English p. 1 Español p. 19 de 183 cm (72 po) pour foyer et médias INSTRUCTIONS D’UTILISATION, D’ASSEMBLAGE ET DE MAINTENANCE MODÈLE # 1037IM-28-245 Date d’achat _______________________ www.greentouchhome.com...
- Page 11 CONTENU DE L’EMBALLAGE PIÈCE DESCRIPTION QUANTITÉ Coffret Principal Étagère Centrale Pour Média Étagère Latérale Panneau Arrière Inférieur Foyer encastrable Télécommande Pile Pied de Support Central Support D'insert En Bois Cristaux Galets...
- Page 12 HARDWARE CONTENTS (NOT SHOWN ACTUAL SIZE) PIÈCE DESCRIPTION QUANTITÉ Goupille à Tablette Boulon Long Rondelle Crayon à Retouche...
- Page 13 PRÉPARATION Avant de commencer l’assemblage de l’article, Temps d’assemblage approximatif : assurez-vous d’avoir toutes les pièces. Comparez 45 minutes. le contenu de l’emballage avec la liste des pièces et celle de la quincaillerie incluse. S’il y a des Outil nécessaire pour l’assemblage pièces manquantes ou endommagées, ne tentez (non inclus) : tournevis cruciforme.
- Page 14 INSTALLATION DU COFFRET 1. Accompagné de 2 personnes, placer le coffret principal sur le dos, sur une surface plate et sans rayures. Localiser le pied de support central (J) et le visser dans la base du coffret principal. Une fois terminé, soulever le coffret principal (A) en position verticale.
- Page 15 INSTALLATION DU COFFRET 3. Suivez les étapes suivantes pour ajuster les portes. Pour ajuster la porte verticalement, desserrez les vis (a) sur les deux charnières, ajustez la porte et resserrez les vis. Pour ajuster la porte vers la gauche ou vers la droite, tournez les vis (b) sur les deux charnières vers l’intérieur ou l’extérieur.
- Page 16 INSTRUCTIONS DE MONTAGE DU FOYER ÉLECTRIQUE (OPTIONNEL) 1. Sortez les étagère centrale pour média (B). 2. De l'arrière de l'assemblage, enlever le panneau arrière inférieur (D) en dévissant les vis sur le panneau arrière.
- Page 17 INSTRUCTIONS DE MONTAGE DU FOYER ÉLECTRIQUE (OPTIONNEL) Remarque: Avant de passer à l’étape suivante, et avec l’aide d’une autre personne, placez lemeuble à proximité de l’emplacement final désiré 3. Avec l’aide d’une autre personne, placez le foyer encastrable (E) dans l’ouverture centrale du meuble. ATTENTION : Ne faites PAS glisser le foyer encastrable sur une surface en bois afin de prévenir les égratignures.
- Page 18 GARANTIE Cet article est garanti par le fabricant contre les défauts de matériaux et de fabrication pour une période de un an à compter de la date d’achat. La présente garantie est assujettie aux restrictions et aux conditions suivantes : Ce meuble doit être installé...
- Page 19 Chimenea/consola English p. 1 Français p. 10 multimedia intercambiable de 72" INSTRUCCIONES DE ENSAMBLAJE, CUIDADO Y USO MODELO # 1037IM-28-245 Fecha de compra _______________________ www.greentouchhome.com...
- Page 20 CONTENIDO DEL PAQUETE PIEZA DESCRIPCIÓN CANTIDAD Gabinete Principal Estante Central Multimedia Estante Lateral Panel Trasero Inferior Accesorio Control Remoto Pila Pata De Apoyo Central Soporte Del Inserto De Madera Ya Sean Cristales Guijarros...
- Page 21 CONTENIDO DE HARDWARE (NO SE MUESTRAN EN TAMAÑO REAL) PIEZA DESCRIPCIÓN CANTIDAD Pasador De Repisa Perno Largo Arandela Aplicador De Retoque...
- Page 22 PREPARACIÓN Antes de comenzar a ensamblar el producto, Tiempo Estimado De Ensamblaje: 45 minutos asegúrese de tener todas las piezas. Compare Herramientas necesarias para el ensamblaje las piezas con la lista del contenido del (no se incluyen): Destornillador Phillips paquete y la lista de aditamentos. No intente ensamblar el producto si falta alguna pieza o si estas están dañadas.
- Page 23 INSTALACIÓN DEL GABINETE 1. Con 2 personas, coloque el gabinete principal de espaldas sobre una superficie plana y que no raye. Localice la pata de soporte central (J) y atorníllela en la base del gabinete principal. Una vez terminado, levante el gabinete principal (A) hasta su posición vertical.
- Page 24 INSTALACIÓN DEL GABINETE 3. Si necesita ajustar las puertas, proceda como se indica a continuación: Para ajustar la puerta hacia arriba o abajo, afloje los tornillos (a) de ambas bisagras, ajuste la altura y apriete nuevamente los tornillos. Para ajustar la puerta hacia la izquierda o la derecha, regule los tornillos (b) de ambas bisagras hacia adentro o hacia afuera.
- Page 25 INSTRUCCIONES DE MONTAJE DE LA CHIMENEA ELÉCTRICA (OPCIONAL) 1. Retire los estante central multimedia (B). 2. Desde detrás del conjunto, retire el panel trasero inferior (D) destornillando los tornillos del panel trasero.
- Page 26 INSTRUCCIONES DE MONTAJE DE LA CHIMENEA ELÉCTRICA (OPCIONAL) Nota: Antes de seguir con el próximo paso, con la ayuda de otra persona, mueva la repisa a la ubicación final deseada 3. Con ayuda de otra persona, ubique el accesorio (E) en la abertura central del ensamble de la repisa. PRECAUCIÓN: NO deslice el accesorio en la parte superior de la madera para evitar rayar la superficie de madera.
- Page 27 GARANTÍA El fabricante garantiza que este producto no presentará defectos de materiales o de fabricación por un período de un año a partir de la fecha de compra original. Esta garantía está sujeta a las siguientes condiciones y limitaciones: Esta repisa se debe instalar y operar de acuerdo con las instrucciones de instalación y operación proporcionadas con el producto.