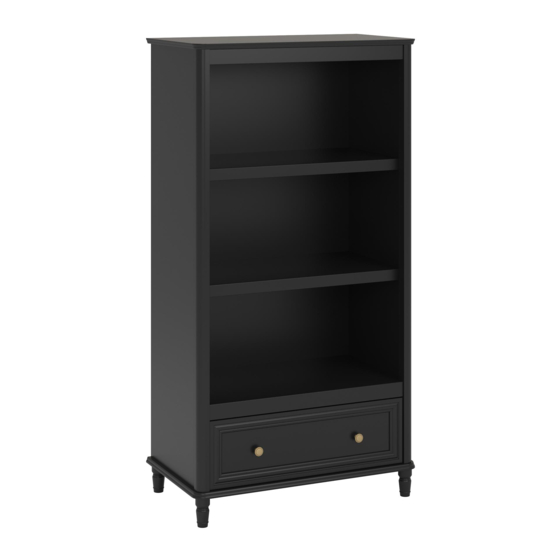
Télécharger Imprimer la page

Publicité

Les langues disponibles

Les langues disponibles

Liens rapides

BBBBBBBBBBBBB
TM
inside for Assembly Manual
Check us out!
littleseedskids.com

Publicité

loading

Sommaire des Matières pour Little Seeds 6857096BRU

  • Page 1 BBBBBBBBBBBBB inside for Assembly Manual Check us out! littleseedskids.com...
  • Page 2 Keep this Assembly Manual for future reference Two Adults recommended for assembly This product is not intended for commercial use Do NOT return this product! Follow little seeds on For missing or broken parts - Visit littleseedskids.com - Call 1-800-489-3351...
  • Page 3 Do NOT return this product! Contact our friendly customer service team first for help Assembly Tips Call us! 1-800-489-3351 Monday-Friday 9am - 5pm CST Visit littleseedskids.com to view the limited warranty valid in the U.S and Canada Helpful Hints PEOPLE NEEDED FOR ASSEMBLY: 1-2 ESTIMATED ASSEMBLY TIME: 1 HOUR - Open your item in the area you plan to keep it for less heavy lifting - Identify, sort and count the parts before attempting assembly...
  • Page 4 Before You Start Read through each step carefully and follow the proper order Separate and count all your parts and hardware Give yourself enough room for the assembly process Have the following tools: Flat Head Screwdriver, #2 Phillips Head Screwdriver and Hammer Caution: If using a power drill or power screwdriver for screwing, please beware to slow down and stop when screw is tight.
  • Page 5 Board Ident f lat on Not altual size T6857096010 T6857096020 T6857096030 TOP PANEL LEFT SIDE PANEL RIGHT SIDE PANEL T6857096040 T6857096050 T6857096060 BOTTOM PANEL TOP MOLDING T6857096070 T6857096080 T6857096090 FRONT DRAWER LEFT SIDE DRAWER RIGHT SIDE DRAWER lil leseedslidsllom...
  • Page 6 Board Ident f lat on Not altual size T6857096100 T6857096110 T6857096120 BACK DRAWER BOTTOM DRAWER DRAWER SUPPORT T6857096130 T6857096140 T6857096150 UPPER SHELF MIDDLE SHELF LOWER SHELF T6857096160 T6857096170 UPPER BACK PANEL LOWER BACK PANEL lil leseedslidsllom...
  • Page 7 Hardware Bag Reference Number: 26857096BRU0 Part List Altual size TUD0009 TUD0001 TUD0002 TUD0004 TUD0005 CBS 4 x 38 Cam Bolt Cam Loll DOWEL 8 X 25 DOWEL 6 X 25 15-12 TUD0011 TUD0008 TUD0006 TUD0028 PH M4 X 12 CBS 3l5 x 16 NAIL SHELF HOLDER lil leseedslidsllom...
  • Page 8 Hardware Bag Reference Number: 26857096BRU0 Part List Not altual size x1 SET TUD0017 TUD0013 DRAWER SLIDE ROUND KNOB 350 MML x1 set TUD0021 ANTI TIPPING KIT lil leseedslidsllom...
  • Page 9 Step 1 TUD0001 TUD0021 Alach the Cam Lock. For ant tppinng bracket, do not fully tghten in this step. * raw edges are shaded lil leseedslidsllom...
  • Page 10 Step 2 x1 (CL) TUD0001 TUD0008 TUD0017 TUD0002 TUD0004 Preparaton of left side panel Proper orientaton of CAM LOCK Screw Positon * raw edges are shaded lil leseedslidsllom...
  • Page 11 Step 3 x1 (CR) TUD0008 TUD0001 TUD0004 TUD0017 TUD0002 Preparaton of right side panel Proper orientaton of CAM LOCK Screw Positon * raw edges are shaded lil leseedslidsllom...
  • Page 12 Step 4 TUD0004 TUD0002 Preparaton of lower back panel & top molding Proper orientaton of CAM LOCK * raw edges are shaded lil leseedslidsllom...
  • Page 13 Step 5 TUD0002 TUD0004 Preparaton of upper & lower shelves * raw edges are shaded lil leseedslidsllom...
  • Page 14 Step 6 TUD0001 Preparaton of front drawer * raw edges are shaded lil leseedslidsllom...
  • Page 15 Step 7 Proper orientat on of CAM LOCK TUD0005 TUD0002 Preparat on of left & right side drawer * raw edges are shaded lil leseedslidsllom...
  • Page 16 Step 8 TUD0005 Preparaton of drawer support * raw edges are shaded lil leseedslidsllom...
  • Page 17 Step 9 Alach left side drawer to front drawer. * raw edges are shaded lil leseedslidsllom...
  • Page 18 Step 10 Alach right side drawer to front drawer * raw edges are shaded lil leseedslidsllom...
  • Page 19 Step 11 Alach drawer support to front drawer * raw edges are shaded lil leseedslidsllom...
  • Page 20 Step 12 Slotting in bolom drawer * raw edges are shaded lil leseedslidsllom...
  • Page 21 Step 13 TUD0009 Alach the back drawer with screw * raw edges are shaded lil leseedslidsllom...
  • Page 22 Step 14 x1 (DR & DL) TUD0008 TUD0017 Alach drawer slide for drawer box * raw edges are shaded lil leseedslidsllom...
  • Page 23 Step 15 TUD0013 TUD0011 Knob installaton * raw edges are shaded lil leseedslidsllom...
  • Page 24 Step 16 Before start, cover the work floor with any cloth or carton box paper to prevent scratch on board panel edges Alach top molding to left side panel. Must contnue to hold left side panel. Note : Hole faling up * raw edges are shaded lil leseedslidsllom...
  • Page 25 Step 17 Alach the lower shelf * raw edges are shaded lil leseedslidsllom...
  • Page 26 Step 18 Alach the upper shelf * raw edges are shaded lil leseedslidsllom...
  • Page 27 Step 19 Alach the lower back panel. Must contnue to hold the lower back panel. * raw edges are shaded lil leseedslidsllom...
  • Page 28 Step 20 While holding the lower back panel, alach right side panel and align the connecton larefullyl * raw edges are shaded lil leseedslidsllom...
  • Page 29 Step 21 Alach the top panel carefully, do not make a harsh movements. * raw edges are shaded lil leseedslidsllom...
  • Page 30 Step 22 Alach the bolom panel carefully, do not make a harsh movements. TUD0009 * raw edges are shaded lil leseedslidsllom...
  • Page 31 Step 23 TUD0006 Carefully turn the unit over onto its front as shown. Assure that the unit is squarel Distanle from lorner to lorner must be equal as shownl IMPOBTANT! THE BACK PANEL IS A STRUCTURAL PART OF THIS UNIT AND MUST BE INSTALLED PROPERLYl * raw edges are shaded lil leseedslidsllom...
  • Page 32 Step 24 Alach the legs to the bolom panel. twist clockwise untl fully tghten. * raw edges are shaded lil leseedslidsllom...
  • Page 33 Step 25 TUD0028 Insert shelf holder into desire height setting as shownl * raw edges are shaded lil leseedslidsllom...
  • Page 34 Step 26 Insert middle shelf all the way to the ball Adjust to normal plane and ensure sit by lower down 1 side nilely on the holdersl * raw edges are shaded lil leseedslidsllom...
  • Page 35 Step 27 For Masonry, Concrete, or other wall materials: Consult your lolal hardware store for appropriate anlhors to selurely alach the safety bracket. IMPOBTANT: THIS UNIT MUST BE SECURE TO THE WALL TO HELP PREVENT TIPOVERl FOLLOW THESE INSTRUCTIONS TO INSTALL THE ANTI-TIPPING SAFETY BRACKET PROVIDED WITH THIS PRODUCTl WABNING hole...
  • Page 36 Step 28 Insert the drawer, larfeully align the roller * raw edges are shaded lil leseedslidsllom...
  • Page 37 Maximum Loads This unit has been designed to support the maximum loads shownl Exleeding these load limits could cause sagging, instability, product collapse, and/or serious injury. 0 lbsl 0 lg 30 lbsl 13l6 lg ealh shelf 35 lbsl 15l9lg ealh drawer Warning: Risk of serious injury to person - do not place a television on this furniture.
  • Page 38 BPgPPtPP youP PPPduPt tP receive thP following: * NPw tPPnd dPtPPlP -PnPPP PPPP Pn what's nPw * SurveyP -have P voice within PuP community * ExclusivP dPPlP Pnd dPPPPunt PPdPP * QuPPP Pnd easy PPPlPPPmPnt PPPt servicP TP PPgPPtPP your PPPduPt, visit VPPPt your lPPPl retailer's website, PPtP your PuPPhPPPd PPPduPt Pnd leave uP PPmP fPPdbPPP! WP would lPPP tP PxtPnd P bPg "ThPnP YPu"...
  • Page 39 Español Cubierta Delantera Busque en el interior del manual de montaje Búsquenos! PágPnP 2 Conserve este manual de montaje para futuras consultas. Se relomienda dos adultos para el montajel Este produlto no es para uso lomerliall No Regrese este produlto! Para piezas perdidas o rotasl Visitar: lilleseedskids.com Llamenos al: 1-800-489-3351 (Grats) Lunes - Viernes 9am - 5pm CST Seguir lille seeds en...
  • Page 40 Español Paso 1 (página 9) Conecte el bloqueo de leva. Para el soporte ant inclinación, no apriete completamente en este paso. Paso 2 (página 10) Preparación del panel lateral izquierdo Orientación adecuada de CAM LOCK Posición del tornillo Paso 3 (página 11) Preparación del panel lateral derecho Orientación adecuada de CAM LOCK Posición del tornillo...
  • Page 41 Español Paso 14 (página 22) Coloque la corredera del cajón para la caja del cajón Paso 15 (página 23) Instalación de la perilla Paso 16 (página 24) Antes de comenzar, cubra el piso de trabajo con cualquier paño o papel de caja de cartón para evitar rasguños en los bordes del panel Conelte el moldeo superior al panel lateral izquierdol Debe contnuar sosteniendo el panel lateral izquierdo.
  • Page 42 Español Paso 24 (página 32) Sujete las patas al panel inferiorl Gire halia la derelha hasta apretar lompletamentel Paso 25 (página 33) Inserte el soporte de la repisa en el ajuste de la altura del deseo lomo se muestral Cara Plana, Halia arriba Paso 26 (página 34) Inserte el estante del medio todo el lamino hasta la parte posterior por abajo halia abajo 1 lado...
  • Page 43 Español PágPnP BB La unidad máxima ha sido diseñada para soportar las cargas máximas mostradas. Exceder estos límites de carga podría causar flacidez, instabilit, colapso del producto y / o lesiones graves. Advertencia: riesgo de lesiones graves a la persona - no coloque un televisor en este mueble. Este mobiliario no está...
  • Page 44 Français Capot Avant Regardez à l'intérieur du manuel d'assemblage Búsquenos! PPgP 2 Conservez ce manuel d'installaton pour référence ultérieure. deux adultes pour l'installaton est recommandée. Ce produit n'est pas pour un usage lommerliall Ne pas retourner ce produit! Pour les pièces perdues ou cassées. Visite: lilleseedskids.com Appel: 1-800-489-3351 (gratuit) Lundi - Vendredi 9am - 5pm CST Suivez les pettes graines dans...
  • Page 45 Français Paso 1 (page 9) Conecte el bloqueo de leva. Para el soporte ant inclinación, no apriete completamente en este paso. Paso 2 (page 10) Préparaton du panneau latéral gauche Orientación adecuada de CAM LOCK Posición del tornillo Paso 3 (page 11) Préparaton du panneau latéral derecho Orientación adecuada de CAM LOCK Posición del tornillo...
  • Page 46 Français Etape 13 (page 21) troir arrière sécurisé avec vis Etape 14 (page 22) Placez le troir à boîte de troir Etape 15 (page 23) Installaton du bouton Etape 16 (page 24) Avant de commencer, couvrir le plancher de travail avec un carton de tssu ou du papier pour éviter les rayures sur les bords du panneau Pour connecter le moulage par panneau latéral supérieur gauche.
  • Page 47 Français Étape 24 (page 32) Serrer les jambes au panneau inférieur. Tourner dans le sens horaire jusqu’à ce que complètement serré. Étape 25 (page 33) Insérez le support de plateau pour ajuster la hauteur du désir comme indiqué. Visage plat, En haut Etape 26 (page 34) Insérez l’étagère du milieu tout le chemin vers le bas vers le bas un côté...
  • Page 48 Français Étape 28 (page 36) Insérez le troir, le rouleau d'alignement PPgP BB L’unité maximale est conçue pour résister aux charges maximales indiquées. Le dépassement de ces limites de charge pourrait provoquer l’affaissement, instabilit, effondrement du produit et / ou des blessures graves. Alenton: risque de blessures graves à...