
Manuels Connexes pour Bosch PE 2/XH


Sommaire des Matières pour Bosch PE 2/XH
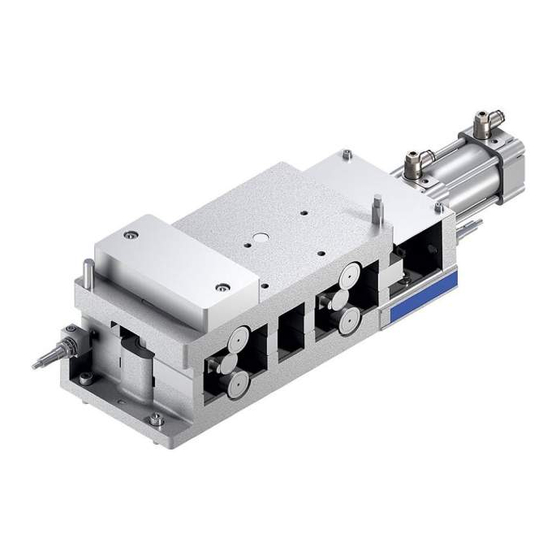
- Page 1 Montagetechnik Assembly technology Technique de montage Tecnica di montaggio Técnica de montaje Positioniereinheit PE 2/XH Positioning unit Unité de positionnement Unità di posizionamento Unidad de posicionamiento PE 2/XH...
-
Page 2: Sicherheitshinweise
“Maintenance work in progress“, or “Repair work in progress“! Die bestimmungsgemäße Verwendung der PE 2/XH ist das Anheben und The PE 2/XH is intended to be used for Positionieren von lifting the workpiece pallet (WT 2) in Werkstückträgern (WT 2) im the Bosch transfer system TS 2plus. - Page 3 L‘PE 2/XH è preposto al sollevamento e palettes porte-pièces (WT 2) dans le al posizionamento dei portapezzi La utilización prevista de la PE 2/XH es système de transfert Bosch TS 2plus. (WT 2) nel sistema di trasferimento la elevación y el posicionamiento de TS 2plus della Bosch.
-
Page 4: Einführung/Baugrößen
WT 2 b *) PE 2/XH Fig. 1 Die Positioniereinheit PE 2/XH The PE 2/XH positioning unit - hebt Werkstückträger (WT 2) von der - lifts workpiece pallets (WT 2) from Bandstrecke (Arbeitsstellung) oder the conveyor belt section (operating - läßt die WT 2 passieren position) or (Ruhestellung). - Page 5 L’unité de positionnement PE 2/XH L‘unità di posizionamento PE 2/XH La unidad de posicionamiento PE 2/XH - soulève des palettes porte- - solleva i portapezzi (WT 2) dal tratto - eleva portapiezas (WT 2) desde el pièces (WT 2) de la section à bande a nastro (posizione di lavoro) oppure tramo de cinta (posición de trabajo) o...
-
Page 6: Anlieferzustand/Lieferumfang
Anlieferzustand/Lieferumfang Condition on delivery/Scope of delivery Etat à la livraison/Fournitures Stato alla consegna/Fornitura Estado de entrega/Volumen del suministro Die PE 2/XH wird komplett montiert PE 2/XH geliefert. Die Befestigungselemente sind lose beigepackt. BG I BG II 3 842 242 350... -
Page 7: Optionales Zubehör
Optionales Zubehör Optional accessories Accessoires en option Accessori facoltativi Accesorios opcionales Ambossplatte Bestell-Nr. (für Ambossplatte) Das optionale Zubehör ist separat zu Anvil plate Order no. (for anvil plate) bestellen. Plaque enclume N° de commande (pour plaque enclume) - Endlagenabfrage: ein oder zwei Piastra incudine Codice ord. - Page 8 Optional accessories (cont.) Accessoires en option (suite) Accessori facoltativi (cont.) Accesorios opcionales (cont.) Teilesatz für WT-Durchlauf- WT 2 PE 2/XH steuerung 3 842 211 354 bestehend aus: 1 Vereinzeler VE 2 (2x) 2 Schalterhalter SH 2/UV (2x) ST 2 3 Schalterhalter SH 2/S (1x) Elektrische Näherungsschalter...
-
Page 9: Montage: Bohrbilder Für Befestigung
Montage: Bohrbilder für Befestigung Assembly: drilling plan for attachment Montage : gabarit de perçage pour fixation Montaggio: Schemi di foratura per il fissaggio Montaje: esquema de taladros para fijación Bohrbild für die Befestigung des Unter- teils nach Fig. 5 + Tabelle herstellen. C *) Bohrbild des Oberteils (BG II) für kun- denspezifische Positionier- und... -
Page 10: Montage, Einbau
Montage, Einbau Assembly, installation Assemblage, montage Montaggio, assemblaggio Montaje, ensamblaje Fig. 7... - Page 11 1 Positioniereinheit PE 2/XH 1 Positioning unit PE 2/XH 1 Unité de positionnement PE 2/XH 2 Strecke ST 2 2 Conveyor section ST 2 2 Section ST 2 3 Ambossplatte 3 Anvil plate 3 Plaque enclume 4 Positionierstift, rund 4 Positioning pin, round...
- Page 12 Montage, Einbau (Forts.) Assembly, installation (cont.) Assemblage, montage (suite) Montaggio, assemblaggio (cont.) Montaje, ensamblaje (cont.) SW 6 (2x) (2x) PE 2/XH WT 2 ST 2 SW 6 (2x) (4x) (4x) ST 2 Fig. 8...
- Page 13 PE 2/XH ai profilati del tratto a nastro! PE 2/XH a los perfiles del tramo de cinta! Inserire il PE 2/XH tra i tratti ST 2, e precisamente a scelta Montar la PE 2/XH entre los tramos - sulla piastra in acciaio della struttura...
-
Page 14: Montageschritte/Justierung
(proximity switches S4, S5): Hinweis: Note: Näherungsschalter nicht als Anschlag Do not use proximity switches as stops! nutzen! Move PE 2/XH into its upper PE 2/XH in obere Endlage end position. bringen. Insert proximity switch (S5) Näherungsschalter (S5) in into the bracket (1) and... - Page 15 Amener la PE 2/XH en position Portare il PE 2/XH nella Llevar la PE 2/XH a la posición finale haute. posizione finale superiore. final superior. Insérer le détecteur de proximité...
-
Page 16: Montage, Commande De Passage Du Wt
Montage (Zubehör), WT-Durchlaufsteuerung Assembly (accessories), WT pass-through control Montage (accessoires), commande de passage du WT Montaggio (accessori), controllo del passaggio del WT Montaje (accesorios), comando de pasaje de WT BG I 3. Teile zur WT-Durchlaufsteuerung entsprechend Abbildungen und Tabelle montieren: Vereinzeler VE1 und VE2 (nach separater Montagean- leitung 3 842 512 700) -
Page 17: Installation/Mise En Service
Installation/Inbetriebnahme Installation/Initial operation Installation/Mise en service Installazione/Messa in funzione Instalación/Puesta en funcionamiento 90˚ 90° Fig. 11 1. Vor Inbetriebnahme prüfen 1. Check the following before initial 1. Avant la mise en service, vérifier operation: Einbaulage der Positioning pin installation La position de montage des Positionierstifte position tiges de positionnement... - Page 18 Installation/Inbetriebnahme (Forts.) Installation/Initial operation (cont.) Installation/Mise en service (suite) Installazione/Messa in funzione (cont.) Instalación/Puesta en funcionamiento (conts.) 2. Druckluftverbindungen herstellen Hinweis: Zur Druckluftaufbereitung ist eine handelsübliche Wartungseinheit vorzuschalten! Gereinigte, ungeölte Luft verwenden! Die Druckluftanschlüsse über Steckfix-Verbindungen mit den jeweiligen Schaltventilen verbinden: A: Anheben, B: Absenken.
- Page 19 yyyy yyyyy 2. Réalisation des raccordements 2. Realizzazione del collegamento 2. Establecer las conexiones de aire pneumatiques dell‘aria compressa comprimido Remarque : Avvertenza: Indicación: Monter en amont une unité de mainte- Per la preparazione dell‘aria compres-sa ¡Para la preparación del aire compri- nance usuelle pour le conditionne-ment montare a monte un‘unità...
- Page 20 Ausgangsstellung: VE2 öffnet. Die Näherungsschalter anschließen: VE1 offen, VE2 geschlossen. S3 durch WT belegt: VE2 schließt. VE1 öffnet. S4 und S5 PE 2/XH in unterer Endlage (Endlagenabfragen) S1 durch vorbeifahrenden Ausgangsstellung. S1, S2 und S3 Werkstückträger (WT) belegt. (WT-Steuerung) VE1 schließt.
- Page 21 Initial position: position initiale : Posición inicial: VE1 open, VE2 closed. VE1 ouvert, VE2 fermé. VE1 abierto, VE2 cerrado. PE 2/XH in the lower end PE 2/XH en position finale PE 2/XH en la posición final position basse inferior S1 occupied by passing S1 actionné...
-
Page 22: Mantenimiento
At regular intervals (Sichtprüfung): (visual inspection): A intervalles réguliers (inspection) : - Alle gleitenden Teile der PE 2/XH mit - Crease all sliding parts of the - Graisser toutes les pièces Schmierfett „gleitmo 585 K“ einfet- PE 2/XH with “gleitmo 585 K“... -
Page 23: Reparación
Instandsetzung Repairs Réparations Riparazione Reparación Vor Instandsetzungsarbeiten sind die Power supplies (main switch, pressure Energiezuführungen (Hauptschalter, relief valve, etc.) must be turned off Avant d’effectuer des réparations, Druckminderventil, usw.) abzuschalten! before repair work! couper l’alimentation en énergie (interrupteur principal, mano-détendeur, Außerdem sind Maßnahmen erforder- Measures must also be taken to prevent etc.)! - Page 24 M5 enough so that S5 can be - PE 2/XH in obere Endlage bringen. pulled out. - Neuen Näherungsschalter (S5) in - Move PE 2/XH into the upper end Halterung (1) einlegen und mit position. Fühllehre auf Schalterabstand - Insert new proximity switch (S5) in 0,5 mm justieren.
- Page 25 - Allentare la vite brugola M5 fino a M5 hasta que se pueda extraer el S5. - Amener PE 2/XH en position finale quando si potrà sfilare l‘S5. - Llevar la PE 2/XH a la posición final haute. - Portare il PE 2/XH nella posizione superior.
- Page 26 M8 (B). creux M8 (B). 3. PE 2/XH von den Zylinderstiften (A) 3. Lift PE 2/XH away from the straight 3. Retirer par le haut la PE 2/XH des nach oben abnehmen. pins (A). goupilles cylindriques (A). 4. Schutzabdeckung entfernen.
- Page 27 III = Schieber I = Ambossplatte Spool Anvil plate Palque enclume Coulisseau Saracinesca Piastra incudine Corredera Placa del yunque II = Oberteil IV = Unterteil Upper section Lower section Partie supérieure Partie inférieure Parte superiore Parte inferiore Fig. 15 Parte superior Parte inferior...
- Page 28 Übrige Ersatzteile tauschen Replacing remaining parts Remplacement des autres pièces Sostituzione degli altri componenti Sustitución de las piezas restantes Pneumatikzylinder (1) tauschen Replacing the pneumatic cylinder (1) 1. Kupplungsteil (2) von der Kolben- 1. Unscrew the coupler (2) from the stange schrauben.
- Page 29 yyyy yyyyy Remplacement du vérin Sostituzione del cilindro Sustitución de cilindros pneumatique (1) pneumatico(1) neumáticos (1) 1. Svitare il giunto (2) dallo stelo del 1. Desatornillar el acoplamiento (2) del 1. Dévisser le coupleur (2) de la tige pistone. vástago de émbolo (2). de piston.
-
Page 30: Ensamblaje
“gleitmo 585 K“. Ensamblaje 3. PE 2/XH auf wieder auf Tischplatte 3. Screw PE 2/XH back onto table schrauben. top. 4. PE 2/XH wieder in Betrieb nehmen. 4. Start PE 2/XH up again. (see Initial (siehe Kapitel Inbetriebnahme.) Operation section.) - Page 31 „gleitmo 585 K“. con „gleitmo 585 K“. 3. Revisser la PE 2/XH sur le plateau 3. Riavvitare il PE 2/XH sulla piastra 3. Atornillar la PE 2/XH a la placa de de table. della tavola. mesa. 4. Remettre la PE 2/XH en service.
-
Page 32: Table Des Matières
3 842 523 895 (00.12) · de/en/fr/it/es · AT/VWM · Printed in Germany Robert Bosch GmbH · Geschäftsbereich Automationstechnik · Montagetechnik Postfach 30 02 07 · D-70442 Stuttgart · Telefax (07 11) 8 11-77 77 Technische Änderungen vorbehalten · Subject to technical modifications · Sous réserve de modifications techniques · Soggetto a modifiche tecniche · Modificaciones técnicas reservadas...