Publicité
Liens rapides
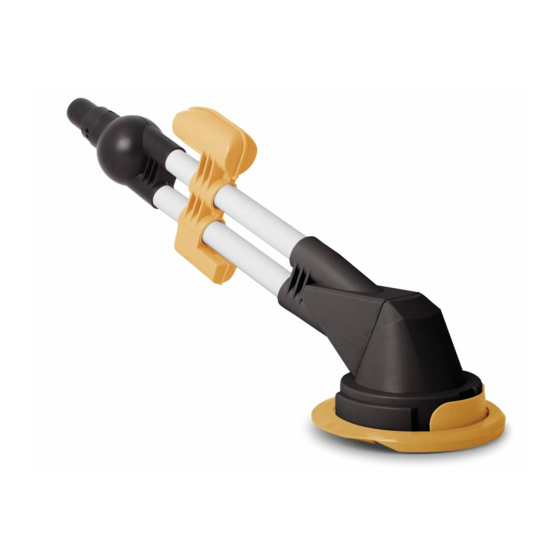
Automatische Zwembadreiniger Minizap™
NL
Reinigt automatisch de bodem van uw zwembad.
Geschikt voor de meeste soorten zwembaden met een zachte wand.
Inclusief 5,8m slang.
Minizap™ is de enige automatische zwembadreiniger die kan werken
op de zuigkracht van kleine pompen van 85W (3m³/u) tot 375W (9m³/u).
De Minizap™ kan ook werken op een krachtigere pomp, maar dan
is er een drukregelaar nodig, die niet inbegrepen is.
Als u de Minizap™ gebruikt met een pomp die zwaarder is dan 375W
zonder drukregelaar, kan het apparaat beschadigd raken en kunt
u geen aanspraak meer maken op de garantie.
De Minizap™ heeft een voorfilter om te voorkomen dat uw
filtersysteem verstopt raakt.
De Minizap™ wordt bij de fabricage volledig gemonteerd en kan direct op uw
filtersysteem aan de binnenkant van het zwembad aangesloten worden.
Kijk, voordat u de Minizap™ aansluit, hem goed na om er zeker van
te zijn dat de bodemplaat goed op zijn plek vastzit.
Wordt geleverd met 5,8m slang, wat voldoende is voor ronde of
rechthoekige zwembaden met een doorsnee of lengte tot 5,49m.
DE Minizap™ AANSLUITEN
Zet de filter uit voordat u de Minizap™ op uw zwembad aansluit.
Door de langere manchet van slang A en de meegeleverde 4 koppelstukken
(G1/G2/G3/G4) is de Minizap™ geschikt voor de meeste soorten opzetzwembaden.
Zie hieronder voor het correct aansluiten op de inlaat van uw zwembad.
Kies het juiste koppelstuk dat past op uw inlaatkoppeling.
Ø Voor 38mm Aanzuiginlaat
Ø Voor 40mm Aanzuiginlaat
Maak het filterkapje los. Plaats G1 op
Maak het filterkapje los en plaats
G1 erin.
G4, en plaats G4 op de inlaataansluiting.
G1
Ø Voor 110mm Aanzuiginlaat
Ø Voor 90mm Aanzuiginlaat
Draai de filterkap los en schroef G2 op de schroefdraad
Draai de filterkap los. Schroef G2 op G3, en
schroef G3 vervolgens op de inlaataansluiting.
in het midden van de inlaataansluiting.
G2
G2
G3
Samenvoegen van de slangdelen
Begin met de wartel van de korte blauwe slang (A+B):
VOOR RONDE ZWEMBADEN VAN 3,60m
1 blauwe slang (C) / 1 witte slang (D) / 1 witte extra flexibele slang(E) / 1 witte slang (D) / 1 witte extra flexibele slang (E) /
1 witte slang (D) / 1 witte extra flexibele slang (E) / 1 witte korte slang (F)
G
A
B
C
D
E
VOOR RONDE ZWEMBADEN VAN 4,57m
Volg de hiervoor beschreven instructie en voeg nog een witte slang D toe, als volgt:
1 blauwe slang (C) / 1 witte slang (D) / 1 witte extra flexibele slang(E) / 1 witte slang (D) / 1 witte slang (D) /
1 witte extra flexibele slang (E) / 1 witte slang (D) / 1 witte extra flexibele slang (E) / 1 witte korte slang (F)
G
A
B
C
D
E
VOOR RONDE EN RECHTHOEKIGE ZWEMBADEN VAN 5,49m
Volg de hiervoor beschreven instructie en voeg nog twee witte slangen D toe, als volgt:
1 blauwe slang (C) / 1 witte slang (D) / 1 witte extra flexibele slang(E) / 1 witte slang (D) / 1 witte slang (D) /
1 witte extra flexibele slang (E) / 1 witte slang (D) / 1 witte slang (D) / 1 witte extra flexibele slang (E) / 1 witte korte slang (F)
G
A
B
C
D
E
D
Dompel de slangen en de Minizap™ helemaal onder om de lucht te laten ontsnappen en sluit het open uiteinde van de slang
aan op de zwembadreiniger.
TIPS: Dompel de slang (A gekoppeld aan B) onder om alle lucht die erin zit te verwijderen en sluit hem dan aan op G.
Dompel de andere slangen een voor een onder in de hiervoor genoemde volgorde om de lucht te laten ontsnappen en
maak de slangverbinding onder water af.
Lucht in uw reinigingssysteem kan ertoe leiden dat de pomp niet goed werkt.
Als dit het geval is, zet de pomp dan uit, open het ventiel op uw filter (indien aanwezig) en laat lucht ontsnappen totdat er
alleen nog maar water uit het ventiel komt. Sluit daarna het ventiel.
Zie de handleiding van uw filter voor het laten ontsnappen van lucht.
BEDIENING VAN DE Minizap™
HAAL DE LADDER UIT HET ZWEMBAD VOORDAT U BEGINT.
LET OP: als uw zwembad 2 zuigleidingen heeft, dan moet er een afgedekt worden voordat u deze zwembadreiniger in gebruik neemt.
BELANGRIJK! Nadat uw Minizap™ is aangesloten, zet u de pomp aan, schud de slang een of twee keer in de buurt van de
zwembadreiniger en hij zal beginnen de bodem van uw zwembad te reinigen in een willekeurig patroon.
Hij gaat automatisch door totdat de filtermand vol is.
De filtermand heeft een verwijderbare zak voor het filteren van zand en kleine deeltjes van de bodem van uw zwembad.
BELANGRIJK! Zorg ervoor dat de filterzak op zijn plek zit als de zwembadreiniger in gebruik is. Leeg de filterzak regelmatig
om de maximale zuigkracht te behouden.
Voor het reinigen van de filtermand en de filterzak, dient u het filtersysteem uit te zetten, de bodemplaat van de reiniger los
te maken, het vuil te verwijderen en de zak uit te spoelen.
1.
2.
PROBLEMEN OPLOSSEN
• Als de zwembadreiniger niet meer werkt of te langzaam werkt, kan het zijn dat er onvoldoende water door de reiniger stroomt.
1. Controleer op de pomp of vraag uw dealer of het vermogen van uw pomp niet minder is dan 85W en een toevoer heeft van minstens 3m³/u.
2. Controleer of uw filtersysteem de watertoevoer en daarmee de zuigkracht van de reiniger in belangrijke mate vermindert.
Als u een filtersysteem met meerdere kleppen heeft, zet de klep dan in de circulatiestand om het filter te mijden. Of raadpleeg
de handleiding van uw filter voor het direct naar het zwembad retourneren van het water. Als u dit doet, zorg er dan voor
dat de filtermand en filterzak in de zwembadreiniger geplaatst zijn.
3. Het gebruik van een zonnepaneel kan de watertoevoer en de zuigkracht aanzienlijk beperken. Gebruik in dat geval een
bypass klep en stel deze zo in dat het water direct in het zwembad stroomt en het zonnepaneel overslaat.
• Zorg ervoor dat de bodemplaat correct geplaatst is.
• Maak de bodemplaat los, verwijder en leeg de filtermand en filterzak. Controleer of er geen vuil in de weg zit bij de flapper,
plaats alles weer terug en zet de zwembadreiniger weer aan.
• Als dit niet helpt, controleer dan of er geen lucht in het filtersysteem zit. Als dat zo is, ziet u lichtbellen uit de wateruitlaat komen.
• Er kan lucht in het filtersysteem gezogen worden bij de aansluiting van de flexibele slangen met de reiniger of bij de aansluiting
van de in-/uitlaatslangen met het zwembad of met de pomp of doordat het ventiel bovenop de pomp niet goed gesloten is.
• Verwijder de lucht uit het systeem, zoals elders beschreven, zorg dat er niet opnieuw lucht in het systeem komt en zet de
zwembadreiniger weer aan.
Als de zwembadreiniger sommige stukken van het zwembad niet reinigt.
• Wijzig de positie van een extra flexibele slang (E) maar wijzig nooit de positie van slang (A) en (F), daar dit het
reinigingspatroon zal veranderen. De extra flexibele slang bepaalt de draaihoek van de reiniger, en helpt zo om het
oppervlak van het zwembad nauwkeurig te beslaan. U kunt ook sommige delen van de slangen laten draaien aangezien
de slangen zich in de loop van de tijd buigen, waardoor het patroon anders wordt.
A.
Blauwe korte slang
B.
Wartel
C.
Blauwe slang
D.
Witte slang
E.
Witte extra flexibele slang (SF)
F.
Witte korte slang
G.
Koppelstuk
H.
Flapper
I.
Filtermand
J.
Zak
B
x1
K.
Grondplaat
F
x1
D
x5
C
x1
G
G1
G2
Ø Voor 80mm Aanzuiginlaat
Draai de filterkap los en schroef G2 op de
inlaataansluiting.
G2
G2
G1
G4
Ø Voor 36mm Aanzuiginlaatgat
Maak de filterkap los en plaats de manchet
van slang A direct in het inlaatgat.
G2
D
E
D
E
F
D
D
E
D
E
F
D
E
D
D
E
3.
4.
Gemaakt in China • Made in China • Fabriqué en Chine • Gemacht in China
WWW.INTERLINE-PRODUCTS.COM
Automatic Pool Cleaner Minizap™
GB
Cleans the bottom of your pool automatically.
Works with all major brands of soft sided pools.
580cm (19ft) of hoses included.
Minizap™ is the only automatic suction side cleaner that can
work off very small pumps from as low as 85W up to 375W.
It is possible for Minizap™ to work with more powerful pumps but
this would require a pressure regulator which is not included.
H
Using Minizap™ with pumps exceeding 375W without pressure
regulator may damage it and void the warranty.
I
Minizap™ has a pre-filter that prevents clogging your filtration.
J
The Minizap™ is fully assembled in the factory and can be
K
connected directly to your filtration.
Before connecting the Minizap™ inspect the unit to make sure that
the bottom plate is properly locked in position.
E
x3
It is supplied with a total of 580cm of hoses which are sufficient for
round or rectangular pools with diameter or length up to 549cm (18ft).
HOW TO CONNECT YOUR Minizap™
A x1
Turn filtration OFF before start connecting Minizap™ to your pool.
Longer cuff on hose A and 4 connectors (G1/G2/G3/G4) provided
make Minizap™ fit for most brands of Above Ground Pool in the market.
See follow for proper connection to the intake of your pool.
G3
G4
Choose the right connector to fit the following intake connector.
Ø38mm (1½ in) Strainer
Detach the grid cover and
press G1 on it.
Ø90mm (3½ in) Strainer
Unscrew the strainer grid cover. Screw G2
onto G3, and then screw G3 onto the strainer.
G2
G3
A
Hose section assembly
Starting from the swivel of the short blue hose (A+B):
FOR 360cm (12ft) ROUND POOLS
1 blue hose (C) / 1 white hose (D) / 1 white superflex (E) / 1 white hose (D) / 1 white superflex (E) /
1 white hose (D) / 1 white superflex (E) / 1 white short hose (F)
G
A
B
C
FOR 457cm (15ft) ROUND POOLS
Follow previous setup adding one more white hose D as following:
1 blue hose (C) / 1 white hose (D) / 1 white superflex (E) / 1 white hose (D) / 1 white hose (D) /
1 white superflex (E) / 1 white hose (D) / 1 white superflex (E) / 1 white short hose (F)
G
A
B
C
FOR 549cm (18ft) ROUND AND (18ft) RECTANGULAR POOLS
Follow previous setup adding two more white hose D as following:
1 blue hose (C) / 1 white hose (D) / 1 white superflex (E) / 1 white hose (D) / 1 white hose (D) /
1 white superflex (E) / 1 white hose (D) / 1 white hose (D) / 1 white superflex (E) / 1 white short hose (F)
F
G
A
B
C
Immerse completely the hoses and the Minizap™ to let air escape and connect the open end of the hose to the cleaner.
TIPS: Immerse hose (A preassembled with B) into water to remove all entrapped air and then connect it to G. Immerse
other hoses into water one by one in a forementioned sequence to remove air and finish hose connection under the water.
Trapped air in your cleaning system may prevent the pump from operating correctly.
If this happens, switch off your pump, open the release valve (if applicable) on your filter and let air escape until only water
comes out from the release valve. Then close the valve.
Refer to your filtration manual for how to release the air.
HOW TO OPERATE YOUR Minizap™
REMOVE THE LADDER FROM THE POOL BEFORE START.
NOTE: If your pool has 2 suction lines, then one suction line should be covered before using this cleaner.
IMPORTANT! Once your Minizap™ is connected, turn your pump ON, shake the hose once or twice near the cleaner
and the cleaner will start cleaning the bottom of your pool in a random fashion.
It will operate automatically until the filter basket is full.
The filter basket has a removable mesh bag designed to filter the sand and small particles from the bottom of the pool.
IMPORTANT! Make sure the mesh bag is in place during cleaner operation. Empty this mesh bag regularly to ensure
maximum suction.
To clean the filter basket and its mesh bag, switch off the filtration, unlock the bottom plate from the cleaner, remove
the debris and rinse the mesh bag.
1.
TROUBLE SHOOTING
• If the cleaner stops working or works too slowly, this may be due to insufficient water flow going through the cleaner:
1. Verify on the pump or with your dealer that the power of your pump is no less than 85W and has a flow of at least 3m³/h or 800gal/h.
2. Verify if your filtration is reducing the water flow significantly and therefore cleaner suction. If using filtration with multiport
valve, turn the valve to "Circulation" position to bypass the filter. Otherwise, refer to your filtration manual how to direct the
water return to the pool directly. When doing this, make sure the filter basket and mesh bag are in place inside the cleaner.
3. If using a solar panel, this may reduce the flow significantly and affect cleaner suction. In this case use a bypass valve,
and turn the bypass valve for the water flow directly to the pool, skipping the solar panel.
• Verify that the foot pad is in the correct position with the indent of the foot pad facing exactly the opening for the latch of the plate.
• Unlock the base plate, remove and empty the filter basket and mesh bag. Verify that there is no debris hindering the
flapper, place everything back and try to restart the cleaner.
• If this does not work, verify that there is no air trapped in the filtration system. If this is the case you can see air bubbles
coming out of the water outlet.
• Air can be sucked in the filtration at the connections of the flexible hoses of the cleaner or at the connections bewteen the
inlet/outlet hoses with the pool or with the pump or because the release valve at the top of the pump is not closed properly.
• Remove air trapped in the filtration system, as explained previously, prevent air from being sucked again in the filtration
system then restart the cleaner.
If the cleaner does not clean some areas of the pool.
• Change the position of one superflex hose (E) but never replace position of hose (A) and (F), this will change the cleaning
pattern of the cleaner. Superflex hose controls the turning angle of the cleaner, helping to cover the pool surface more thoroughly.
V/P 57600751
You may also rotate or twist some sections of hoses because hoses will bend over time which creates routing pattern.
A.
Blue short hose
B.
Swivel
C.
Blue hose
D.
White hose
E.
White superflex (SF)
F.
White short hose
G.
Connector
H.
Flapper
I.
Filter basket
J.
Mesh bag
K.
Base plate
D
C
G
G1
Ø40mm (1
/
in) Strainer
Ø80mm (3 in) Strainer
3
5
Detach the strainer grid cover. Press G1
Unscrew the strainer grid cover and screw
on G2.
onto G4, and press G4 onto the strainer.
G1
G1
G4
Ø110mm (4
1
/
in) Strainer
3
Unscrew the strainer grid cover and screw G2
onto the middle thread of the strainer.
G2
G2
D
E
D
E
D
D
E
D
D
E
D
E
D
D
E
2.
3.
H
I
B
x1
J
F
x1
K
x5
E
x3
A x1
x1
G2
G3
G4
G2
G2
/
Ø36mm (1
2
in) Strainer Hole
5
Remove the grid cover and directly insert
the cuff of hose A into the strainer hole.
A
E
F
D
E
F
D
D
E
F
4.
Publicité

Sommaire des Matières pour Interline Minizap
- Page 1 IMPORTANT! Once your Minizap™ is connected, turn your pump ON, shake the hose once or twice near the cleaner BELANGRIJK! Nadat uw Minizap™ is aangesloten, zet u de pomp aan, schud de slang een of twee keer in de buurt van de and the cleaner will start cleaning the bottom of your pool in a random fashion.
- Page 2 Immerger totalement les tuyaux et le Minizap™ pour laisser l’air s’échapper et relier l’extrémité du tuyau au balai. Tauchen Sie den Schlauch und den Minizap™ völlig unter um die Luft entweichen zu lassen und schließen Sie das offene Ende des Schlauchs an den Reiniger an.