Table des Matières

Publicité

Les langues disponibles

Les langues disponibles

Liens rapides

ENGLISH
User/ Product Manual
PRODUCT USE AND CARE INSTRUCTIONS
KIDYBIKE

Publicité

Table des Matières
loading

Sommaire des Matières pour KIDYWOLF KIDYBIKE

  • Page 1 ENGLISH User/ Product Manual PRODUCT USE AND CARE INSTRUCTIONS KIDYBIKE...
  • Page 2: Table Des Matières

    Before riding, please read this Product Manual carefully, learn Security Warnings and Precautions. This manual can help you understand, use and maintain KIDYBIKE. In order to avoid dangers that are caused by collisions, falls and loss of control, please learn how to ride electric balance bike safely.
  • Page 3: Before Using

    1. BEFORE USING 1.1 Riding Risk Electric balance bike is a personal electric vehicle toy, our technology and production processes have strict testing for every pair of electric balance bike. Riding without attention to contents of this manual may cause injury. Falling, losing control, collision, or failure to follow e-balance bike manual, may cause injury even death.
  • Page 4: Product Specification

    1.2.2 Product specification Net weight Approx. 10kgs Size 980*510*568mm Running time 6-10km E-balance bike Operating temperature range 0℃-40℃ Max climbing angle 6~9° Max weight capacity 50KG Capacity 2.0Ah Types 18650 high rate discharge battery Battery Charging duration 3~4 hours Charging times 300 times Type Brush motor...
  • Page 5: Description Of Parts

    Rear wheel Front rim Brake Foot pedal Charging pot Chain cover 1.2.4 How to assemble the KIDYBIKE STEP 1: Assemble the handle bar A: Size: M5X20 Socket head bolt B: Upper block C: Handle bar D: Down block 1. Put(C)in to location(D),then cover(B)...
  • Page 6 STEP 2: Assemble the front wheel Loosen the screws and nuts. Put the front wheel into the front fork and hooked. Tighten the screws and nuts, finished as left photo, make sure the front the wheel is in the middle of the front fork.
  • Page 7 STEP 3: Install the battery battery handle female plug male plug a. Install the battery:Take the battery out, find the female plug in the battery and the male plug in the bike. Match the female plug to the male plug, then press the battery case until the two plugs are completely locked. (Move the battery slowly, if it is a movable battery, it means the plugs are not locked completely.
  • Page 8: Safe-Using Of Electric Balance Bike

    Step 5: Check the battery capacity Battery capacity display After install all the above steps, check press the red bottom check the battery capacity. • Full battery capacity: Green,Yellow,Red light on • Half battery capacity: Yellow, Red light on; Green light off •...
  • Page 9: Weight Limit

    2.1 Weight Limit To ensure safety and reduce damage, user must follow minimum and maximum load: Minimum Load: 20kgs Maximum Load: 50kgs Overweight may increase possibility of injury 2.2 Maximum Riding Range There are a lot of factors that will affect riding range& performance, such as: Grade: A smooth, flat surface will increase the riding speed, while an incline or hilly terrain will reduce the speed.
  • Page 10: Charging Process

    For the purposes of recharging the battery, only use the detachable charger provided with this appliance 3.2 Charging process Ensure the charging port is dry When the Led light turn red, it means low power, then the battery need to be charged Switch off the electric balance bike in "off "...
  • Page 11: Temperature

    3.3 Temperature The best charging temperature is 10 degree to -40 degree. Over cold and over hot will not completely charge the battery 3.4 Description of battery Contents Parameters Battery Lithium battery Charging time 2~3h Voltage Initial Capacity 2.0Ah Working Temperature -15℃~50℃ Charging Temperature 10℃~40℃...
  • Page 12: Storing Electric Balance Bike

    Do not disassemble Electric balance bike. Users who try to disassemble Electric balance bike lose their right for guaranty. 5. Service Thank you again for your purchasing KIDYBIKE, we would like to provide you good after-sale services since your purchasing date.
  • Page 13: Troubleshooting And Guide

    6. Troubleshooting and guide Problem Possible Cause Solution Charge the battery until the charger's indicate light turns red into green. Battery needs a charge Check all connectors. Make sure the charger connector is tightly plugged into the charging port, and that the charger is plugged into Scooter does not run the wall.
  • Page 14 MULTILINGAL INSTRUCTION MANUAL...
  • Page 15 FRANCAIS Manuel d’utilisation INSTRUCTIONS D'UTILISATION ET D'ENTRETIEN DU PRODUIT KIDYBIKE...
  • Page 16 Avant de rouler, veuillez lire attentivement ce manuel du produit, apprendre les avertissements et les précautions de sécurité. Ce manuel peut vous aider à comprendre, utiliser et entretenir votre KIDYBIKE. Afin d'éviter les dangers causés par les collisions, les chutes et la perte de contrôle, veuillez apprendre à...
  • Page 17: Avant L'utilisation

    1. AVANT L’UTILISATION 1.1 Risque de rouler Le vélo d'équilibre électrique est un jouet, véhicule électrique personnel, notre technologie et nos processus de production ont des tests stricts pour chaque unité de production. Conduire sans tenir compte du contenu de ce manuel peut provoquer des blessures. Une chute, une perte de contrôle, une collision ou le non-respect du contenu de ce manuel peut entraîner des blessures, voire la mort.
  • Page 18: Spécificités Produit

    1.2.2 Spécificités produit Poids net 10 KG Dimensions 980 x 510 x 568 mm Durée d'utilisation 6-10 km KIDYBIKE Plage de température de fonctionnement 0 - 40℃ Angle de montée maximum 6 ~ 9° Capacité de poids maximum 50 KG Capacité...
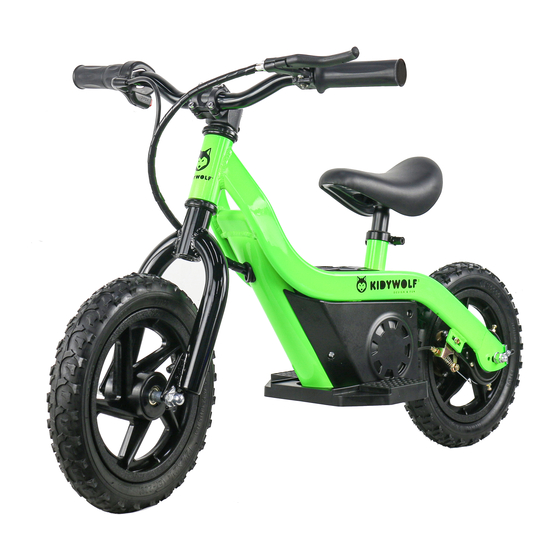
  • Page 19: Description Des Pièces

    Jante avant Frein Pédale / Port de chargement Couvre chaine Pose pied 1.2.4 Comment assembler le KIDYBIKE ÉTAPE 1: Assemblez le guidon A: Taille: M5X20 Boulon à tête creuse B: Bloc supérieur C: Guidon D: Bloc inférieur 1. Mettez (C) à l'emplacement (D), puis couvrez (B) 2.
  • Page 20 ÉTAPE 2: Assemblez la roue avant Desserrez les vis et les écrous. Mettez la roue avant dans la fourche avant et accrocher Serrez les vis et les écrous, terminé comme sur la photo de gauche, assurez-vous que l'avant de la roue est au milieu de la fourche avant.
  • Page 21 ÉTAPE 3: Installez la batterie Poignée de la batterie Prise femelle Prise male A. Installez la batterie: Retirez la batterie, trouvez la fiche femelle dans la batterie et la fiche mâle dans le vélo. Faites correspondre la fiche femelle à la fiche mâle, puis appuyez sur le boîtier de la batterie jusqu'à...
  • Page 22: Utilisation Sûre Du Vélo D'équilibre Électrique

    électrique pour la première fois. Vérifiez si la puissance de la batterie est suffisante, que les pneus ne sont pas endommagés et qu’aucune pièces n’est déssérées avant d’utiliser le KIDYBIKE. En cas de situation anormale, veuillez contacter le revendeur local pour réparation.
  • Page 23: Limite De Poids

    8. Soyez attentif aux choses proche et éloigné des enfants, être attentive à l’enviroonement gardera les enfants en sécurité. 9. Ne roulez pas sur des surfaces glissantes et humides ou les jours de pluie. Ne roulez pas dans des endroits sombre. 10.
  • Page 24: Processus De Chargement

    • Garder la batterie hors de portée des enfants lorsqu'ils ne conduisent pas • Le chargeur doit être débranché du port de charge avant de rouler. • La batterie contient des substances dangereuses, n'ouvrez pas la batterie, n'insérez rien dans la batterie. •...
  • Page 25: Température

    3.3 Température La meilleure temperature ambiante pour recharge est de 10 à 40 degrés. Une temperature trop fraiche ou trop chaude ne chargera pas complètement la batterie. 3.4 Description de la batterie Contenu Paramètres Batterie Batterie Lithium Temps de charge 2~3 heures Tension 24 V...
  • Page 26: Service

    électrique perdent leur droit à la garantie. 5. Service Merci encore d'avoir acheté KIDYBIKE, nous aimerions vous fournir de bons services après-vente. La période de garantie est conforme à la politique de garantie nationale et locale. La période de garantie est calculée à partir de la date d'achat originale par l'utilisateur.
  • Page 27: Dépannage Et Guide

    6. Dépannage et guide Problème Cause possible Solution Chargez la batterie jusqu'à ce que le voyant du chargeur devienne rouge en vert. La batterie a besoin d'une charge Vérifiez tous les connecteurs. Assurez-vous que le connecteur du chargeur est bien branché dans le port de charge et que le chargeur Le scooter ne est branché...
  • Page 28 MULTILINGAL INSTRUCTION MANUAL...
  • Page 29 NEDERLANDS Gebruikershandleiding INSTRUCTIES VOOR GEBRUIK EN ONDERHOUD VAN HET PRODUCT KIDYBIKE...
  • Page 30 Lees deze producthandleiding zorgvuldig door voordat u gaat rijden, lees de waarschuwingen en veiligheidsmaatregelen. Deze handleiding kan u helpen uw KIDYBIKE te begrijpen, gebruiken en onderhouden. Leer om op de elektrische loopfiets veilig te rijden. Gevaren te vermijden die worden veroorzaakt door botsingen, vallen en verlies van controle.
  • Page 31: Voor Gebruik

    1. VOOR GEBRUIK 1.1 Risico op rollen Elektrische loopfiets is een persoonlijk speelgoedvoertuig voor elektrische voertuigen, onze technologie en productieprocessen worden streng getest voor elk paar elektrische loopfiets. Rijden zonder aandacht voor de inhoud van deze handleiding kan letsel veroorzaken. Vallen, de controle verliezen, crashen of de inhoud van deze handleiding negeren, kan letsel of de dood tot gevolg hebben.
  • Page 32: Product Specificaties

    1.2.2 Product specificaties Nettogewicht 10 KG Afmeting 980 x 510 x 568 mm Duur van gebruik 6-10 km KIDYBIKE Werktemperatuur 0 - 40℃ Maximale klimhoek 6 ~ 9° Maximale gewichtscapaciteit 50 KG Hoedanigheid 2.0 Ah Typen 18650 high flow ontladingsbatterij...
  • Page 33: Beschrijving Van Onderdelen

    Motorkap Achterwiel Voorrand Voetpedaal Oplaad poort Kettingscherm 1.2.4 Hoe de KIDYBIKE in elkaar te zetten STAP 1: Monteer het stuur A: Maat: M5X20 Inbusbout B: Bovenste blok C: Stuur D: onderste blok 1. Plaats (C) op locatie (D) en bedek vervolgens (B) 2.
  • Page 34 STAP 2: Monteer het voorwiel Draai de schroeven en moeren los. Plaats het voorwiel in de voorvork en verslaafd Draai de schroeven en moeren vast, afgewerkt zoals op de foto links, zorg ervoor dat de voorkant van het wiel zich in het midden van de voorvork bevindt.
  • Page 35 STAP 3: Installeer de batterij Batterij handvat vrouwelijke stekker mannelijke stekker A. Installeer de batterij: verwijder de batterij, zoek de vrouwelijke stekker in de batterij en de mannelijke stekker in de fiets. Koppel de vrouwelijke stekker aan de mannelijke stekker en druk vervolgens op de batterijhouder totdat de twee stekkers volledig zijn vergrendeld.
  • Page 36: Veilig Gebruik Van De Elektrische Loopfiets

    Controleer of de batterij voldoende is, of de banden niet zijn beschadigd en of er geen onderdelen loszitten voordat u de KIDYBIKE gebruikt. Neem in geval van een abnormale situatie contact op met de plaatselijke dealer voor reparatie.
  • Page 37: Gewichtslimiet

    9. Rijd niet op gladde, vochtige oppervlakken of op regenachtige dagen. Rijd niet op donkere plaatsen. 10. Rijd niet over obstakels zoals twijgen, afval of kleine stenen, enz. Vermijd rijden in nauwe ruimtes. Vermijd rijden op een steile helling. 11. Om achteruitgang van de batterijprestaties door hitte te voorkomen, moet de elektrische loopfiets op een koele, droge plaats uit de zon worden opgeslagen.
  • Page 38: Oplaadproces

    • Houd de batterij buiten het bereik van kinderen wanneer ze niet rijden • De lader moet worden losgekoppeld van de laadpoort voordat u gaat rijden. • De batterij bevat gevaarlijke stoffen, open de batterij niet en plaats niets in de batterij. •...
  • Page 39: Temperatuur

    3.3 Temperatuur De beste omgevingstemperatuur voor het opladen is 10 tot 40 graden. Een te lage of te hoge temperatuur laadt de batterij niet volledig op. 3.4 Beschrijving van de batterij Inhoud Instellingen Batterij Lithiumbatterij Oplaadtijd 2~3 uur Spanning 24 V Begincapaciteit 2.0 Ah Werktemperatuur...
  • Page 40: Dienst

    5. Dienst Nogmaals bedankt voor het kopen van KIDYBIKE, we willen u graag goede after-sales services bieden. De garantieperiode is in overeenstemming met het nationale en lokale garantiebeleid. De garantieperiode is vanaf de datum van oorspronkelijke aankoop door de gebruiker.
  • Page 41: Problemen Oplossen En Gids

    6. Problemen oplossen en gids Probleem Mogelijke oorzaak Oplossing Laad de batterij op totdat de laderindicator rood naar groen wordt. De batterij moet worden Controleer alle connectoren. Zorg ervoor dat de laderconnector goed opgeladen is aangesloten op de laadpoort en dat de lader is aangesloten op de muur.
  • Page 42 MULTILINGAL INSTRUCTION MANUAL...

Table des Matières