Télécharger Imprimer la page

Publicité

Les langues disponibles
  • FR

Les langues disponibles

  • FRANÇAIS, page 1

Liens rapides

FR
NL
ES
PT
IT
DE
EN
DiOBELL-B01
DiOBELL-B02

Publicité

loading

Sommaire des Matières pour DiO BELL-B01

  • Page 1 DiOBELL-B01 DiOBELL-B02...
  • Page 2 
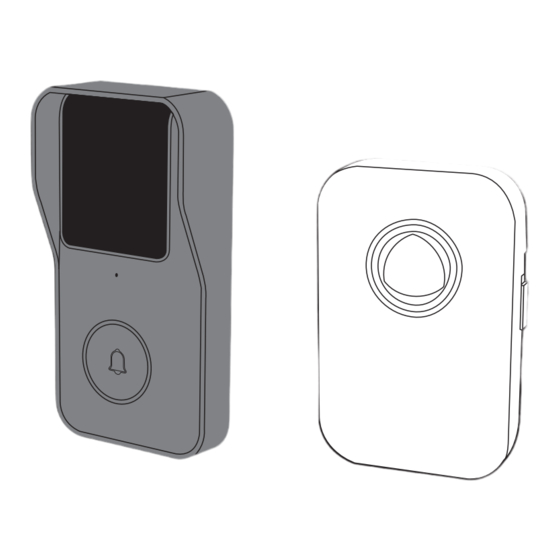
0. Contenu DiO BELL-B01 ou/of/o DiO BELL-B02 name 1. Enregistrer la garantie Pour enregistrer votre garantie, remplissez le formulaire en ligne sur www.chacon.com/warranty 2. Description du produit Mélodies Volume Carillon...
  • Page 3 Micro Indicateur LED Bouton DiOBELL-B01 DiO BELL-B01 Lentille ou/of/o Micro DiO BELL-B02 Indicateur LED Bouton DiOBELL-B02 O BELL-B01 name ou/of/o Bouton de réinitialisation BELL-B02 Remarque Pour réinitialiser l’appareil, maintenez le bouton de réinitialisation enfoncé durant 5 secondes. La sonnette émet un son lorsque l’opération est terminée.
  • Page 4 3. Instructions de montage 4xAA 1,5V 4xAA 1,5V 1. Fixez le couvercle des piles sur 2. Insérez 4 piles AA dans votre votre mur à l’aide des vis fournies sonnette 3. Fixez la sonnette au couvercle 4. Placez la casquette de protection des piles sur la sonnette 5.
  • Page 5 Étape 3 Exécutez l’application DiO one et inscrivez-vous pour la toute première utilisation. Étape 4 Suivez les étapes ci-dessous pour ajouter votre sonnette Remarque : Seul le mode point d’accès Wi-Fi est disponible pour le DIO- BELL-B01, veuillez suivre les instructions à l’écran pour l’appairage. Remarque - Si vous avez plusieurs sonnettes, veuillez suivre à...
  • Page 6 B. Appairage du carillon Etape 1 Insérez deux piles AA dans le carillon Etape 2 Appuyez sur le bouton du votre sonnette endéans les 120 secondes 5. Mentions légales Spécifications Sonnette connectée Type de lentille 1/2.9’’ CMOS Résolution 2 Mega pixels Objectif 2.4mm Angle de vision...
  • Page 7 Le soussigné, Chacon, déclare que l’équipement radioélectrique du type ‘DiOBELL-B01 / DiOBELL-B02’ sont conformes à la Directive 2014/53/UE. Le texte complet de la déclaration UE de conformité est disponible à l’adresse internet suivante : http://chacon.com/ conformity FR - FRANCE: SUIVANT LA REGLEMENTATION CNIL concernant les dispositif de vidéosurveillance ou visiophone Ce dispositif a pour fonction d’identifier un visiteur, en aucun cas il ne doit être utilisé...
  • Page 8 0. Inhoud van de verpakking DiO BELL-B01 ou/of/o DiO BELL-B02 name 1. Registreren van uw garantie Vul om uw garantie te registreren het onlineformulier in op www.chacon. com/warranty. 2. Productbeschrijving Melodieën Volume Deurbell...
  • Page 9 Microfoon Led-indicator Belknop DiOBELL-B01 DiO BELL-B01 Lens ou/of/o Microfoon DiO BELL-B02 Led-indicator Belknop DiOBELL-B02 O BELL-B01 name ou/of/o Reset-knop BELL-B02 Opmerking Houd om het apparaat te resetten de Reset- knop 5 seconden ingedrukt. De deurbel laat een toon horen als hij hiermee klaar is.
  • Page 10 3. Montage-instructies 4xAA 1,5V 4xAA 1,5V 1. Bevestig het klepje van het 2. Plaats 4 AA-batterijen in de batterijvak aan de muur met de deurbel. bijgeleverde schroeven. 3. Plaats de deurbel op het 4. Plaats het beschermkapje op de batterijklepje. deurbel.
  • Page 11 A. Toevoegen van de deurbel in de app Stap 1 Verbind uw smartphone met het wifi-netwerk. Stap 2 Download de DiO one-app in de Apple Store of Android Play Store afhankelijk van uw apparaat. Stap 3 Open de DiO one-app en meld u aan voor het eerste gebruik.
  • Page 12 B. Koppelen van de bel Stap 1 Plaats twee AA-batterijen in de bel. Stap 2 Druk binnen 120 seconden op de belknop van uw deurbel. 5. Wettelijke kennisgevingen Technische gegevens Smartdeurbel Lenstype 1/2,9” CMOS Resolutie 2 megapixel Lens 2,4 mm Kijkhoek 140°...
  • Page 13 Hierbij verklaar ik, Chacon, dat het type radioapparatuur ‘DiOBELL-B01 / DiOBELL-B02’ conform is met Richtlijn 2014/53/ De volledige tekst van de EU-conformiteitsverklaring kan worden geraadpleegd op het volgende internetadres: http://chacon.com/ conformity 6. Support www.chacon.com/support www.chacon.com Chacon S.A. - Avenue mercator 2 - 1300 Wavre v 1.0 200416...
  • Page 14 0. Contenido de la caja DiO BELL-B01 ou/of/o DiO BELL-B02 name 1. Registrar la garantía Para registrar la garantía, rellene el formulario en línea en www.chacon.com/ warranty 2. Descripción del producto Melodías Volumen Timbre...
  • Page 15 Lente Micro Indicador LED DiOBELL-B01 DiO BELL-B01 Lente ou/of/o Micro DiO BELL-B02 Indicador LED Botón DiOBELL-B02 O BELL-B01 name ou/of/o Botón de reinicio BELL-B02 Nota Para reiniciar el dispositivo, mantenga pulsado el botón de reinicio durante 5 segundos. El timbre emitirá un pitido cuando la operación se haya completado.
  • Page 16 3. Instrucciones de montaje 4xAA 1,5V 4xAA 1,5V 1. Fije la tapa de las pilas a la pared 2. Introduzca 4 pilas AA en el timbre con los tornillos incluido 3. Fije el timbre a la tapa de las pilas 4.
  • Page 17 A. Añadir el timbre a la aplicación Paso 1 Conecte su smartphone a la red wifi. Paso 2 Descárguese la aplicación DiO one en Apple Store o Android Play Store según su dispositivo. Paso 3 Inicie la aplicación DiO one y regístrese para el primer uso.
  • Page 18 B. Asociar el timbre con cables Paso 1 Introduzca dos pilas AA en el timbre con cables. Paso 2 Pulse el botón del timbre conectado en los 120 segundos posteriores. 5. Avisos legales Especificaciones Timbre conectado Tipo de lente CMOS de 1/2,9» Resolución 2 megapíxeles Objetivo...
  • Page 19 Por la presente, Chacon, declara que el tipo de equipo radioeléctrico ‘DiOBELL-B01 / DiOBELL-B02’ es conforme con le Directiva 2014/53/UE. El texto completo de la declaración UE de conformidad está disponible en la dirección internet siguiente: http://chacon.com/conformity 6. Support www.chacon.com/support www.chacon.com Chacon S.A.
  • Page 20 0. Conteúdo da embalagem DiO BELL-B01 ou/of/o DiO BELL-B02 name 1. Registar a garantia Para registar a sua garantia, preencha o formulário online em www.chacon. com/warranty 2. Descrição do produto Melodias Volume Campainha...
  • Page 21 Microfone Indicador LED Botão DiOBELL-B01 DiO BELL-B01 Lente ou/of/o Microfone DiO BELL-B02 Indicador LED Botão DiOBELL-B02 O BELL-B01 name ou/of/o Botão de reinicialização BELL-B02 Observação Para reinicializar o aparelho, mantenha o botão de reinicialização premido durante 5 segundos. A campainha emite um som quando a operação está...
  • Page 22 3. Instruções de montagem 4xAA 1,5V 4xAA 1,5V 1. Fixe a tampa do compartimento 2. Insira as 4 pilhas AA na sua das pilhas na parede com a ajuda campainha dos parafusos fornecidos 3. Fixe a campainha na tampa do 4.
  • Page 23 A. Adição da campainha na aplicação Etapa 1 Ligue o seu smartphone à rede Wi-Fi Etapa 2 Transfira a aplicação DiO one em Apple Store ou Android Play Store consoante o seu aparelho. Etapa 3 Execute a aplicação DiO one e registe-se para a primeira utilização.
  • Page 24 Protocolos TCP/IP, HTTP, DHCP, DNS, RTSP Dimensões (mm) 65 x 125 x 35 Índice de proteção IP54 Campainha interior sem fios Frequência de rádio 433.92 MHz Alimentação 2 pilhas AA Consumo em espera ≤ 600 uA Temperatura de funcionamento 0°C~35°C Este produto deve ser passado pelo tratamento conforme à...
  • Page 25 O abaixo assinado, Chacon, declara que o presente tipo de equipamento de rádio ‘DiOBELL-B01 / DiOBELL-B02’ está em conformidade com a Diretiva 2014/53/UE. O texto integral da declaração de conformidade está disponível no seguinte endereço de Internet: http://chacon.com/conformity 6. Support www.chacon.com/support...
  • Page 26 0. Contenuto della confezione DiO BELL-B01 ou/of/o DiO BELL-B02 name 1. Registrare la garanzia Per registrare la garanzia, compilare il modulo online all’indirizzo www.chacon.com/warranty 2. Descrizione del prodotto Melodie Volume Campanello...
  • Page 27 Microfono Spia led Pulsante DiOBELL-B01 DiO BELL-B01 Lente ou/of/o Microfono DiO BELL-B02 Spia led Pulsante DiOBELL-B02 O BELL-B01 name ou/of/o Pulsante reset BELL-B02 N.B. Per resettare il dispositivo, tenere premuto il pulsante reset per 5 secondi. Il campanello emetterà un suono a operazione completata.
  • Page 28 3. Istruzioni di montaggio 4xAA 1,5V 4xAA 1,5V 1. Fissare il coperchio delle pile alla 2. Inserire quattro pile AA nel vano parete servendosi delle viti in del campanello esterno dotazione 3. Fissare il campanello al coperchio 4. Posizionare la cornice di delle pile protezione sul campanello 5.
  • Page 29 A. Aggiungere il campanello tramite l’applicazione Step 1 Collegare lo smartphone alla rete WiFi Step 2 Scaricare l’applicazione DiO one dall’Apple Store o dal Play Store Android, a seconda del proprio dispositivo. Step 3 Avviare l’applicazione DiO one ed effettuare la registrazione al primo utilizzo.
  • Page 30 B. Abbinamento del campanello interno Step 1 Inserire due pile AA nel campanello interno Step 2 Premere il pulsante del campanello esterno entro 120 secondi 5. Note legali Specifiche Campanello esterno Tipo di lente 1/2.9’’ CMOS Risoluzione 2 Mega pixels Obiettivo 2.4 mm Angolo di vista...
  • Page 31 Con la presente, Chacon, dichiara che l’apparecchiatura radio tipo ‘DiOBELL-B01 / DiOBELL-B02’ è conforme alla direttiva 2014/53/UE. Il testo completo della dichiarazione di conformità UE è disponibile al seguente sito: http://chacon.com/conformity 6. Support www.chacon.com/support www.chacon.com Chacon S.A. - Avenue mercator 2 - 1300 Wavre v 1.0 200416...
  • Page 32 0. Packungsinhalt DiO BELL-B01 ou/of/o DiO BELL-B02 name 1. Registrierung Ihrer Garantie Um Ihre Garantie zu registrieren, füllen Sie das Online-Formular unter www.chacon.com/warranty aus 2. Produktbeschreibung Melodien Lautstärke Klingel...
  • Page 33 Mikro LED-Anzeige Taste DiOBELL-B01 DiO BELL-B01 Linse ou/of/o Mikro DiO BELL-B02 LED-Anzeige Taste DiOBELL-B02 O BELL-B01 name ou/of/o Reset-Taste BELL-B02 Hinweis Zum Zurücksetzen des Geräts die Reset- Taste für 5 Sekunden gedrückt halten. Die Klingel gibt einen Ton ab, wenn der Vorgang beendet ist.
  • Page 34 3. Montageanleitung 4xAA 1,5V 4xAA 1,5V 1. Befestigen Sie die Batteriefachab- 2. Legen Sie 4 Batterien des Typs deckung mit den mitgelieferten AA in Ihre Klingel ein. Schrauben an der Wand. 3. Befestigen Sie die Klingel auf der 4. Setzen Sie die Schutzkappe auf Batteriefachabdeckung.
  • Page 35 Schritt 2 Laden Sie die App DiO one im Apple Store oder Android Play Store je nach Ihrem Gerät herunter. Schritt 3 Führen Sie die App DiO one aus und melden Sie sich für die erstmalige Nutzung an. Schritt 4 Folgen Sie den nachstehenden Schritten, um Ihre Klingel hinzuzufügen.
  • Page 36 B. Kopplung des Türglockenspiels Schritt 1 Legen Sie 2 Batterien des Typs AA in das Glockenspiel ein. Schritt 2 Drücken Sie innerhalb von 120 Sekunden auf die Taste Ihrer Klingel. 5. Gesetzliche Angaben Technische Daten Vernetzte Klingel Linsentyp 1/2,9’’ CMOS Auflösung 2 Megapixel Objektiv...
  • Page 37 Chacon erklärt hiermit, dass der Funkgerätetyp „DiOBELL-B01 / DiOBELL-B02“ mit der Richtlinie 2014/53/EG konform ist. Der vollständige Test der EU-Konformitätserklärung steht unter der folgenden Internetadresse zur Verfügung: http://chacon. com/conformity 6. Support www.chacon.com/support www.chacon.com Chacon S.A. - Avenue mercator 2 - 1300 Wavre v 1.0 200416...
  • Page 38 0. Package contents DiO BELL-B01 ou/of/o DiO BELL-B02 name 1. Registering your warranty To register your warranty, fill in the online form at www.chacon.com/ warranty 2. Description of the product Melodies Volume Doorbell...
  • Page 39 Micro LED indicator Button DiOBELL-B01 DiO BELL-B01 Lens ou/of/o Micro DiO BELL-B02 LED indicator Button DiOBELL-B02 O BELL-B01 name ou/of/o Reset button BELL-B02 Note In order to reset the device, press and hold the reset button for 5 seconds. The doorbell rings when the process is complete.
  • Page 40 3. Installation instructions 4xAA 1,5V 4xAA 1,5V 1. Fix the battery cover to your wall 2. Insert 4 AA batteries into your using the screws provided doorbell 3. Fix the doorbell to the battery 4. Place the protection cover over cover the doorbell 5.
  • Page 41 Download the DiO one app from the Apple Store or the Android Play Store, depending on your device. Step 3 Run the DiO one app and register when you use it for the first time. Step 4 Follow the steps described in the app to add your doorbell.
  • Page 42 B. Pairing the chime Step 1 Insert two AA batteries into the chime Step 2 Press the button on your doorbell within 120 seconds 5. General Conditions of Sale and Use Specifications Wired doorbell Lens type 1 / 2.9’’ CMOS Resolution 2 megapixels Lens:...
  • Page 43 Hereby, Chacon, declares that the radio equipment type ‘DiOBELL-B01 / DiOBELL-B02’ is in compliance with the Directive 2014/53/EU. The full test of the EU declaration of conformity is available at the following Internet address: http://chacon.com/conformity 6. Support www.chacon.com/support www.chacon.com Chacon S.A. - Avenue mercator 2 - 1300 Wavre v 1.0 200416...

Ce manuel est également adapté pour:

Bell-b02