Celestron 44342 Guide De L'utilisateur

Celestron 44342 Guide De L'utilisateur

Microscope numérique à moniteur lcd (ldm)

Publicité

Les langues disponibles
  • FR

Les langues disponibles

Liens rapides

I
N
S
T
R
U
C
I
N
S
T
R
U
C
L
C
D
D
i
g
i
t
a
l
L
C
D
D
i
g
i
t
a
l
M
o
d
M
o
d
T
I
O
N
M
A
N
T
I
O
N
M
A
N
M
i
c
r
o
s
c
o
p
e
M
i
c
r
o
s
c
o
p
e
e
l
#
4
4
3
4
2
e
l
#
4
4
3
4
2
U
A
L
U
A
L
(
L
D
M
)
(
L
D
M
)

Publicité

Table des Matières
loading

Sommaire des Matières pour Celestron 44342

  • Page 2 Introduction Thank you for purchasing the Celestron LCD Digital Microscope (LDM) with a 2” monitor. Your microscope is a precision optical instrument, made of the highest quality materials to ensure durability and long life. It is designed to give you a lifetime of pleasure with a minimal amount of maintenance.
  • Page 3 Specifications Model # 44342 Specifications Stage Simple with Slide Holder Mechanism - 1.7”x1.7” (44mmx44mm) 2MP CMOS; 6x magnification in lieu of an eyepiece; 1600x Digital Camera 1200 pixel array 2” with 8x Digital Zoom – High Definition Digital TFT display...
  • Page 4 Microscope Operation Before looking at slide specimens you must remove the protective cover over the LCD screen, turn the LCD on, turn on the illuminator, and understand how to use the slide holder and then you are ready to begin viewing. ESC (Change) Key Menu Key Monitor On LED...
  • Page 5: General Settings

    Viewing a Specimen Your instrument is provided with a fixed, simple stage with holding clips to guide the positioning of the slide holder. Place a specimen slide - 1” x 3” size (25mm x 76mm) into the slide holder. Do this by gently placing the specimen slide under the small guides of the slide holder (Figure 6).
  • Page 6 Use the Up/Down keys for your choice of what to display first – the day, the month, or year. Then, use the Left/Right keys to highlight the day, month, year, hour (24-hour format), minutes, or seconds. At each selection, you use the Up/Down keys to make your choices and then press OK to set the choices. Press the Left key twice to Exit the Menu.
  • Page 7 Care, Maintenance, and Warranty Your Celestron microscope is a precision optical instrument and should be treated with care at all times. Follow these care and maintenance suggestions and your microscope will need very little maintenance throughout its lifetime.
  • Page 8 The following specimen images left to right below were taken at 40x, 100x, 400x of a Corn Stem C.S. Warranty Your microscope has a two year limited warranty. Please see the Celestron website for detailed information on all Celestron microscopes at www.celestron.com.
  • Page 10 Einführung Wir danken Ihnen für den Kauf eines Celestron LCD-Digitalmikroskops (LDM) mit einem 2-Zoll-Monitor. Ihr Mikroskop ist ein optisches Präzisionsinstrument, das aus Materialien von höchster Qualität hergestellt ist, um Haltbarkeit und eine lange Lebensdauer des Produkts zu gewährleisten. Es wurde entwickelt, um Ihnen mit minimalen Wartungsanforderungen viele Jahre Freude zu bereiten.
  • Page 11: Technische Daten

    Technische Daten Modell 44342 Technische Daten Objekttisch Einfach mit Objektträgerhalter-Mechanismus – 44 mm x 44 mm (1,7 x 1,7 Zoll) 2 MP CMOS; 6x-Vergrößerung anstelle von Okular; 1600x Digitalkamera 1200 Pixel-Array 2 Zoll mit 8x Digital-Zoom – Hochdefinitions (HD)-TFT-Digitalanzeige LCD-Monitor...
  • Page 12: Einstellung Der Beleuchtung

    Betrieb des Mikroskops Vor der Betrachtung von Proben mit dem Mikroskop müssen Sie die Schutzabdeckung über dem LCD-Bildschirm abnehmen, den LCD- Bildschirm und die Beleuchtung einschalten. Sie müssen auch wissen, wie der Objektträgerhalter verwendet wird. ESC (Ändern)-Taste Menü-Taste Monitor-Ein-LED Richtungs-/OK-Tasten Strom-Ein/Aus-Taste Schnapp-schusstaste Abb.
  • Page 13: Allgemeine Einstellungen

    Die manuelle Entfernung des Objektträgerhalters kann am Anfang etwas schwierig sein, aber nach etwas Experimentieren ist die Verwendung einfach. Abb. 6 Abb. 7 Abb. 8 Nachdem der Objektträger eingesetzt ist, können Sie ihn betrachten, indem Sie die Vergrößerung einstellen. Verwenden Sie den Zoom-Knopf (in der Mitte von Abb. 9), um die Objektivlinsen zu drehen, bis sich der 4x-Punkt in der Nähe der Anzeige befindet –...
  • Page 14: Aufnehmen Von Bildern

    Hinweis: Die meisten Einstellungen müssen jedes Mal neu eingestellt werden, wenn Sie den LCD-Bildschirm einschalten. Unten rechts am Bildschirm ist ein „M“ zu sehen, d.h. Sie verwenden den internen Speicher. Wenn Sie eine optionale SD-Karte verwenden, wird das SD-Kartensymbol unten rechts am Bildschirm angezeigt. Zur Einstellung des Schnappschuss- oder Videomodus drücken Sie die Esc-Taste, bis das richtige Symbol oben rechts am LCD-Bildschirm erscheint.
  • Page 15 Bilder zu verwenden. Bei beiden Methoden werden Sie vom PC gefragt, in welches Programm Sie die Bilder übertragen wollen. Pflege, Wartung und Garantie Ihr Celestron-Mikroskop ist ein optisches Präzisionsinstrument, das stets mit der erforderlichen Sorgfalt behandelt werden sollte. Wenn Sie diese Empfehlungen zur Pflege und Wartung befolgen, erfordert Ihr Mikroskop während seiner Lebensdauer nur sehr wenig Wartung.
  • Page 16: Garantie

    Beispielaufnahmen Die folgenden Probenaufnahmen wurden mit 40x, 100x, 400x (von links nach rechts) von einem Maisstengel (C.S.) aufgenommen. Garantie Ihr Mikroskop hat eine eingeschränkte Zwei-Jahres-Garantie. Auf der Celestron-Website www.celestron.com finden Sie detaillierte Informationen. EWG: Dieses Produkt entspricht den EWG-Richtlinien in EN61558-2-6:1997 und EN61558-1:1997+A1.
  • Page 18 Introduzione Grazie per aver acquistato il Microscopio digitale LCD (LDM) Celestron con monitor da 2 pollici. Il microscopio è uno strumento ottico di precisione, realizzato con materiali della più alta qualità per assicurarne la lunga durata. È stato progettato perché duri una vita intera, con una minima manutenzione.
  • Page 19: Dati Tecnici

    Dati tecnici Modello n. 44342 Dati tecnici Portaoggetti Semplice, con meccanismo per portavetrini - 44 mm x 44 mm (1,7 poll. x 1,7 poll.) Fotocamera/telecamera CMOS da 2 MP; ingrandimento 6x senza oculare; 1600 x 1200 pixel digitale Monitor LCD 2 pollici zoom digitale 8x –...
  • Page 20 Funzionamento del microscopio Prima di osservare preparati su vetrino, occorre rimuovere il rivestimento protettivo dallo schermo LCD e accenderlo, accendere l’illuminatore e capire come usare il portavetrini; a questo punto si è pronti a iniziare le osservazioni. Tasto ESC (cambia) Tasto Menu Spia schermo acceso Tasti freccia/OK...
  • Page 21: Impostazioni Generali

    Spostare manualmente il portavetrini potrebbe sembrare difficile all’inizio, ma dopo aver fatto un po’ di pratica risulta piuttosto facile. Figura 6 Figura 7 Figura 8 Una volta che il vetrino sia in posizione, si è pronti a iniziare la visualizzazione impostando la potenza. Usare la manopola della potenza (al centro della Figura 9) per ruotare le lenti dell’obiettivo finché...
  • Page 22 Per impostare le modalità Snapshot (Istantanea) o Video (filmato), si preme il tasto Esc finché non appare l’icona corretta nella parte superiore destra dello schermo LCD. Impostazione per la modalità Snapshot (Istantanea) Per poter iniziare, l’icona di una fotocamera digitale dovrebbe trovarsi nella parte superiore destra dello schermo LCD. Premere quindi il tasto Menu.
  • Page 23: Trasferimento Delle Immagini

    Cura, manutenzione e garanzia Il microscopio Celestron è uno strumento ottico di precisione e va trattato sempre con cura. Seguire questi suggerimenti per la cura e la manutenzione per assicurare che il microscopio richieda pochissima manutenzione nel corso della sua durata utile.
  • Page 24 Garanzia Il microscopio è coperto da una garanzia limitata di due anni. Per informazioni dettagliate su tutti i microscopi Celestron, consultare il sito Web di Celestron all’indirizzo www.celestron.com. CEE: questo prodotto risulta conforme alle linee guida CEE riportate in EN61558-2-6:1997 e EN61558-1:1997+A1 Dichiarazione FCC Questo dispositivo risulta conforme alla Parte 15 delle norme FCC.
  • Page 25 º º...
  • Page 26 Introducción Le damos las gracias por la compra de su microscopio digital con monitor de 2 pulgadas LCD (LDM) de Celestron. Este microscopio es un instrumento óptico de precisión, fabricado con materiales de la más alta calidad para garantizar su larga durabilidad. Está diseñado para ofrecerle una vida llena de entretenimiento con un mantenimiento mínimo.
  • Page 27 Especificaciones Modelo Nº 44342 Especificaciones Platina Simple con mecanismo para portaobjetos: 44 x 44 mm (1,7 x 1,7 pulgadas) Cámara digital 2 MP CMOS; aumento de 6x en lugar de un ocular; 1600x matriz de 1200 píxeles 2 pulgadas con zoom digital de 8x: Pantalla TFT digital de alta definición Monitor LCD Píxeles 640 x 240...
  • Page 28 Funcionamiento del microscopio Antes de mirar las muestras debe retirar la cubierta protectora de la pantalla LCD, encenderla, encender el iluminador y entender cómo se utiliza el portaobjetos, entonces está listo para comenzar la visualización. Botón ESC (cambio) Botón del menú Luz encendido del monitor Botones direccionales y OK (aceptar)
  • Page 29: Configuración General

    Quizás parezca difícil al principio mover manualmente el portaobjetos, pero después de practicar unas cuantas veces se podrá utilizar muy fácilmente. Figura 6 Figura 7 Figura 8 Una vez esté la platina en su lugar ya podrá iniciar su visualización al establecer la potencia. Utilice el botón de potencia (en el centro de la Figura 9) para girar el objetivo hasta que el punto 4x esté...
  • Page 30 Para establecer los modos Snapshot (Foto) o Video, pulse el botón Esc hasta que el icono correcto esté en la parte superior derecha de la pantalla LCD. Establecer el modo Snapshot (Foto) El icono de una cámara digital deberá estar en la parte superior derecha de la pantalla LCD para comenzar. Después, pulse el botón Menu. En la parte superior izquierda de la pantalla LCD está...
  • Page 31 Cuidado, mantenimiento y garantía Su microscopio Celestron es un instrumento óptico de precisión y debe tratarse siempre con cuidado. Siga estas sugerencias de cuidado y mantenimiento y su microscopio necesitará muy poco mantenimiento durante toda su vida útil.
  • Page 32 Garantía Su microscopio tiene una garantía limitada de dos años. Consulte la información detallada de todos los microscopios Celestron en el sitio Web de Celestron www.celestron.com. CEE: este producto cumple con la normativa EN61558-2-6:1997 y EN61558-1:1997+A1 de la CEE. Declaración FCC Este dispositivo cumple con la parte 15 de la normativa FCC.
  • Page 33 ’ ’ é à é à è ° è °...
  • Page 34: Accessoires Standard Livrés Avec Votre Microscope

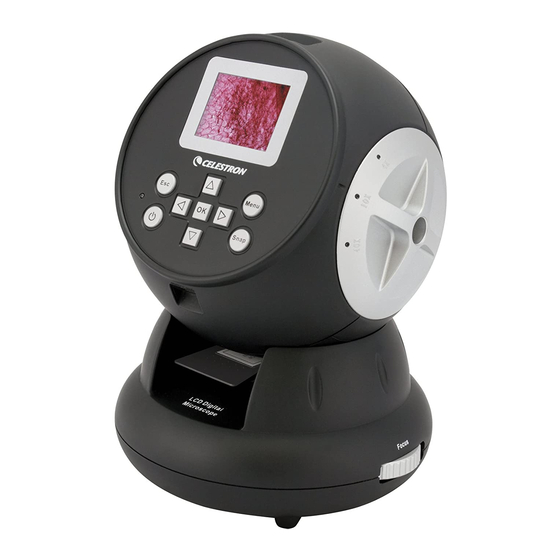
    Introduction Nous vous remercions d'avoir fait l'acquisition d'un microscope numérique LCD Celestron (LDM) avec moniteur de 2 po. Votre microscope est un instrument de précision optique fabriqué à partir de matériaux de la meilleure qualité pour lui assurer une grande durabilité et longévité.
  • Page 35: Installation De Votre Microscope

    Spécifications Modèle n° 44342 Spécifications Platine Simple avec mécanisme de pince valet – 44 mm x 44 mm (1,7 po x 1,7 po) Appareil photo numérique 2MP CMOS ; grossissement 6x à la place d’un oculaire ; matrice de pixels 1600 x 1200 50,8 mm (2 po) avec zoom numérique 8x –...
  • Page 36: Fonctionnement Du Microscope

    Fonctionnement du microscope Avant d’observer des lames d’échantillons, vous devez retirer le cache protecteur de l’écran LCD, allumer l’écran, allumer l’illuminateur, et comprendre comment utiliser la pince valet afin de pouvoir commencer. Touche ESC (échap.) (Changer) Touche Menu LED de mise en marche du moniteur Touches directionnelles/OK...
  • Page 37: Imagerie Numérique

    Pour les lames sur lesquelles l’échantillon est de côté, il se peut que l’échantillon ne soit pas totalement visible, auquel cas il vous faudra retirer la lame de la pince valet, tourner la lame sur 180° et recommencer. Il peut sembler difficile au début de déplacer manuellement la pince valet, mais avec un peu de pratique, vous y parviendrez sans difficulté.
  • Page 38: Réglage Du Mode Snapshot (Prise De Vue)

    Remarque : La plupart des réglages devront être refaits chaque fois que vous allumez l’écran LCD. Lorsque vous voyez un « M » s’afficher dans l’angle inférieur droit de l’écran, cela signifie que vous utilisez de la mémoire interne. Si vous utilisez une carte SD optionnelle, l’icône de la carte SD apparaîtra alors dans l’angle inférieur droit de l’écran.
  • Page 39: Pour Transférer Vos Images

    Entretien, nettoyage et garantie Votre microscope Celestron est un instrument de précision optique qu’il convient de toujours manipuler avec soin. Si vous respectez ces conseils de nettoyage et d’entretien, votre microscope ne nécessitera qu'un entretien minimum pendant toute sa durée de vie.
  • Page 40 40x, 100x, 400x. Garantie Votre microscope bénéficie d’une garantie limitée de deux ans. Veuillez consulter le site web Celestron pour des informations détaillées sur toute la gamme de microscopes Celestron à www.celestron.com. CEE : Ce produit est conforme aux directives EN61558-2-6:1997 et EN61558-1:1997+A1 de la CEE Déclaration FCC...

Table des Matières