Publicité

Les langues disponibles
  • FR

Les langues disponibles

  • FRANÇAIS, page 21

Liens rapides

ASPIRATORE A CICLONE
CYCLONE DUST COLLECTORS
ASPIRATTEURES CYCLONE
ZYKLONABSAUGANLAGEN
ASPIRADORES DE CICLÓN
ASPIRADOR CICLONE
Modello / Model / Modell /
Modèle / Modelo / Modelo
F50-843

Publicité

Chapitres

Table des Matières
loading

Sommaire des Matières pour Fox F50-843

  • Page 1 ASPIRATORE A CICLONE CYCLONE DUST COLLECTORS ASPIRATTEURES CYCLONE ZYKLONABSAUGANLAGEN ASPIRADORES DE CICLÓN ASPIRADOR CICLONE Modello / Model / Modell / Modèle / Modelo / Modelo F50-843...
  • Page 2: Dichiarazione Di Conformitá

    Via Del Lavoro, 4 - 40023 Castel Guelfo - (BO) ITALY Via Del Lavoro, 4 - 40023 Castel Guelfo - (BO) ITALY dichiara che la macchina: déclare que la machine: ASPIRATORE A CICLONE F50-843 ASPIRATTEURES CYCLONE F50-843 prodotta nel (vedi etichetta riportata): produite en (voir étiquette reportée) : - è...
  • Page 3: Introduzione All'uso

    SIMBOLOGIA INDICE Non sottovalutare i richiami “ATTENZIONE - CAUTELA” 1 INTRODUZIONE ALL’USO ........1 riportati in questo manuale. Al fi ne di attirare l’attenzione e dare messaggi di sicurezza le 2 INSTALLAZIONE ............3 operazioni pericolose sono precedute da simboli e note che 3 UTILIZZAZIONE ............
  • Page 4: Regole Di Sicurezza

    REGOLE DI SICUREZZA SUPPLEMENTARI REGOLE DI SICUREZZA PER GLI ASPIRATORI DA OFFICINA Lavorare il legno può essere pericoloso se non si rispettano ATTENZIONE: delle tecniche sicure e appropriate. Osservare sempre le misure di precauzione di Come per ogni macchina, il suo utilizzo può provocare base quando si utilizza l’aspiratore da offi...
  • Page 5: Installazione

    RIMOZIONE DELL’IMBALLO Rimuovere la scatola che protegge la macchina durante il trasporto, avendo cura per quanto possibile di mantenere l’imballo intatto, nel caso dobbiate spostare l’aspiratore per lunghi tragitti oppure immagazzinarlo per lunghi periodi. AVVERTENZA: Non attivare l’aspiratore fi no a quanto non é stato completamente assemblato e fi...
  • Page 6 2. Fissare l’assieme motore/ventola/ convogliatore al centro della base rettangolare utilizzando le rispettive viti, rondelle e dadi. Fissare il convogliatore al condotto aria posizionando precedentemente la guarnizione tra i due pezzi. (Fig. 3) Fig. 3 3. Fissare i due tamburi all’uscita dei condotti con le due rispettive guarnizioni (Fig. 4) e collegare alla base le aste di supporto.
  • Page 7 5. Passare la fascetta di chiusura nell‘ orlo del sacco superiore per la polvere munito di un dispositivo che permette di fi ssarlo al gancio. Sospendere il sacco al gancio. Piazzare l’ estremità aperta del sacco fi ltrante sull’orlo del tamburo. Una volta piazzato il fi...
  • Page 8: Collegamento Elettrico

    COLLEGAMENTO ELETTRICO MANUTENZIONE Controllare che l’impianto rete sul quale inserite la macchina sia collegato a terra come previsto dalle norme di sicurezza OSSERVAZIONI vigenti, e che la presa di corrente sia in buono stato. Si ricorda all’utilizzatore che a monte dell’impianto rete Prima di qualsiasi manutenzione assicurarsi che deve essere presente una protezione magnetotermica l’apparecchio sia staccato dall’alimentazione per evitare...
  • Page 9: Introduction To Use

    CONVENTIONAL SYMBOLS INDEX Before starting work with your sawing machine, carefully read this instructions manual so that you are familiar with 1 INTRODUCTION TO USE ........7 the machine and its uses and where it should not be used. 2 INSTALLATION ............9 Keep this manual in a safe place.
  • Page 10: Safety Rules

    SAFETY RULES SUPPLEMENTARY SAFETY RULES FOR WORK SHOP SUCTION FANS Washing wood could be a dangerous operation if safe and appropriate techniques are not complied with. WARNING: As occurs with any machine, using it could give rise to Always comply with the standard precautionary serious danger.
  • Page 11: Technical Specifications

    REMOVING THE PACKING Remove the box used for protecting the machine during transport. Exercise the greatest caution not to damage the packing as you might need it again to move the suction fan or store it for long periods of time. WARNING: Do not start the suction fan until it has been completely assembled and until all the...
  • Page 12 2. Secure the motor/fan/cowling assembly to the centre of the rectangular base using the relative screws, nuts and washers. Secure the cowling to the air ducts placing the gasket between the two parts (Fig. 3). Fig. 3 3. Fit the two drums to the duct outlets with the two relative gaskets (Fig. 4) and connect the support rods to the base. (Fig.
  • Page 13 5. Pass the closing strap through the dust upper bag’s mouth that has a device for fi xing it to the hook. Hang the bag on the hook. Place the open end of the fi lter bag on the drum’s edge. Once done, adjust the closing strap so that the tensioner is in the closing system’s teeth.
  • Page 14: Electrical Connection

    ELECTRICAL CONNECTION MAINTENANCE Check that the mains system in which the machine is inserted is connected to ground as set forth in the prevailing OBSERVATIONS safety standards and that the current socket is in good condition. Before performing any type of maintenance make sure The user should not forget that a magnetothermal circuit that the equipment is disconnected from the power breaker must be installed upstream of the mains system...
  • Page 15: Einführung In Die Bedienung

    PIKTOGRAMME INHALT DEN ANWENDUNGSPUNKTEN 1 EINFÜHRUNG IN DIE BEDIENUNG ...... 13 Unterschätzen Sie die Anweisungen „ACHTUNG !“ und „VORSICHT!“ in diesem Handbuch nie. Spezielle Symbole 2 INSTALLATION ............ 15 und Hinweise sollen Ihre Aufmerksamkeit auf sich ziehen und Sicherheitsanweisungen über gefährliche Operationen 3 EINSATZ ..............
  • Page 16: Sicherheitsvorschriften

    ZUSÄTZLICHE 12. Die Finger oder Gegenstände sollten nicht in die SICHERHEITSVORSCHRIFTEN FÜR DEN Staubeinsauglöcher gesteckt werden. Lange Haare WERKSTATT-STAUBSAUGER sind zusammenzubinden. Vorsicht auch bei weiten Kleidern. Die Finger und andere Körperteile sollten ACHTUNG: nicht in die Nähe der Öffnungen oder der beweglichen Beim Betrieb des Staubsaugers in der Teile des Staubsaugers gebracht werden.
  • Page 17: Installation

    BESCHREIBUNG DER MASCHINE ENTFERNUNG DER TRANSPORTVERPACKUNG A Rechteckiges Untergestell B Motor Die Schachtel, mit der die Maschine während des C Saugsammlerleitung mit Turbine Transports geschützt wird, entfernen. Dabei sollte so D Befestigungstrommel Beutel vorgegangen werden, dass die Transportverpackung E Vier Saugbeutel möglichst intakt bleibt, damit sie für weitere Transporte F Richtungsrollen des Staubsaugers oder die langfristige Einlagerung erneut...
  • Page 18 2. Die Einheit Motor/Lüfter/Saugrohr mit den hierfür vorgesehenen Schrauben, Unterlegscheiben und Muttern in der Mitte des rechteckigen Untergestells befestigen. Das Saugrohr am Luftkanal befestigen; zuvor die Dichtung zwischen die zwei Teile einsetzen. (Abb. 3) Abb. 3 3. Die zwei Trommeln mit den zugehörigen Dichtungen am Ausgang der Kanäle befestigen (Abb. 4) und die Haltestangen mit dem Untergestell verbinden.
  • Page 19 5. Die Schließschelle durch die Einfassung des oberen Staubbeutels ziehen, der mit einer Vorrichtung für die Befestigung am Haken ausgestattet ist. Den Beutel in den Haken einhängen. Das offene Endstück des Filterbeutels über die Einfassung der Trommel ziehen. Nach Anbringung des Filters ist die Schließschelle so zu positionieren, dass der Spanner in den Zähnen des Schließsystems sitzt.
  • Page 20: Elektrischer Anschluss

    ELEKTRISCHER ANSCHLUSS INSTANDHALTUNG Überprüfen, ob die Netzanlage, auf der die Maschine HINWEISE eingesteckt wird, über einen Erdungsanschluss gemäß der geltenden Sicherheitsvorschriften verfügt, und ob die Vor der Ausführung jeglichen Eingriffs zu Instandhaltung Steckdose sich in einem guten Zustand befi ndet. sollte sichergestellt werden, dass das Gerät von der Es wird darauf hingewiesen, dass vor der Netzanlage eine Versorgung abgenommen wurde, um eventuelle Unfälle...
  • Page 21: Introduction A L'emploi

    SYMBOLIQUE INDEX Avant de commencer à travailler avec votre scie, lisez attentivement ce manuel d’instructions, afi n de connaître 1 INTRODUCTION A L’EMPLOI ........ 19 la machine, ses différents emplois et les éventuelles contre 2 INSTALLATION ............21 indications. Ne pas sous-estimer les rappels «ATTENTION» et 3 UTILISATION ............
  • Page 22: Regles De Securite Supplementaires Pour Les Aspirateurs Destines A L'atelier

    REGLES DE SECURITE SUPPLEMENTAIRES 14. VERIFIER REGULIEREMENT le sac fi ltrant et le sac POUR LES ASPIRATEURS DESTINES A à poussière, en vue de s’assurer qu’ils ne sont pas L’ATELIER déchirés ou coupés. Il ne faut absolument pas se servir de l’aspirateur, au cas où...
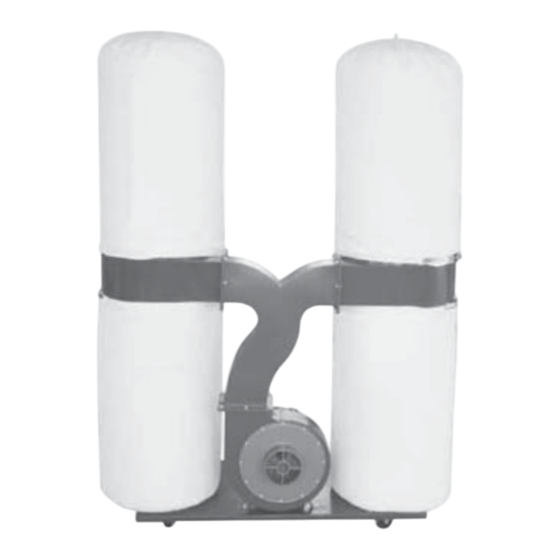
  • Page 23: Deballage

    DEBALLAGE Enlever la boîte qui protège la machine au cours du transport, en prenant garde autant que possible de maintenir l’emballage intact, au cas où vous devriez déplacer l’aspirateur pour de longs trajets ou bien le stocker pendant longtemps. CONSIGNES : Il ne faut pas activer l’aspirateur tant qu’il n’a pas été...
  • Page 24 2. Fixer le groupe moteur/ventilateur/convoyeur au centre de l’embase rectangulaire en utilisant les vis, rondelles et écrous correspondants. Fixer le convoyeur au conduit d’air en positionnant au préalable le joint entre les deux pièces. (Fig. 3). Fig. 3 3. Fixer les deux tambours à la sortie des conduits avec les deux joints respectifs (Fig. 4) et placer à la base les tiges de support.
  • Page 25 5. Passer le collier de fermeture dans l’ourlet du sac supérieur à poussière doté d’un dispositif qui permet de le fi xer au crochet. Suspendre le sac au crochet. Placer l’extrémité ouverte du sac fi ltrant sur l’ourlet du tambour. Une fois le fi...
  • Page 26: Connexion Electrique

    CONNEXION ELECTRIQUE ENTRETIEN Contrôler que l’installation du réseau, sur laquelle est montée la machine, est bien connectée à la terre, comme REMARQUES prévu par les normes de sécurité en vigueur et que la prise de courant est en bon état. L’utilisateur doit bien garder Avant d’effectuer n’importe quel entretien, s’assurer que à...
  • Page 27 SÍMBOLOS UTILIZADOS INDICE No ignore las notas “ATENCION” y “CUIDADO” del presente manual. 1 INTRODUCCIÓN PARA EL USO ......25 Con el objeto de llamar la atención y dar mensajes de 2 INSTALACIÓN ............27 seguridad, las operaciones peligrosas están precedidas por símbolos y notas que evidencias el peligro y explican cómo 3 UTILIZACIÓN ............
  • Page 28: Reglas De Seguridad

    REGLAS DE SEGURIDAD NOTA: SUPLEMENTARIAS PARA LAS CONSERVAR LAS INSTRUCCIONES. Releerlas ASPIRADORAS DE TALLER frecuentemente y utilizarlas para informar a las demás personas. ATENCIÓN: Respetar siempre las medidas de precaución REGLAS DE SEGURIDAD básicas cuando se utiliza la aspiradora de taller.
  • Page 29: Eliminación Del Embalaje

    ELIMINACIÓN DEL EMBALAJE Quitar la caja que protege la máquina durante el transporte, observando la precaución de mantener el embalaje lo más intacto posible, en el caso de que deban desplazar la aspiradora largos trayectos o almacenarla durante mucho tiempo. ADVERTENCIA: No activar la aspiradora hasta que no se haya montado del todo y hasta que no se hayan...
  • Page 30 2. Fijar el conjunto motor/ventilador/transportador en el centro de la base rectangular utilizando los respectivos tornillos, arandelas y tuercas. Fijar el transportador al conducto del aire posicionando previamente la guarnición entre las dos piezas (Fig. 3). Fig. 3 3. Fijar los dos tambores en la salida de los conductos con las dos correspondientes guarniciones (Fig. 4) y conectar a la base las astas de soporte (Fig.
  • Page 31 5. Pasar la abrazadera de cierre por el borde del saco superior para el polvo provisto de un dispositivo que permite sujetarlo al gancho. Suspender el saco al gancho. Situar el extremo abierto del saco fi ltrante en el borde del tambor. Una vez situado el fi...
  • Page 32: Conexión Eléctrica

    MANTENIMIENTO CONEXIÓN ELÉCTRICA Controlar que la instalación de la red en la que colocarán la máquina esté conectada a tierra como previsto por las OBSERVACIONES normas de seguridad vigentes y que la toma de corriente Antes de efectuar cualquier operación de mantenimiento esté...
  • Page 33 SÍMBOLOS ÍNDICE Nunca subestime os alarmes de “Atenção – Aviso” que vêm neste manual. 1 INTRODUÇÃO À UTILIZAÇÃO ......31 Para a atenção do utilizador e para preservar as condições 2 INSTALAÇÃO ............33 de segurança, as operações perigosas são precedidas por símbolos e notas que indicam o perigo e explicam como 3 UTILIZAÇÃO ............
  • Page 34: Regras De Segurança

    REGRAS DE SEGURANÇA SUPLEMENTARES 15. O aspirador foi concebido para uso doméstico. PARA OS ASPIRADORES DE OFICINA NOTA: C O N S E RVA R A S I N S T R U Ç Õ E S . L e r a s ATENÇÃO: instruções frequentemente e utilizá-las para Respeitar sempre as indicações de precaução...
  • Page 35: Remoção Da Embalagem

    REMOÇÃO DA EMBALAGEM Retirar a caixa que protege a máquina durante o transporte, tendo o cuidado, na medida do possível, de manter a embalagem intacta, no caso que seja necessário transportar o aspirador para distâncias consideradas ou para o armazenar por períodos prolongados. ADVERTÊNCIA: Não accionar o aspirador enquanto não estiver completamente montado e enquanto não tiver...
  • Page 36 2. Fixar o conjunto motor/ventoinha/tubo no centro da base rectangular utilizando os respectivos parafusos, anilhas e porcas. Fixar o tubo na conduta de ar colocada colocando previamente a junta de vedação entre as duas peças. (Fig. 3). Fig. 3 3. Fixar os dois tambores na saída das condutas com as duas juntas de vedação (Fig. 4) correspondentes e ligar as barras de suporte à...
  • Page 37 fi xá-lo ao gancho. Pendurar o saco no gancho. Colocar a extremidade aperta do saco de fi ltro no bordo do tambor. Depois de colocado o fi ltro, ajustar a braçadeira de aperto de modo que o esticador seja colocado nos dentes do sistema de aperto.
  • Page 38: Ligação Eléctrica

    LIGAÇÃO ELÉCTRICA MANUTENÇÃO Verifi car se a instalação de rede à qual será ligada a máquina está ligado à terra como previsto pelas normas OBSERVAÇÕES de segurança em vigor e se a tomada de corrente está em bom estado. Lembramos ao utilizador que a montante da Antes de qualquer manutenção, certifi...
  • Page 39 SCHEMA ELETTRICO / WIRING DIAGRAM / ELEKTRISCHER SCHALTPLAN - / SCHEME ELECTRIQUE / ESQUEMA ELECTRICO / ESQUEMA ELÉCTRICO Moteur Motor Motore Motor Motor Motor Interrupteur Interruttore Main switch Interruptor Interrupteur général Hauptschalter general generale general Kondensator Condensador Condensatore Condensador Condensator Condensateur Circuito di Erdung...
  • Page 40 TAVOLE RICAMBI - SPARE PARTS - ERSATZTEILE PIECES DE RECHANGE - REPUESTOS - PEÇAS DE MUDANÇA...
  • Page 41 POS. COD./KOD. NOTE/MERKE/NOTES/NOTA/NOTAS F50-843-001 F50-843-002 F50-843-003 F50-843-004 F50-843-005 F50-843-006 F50-843-007 F50-843-008 F50-843-009 F50-843-010 F50-843-011 F50-843-012 F50-843-013 F50-843-014 F50-843-015 F50-843-016 F50-843-017 F50-843-018 F50-843-019 F50-843-020 F50-843-021 F50-843-022 F50-843-023 F50-843-024 F50-843-025 F50-843-026 F50-843-027 F50-843-028 F50-843-029 F50-843-030 F50-843-031 F50-843-032 F50-843-033 F50-843-034 F50-843-035 F50-843-036 F50-843-037...
  • Page 42 40023 CASTEL GUELFO (BO) ITALY Via del Lavoro, 4 Tel. +39-0542/487611 Fax +39-0542/488226 E-Mail: infocom@fox-machines.com – www.fox-machines.com...
  • Page 43 SPECIFICHE TECNICHE - TECHNICAL SPECIFICATIONS - TECHNISCHE DATEN - SPECIFICATIONS TECHNIQUES - ESPECIFICACIONES TÉCNICAS - ESPECIFICAÇÕES TÉCNICAS m³/h mm H₂O F50-843 4200 TAVOLE RICAMBI - SPARE PARTS - ERSATZTEILE - PIECES DE RECHANGE - REPUESTOS - PEÇAS DE MUDANÇA POS.
  • Page 44 - F50-843 TAVOLE RICAMBI - SPARE PARTS - ERSATZTEILE - PIECES DE RECHANGE - REPUESTOS - PEÇAS DE MUDANÇA...
  • Page 45 PT - DECLARAÇÃO DE CONFORMIDADE IT - DICHIARAZIONE DI CONFORMITA’ CE Questo prodotto è conforme anche alle direttive Este producto também está em conformidades com as 2011/65/UE, 2012/19/UE, (2004/108 e 2006/95 fino al 19 diretivas da CE 2011/65/UE, 2012/19/UE, (2004/108 e Aprile 2016), 2014/30/UE e 2014/35/UE dal 20 Aprile 2006/95 até...

Table des Matières