Publicité

Les langues disponibles
  • FR

Les langues disponibles

Liens rapides

Wide-zoom lens for LCD projector
Weitwinkel-zoomobjektiv für LCD-Projektor
Objectif grand angle-zoom pour projecteur LCD
Objetivo granangular-zoom para proyector LCD
AN-C12MZ
INSTALLATION MANUAL
INSTALLATIONSHANDBUCH
MANUEL D'INSTALLATION
MANUAL DE INSTALACIÓN
English
Deutsch
Français
Español

Publicité

Table des Matières
loading

Sommaire des Matières pour Sharp AN-C12MZ

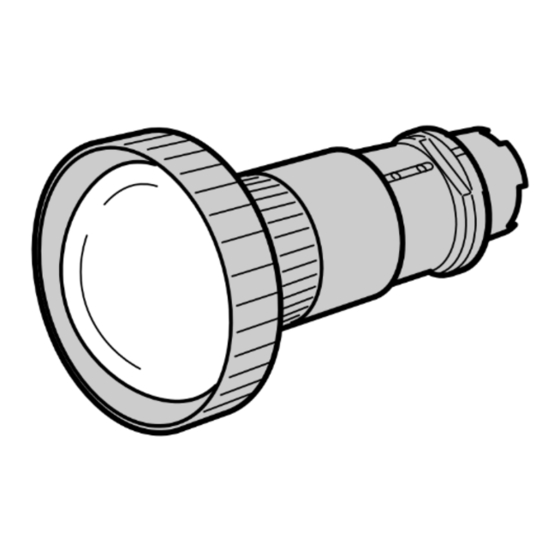
  • Page 1 English Deutsch AN-C12MZ Français Español Wide-zoom lens for LCD projector Weitwinkel-zoomobjektiv für LCD-Projektor Objectif grand angle-zoom pour projecteur LCD Objetivo granangular-zoom para proyector LCD INSTALLATION MANUAL INSTALLATIONSHANDBUCH MANUEL D’INSTALLATION MANUAL DE INSTALACIÓN...
  • Page 2: Changing The Lens

    Changing the Lens When changing the lens, use the supplied lens cover stick. Info • Before changing the lens turn off the power to the projector and remove the power cord from the wall outlet. • Do not attempt to change the lens while the projector is mounted on the ceiling. Upper half of the Pull out the carrying handle.
  • Page 3 Tab holes B First insert tabs a a of the lens cover into tab holes A A of the projector, then push tabs b into tab holes B B until it clicks into place. Push in the carrying handle. Tabs b Tab holes A Tabs a Remove the cap from the end of the lens that...
  • Page 4 Adjust the picture size and focus Zoom ring Turn the zoom ring to adjust picture size. Turn the focus ring to adjust the focus. Focus ring Picture size and projection ditance chart Base line: Horizontal line passing through Screen the lens center Lens center L : Projection distance NORMAL Mode (4:3)
  • Page 5: Handling Precautions

    Unité : mm (pouces) 377.3 - 379.3 (14 " - 14 ") Specifications Product type Wide-zoom lens for LCD projector Model AN-C12MZ Type of lens Zoom lens Picture size (diagonal) 30'' to 300'' Focal length 24.5 to 30.7 mm ( '' to 1 F no.
  • Page 6 Objektiv austauschen Verwenden Sie für den Austausch des Objektivs den beiliegenden Objektivabdeckungsstab. Info • Schalten Sie die Stromversorgung zum Projektor aus und ziehen Sie das Netzkabel aus der Netzsteckdose heraus, bevor das Objektiv abgenommen wird. • Versuchen Sie nicht, das Objektiv abzunehmen, während der Projektor noch an der Decke installiert ist. Obere Hälfte der Ziehen Sie den Tragegriff heraus.
  • Page 7 Sperrzungenöffnungen B Setzen Sie zuerst die Sperrzungen a a der Objektivabdeckung in die Zungenöffnungen A des Projektors ein, drücken Sie dann die b in die ZungenöffnungenB Sperrzungenb bis diese einrasten. Schieben Sie den Tragegriff ein. Sperrzungen b Sperrzungenöffnungen A Sperrzungen a Entfernen Sie die Kappe von dem Objektivende , das Sie am Projektor befestigen.
  • Page 8 Einstellen von Bildformat und Fokus Zoomring Drehen Sie den Zoomring, um das Bildformat einzustellen. Drehen Sie den Fokusring, um den Fokus einzustellen. Fokusring Tabelle für Bildformat und Projektionsentfernung Grundlinie: Horizontale Linie, die die Bildwand Objektivmitte passiert. Objektivmitte L: Projektionsabstand NORMAL Modus (4:3) Bildgröße (Bildwandgröße) Projektionsabstand (L) Abstand von der Objektivmitte...
  • Page 9: Vorsichtsmaßnahmen Bei Der Handhabung

    Projektor- und Objektivabmessungen Enheit : mm (Zoll) 377.3 - 379.3 (14 " - 14 ") Technische Daten Produkttyp Weitwinkel-zoomobjektiv für LCD Projektor Modell AN-C12MZ Objektiv-Typ Zoomobjektiv Bildformat (diagonal) 30'' bis 300'' Brennweite 24,5 bis 30,7 mm ( '' bis 1 Fokus...
  • Page 10: Changement D'objectif

    Changement d’objectif Lors du changement d’objectif, utiliser la baguette de cache-objectif fournie. Info • Avant de changer l’objectif, éteindre le projecteur et retirer le cordon d’alimentation de la prise murale. • Ne pas essayer de changer l’objectif pednant que le projecteur est monté au plafond. MoitiŽ...
  • Page 11 Trous de languette Insérer d’abord les languettes a a du cache- objectif dans les trous de languette A A du projecteur, ensuite enfoncer les languettes b dans les trous de languette B B jusqu’à ce qu’elles s’emboîtent en place. Languettes Enfoncer la poignée de transport.
  • Page 12: Ajuster La Taille Et La Mise Au Point De L'image

    Ajuster la taille et la mise au point de l’image Bague de zoom Tourner la bague de zoom pour ajuster la taille de l’image. Tourner la bague de mise au point pour ajuster la mise au point. Bague de mise au point Format de l’écran et distance de projection Ligne de base : Ligne horizontale passant par...
  • Page 13: Précautions De Manipulation

    377.3 - 379.3 (14 " - 14 ") Caractéristiques Type de produit Objectif grand anlgle-zoom pour projecteur LCD Modèle AN-C12MZ Type d’objectif Objectif de zoom Taille de l’image (en diagonale) 30'' à 300'' Longueur focale 24,5 à 30,7 mm ( '' à...
  • Page 14 Cambio del objetivo Al cambiar el objetivo, use la varita suministrada con la cubierta del objetivo. Información • Antes de cambiar el objetivo, desconecte la alimentación del proyector y desenchufe el cable de alimentación de la toma de corriente mural. •...
  • Page 15 Agujeros B Primero, introduzca las lengüetas a a de la cubierta del objetivo en los agujeros A A del proyector; luego, introduzca las lengüetas b en los agujeros B B , presionándolas hasta que encajen en posición. Lengüetas b Devuelva el asa de transporte a su posición Agujeros A original.
  • Page 16 Ajuste el tamaño de la imagen Aro de zoom y el enfoque Gire el aro de zoom para ajustar el tamaño de la imagen. Gire el aro de enfoque para ajustar el enfoque. Aro de enfoque Tamaño de la pantalla y distancia de proyección Línea de base: Línea horizontal que pasa a Pantalla...
  • Page 17: Accesorios Suministrados

    377.3 - 379.3 (14 " - 14 ") Especificaciones Tipo de producto Objetivo granangular-zoom para proyector LCD Modelo AN-C12MZ Tipo de objetivo Objetivo zoom Tamaño de la imagen (diagonal) 30'' a 300'' Distancia focal 24,5 a 30,7 mm ( '' a 1 Núm.
  • Page 18 更換鏡頭 更換鏡頭時﹐請使用附帶的鏡頭蓋拆卸杆。 ∑ 在更換鏡頭前﹐先關掉投影機的電源﹐並從牆上插座拔下電源線。 ∑ 當投影機安裝在天花板上時﹐請勿嘗試更換鏡頭。 鏡頭蓋的上 拉出攜帶把手。 半部分 將鏡頭蓋向前拉的同時﹐用附帶的鏡頭蓋 拆卸杆的端頭將鏡頭蓋上半部分頂部的企 口往下推﹐用手將鏡頭蓋取下。 攜帶把手 要拆下鏡頭蓋的下半部分﹐請向着自己往 下拉。 鏡頭蓋的下 半部分 要拆下鏡頭﹐用一只手沿圖中的箭頭方向 鏡頭接圈鎖 扣凸起 轉動鏡頭接圈鎖扣凸起的同時﹐請用另一 只手抓住鏡頭﹐以防止鏡頭跌落。 ∑ 如果鏡頭接圈很難拆﹐請將附帶的鎖扣 釋放帶連接到鏡頭接圈的鎖扣凸起上﹐ 並拉動該帶使鏡頭接圈轉動。 拆下鏡頭。 松開難拆鏡頭接圈的步驟 鏡頭接圈鎖 鎖扣釋放帶 扣凸起...
  • Page 19 先將鏡頭蓋的凸起 a 插入投影機的凸起孔 凸起孔 A 中﹐然后將凸起 b 推入凸起孔 B 中﹐ 直到喀嗒一聲到位為止。 推入攜帶把手。 凸起 凸起孔 凸起 從要連接到投影機的鏡頭端部取下蓋子。 確認鏡頭接圈上的兩個槽面朝上。 槽 鏡頭接圈 將鏡頭推入投影機時﹐要保証鏡頭座上的 兩個槽面朝上﹐並將鏡頭插入部分的銷插 入鏡頭座的孔中。 ∑ 務必將鏡頭完全推入投影機內。 銷 鏡頭座 孔 沿圖中箭頭所示的方向轉動鏡頭接圈鎖扣 凸起﹐直到停止為止。 ∑ 要小心﹐不要將鏡頭接圈擰的太緊﹐否 則下次更換鏡頭時鏡頭接圈很難拆。 將鏡頭蓋凸起的上半部分插入投影機的凸 凸起 起孔中后﹐向着投影機的方向滑動鏡頭 蓋﹐直到喀嗒一聲到位為止。 ∑ 如果鏡頭蓋的上半部分沒有固定到投影 機上﹐就無法打開投影機的電源。 凸起孔...
  • Page 20 調節圖像大小及焦距 變焦環 轉動變焦環調節圖像大小。 轉動對焦環調節焦距。 聚焦環 圖像大小和投影距離圖表 基本線︰ 穿過鏡頭中心的水平線 投影屏幕 鏡頭中心 L︰投影距離 注 ∑ 上述公式有 ±3% 的誤差。 ∑ 帶負號 (–) 的值表示鏡頭中心的距離低于投影屏幕的底部。...
  • Page 21 ∑ 鎖扣釋放帶 1 根 ∑ 安裝說明書 本說明書 投影機及鏡頭尺寸 單位︰mm 英寸 377.3 - 379.3 (14 " - 14 ") 規格 產品類型 用於液晶顯示投影機的廣角 變焦鏡頭 型號 AN-C12MZ 鏡頭類型 變焦鏡頭 圖像大小 對角線長度 30~300 英寸 ''~ 1 焦距 24.5~30.7 mm 光圈值 2.2~2.7 投射率 1:1.18~1.48 (3.35 lbs) 重量...
  • Page 22 レンズを交換する ∫ ∫ ∫ Downloaded from: http://www.usersmanualguide.com/...
  • Page 23 ∫ ∫ Downloaded from: http://www.usersmanualguide.com/...
  • Page 24 画面サイズとフォーカスを調整する 画面サイズと投映距離 30'5" 9.26m 24'3" 7.38m 3/4" 45.1cm 609.6cm 457.2cm 25'4" 7.71m 20'2" 6.14m 14 13/16" 37.6cm 381.0cm 508.0cm 20'3" 6.15m 16'1" 4.89m 11 13/16" 30.0cm 304.8cm 406.4cm 15'2" 4.60m 3.65m 7/8" 22.5cm 304.8cm 228.6cm 3.04m 7'11" 2.41m 7/8" 15.0cm 203.2cm 152.4cm 8'4"...
  • Page 25 使用上の注意 ∫ ∫ 付属品 ∫ ∫ ∫ プロジェクターとレンズの寸法 : mm 377.3 - 379.3 (14 " - 14 ") 仕様 Downloaded from: http://www.usersmanualguide.com/...
  • Page 26 SHARP CORPORATION Printed in Japan Gedrukt in Japan Imprimé au Japon Improso en Japón 02P07-JM...
  • Page 27 This file has been downloaded from: www.UsersManualGuide.com User Manual and User Guide for many equipments like mobile phones, photo cameras, monther board, monitors, software, tv, dvd, and othes.. Manual users, user manuals, user guide manual, owners manual, instruction manual, manual owner, manual owner's, manual guide, manual operation, operating manual, user's manual, operating instructions, manual operators, manual operator, manual product, documentation manual, user maintenance, brochure, user reference, pdf manual Downloaded from:...

Table des Matières