
Manuels Connexes pour Throwback 60047

Sommaire des Matières pour Throwback 60047
- Page 1 3 n1 Treat Baker Instruction Manual Ga fr er M lt fonct on 3 en 1 Manuel d’instructions Fábr ca de d lces 3 en 1 Manual de instrucciones SO-313867_60047_Throwback_Treat Baker_W&S_IM_145x210_R10.indd 1 2017-07-24 9:32 AM...
- Page 2 SO-313867_60047_Throwback_Treat Baker_W&S_IM_145x210_R10.indd 1 2017-07-24 9:32 AM...
-
Page 3: Table Des Matières
Table of Contents Important Safeguards .............................3-4 Additional Important Safeguards .......................... 4 Notes on the Plug ................................. 5 Notes on the Cord ................................ 5 Plasticizer Warning ..............................5 Electric Power ................................5 Getting to Know Your Treat Baker ........................6 Before Using for the First Time ......................... 7-8 Operating Instructions ............................8-9 User Maintenance Instructions .......................... -
Page 4: Important Safeguards
IMPORTANT SAFEGUARDS When using electrical appliances, basic safety precautions should always be followed, including the following: READ ALL INSTRUCTIONS before using this appliance. The cord to this appliance should be plugged into a 120V AC electrical outlet only. CAUTION: NEVER PLUG UNIT IN WITHOUT BOTH UPPER AND LOWER COOKING PLATES PROPERLY INSTALLED. -
Page 5: Additional Important Safeguards
21. WARNING: to avoid possible fire hazard and damage to the unit, the treat maker must be stored and used with both matching upper/lower plates installed at all times. 22. Do not use for other than intended use. ADDITIONAL IMPORTANT SAFEGUARDS CAUTION HOT SURFACES: This appliance generates heat and escaping steam during use. -
Page 6: Notes On The Plug
Notes on the plug This appliance has a polarized plug (one blade is wider than the other). To reduce the risk of electric shock, this plug will fit in a polarized outlet only one way. If the plug does not fit fully into the outlet, reverse the plug. If it still does not fit, contact a qualified electrician. -
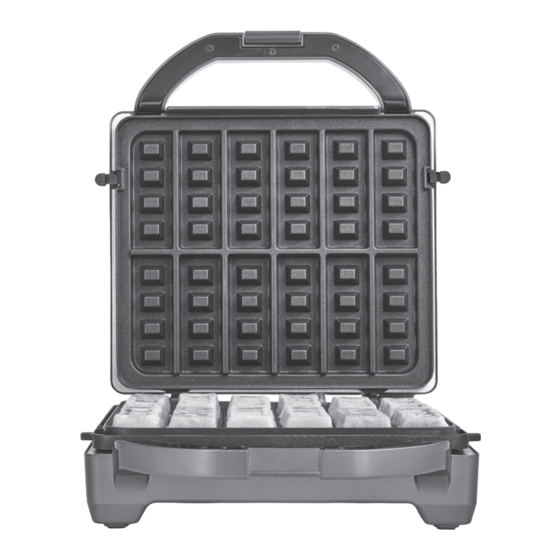
Page 7: Getting To Know Your Treat Baker
Getting to Know Your Treat Baker Product may vary slightly from illustration Figure 1 Housing Slots (See Figures 5 and 6) Upper Plate Locks Plate Tabs (See Figures 5 and 6) Removable Non-Stick Upper and Lower Baking Plates Lower Plate Locks Non-skid Feet Red POWER ON Light/ red READY Light... -
Page 8: Before Using For The First Time
Before Using for the First Time Carefully unpack the Treat Maker and remove all packaging and materials. 2. Your Treat Baker comes assembled with baking plates in position. 3. Before using your Treat Baker for the first time, ensure that upper and lower plates are securely fixed. -
Page 9: Operating Instructions
Baking Plate Assembly Choose matching baking plates for both the mini donuts and waffl e sticks. Check the baking plate’s backsides to determine UPPER and LOWER baking plates. (See Figure 4.) NOTE: Use the fl at upper baking plate for mini cupcakes only. (See Figure 1.) LOWER Baking Plate Figure 4 UPPER Baking Plate... - Page 10 7. Using the batter squeeze bottle (included) • The squeezable bottle is light, and easily controlled with one hand. • Fill batter bottle with any thin (runny) batter to fill molds. NOTE: The batter bottle can also be used to add your favorite glaze. See glaze recipes in the “Recipe”...
-
Page 11: User Maintenance Instructions
User Maintenance Instructions This appliance requires little maintenance. It contains no user serviceable parts. Do not try to repair it yourself. Contact a qualified appliance repair technician if the product requires servicing. Care & Cleaning Instructions CAUTION: Unplug from electrical outlet and allow to cool thoroughly before cleaning. The Treat Maker body does not disassemble for cleaning. -
Page 12: Choose From 3 Delicious Treats
Recipes Choose From 3 Delicious Treats! Bake a dozen mini cupcakes, a dozen mini donuts or a dozen waffle sticks in minutes! Perfect for anyone with dietary restrictions, this Treat Baker allows you to control the ingredients that go into each snack. Quick and delicious, these treats are best baked fresh for parties, birthdays, graduation, barbeques, wedding sho wers, baby showers, sweet sixteens. -
Page 13: Recipe Replacements
Recipes Recipe Replacements To lower sugar: • Use sugar substitutes • Use sugar-free or no sugar added gelatin, puddings, jellies, jams, etc. • Use sugar-free maple syrup for flavorings and toppings To lower fat, lower cholesterol: • Use skim milk •... -
Page 14: Recipes
Recipes Classic Buttermilk Waffle Sticks Makes: 12 waffle sticks • 1 cup all-purpose • 3 tablespoons • 2 tablespoons • 1 large egg flour sugar butter, melted • 2 teaspoons • 1/4 teaspoon salt • 1/2 cup buttermilk baking powder Use a brush or paper towel to apply a generous coat of oil to each of the cavities on the upper and lower baking plates. - Page 15 Recipes Cranberry Maple Syrup • 1/4 cup maple syrup • 1/2 teaspoon ground cinnamon • 1/4 cup cranberry sauce Use a brush or paper towel to apply a generous coat of oil to each of the cavities on the upper and lower baking plates. Plug Treat Baker into a 120V AC electrical outlet to preheat. Prepare Waffle Sticks: Use a box grater or a food processor to shred raw sweet potato.
- Page 16 Recipes Caramel Banana Topping • 1/2 cup brown sugar • 2 tablespoons butter • 1/4 cup whipping cream • 1 teaspoon vanilla • 1/4 cup light corn syrup • 3 medium bananas, sliced Use a brush or paper towel to apply a generous coat of oil to each of the cavities on the upper and lower baking plates.
- Page 17 Recipes Honey Almond Drizzle • 1/2 cup honey, warmed • 1/2 cup sliced roasted almonds Use a brush or paper towel to apply a generous coat of oil to each of the cavities on the upper and lower baking plates. Plug Treat Baker into a 120V AC electrical outlet to preheat. Prepare Gingerbread Waffle Sticks: In a small bowl, combine ground flax and water.
- Page 18 Recipes Cinnamon Whipped Cream • 2 cups whipping cream, chilled • 4 tablespoons confectioner’s sugar • 1 teaspoon ground cinnamon Use a brush or paper towel to apply a generous coat of oil to each of the cavities on the upper and lower baking plates.
- Page 19 Recipes Orange Cream Cheese Icing • 1 (8 oz.) package cream cheese, softened • 1 teaspoon vanilla extract • 1/2 cup (1 stick) unsalted butter, softened • 1 teaspoon orange extract • 2 cups confectioners’ sugar • zest from 1 orange Use a brush or paper towel to apply a generous coat of oil to each of the cavities on the upper and lower baking plates.
- Page 20 Recipes Milk Chocolate Frosting • 3 oz. milk chocolate, finely chopped • 1/4 cup sour cream • 3 tablespoons unsalted butter, room • 1/4 teaspoon salt temperature • 1/2 teaspoon pure vanilla extract • 1/2 tablespoon light corn syrup • 3/4 cup confectioners’...
- Page 21 Recipes Basic Mini Donut Recipe Makes 24 mini donuts • 1 cup flour • 1/2 cup milk • 1/2 cup sugar • 1/2 teaspoon vanilla • 1 tablespoon baking powder • 4 tablespoons cooking oil • 1 egg • sugar, powdered sugar, cinnamon-sugar for coating Use a brush or paper towel to apply a generous coat of oil to each of the cavities on the upper and lower baking plates.
- Page 22 Recipes Donut Glaze • 1/2 cup powdered sugar • 2 teaspoons milk Use a brush or paper towel to apply a generous coat of oil to each of the cavities on the upper and lower baking plates. Plug Treat Baker into a 120V AC electrical outlet to preheat. Prepare Mini Donuts: In a large bowl, whisk together cake flour, sugar, cocoa powder, baking powder, and salt.
- Page 23 Recipes Apple Mini Donuts with Cinnamon Maple Glaze Makes 24 mini donuts • 1/2 cup apple, shredded • 1 teaspoon vanilla extract • 1 large egg • 1-1/2 cups all purpose flour • 1/3 cup milk • 2 teaspoons baking powder •...
-
Page 24: Warranty
Limited TWO-YEAR Warranty SENSIO Inc. hereby warrants that for a period of TWO YEARS from the date of purchase, this product will be free from mechanical defects in material and workmanship, and for 90 days in respect to non-mechanical parts. At its sole discretion, SENSIO Inc. -
Page 25: Importantes Consignes De Sécurité
IMPORTANTES CONSIGNES DE SÉCURITÉ Toujours respecter les consignes de sécurité de base au moment d’utiliser des appareils électriques, y compris celles-ci : LIRE TOUTES LES INSTRUCTIONS avant d’utiliser cet appareil. Le cordon de l’appareil doit être branché dans une prise c.a. de 120 V seulement. MISE EN GARDE : NE JAMAIS BRANCHER L’APPAREIL SI LES PLAQUES DE CUISSON SUPÉRIEURES ET INFÉRIEURES NE SONT PAS PLACÉES CORRECTEMENT. -
Page 26: Autres Consignes De Sécurité Importantes
19. Faire preuve d’une extrême prudence lors du déplacement de l’appareil contenant des aliments chauds, ou encore de l’eau, de l’huile ou d’autres liquides chauds. 20. Pour débrancher, retirer la fiche de la prise. AVERTISSEMENT! Toujours débrancher l’appareil une fois la cuisson terminée. Sinon, le gaufrier continuera de chauffer jusqu’à... -
Page 27: Remarques Sur La Fiche Électrique
Remarques sur la fiche électrique Cet appareil est doté d’une fiche polarisée (une broche est plus large que l’autre). Pour réduire le risque de décharge électrique, la fiche s’insère d’une seule manière dans une prise polarisée. Si la fiche ne s’insère pas complètement dans la prise, la tourner pour l’insérer de l’autre côté. -
Page 28: Fonctionnement De Votre Gaufrier Multifonction
Fonctionnement de votre gaufrier multifonction Le produit pourrait être légèrement différent de l’illustration. Figure 1 Logements de fi xation (Se reporter à la fi gure 5 et 6) Verrous de la plaque supérieure Pattes de fi xation des plaques (Se reporter à la fi gure 5 et 6) Plaques de cuisson antiadhésives amovibles supérieure et inférieure... -
Page 29: Avant La Première Utilisation
Avant la première utilisation Déballer le gaufrier multifonction avec soin et retirer tous les éléments d’emballage et matériaux. 2. Votre gaufrier est vendu tout assemblé avec ses plaques de cuisson adéquatement positionnées. 3. Avant d’utiliser votre gaufrier multifonction pour la première fois, s’assurer que les plaques supérieure et inférieure sont bien fixées. -
Page 30: Mode D'emploi
Assembler les plaques de cuisson Choisir les plaques de cuisson correspondantes pour les beignets et les gaufres. Vérifi er le revers des plaques pour savoir s’il s’agit de la plaque supérieure (UPPER) ou inférieure (LOWER). (Se reporter à la fi gure 4.) REMARQUE : Employer la plaque de cuisson supérieure plate pour les gâtelets uniquement. - Page 31 7. Utiliser la bouteille compressible pour la pâte à cuire (incluse) • La bouteille compressible est légère et facilement manipulable d’une seule main. • Remplir la bouteille de pâte à cuire mince (coulante) pour remplir les moules. REMARQUE : La bouteille compressible peut aussi être utilisée pour couvrir vos pâtisseries de votre glaçage préféré.
-
Page 32: Instructions D'entretien Pour L'utilisateur
Instructions d’entretien pour l’utilisateur L’appareil exige peu d’entretien. Il ne contient aucune pièce pouvant être réparée ou remplacée par l’utilisateur. Il ne faut donc pas tenter de le réparer soi-même. Communiquer avec un technicien réparateur d’appareils électriques qualifié si l’appareil doit être réparé. Instructions d’entretien et de nettoyage MISE EN GARDE : Débrancher l’appareil de la prise électrique et le laisser refroidir complètement avant de le nettoyer. -
Page 33: Garantie Limitée De Deux Ans
Garantie limitée de DEUX ANS SENSIO Inc. assure par la présente que le produit est garanti contre tout défaut de matériel et de fabrication pendant une période de DEUX ANS à compter de la date d’achat et contre tout défaut des pièces autres que mécaniques pendant 90 jours. -
Page 34: Medidas De Seguridad Importantes
MEDIDAS DE SEGURIDAD IMPORTANTES Al utilizar electrodomésticos, siempre deben cumplirse las precauciones de seguridad básicas, incluidas las siguientes: LEA TODAS LAS INSTRUCCIONES antes de usar este electrodoméstico. El cable de este electrodoméstico solo debe enchufarse en un tomacorriente de pared de 120 V CA. PRECAUCIÓN: NUNCA ENCHUFE LA UNIDAD SIN LAS PLACAS DE COCCIÓN SUPERIOR E INFERIOR COLOCADAS CORRECTAMENTE. -
Page 35: Otras Medidas De Seguridad Importantes
contengan alimentos, agua, aceite u otros líquidos calientes. 20. Para desconectar, retire el enchufe del tomacorriente. ¡ADVERTENCIA! Siempre desenchufe la unidad cuando termine de cocinar. De lo contrario, la fábrica de dulces continuará calentando hasta que se desenchufe la unidad. 21. -
Page 36: Notas Sobre El Enchufe
Notas sobre el enchufe Este electrodoméstico cuenta con un enchufe polarizado (una pata es más ancha que la otra). Para reducir el riesgo de descarga eléctrica, este enchufe encaja de una sola manera en un tomacorriente polarizado. Si el enchufe no encaja bien en el tomacorriente, delo vuelta. -
Page 37: Conozca Su Fábrica De Dulces
Conozca su fábrica de dulces El producto puede variar ligeramente con respecto a la ilustración Figura 1 Ranuras de la carcasa (Vea las Figuras 5 y 6) Trabas de la placa superior Lengüetas de la placa (Vea las Figuras 5 y 6) Placas de horneado inferior y superior antiadherentes y desmontables... -
Page 38: Antes De Utilizar Por Primera Vez
Antes de utilizar por primera vez . Desempaque con cuidado la fábrica de dulces y quite todos los envoltorios y materiales. 2. Su fábrica de dulces viene con placas de horneado colocadas en posición. 3. Antes de usar su fábrica de dulces por primera vez, asegúrese de que las placas superior e inferior estén firmemente fijadas. -
Page 39: Instrucciones De Funcionamiento
Armado de la placa de horneado Elija placas de horneado compatibles para las rosquillas pequeñas y los paliwafl es. Verifi que los reversos de la placa de horneado para determinar las placas de horneado SUPERIOR e INFERIOR. (Vea la Figura 4). NOTA: Utilice solo la placa de horneado superior plana para hacer magdalenas pequeñas. - Page 40 7. Uso de la botella flexible para batido (incluida) • La botella flexible es liviana y fácil de manejar con una mano. • Llene la botella para batido con cualquier masa poco espesa (líquida) para llenar los moldes. NOTA: La botella para batido también se puede utilizar para agregar su glaseado favorito. Vea las recetas de glaseado en la sección “Receta”...
-
Page 41: Instrucciones De Mantenimiento Para El Usuario
Instrucciones de mantenimiento para el usuario Este electrodoméstico requiere poco mantenimiento. No contiene piezas que puedan ser reparadas por el usuario. No intente reparar la unidad usted mismo. Comuníquese con un técnico de reparación de electrodomésticos calificado si el producto necesita servicio técnico. Instrucciones de cuidado y limpieza PRECAUCIÓN: Desenchufe la unidad del tomacorriente y deje enfriar por completo antes de limpiar. -
Page 42: Garantía
Garantía limitada de DOS AÑOS Mediante la presente, SENSIO Inc. garantiza que, durante el plazo de DOS AÑOS a partir de la fecha de compra, este producto no presentará defectos mecánicos en el material ni en la mano de obra, y durante 90 días, no los presentará... - Page 43 SO-313867_60047_Throwback_Treat Baker_W&S_IM_145x210_R10.indd 42 2017-07-24 9:32 AM...
- Page 44 Authentic Throwback Appliance Co.™ is a trademark of 8479950 Canada Inc. All rights reserved. Authentic Throwback Appliance Co.™ est une marque déposée de 8479950 Canada Inc. Tous droits réservés. Authentic Throwback Appliance Co.™ es una marca registrada de 8479950 Canada Inc.