RC System POWER X-80 Mode D'emploi
Les langues disponibles
Les langues disponibles
Liens rapides
Introduction
Please be sure to read right through these operating instruction attentively before you attempt to use your new switching power
supply, as this will ensure that you can make full use of all of its facilities. Take particular note of the warnings and safety notes.
These instructions should be kept in a safe place; if you ever dispose of the charger be sure to pass them on to the new owner.
This power supply is small, lightweight, compact, provided with a current limiter, a universal output for 4mm banana plugs and
an automatic current regulator. At the same time, it is suitable for giving power or testing your equipment. It's also provided with
a protection circuitry to prevent any damages to the unity or your equipment in case of malfunctioning to high-voltages. Fitted out
with a cooling system that guarantees a constant full operatively to the unit and prevents from overheating. This power supply is
perfect to supply 12V chargers and DC mini drills. This power supply can also be used as a Pb charger.
• Input Voltage: 220 ~ 240V AC 50Hz
1. Specification:
• Input Plug: SCHUKO plug
• Output Voltage: 12V ~ 30 V DC (adjustable)
• Output Connection: 4mm Banana Clamp
• Output Current 0 ~ 30A (adjustable)
• Size: 260x190x105mm
Connection and use:
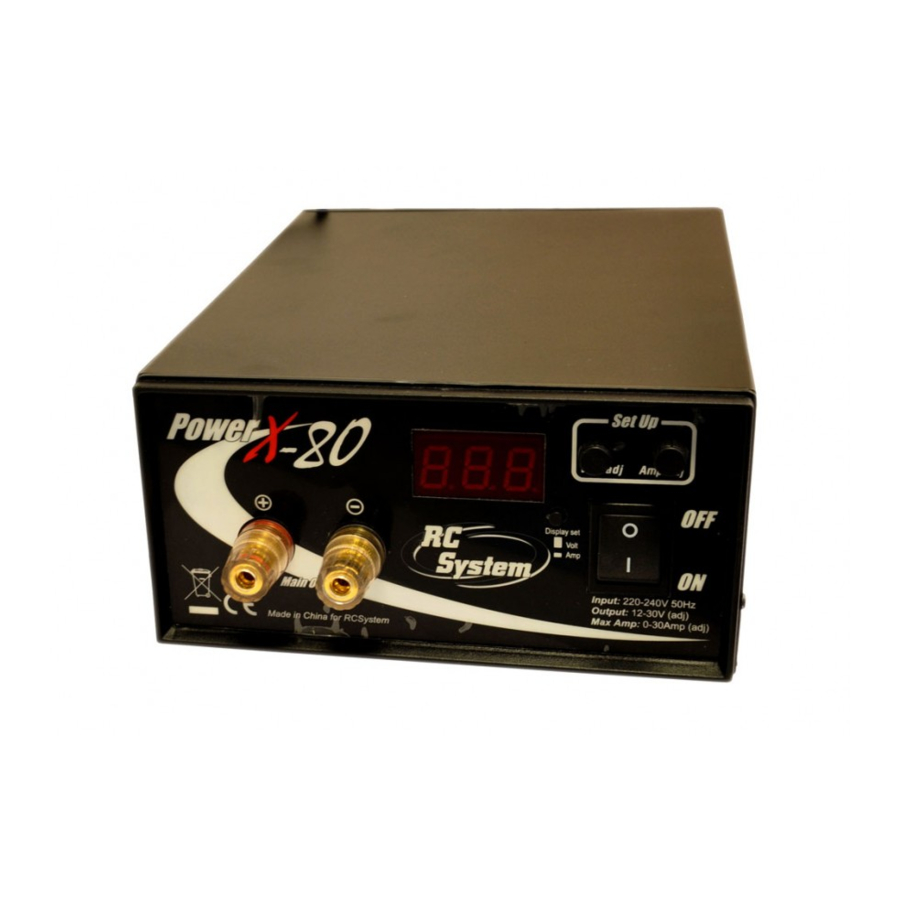
4. "Set-up" panel: the two trims placed inside the "Set-up" panel could be used to adjust the voltage and the current delivered. The
trim named "Volt" will set the voltage and the trim marked as "Amp" will adjust the current. If you connect a battery charger to
the Power X-20, you have to set the trim "Amp" to his maximum position. If you connect a Pb battery directly to the power supply,
you have to set the current and voltage to match the battery specifi cations;
2. Features:
• Over power protection, short circuit protection
• Inner cooling system by fan
• Adjustable maximum power output
Pw =VoxI0
Vo: output voltage (adjustable)
Io: output current in short circuit (adjustable)
• LC displaying output voltage and current
1. Usine as a common DC oower supply: plug in, adjust the voltage knob to get your needed value (12 ~ 30 V). The voltage is
3. Operating Instructions:
displayed on the LCD.
2. Then turn the Amp knob to get your needed max current cut off point.
3. The LCD will show you the current.
4. Read thoroughly the following contents before using.
5. Disconnect the power supply from AC mains power before connecting device to the power supply.
6. Connect the device to the power supply ensuring the correct polarity. Red is positive. Black is negative and ensuring good contact.
7. Switch the power supply "OFF" with the switch on the front of the unit. Connect the power supply input AC lead.
8. Switch the power supply "ON" with the switch on the front of the unit. The "power on" led will illuminate. And the unit will
commence supply of power to the device.
Warnings:
• When the power supply is operating. Do not attempt to open the power supply casing. In doing so will void warranty.
• Do ensure correct polarity when connecting device to the power supply. As damage to this device may occur if in correct
connections are made.
1. Main output: Here you could connect the
battery charger (or the Pb battery to charge).
Warning!: Make sure you follow the correct
polarity! The RED plug is the positive pole and
the BLACK plug is the negative pole. If you
use crocodile plugs make sure that they are in
good conditions;
2. On/Off Switch;
3. Display button: It's used to select the data type
to display on the LED screen. With the button
pressed the screen will show the current
delivered, otherwise it will show the voltage;

Sommaire des Matières pour RC System POWER X-80
- Page 4 5. Lorsque vous branchez l’appareil à alimenter à la POWER X-80, veillez à ce que cette dernière ne soit pas connectée au secteur. 6. Connectez l’appareil à alimenter à la POWER X-80 en veillant à respecter la polarité. Le fil rouge correspond au “+”, et le fil noir au “-”.
- Page 5 • Ne reliez la POWER X-80 au secteur QUE lorsque vous l’utilisez. En dehors de ces périodes d’utilisation veillez à ce que la POWER X-80 soit déconnectée du secteur. • La POWER X-80 peut devenir chaude lors de son utilisation et émettre un très léger grésillement. Ceci est tout à fait normal et ne doit pas être considéré comme un disfonctionnement.
- Page 6 • Ne laissez JAMAIS la POWER X-80 sans surveillance lors de son fonctionnement. • La POWER X-80 peut devenir chaude lors de son utilisation et émettre un très léger grésillement. Ceci est tout à fait normal et ne doit pas être considéré comme un disfonctionnement.
-
Page 7: Garantie
Ce produit ne doit pas être éliminé avec les autres déchets commerciaux. N° d’agrément M823. Distribué en France par: Model Racing Car ZAC. 15bis Avenue de la Sablière 94370 Sucy en Brie RC System est une marque propriété des sociétés Tél. : 01.49.62.09.60 Safalero S.r.l. (Italy) Fax : 01.49.62.09.73 Model Racing Car (France) www.mrcmodelisme.com...