
Manuels Connexes pour CAME BPT TA/450


Sommaire des Matières pour CAME BPT TA/450
- Page 1 Termostato digitale FB00801M04 IT Italiano TA/450 EN English FR Français MANUALE DI INSTALLAZIONE ED USO DE Deutsch...
-
Page 2: Avvertenze Generali
Avvertenze generali • Importanti istruzioni per la sicurezza delle persone: LEGGERE ATTENTAMENTE! • Assicurarsi che la rete di alimentazione, conformemente alle regole di installazione, sia provvista di dispositivo di disconnessione onnipolare, che consenta la protezione per categoria di sovratensione III. •... -
Page 3: Descrizione Dispositivo
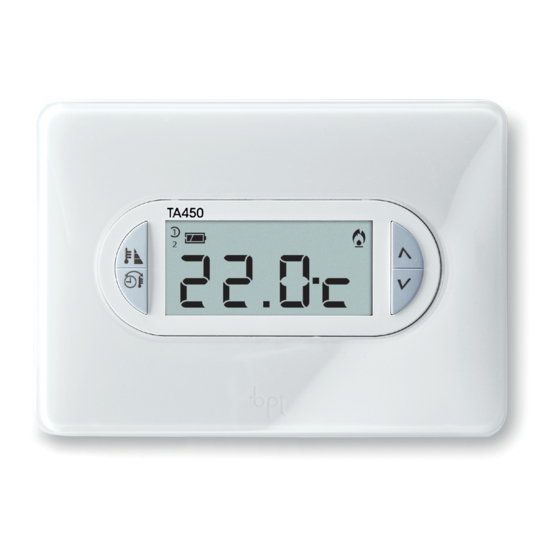
Descrizione dispositivo Descrizione delle icone sul display e funzione dei pulsanti ① ② ③ ④ ⑤ ⑥ ⑦ ⑧ ⑨ ⑩ ⑭ ⑪ ⑬ ⑫ Profili utente; è evidenziato il profilo Modalità riscaldamento attiva. ① ⑩ attivo. Icona animata = riscaldamento in corso. - Page 4 Funzione dei pulsanti interni Per accedere ai pulsanti di comando interni aprire lo sportello frontale del dispositivo. ⑮ ⑯ ⑰ ⑱ ⑲ ⑳ ㉑ ㉒ ⑮ Pulsante di reset. ⑯ Impostazione dell’orologio. ⑰ Impostazione dei parametri di funzionamento. Selezione della modalità di funzionamento del dispositivo. ⑱...
- Page 5 Installazione Installare l’apparecchio in posizione idonea a rilevare correttamente la temperatura dell’ambiente, possibilmente in una parete interna, evitando l’installazione in nicchie, dietro a porte, a tende o vicino a sorgenti di calore. premere il pulsante ❶ e separare la base ❷...
-
Page 6: Collegamenti Elettrici
Collegamenti elettrici I collegamenti vanno effettuati in funzione del tipo di apparecchiatura comandata dal CARICO CARICO cronotermostato. CHIUSO CHIUSO 230V~ CARIC 50 Hz APERTO APERTO APERTO LEGENDA Conduttori di alimentazione da rete. N = neutro. L = fase. Contatti del relé. C = comune. - Page 7 Inserire n. 3 pile alcaline LR03 tipo mini stilo AAA da 1,5V nell’apposita sede rispettando le polarità indicate sul fondo dell’alloggiamento J. L’errato posizionamento delle pile può danneggiare l’apparecchio. Qualora le indicazioni sul display non dovessero comparire entro 10 secondi, premere il pulsante di reset R.
-
Page 8: Impostazione Dell'orologio
Programmazione e uso del dispositivo Impostazione dell’orologio Premere il pulsante visualizzare l’ora. Premere il pulsante Le cifre dei minuti lampeggiano. Usare i pulsanti per impo- stare il valore esatto dei minuti Premere il pulsante Le cifre delle ore lampeggiano. Usare i pulsanti per impo- stare l’ora esatta D. - Page 9 E per Premere il pulsante terminare la procedura di impo- stazione ora e giorno G. I due punti fra ore e minuti lam- peggeranno confermando la conclusione dell’operazione. Nota. Dopo 15 secondi di inattività, l’apparecchio esce autonomamente dalla procedura memorizzando gli ultimi dati impostati. Nota.
- Page 10 Modalità OFF L’accensione dell’icona e la scomparsa per 5 secondi della temperatura ambiente, conferma l’esclusione della zona termica dal controllo dell’impianto B. Nota. Anche se la zona è esclusa dal controllo, è comunque attiva la funzione antigelo. Programmazione della temperatura antigelo Premere il pulsante Sul display compare la tempera- tura antigelo predefinita (3 °C).
- Page 11 ambiente rilevata. = Programma ECO attivo. = Programma NOTTE attivo. Variazione temporanea del livello di temperatura programmato Agendo sui pulsanti è possibile selezionare un valore di temperatura diverso da quelli programmati. Il nuovo livello di temperatura pro- grammato annulla le programma- zioni in essere, per questo motivo dallo schermo scompaiono tutte le icone relative a profili e temperature programmate.
- Page 12 I pulsanti permettono di variare la temperatura impostata per il programma CONFORT. Premendo il pulsante P si con- ferma il valore della temperatura visualizzato sul display e si passa alla programmazione del livello temperatura successivo (ECO). Ripetere la procedura descritta per modificare la programmazione di tutti i livelli di temperatura (ECO, NOTTE, CONFORT).
- Page 13 Attivare la modalità di funziona- mento OFF. Premere il pulsante P fino alla comparsa sul display dell'indica- zione Usare i pulsanti per atti- vare/disattivare l'algoritmo diffe- renziale B. = Differenziale attivo. = Differenziale non attivo. C o n d i f f e r e n z i a l e a t t i v o ), premendo il pulsan- te P sullo schermo si può...
- Page 14 Attivazione e configurazione dell'algoritmo proporzionale integrale Questo algoritmo permette al cronotermostato di ridurre i cicli di accensione della caldaia man mano che la temperatura ambiente si avvicina alla temperatura impostata ottenendo così una notevole riduzione dei consumi pur mantenendo un grado di comfort ottimale. Sono disponibili tre programmi preimpostati adatti alle diverse tipologie di impianti (P1, P2 e P3) oppure un programma completamente manuale (P4).
- Page 15 Usare i pulsanti per sce- gliere la durata di ciclo tra 5, 10, 15, 20, 25, 30, 35 o 40 minuti H. Premere il pulsante P I per confermare il tempo di ciclo im- postato e passare alla regolazione del tempo minimo di ON. Usare i pulsanti per sce- gliere il tempo minimo di ON tra...
- Page 16 Set-point Tempo Durata ciclo Tempo minimo Banda Prog. Tipo di impianto (minuti) di ON (minuti) Proporzionale Base per bruciatore a gas, ventilconvettori, 1,5 °C valvole di zona, termosifoni in alluminio 1,5 °C Termosifoni elettrici Impianti radianti o a pavimento, 1,5 °C raffrescamento da 5 a 40 da 1 a 5...
- Page 17 Configurazione del funzionamento dell'ingresso ausiliario (morsetto 1-2) Ingresso ausiliario usato per attivazione da remoto Collegando un’apposita interfaccia ai morsetti 1-2 (vedi "Collegamenti elettrici") è possibile attivare da remoto il programma CONFORT nella stagionalità desiderata. Premere il pulsante Usare i pulsanti per sce- gliere la funzione abbinata all'in- gresso:...
- Page 18 Usare i pulsanti per abilita- re/disabilitare l'ingresso finestra. = Ingresso disabilitato. = Ingresso abilitato. E per Premere il pulsante confermare la programmazione. Se l'accensione della caldaia vie- ne annullata a causa dell'ingresso aperto, sul display viene visualiz- zato il messaggio Blocco impostazione livelli temperatura Per evitare che i livelli program- mati vengano modificati o che...
-
Page 19: Reset Dispositivo
Tempo di funzionamento dell'impianto Scegliere uno dei 3 livelli di tem- peratura programmati del quale si vuole visualizzare il tempo di attivazione. Premere il pulsante C per vi- sualizzare il dato. Per azzerare il conteggio premere il pulsante mentre il dato è in evidenza. Reset dispositivo Anomalie di funzionamento e altre ragioni tecniche possono richie-... -
Page 20: Caratteristiche Tecniche
Caratteristiche tecniche • Apparecchio per uso domestico. • Intervallo di rilevamento della tempera- tura ambiente: 15 secondi. • Dispositivo elettronico a montaggio indipendente. • Risoluzione di lettura: 0,1 °C. • Display grafico LCD retroilluminato. • Precisione: ≤ ±0,3 °C. • Alimentazione: 3 pile mini stilo alcaline •... -
Page 21: Digital Thermostat
Digital thermostat FB00801-EN TA/450 INSTALLATION AND USE MANUAL EN English... -
Page 22: General Warnings
General warnings • Important personal safety instructions: READ CAREFULLY! • Make sure that the power supply network, in compliance with the installation rules, is equipped with an all-pole disconnecting device, which guarantees protection for overvoltage category III. • Installation, programming, commissioning and maintenance must only be performed by qualified and experienced personnel in compliance with applicable regulations. -
Page 23: Device Description
Device description Description of the icons on the display and function of the buttons ① ② ③ ④ ⑤ ⑥ ⑦ ⑧ ⑨ ⑩ ⑭ ⑪ ⑬ ⑫ User profiles; the active profile is Heating mode active. ① ⑩ highlighted. Animated icon = heating in progress. - Page 24 Function of internal buttons To access the internal control buttons, open the hatch on the front of the device. ⑮ ⑯ ⑰ ⑱ ⑲ ⑳ ㉑ ㉒ ⑮ Reset button. ⑯ Setting the clock. ⑰ Setting the operating parameters. Selecting the device operating mode. ⑱...
- Page 25 Installation Install the unit in a suitable position to correctly detect the temperature, possibly in an internal wall, avoiding installation in niches, behind doors, curtains or near heat sources. Press the button ❶ and separate the base ❷ from the device body B. Remove the protective shell from the terminal block C.
- Page 26 Wiring The connections must be made depending on the type of equipment controlled by the LOAD CARICO programmable thermostat. CLOSED CHIUSO 230V~ CARIC 50 Hz OPEN APERTO APERTO Mains power supply wires. N = neutral. L = line. Relay contacts. C = common.
- Page 27 Insert 3 x LR03 AAA 1.5 V batteries in posi- tion, respecting the polarity shown on the bottom of the casing J. Incorrect positioning of the batteries may damage the unit. If the indications on the display do not appear within 10 seconds, press the reset button R.
-
Page 28: Setting The Clock
Programming and using the device Setting the clock Press the button to display the time. button A. Press the The minute digits blink. Use the buttons to set the exact minute value B. button C. Press the The hour digits blink. Use the buttons to set the exact hour value B. -
Page 29: Selecting The Operating Mode
button E to finish Press the the time and day setting proce- dure G. The colon between the hours and minutes will flash confirming the operation has been completed. N.B. After 15 seconds of inactivity, the unit automatically exits the procedure, storing the last data set. - Page 30 OFF mode When the icon lights up and the ambient temperature disap- pears for 5 seconds, this confirms that the thermal zone has been excluded from system control B. N.B. Although the zone is excluded from the control, the frost protection feature is still active.
- Page 31 detected ambient temperature. = ECO program active. = NIGHT program active. Temporary change in programmed temperature level Press the buttons to select a temperature value different from those programmed. The new programmed tempera- ture level cancels out the pro- gramming in place, which is why all the icons related to profiles and programmed temperatures disappear from the screen.
- Page 32 buttons allow you to vary the temperature set for the COMFORT program. Press button P to confirm the value of the temperature shown on the display and move on to programming the next tempera- ture level (ECO). Repeat the procedure described to change the programming of all the temperature levels (ECO, NIGHT, COMFORT).
- Page 33 Set the operating mode to OFF. Press button P until appears on the display. Use the buttons to acti- vate/deactivate the differential algorithm B. = Differential active. = Differential not active. When the differential is active ), press button P on the screen to read the value of the temperature differential setting C.
- Page 34 Activating and configuring an integral proportional algorithm This algorithm enables the programmable thermostat to reduce boiler power on cycles as the ambient temperature approaches the set temperature, thus obtaining a considerable reduction in consumption, maintaining the ideal level of comfort. Three preset programs are available, suitable for different types of installations (P1, P2 and P3), or there is a completely manual program (P4).
- Page 35 Use the buttons to choose the duration of the cycle - 5, 10, 15, 20, 25, 30, 35 or 40 minutes H. Press P I to confirm the set cycle time and switch to adjusting the minimum ON time. Use the buttons to choose the minimum ON time between 1 and 5 minutes.
- Page 36 Setpoint Time Cycle length Minimum ON Proportional Prog. Type of system (minutes) time (minutes) band Base for gas burner, fan coils, zone 1.5 °C valves, aluminium radiators 1.5 °C Electric radiators 1.5 °C Radiant or underfloor systems, cooling from 5 to 40 from 1 to 5 from 1 °C to 3 °C Changing the temperature sensor calibration...
- Page 37 Configuring the operation of the auxiliary input (terminal 1-2) Auxiliary input used for remote activation By connecting a special interface to terminals 1-2 (see "Wiring"), it is possible to activate the COMFORT program remotely in the desired season. button A. Press the Use the buttons to choose...
- Page 38 Use the buttons to enable/ disable the window input. = Input disabled. = Input enabled. E to confirm the Press programming. If boiler ignition is cancelled because the input is open, the display shows the message Temperature level setting lock To prevent the programmed levels from being changed or the temperature level from being...
-
Page 39: Resetting The Device
System operating time Choose one of the 3 programmed temperature levels for which you want to display the activa- tion time. Press C to display the data. To reset the counter, press while the data is visible. Resetting the device Malfunctioning and other tech- nical reasons may require the device to be reset. -
Page 40: Technical Features
Technical features • Unit for domestic use. • Reading resolution: 0.1 °C. • Independently-assembled electronic • Accuracy: ≤ ±0.3 °C. device. • Class A software. • Backlit graphic LCD. • Pollution rating: 2. • Power supply: 3 x alkaline LR03 AAA •... -
Page 41: Thermostat Numérique
Thermostat numérique FB00801-FR TA/450 MANUEL D'INSTALLATION ET D'UTILISATION FR Français... -
Page 42: Instructions Générales
Instructions générales • Instructions importantes pour la sécurité des personnes : À LIRE ATTENTIVEMENT ! • S’assurer que le réseau d’alimentation est bien doté, conformément aux règles d’installation, d’un dispositif de déconnexion omnipolaire pour la protection en cas de surtension catégorie III. •... -
Page 43: Description Dispositif
Description dispositif Description des icônes sur l’afficheur et fonction des boutons ① ② ③ ④ ⑤ ⑥ ⑦ ⑧ ⑨ ⑩ ⑭ ⑪ ⑬ ⑫ Profils utilisateur ; le profil activé est Modalité chauffage activée. ① ⑩ mis en évidence. Icône animée = chauffage en cours. -
Page 44: Fonction Des Boutons Internes
Fonction des boutons internes Pour accéder aux boutons de commande internes, ouvrir la plaque frontale du dispositif. ⑮ ⑯ ⑰ ⑱ ⑲ ⑳ ㉑ ㉒ ⑮ Bouton RàZ. ⑯ Configuration de l'horloge. ⑰ Configuration des paramètres de fonctionnement. Sélection du mode de fonctionnement du dispositif. ⑱... - Page 45 Installation Installer l'appareil dans une position lui permettant de détecter correctement la température ambiante, si possible dans un mur interne, en évitant l'installation dans des ouvertures, derrière des portes, des rideaux ou près de sources de chaleur. Appuyer sur le bouton ❶ et séparer la base ❷...
-
Page 46: Branchements Électriques
Branchements électriques Les connexions doivent être effectuées en fonction du type d'équipement commandé CHARGE CARICO par le thermostat programmable. FERMÉ CHIUSO 230V~ CARIC 50 Hz OUVERT APERTO APERTO LÉGENDE Conducteurs d'alimentation réseau. N = neutre. L = phase. Contacts du relais. C = commun. - Page 47 Installer 3 piles alcalines LR03 1,5 V type AAA en respectant les polarités indiquées au fond du logement J. Le positionnement incorrect des piles peut endommager l'appareil. À défaut d’affichage des indications dans les 10 secondes qui suivent, appuyer sur le bouton de remise à...
-
Page 48: Programmation Et Utilisation Du Dispositif
Programmation et utilisation du dispositif Configuration de l'horloge Appuyer sur le bouton pour visualiser l’heure. Appuyer sur le bouton Les chiffres des minutes cli- gnotent. Se servir des boutons pour configurer la valeur exacte des minutes B. Appuyer sur le bouton Les chiffres des heures clignotent. -
Page 49: Sélection Du Profil Utilisateur
E pour Appuyer sur le bouton terminer la procédure de configu- ration de l'heure et du jour G. Les deux points entre les heures et les minutes clignoteront pour confirmer la fin de l'opération. Remarque. Au bout de 15 secondes d'inactivité, l'appareil sort de façon autonome de la procédure en mémorisant les dernières données configurées. - Page 50 Modalité OFF L'allumage de l'icône et la visualisation pendant 5 secondes de la température ambiante confirme la désactivation de la zone thermique du contrôle de l’installation B. Remarque. Même si la zone est exclue du contrôle, la fonction antigel reste activée. Programmation de la température antigel Appuyer sur le bouton L'écran affiche la température...
-
Page 51: Variation Temporaire Du Niveau De Température Programmé
ambiante détectée. = Programme ECO activé. = Programme NUIT activé. Variation temporaire du niveau de température programmé Les boutons permettent de sélectionner une valeur de tem- pérature différente par rapport aux valeurs programmées. Le nouveau niveau de tempé- rature programmé annule les programmations en cours, raison pour laquelle l’écran n’affiche plus les icônes concernant les profils et les températures programmées. -
Page 52: Configurer Le Type D'algorithme De Gestion Thermique
Les boutons permettent de modifier la température configu- rée pour le programme CONFORT. L’enfoncement du bouton P per- met de confirmer la valeur de la température affichée à l’écran et de passer à la programmation du niveau de température suivant (ECO). - Page 53 Activer le mode de fonctionne- ment OFF. Appuyer sur le bouton P jusqu'à ce que l'écran affiche l'indication Se servir des boutons pour activer/désactiver l'algorithme différentiel B. = Différentiel activé. = Différentiel désactivé. Avec différentiel activé ( appuyer sur le bouton P à l'écran pour pouvoir lire la valeur du dif- férentiel thermique configuré...
-
Page 54: Activation Et Configuration De L'algorithme Proportionnel Intégral
Activation et configuration de l'algorithme proportionnel intégral Cet algorithme permet au thermostat programmable de réduire les cycles d'allumage de la chaudière au fur et à mesure que la température ambiante avoisine celle configurée, en obtenant ainsi une forte réduction des consommations avec un degré de confort optimal. Il existe trois programmes préconfigurés adaptés aux différents types d'installations (P1, P2 et P3) ou bien un programme totalement manuel (P4). -
Page 55: Appuyer Sur Le Bouton P I
Se servir des boutons pour choisir la durée du cycle entre 5, 10, 15, 20, 25, 30, 35 ou 40 minutes H. Appuyer sur le bouton P I pour confirmer la durée du cycle configurée et passer au réglage du temps minimum de ON. Se servir des boutons pour choisir le temps minimum de ON... - Page 56 Point de consigne Temps Durée cycle Temps minimum de Bande Prog. Type d'installation (minutes) ON (minutes) proportionnelle Base pour brûleur à gaz, ventilo- 1,5°C convecteurs, vannes de zone, radiateurs en aluminium 1,5°C Radiateurs électriques Installations rayonnantes ou au sol, 1,5°C rafraîchissement de 5 à...
- Page 57 Configuration du fonctionnement de l’entrée auxiliaire (borne 1-2) Entrée auxiliaire utilisée pour l’activation à distance La connexion d’une interface spécifique aux bornes 1-2 (voir « Branchements électriques ») permet d’activer à distance le programme CONFORT pour la saison souhaitée. Appuyer sur le bouton Se servir des boutons pour choisir la fonction combinée à...
- Page 58 Se servir des boutons pour activer/désactiver l’entrée fenêtre. = Entrée désactivée. = Entrée activée. Appuyer sur le bouton pour confirmer la programmation. En cas d’allumage de la chau- dière annulé à cause de l’entrée ouverte, l’écran affiche le mes- sage Blocage de la configuration des niveaux de température Pour éviter que les niveaux pro- grammés ne soient modifiés ou...
- Page 59 Temps de fonctionnement de l’installation Choisir l’un des 3 niveaux de température programmés duquel visualiser le temps d’activation. Appuyer sur le bouton C pour vi- sualiser la donnée. Pour remettre le compteur à zéro, appuyer sur le bouton avant que la donnée ne soit plus visualisée.
-
Page 60: Caractéristiques Techniques
Caractéristiques techniques • Appareil à usage domestique. • Intervalle de détection de la tempéra- ture ambiante : 15 secondes. • Dispositif électronique à montage indépendant. • Résolution de lecture : 0,1°C. • Afficheur graphique LCD rétroéclairé. • Précision : ≤ ±0,3°C. •... - Page 61 Digital-Thermostat FB00801-DE TA/450 MONTAGE- UND BETRIEBSANLEITUNG DE Deutsch...
-
Page 62: Allgemeine Hinweise
Allgemeine Hinweise • Wichtige Sicherheitshinweise: BITTE SORGFÄLTIG DURCHLESEN! • Sicherstellen, dass im Stromnetz gemäß den Installationsvorschriften eine omnipolare Schutzauslösungseinheit, die das Gerät unter den Bedingungen der Überspannungs- kategorie III abtrennt, vorhanden ist; • Die Montage, Programmierung, Inbetriebnahme und Wartung muss von ausgebildeten Fachtechnikern und gemäß... -
Page 63: Beschreibung
Beschreibung Beschreibung der Symbole auf dem Display und der Taster ① ② ③ ④ ⑤ ⑥ ⑦ ⑧ ⑨ ⑩ ⑭ ⑪ ⑬ ⑫ Heizbetrieb eingeschaltet. Benutzerprofile; das aktivierte ① ⑩ Animiertes Symbol = Heizung Benutzerprofil wird angezeigt. läuft. Batterien geladen. Taster mit denen die angezeig- ⑪... - Page 64 Funktion der Innentaster Um auf die Innentaster zuzugreifen, die Frontklappe des Geräts öffnen. ⑮ ⑯ ⑰ ⑱ ⑲ ⑳ ㉑ ㉒ ⑮ Reset-Taster ⑯ Uhrzeit einstellen. ⑰ Einstellung der Betriebsparameter. Betriebsart des Geräts auswählen. ⑱ KÜHLEN - HEIZEN - ⑲ Benutzerprofil wählen.
-
Page 65: Montage
Montage Das Gerät an einer für die Temperatur- erfassung geeigneten Stelle montieren (möglichst an einer Innenwand, nicht in Nischen, hinter Türen oder Gardinen oder in der Nähe von Wärmequellen anbringen). Auf den Taster ❶ drücken und die Grund- platte ❷ vom Gerät trennen B. Die Schutzabdeckung der Klemmleiste entfernen C. -
Page 66: Elektrische Anschlüsse
Elektrische Anschlüsse Der Anschluss hängt von den der Ther- mostatsteuerung gesteuerten Geräten ab. VERBRAUCHER CARICO GESCHLOSSEN CHIUSO 230V~ ZEICHENERKLÄRUNG CARIC 50 Hz OFFEN APERTO APERTO Netzstromleiter. N = Neutralleiter. L = Leiter. Relaiskontakte. C = allgemeiner NO = normalerweise offener Kontakt. NC = normalerweise geschlossener Kontakt. - Page 67 3 Alkali-Mangan-Batterien LR03 AAA zu 1,5V in das Batteriefach einlegen, die Polangaben beachten J. Falsches Einlegen der Batterien kann Schäden verursachen. Wenn die Displayanzeige nicht innerhalb von 10 Sekunden sichtbar ist, den Rück- setztaster R drücken. Das Gerät und die Grundplatte, wie in der Abbildung dargestellt, einrasten K.
- Page 68 Programmierung und Verwendung des Geräts Uhrzeit einstellen Auf den Taster drücken, um die Uhrzeit anzuzeigen. drücken A. Auf den Taster Die Minuten blinken nun. Mit den Tastern die genaue Minutenzahl eingeben B. drücken C. Auf den Taster Die Stunden blinken nun. Mit den Tastern die genaue Stundenzahl eingeben D.
-
Page 69: Wahl Der Betriebsart
drücken E, Auf den Taster um die Einstellung der Uhrzeit und des Datums zu beenden G. Nach Beendigung der Einstel- lung blinken die beiden Punkte zwischen der Stunden- und Mi- nutenanzeige. Hinweis. Wenn das Gerät 15 Sek. lang nicht betätigt wird, beendet das Gerät den Vorgang automatisch und speichert die zuletzt eingegebenen Daten. - Page 70 Betriebsart OFF Wenn das Symbol leuchtet und die Raumtemperaturanzeige 5 Sekunden lang nicht mehr angezeigt wird, wird die Tempe- raturzone nicht von der Anlage gesteuert B. Hinweis. Auch wenn die Temperaturzone nicht mehr gesteuert wird, ist die Frostschutz- funktion weiterhin aktiviert. Einstellung der Frostschutztemperatur Den Taster drücken.
- Page 71 angezeigt. = ÖKO-Programm aktiviert. = NACHT-Programm aktiviert. Momentane Änderung des eingestellten Temperaturniveaus Mit den Tastern kann man eine andere Temperatur, die nicht dem eingestellten Temperaturni- veau entspricht, wählen. Das neue Temperaturniveau hebt die vorhandenen Einstellungen auf, aus diesem Grund sind sämtliche, die Profile und programmierten Temperaturen betreffenden Symbole nicht mehr sichtbar.
- Page 72 Mit den Tastern kann man die für das KOMFORT-Programm eingestellte Temperatur ändern. Durch Druck auf den Taster P wird der, auf dem Display angezeigte Wert, bestätigt und man geht wei- ter zur Einstellung des nächsten Temperaturniveaus (ÖKO). Die beschriebene Vorgehensweise wiederholen und die Einstellung aller Temperaturni- veaus (ÖKO, NACHT, KOMFORT) ändern.
- Page 73 OFF-Betrieb aktivieren. Auf den Taster P drücken, bis auf dem Display die Folgende Anzeige zu sehen ist A. Mit den Tastern den D-Reg- ler ein-/ausschalten B. = D-Regler aktiviert. = D-Regler deaktiviert. Bei eingeschaltetem D-Reg- ler ( ), kann man durch Druck auf den P-Taster auf dem Bildschirm das eingestellte Tem- peraturdifferential ablesen C.
- Page 74 PI-Regler aktivieren und konfigurieren Mit diesem Regelalgorhitmus verringert die Thermostatsteuerung die Einschaltzyklen des Heizkessels bei sich dem Sollwert annähernder Ist-Temperatur. Auf diese Weise wird der Verbrauch verringert und ein optimales Wohlfühlklima gewährleistet. Es sind drei vorprogrammierte Temperaturprogramme (P1, P2 und P3), die sich für alle Anlagen eignen sowie ein vollständig manuelles Programm (P4) vorhanden.
- Page 75 Mit den Tastern kann man eine Einschaltdauer von 5, 10, 15, 20, 25, 30, 35 oder 40 Minuten wählen H. Mit dem Taster P I die einge- stellte Einschaltdauer bestätigen und auf die Einstellung der Min- dest-ON-Dauer wechseln. Mit den Tastern die Min- dest-ON-Dauer von 1 oder 5 Minuten wählen.
- Page 76 Set-point Dauer Zyklusdauer Mindest-ON- Prog. Proportionalband Anlagentyp (Minuten) Dauer (Minuten) Gasbrenner, Heizlüfter, Zonen- 1,5 °C Ventile, Heizkörper aus Aluminium 1,5 °C Elektro-Heizkörper Strahlungs- oder 1,5 °C Fußbodenheizung, Klimaanlagen von 5 bis 40 von 1 bis 5 von 1°C bis 3°C Kalibrierung des Temperaturfühlers ändern Wenn aufgrund des Standorts des Gerätes die korrekte Temperaturerfassung nicht möglich sein sollte, kann die Ist-Temperatur in Zehntelgraden bis ±3 °C geändert werden.
- Page 77 Konfiguration der Betriebsweise des AUX-Eingangs (Klemme 1-2) AUX-Eingang wird zur Fernaktivierung verwendet Durch die Anbindung einer entsprechenden Schnittstelle an die Klemmen 1-2 (siehe "Elektrische Anschlüsse") kann das KOMFORT-Programm in der gewünschten Jahreszeit ferngeschaltet werden. drücken A. Auf den Taster Mit den Tastern die dem Eingang zugeordnete Funktion auswählen:...
- Page 78 Mit den Tastern den Fens- ter-Eingang aktivieren/deakti- vieren. = Eingang deaktiviert. = Eingang aktiviert. E die Ein- Mit dem Taster stellung bestätigen. Wenn der Heizofen aufgrund eines offenen Eingangs ausge- schaltet wird, erscheint auf dem Display die Meldung Sperre der Temperaturniveaueinstellung Damit die eingestellten Tempe- raturen nicht verändert bzw.
-
Page 79: Batterien Wechseln
Betriebsdauer der Anlage Eines der 3 eingestellten Tem- peraturniveaus wählen, dessen Betriebsdauer angezeigt werden soll. Auf den Taster C drücken, um den Wert anzuzeigen. Während der Wert angezeigt wird, das Zählwerk, durch Druck auf den Taster auf Null stellen. Geräte-Reset Aufgrund von Störungen und anderen technischen Gründen, kann die Geräterücksetzung... -
Page 80: Technische Daten
Technische Daten • Heimendgerät. • Erfassungsintervall Raumtemperatur: 15 Sekunden. • Unabhängig montiertes elektronisches Gerät. • Lese-Auflösung: 0,1 °C. • LCD-Grafikdisplay mit Hintergrundbe- • Messgenauigkeit: ≤ ±0,3 °C. leuchtung. • Software Klasse A. • Spannungsversorgung: 3 Alkali-Mang- • Verschmutzungsgrad: 2. an-Batterien LR03 AAA zu 1,5V. •...