Table des Matières

Publicité

Les langues disponibles
  • FR

Les langues disponibles

Liens rapides

Manuale d'installazione, uso e manutenzione
Installation, use and maintenance manual
Manuel d'installation, d'utilisation et d'entretien
Installations-, Gebrauchs- und Wartungsanleitung
Manual de instalación, uso y mantenimiento
Pannello remotabile mod. DISPLAY UTILITY
Remotable panel model UTILITY DISPLAY
Panneau de commande distant mod. DISPLAY UTILITY
Remote-Display Mod. DISPLAY UTILITY
Panel de control remotable mod. MONITOR UTILITY
484299220A_M5_09/2014
Hardware - M
Leggere attentamente le istruzioni prima dell'installazione, utilizzo e manutenzione.
Il manuale è parte integrante dell'apparecchio.
Read the instructions carefully before installation, use and maintenance.
The manual is an integral part of the unit.
Lire attentivement les instructions avant l'installation, l'utilisation et l'entretien.
Le manuel fait partie intégrante de l'appareil.
Vor Installation, Gebrauch und Wartung muss diese Anleitung aufmerksam durchgelesen werden.
Das Handbuch ist wesentlicher Bestandteil des Geräts.
Lea atentamente las instrucciones antes de la instalación, el uso y el mantenimiento.
El manual es parte integrante del aparato.
1
DISPLAY UTILITY

Publicité

Table des Matières
loading

Sommaire des Matières pour Ferroli O100

  • Page 1 Manuale d’installazione, uso e manutenzione Installation, use and maintenance manual Manuel d’installation, d'utilisation et d'entretien Installations-, Gebrauchs- und Wartungsanleitung Manual de instalación, uso y mantenimiento Pannello remotabile mod. DISPLAY UTILITY Remotable panel model UTILITY DISPLAY Panneau de commande distant mod. DISPLAY UTILITY Remote-Display Mod.
  • Page 2: Certificato Di Garanzia

    La presente Garanzia si aggiunge e non pregiudica i diritti del Consumatore previsti dalla Direttiva 1999/44/CE e dal relativo decreto di attuazione Dlgs 6.09.2005 n°206. Qualsiasi controversia relativa alla presente garanzia sarà devoluta alla competenza esclusiva del Tribunale di Verona. " direzione e coordinamento della Ferroli spa " DISPLAY UTILITY...
  • Page 3 4 - 9 ............................. La Ditta COLA garantisce i propri prodotti secondo le norme attualmente in vigore, ad esclusione delle parti soggette a normale usura. Per le condizioni di garanzia rivolgersi all’importatore o al rappresentante autorizzato, il quale può integrare il periodo della garanzia obbligatoria con un periodo supplementare a sua totale ed esclusiva responsabilità.
  • Page 4: Table Des Matières

    Le operazioni d’installazione , uso e manutenzione del display UTILITY devono soddisfare i requisiti descritti in questo manuale nonchè le leggi e le norme specifiche esistenti; inoltre essendo un prodotto a supporto di un apparecchio di riscaldamento fabbricato da FERROLI è necessario fare riferimento anche al manuale d’installazione dello stesso.
  • Page 5: Accessori In Dotazione

    Ingombri display Utility Legenda: A- Schermo touch-screen B- Alloggiamento porta USB C- Fori per fissaggio al muro D- Pretrancio passaggio cavo elettrico 1.5 Accessori in dotazione La dotazione è comprensiva di: due connettori maschi per bus-onde convogliate; manuale d’installazione, uso e manutenzione. Istruzioni per richiesta di intervento e ricambi Per richiedere qualsiasi intervento e/o ricambio contattare il proprio rivenditore, importatore di zona o il centro di assistenza autorizzato più...
  • Page 6: Schede Di Controllo Degli Apparecchi Compatibili

    Tarature del display UTILITY All’avvio del display UTILITY comparirà per alcuni secondi il logo FERROLI. Premendo le zone delimitate dal tratteggio è possibile accedere alle impostazioni speciali di regolazione del contrasto del display, della illuminazione e di taratura della sonda ambiente remota.
  • Page 7: Regolazione Del Contrasto

    2.4.1 Regolazione del contrasto Tenere premuta la zona evidenziata dal tratteggio corrispondente al comando P1 per accedere al menù di regolazione del contrasto. In basso a sinistra in corrispondenza della zona P1 è visualizzato il valore in percentuale del contrasto. Selezionare P2 e P3 per ridurre ed incrementare tale valore.
  • Page 8: Accensione

    Di seguito è riportata la schermata principale e le relative indicazioni d’uso: Stato potenza Stato Termostato Orologio (se presente): Ambiente Temperature: Ambiente (ventilato) Riscaldamento Ambiente (idro) Sanitario Riscaldamento Stato funzione Sanitario Tasto di accensione/spegnimento Tasto per il SET del crono e Tasto per impostare la potenza e della lingua la ventilazione...
  • Page 9: Impostazione Della Lingua

    Tramite P2 e P3 è possibile impostare la ventilazione. A seconda dell’apparecchio di riscaldamento collegato può apparire: La ventilazione è impostabile da un valore minimo di 1 a un massimo di 5 La ventilazione è impostabile anche con la funzione AUTOMATICO Doppia ventilazione, impostabile con valori da 1 a 5 con l’aggiunta della funzione AUTOMATICO.
  • Page 10: General Information

    Installation, use and maintenance of the UTILITY display must meet the requirements described in this manual as well as the applicable laws and regulations; also, in being a product used for a heating unit manufactured by FERROLI, reference must be made to its installation manual.
  • Page 11: Accessories Supplied

    Utility display dimensions Key: A- Touch-screen B- USB port housing C- Holes for wall mounting D- Knockout for electrical cable 1.5 Accessories supplied The supply includes: two male connectors for powerline communication bus; installation, use and maintenance manual. 1.6 Instructions for requesting assistance and replacement parts To request any assistance and/or replacement parts contact your dealer, area importer or the nearest authorized service center, clearly specifying the following: remotable display model (i.e.
  • Page 12: Compatible Unit Control Boards

    2.4 UTILITY display settings When the UTILITY display is started, the FERROLI logo will appear for a few seconds. Press the areas marked by the dotted line to access special settings for adjusting the display contrast, lighting and setting of the remote ambient sensor.
  • Page 13: Adjusting The Contrast

    2.4.1 Adjusting the contrast Press and hold the area marked by the dotted line corresponding to command P1 to access the contrast adjustment menu. The contrast percentage value is shown in the bottom left at area P1. Select P2 and P3 to reduce and increase the value.
  • Page 14: Turning On

    Given below is the main screen and the respective indications for use: Power status Thermostat status Clock (if present): Ambient Temperature: Ambient (ventilated) Heating Ambient (Idro) Heating Function status On/Off button Button for chrono and language Button for power and ventilation setting setting Button for temperature...
  • Page 15: Setting The Language

    Ventilation can be set with P2 and P3. Depending on the heating unit connected, the following may appear: Ventilation is settable from a minimum value of 1 to a maximum of 5 Ventilation can also be set with the AUTOMATIC function Double ventilation, settable with values from 1 to 5 with the addition of the AUTOMATIC function.
  • Page 16: Recommandations Générales

    ; d'autre part le display UTILITY étant un accessoire d'un appareil de chauffage fabriqué par FERROLI, il faut nécessairement se référer aussi à la notice d'installation de celui-ci. Toutes les configurations, les dessins, les dimensions et les schémas sont fournis à titre d'exemple.
  • Page 17: Cotes D'encombrement Du Display Utility

    Cotes d'encombrement du display Utility Légende : A- Écran tactile B- Emplacement port USB C- Trous de fixation murale D- Prédécoupe passe-câble électrique 1.5 Accessoires fournis La fourniture comprend : deux connecteurs mâles pour bus-ondes acheminées ; manuel d’installation, d'utilisation et d'entretien. ’...
  • Page 18: Cartes De Contrôle Des Appareils Compatibles

    2.4 Réglages du display UTILITY Le logo FERROLI apparaîtra pendant quelques secondes à l'allumage du display UTILITY. Appuyer sur les zones délimitées par un pointillé pour accéder aux paramétrages spéciaux de réglage du contraste de l'afficheur, de la luminosité et du tarage de la sonde d'ambiance distante.
  • Page 19: Réglage Du Contraste

    2.4.1 Réglage du contraste Maintenir enfoncée la zone mise en évidence par un pointillé correspondant à la commande P1 pour accéder au menu de réglage du contraste. En bas à gauche, dans la zone P1, apparaît le pourcentage du contraste. Sélectionner P2 et P3 pour diminuer ou augmenter cette valeur.
  • Page 20: Allumage

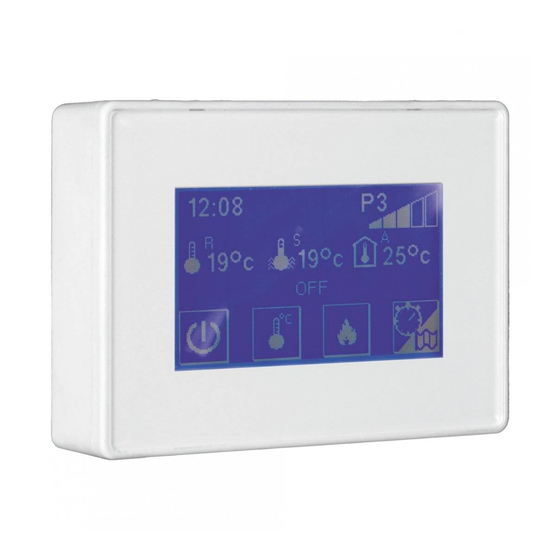
    Voici l'écran principal et ses indications pour son utilisation : État puissance État thermostat Horloge (s'il y en a un) : d'ambiance Températures : Milieu (ventilé) Chauffage Milieu (hydro) Sanitaire Chauffage État fonction Sanitaire Touche d'allumage/d'extinction Touche pour le Touche pour paramétrer la PARAMÉTRAGE du chrono et puissance et la ventilation Touche pour paramétrer les...
  • Page 21: Paramétrage De La Langue

    Il est possible de paramétrer la ventilation avec P2 et P3. Selon l'appareil de chauffage connecté, sur l'afficheur peut apparaître : La ventilation est paramétrable dans une plage de valeur comprise entre un minimum de 1 et un maximum de 5 La ventilation est également paramétrable avec la fonction AUTOMATIQUE...
  • Page 22: Allgemeine Hinweise

    Installation, Bedienung und Wartung des Displays UTILITY müssen den in diesem Handbuch enthaltenen Vorschriften sowie den einschlägigen Gesetzen und Normen entsprechen; da es sich um ein Produkt handelt, das mit einem von FERROLI gebauten Heizgerät kombiniert wird, sind außerdem dessen Installationsanleitungen zu beachten.
  • Page 23: Mitgeliefertes Zubehör

    Außenmaße Display Utility Legende: A- Touchscreen B- Aufnahme für USB-Anschluss C- Bohrungen für die Wandbefestigung D- Vorgestanzter Netzkabeldurchgang 1.5 Mitgeliefertes Zubehör Der Lieferumfang umfasst: zwei Stecker für Bus mit Powerline Communication Installations-, Gebrauchs- und Wartungsanleitung. 1.6 Anleitungen für die Anforderung von Kundendiensteingriffen und Ersatzteilbestellungen Zur Anforderung eines Eingriffs und/oder für Ersatzteilbestellungen wenden Sie sich bitte an Ihren Händler, den Gebietsimporteur oder an den nächstgelegenen Vertragskundendienst und geben Sie die folgenden Daten an: Modell des Remote-Displays, in diesem Fall UTILITY;...
  • Page 24: Steuerplatine Der Kompatiblen Geräte

    Es ist nicht möglich, zwei Displays UTILITY an die gleiche Platine anzuschließen. 2.4 Einstellungen des Displays UTILITY Beim Einschalten des Displays UTILITY wird ein paar Sekunden lang das Logo FERROLI eingeblendet. Durch Antippen der Bereiche mit gestrichelter Umrandung öffnen...
  • Page 25: Kontrasteinstellung

    2.4.1 Kontrasteinstellung Den umrandeten Bereich der Schaltfläche P1 gedrückt halten, um das Menü der Kontrasteinstellung zu öffnen. Unten links beim Bereich P1 wird der prozentuale Kontrastwert angezeigt. Diesen Wert mit P2 und P3 verringern bzw. erhöhen. Bei Antippen von P4 wird das Logo des Unternehmens eingeblendet.
  • Page 26: Einschalten

    Nachstehend ist der Hauptbildschirm mit den jeweiligen Bedienungshinweisen abgebildet: Status Leistungsstufe Status Thermostat (falls vorhanden): Raum Temperaturen: Raum (luftgeführt) Heizung Raum (wassergeführt) Warmwasser Heizung Status Funktion Warmwasser Ein-/Ausschalttaste Schaltfläche zum Einstellen des Schaltfläche zum Einstellen der Uhrenthermostats und der Leistungsstufe und der Lüftung Sprache Schaltfläche zum Einstellen der Temperatursollwerte...
  • Page 27: Einstellung Der Sprache

    Mit P2 und P3 kann die Lüftung eingestellt werden. Je nach Heizgerät können folgende Anzeigen erscheinen: Die Lüftung kann auf einen Wert von mindestens 1 bis höchstens 5 eingestellt werden. Die Lüftung kann auch mit der AUTOMATIK-Funktion eingestellt werden. Doppelte Lüftung, einstellbar mit Werten von 1 bis 5 mit dem Zusatz der AUTOMATIK-Funktion.
  • Page 28: Advertencias Generales

    Descripción técnica El monitor UTILITY permite controlar y configurar a distancia aparatos de la marca Ferroli s.p.a. alimentados con pellets, como estufas de aire canalizadas o no, termoestufas, estufas insertables y calderas. Está dotado de una pantalla táctil donde aparecen las principales informaciones del aparato conectado.
  • Page 29: Accesorios Suministrados

    Medidas del monitor Utility Leyenda: A- Pantalla táctil B- Puerto USB C- Orificios de fijación a la pared D- Precorte para pasar el cable eléctrico 1.5 Accesorios suministrados El suministro incluye: Dos conectores macho para el bus de ondas conducidas Manual de instalación, uso y mantenimiento 1.6 Pedido de reparaciones y recambios Para pedir reparaciones o recambios, contacte con la tienda donde adquirió...
  • Page 30: Tarjetas De Control De Los Aparatos Compatibles

    2.4 Calibración del monitor UTILITY Cuando se enciende el monitor UTILITY, aparece durante algunos segundos el logotipo de FERROLI. Pulse las teclas indicadas con líneas de puntos para acceder a los ajustes de contraste y brillo de la pantalla y calibración de la sonda de ambiente remota.
  • Page 31: Ajuste Del Contraste

    2.4.1 Ajuste del contraste Mantenga presionada la tecla P1 para acceder al ajuste del contraste. Abajo a la izquierda, sobre P1, se indica el porcentaje de contraste. Pulse P2 o P3 para modificar el valor. Pulse P4 para volver a la página inicial. 2.4.2 Ajuste del brillo Al encender el monitor, mantenga presionada la tecla P2 para acceder al ajuste del brillo.
  • Page 32: Encendido

    A continuación se ilustra la página principal con las respectivas indicaciones de uso: Potencia Estado del termostato Reloj (si se utiliza): Ambiente Temperaturas: Ambiente (ventilado) Calefacción Ambiente (hidro) Agua sanitaria Calefacción Estado de Agua funcionamiento sanitaria Tecla de encendido y apagado Tecla para ajustar crono e Tecla para ajustar potencia y...
  • Page 33: Selección Del Idioma

    Seleccione la velocidad de ventilación con P2 y P3. Según el aparato calentador conectado, puede aparecer: Ajuste de ventilación manual entre 1 y 5 Ajuste de ventilación manual entre 1 y 5 o AUTOMÁTICO Doble ventilación con ajuste manual entre 1 y 5 o AUTOMÁTICO Los elementos que aparecen en la pantalla dependen del aparato calentador conectado, por lo cual pueden no coincidir exactamente con los que se ilustran en el manual.

Ce manuel est également adapté pour:

L023

Table des Matières