Publicité
Les langues disponibles
Les langues disponibles
Liens rapides
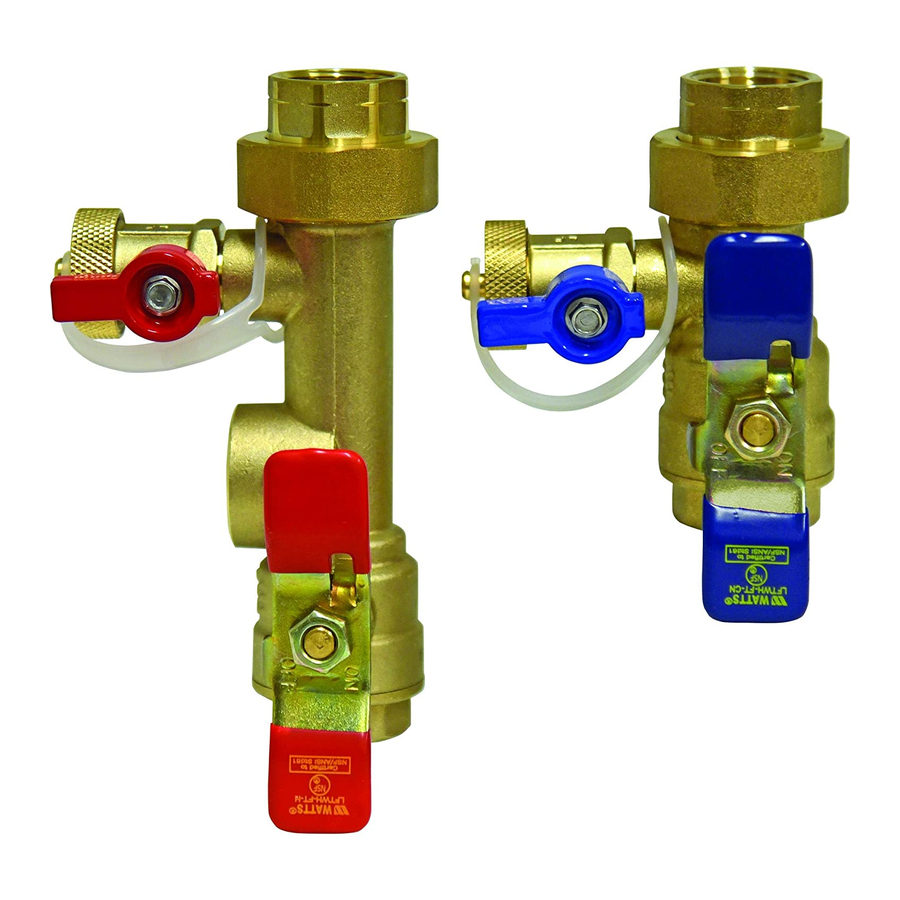
Thank you for choosing the Isolator® EXP Tankless Water Heater Service Valves.
This valve kit was designed with ease of installation and regular maintenance of your tankless water heater in mind. It was not designed for installations
exposed to subfreezing conditions; please keep this in mind when choosing a location to install your tankless water heater. Drain valves should remain
closed during normal operation. Do not rely on the drain cap to stop the water from draining. When draining, always remove drain caps slowly to ensure
that no pressure exists. If you have any questions or comments, please contact us at (800) 225-9529 or visit us on the web - www.webstonevalves.com
Installation Instructions:
1.
Wrap the ends of an approved pressure relief valve, threaded water inlet & outlet on the tankless water heater with a minimum of 3 wraps of
PTFE thread tape.
2.
Screw the pressure relief valve into the 3/4" threads opposite the wing handle on the HOT water service valve. (RED insulator ring)
3.
Loosen the 3/4" union assembly on the HOT water valve.
4.
Connect the union assembly on the HOT water valve to the HOT water outlet on the tankless water heater.
5.
Ensure that the union nut is aligned accurately to the valve and that the RED insulator ring & rubber washer are properly in place.
6.
Tighten the union assembly onto the HOT water side of the EXP valve using approximately 15 foot lbs.
7.
Loosen the 3/4" union assembly on the COLD water valve. (BLUE insulator ring)
8.
Connect the union assembly on the COLD water valve to the COLD water inlet on the tankless water heater.
9.
Ensure that the union nut is aligned accurately to the valve and that the BLUE insulator ring & rubber washer are properly in place.
10. Tighten the union assembly to the COLD water side of the valve using approximately 15 foot lbs.
11. Connect the INLET on the COLD water valve to the MAIN SOURCE of the water supply.
12. Connect the OUTLET on the HOT water valve to the HOT WATE R plumbing system.
13. Ensure that both drain valve lever handles are in the closed position (perpendicular to the drain portion of the body).
Diagnostic and Testing Procedures:
1.
The full port characteristics of the Isolator EXP allows for full diagnostic testing and cleansing of your system by one person.
2.
Ensure that the drain valve handle on the HOT valve is closed (Lever perpendicular to drain portion of the body)
3.
Slowly remove the drain cap and retain the rubber washer.
4.
Connect a hose to the hot water drain valve and run into a bucket, sink, or drain opening and begin testing the system.
(Flow rate, firing rate and temperature tests can all be performed).
5.
Consult your tankless water heater owner's manual for complete information on all diagnostic testing of your particular model.
Cleaning and Flushing Instructions:
Check with the manufacturer of your tankless water heater for specific guidelines for the unit installed. Pump, hoses, pail & solution not included.
1.
Disconnect power to the tankless water heater and shut off the gas valve.
2.
Close both the HOT & COLD water valves by turning the main valve wing handles 90 degrees.
(Handles will now be perpendicular to the main valve body.)
3.
Ensure that both drain valve handles are closed (Handles perpendicular to the drain spout)
4.
Slowly remove the drain caps. Be sure to retain the rubber washer inside of the cap.
5.
Connect the pump outlet hose to the COLD water drain outlet of the EXP valve. (BLUE Insulator Ring).
6.
Connect a drain hose to the HOT water drain outlet of the EXP valve. (RED Insulator Ring).
7.
Pour 3 to 5 gallons of flushing solution into a pail. (Virgin food grade white vinegar or citric acid recommended).
8.
Place both the pump inlet hose and the HOT valve drain outlet hose into the pail.
9.
Open both the HOT & COLD drain valve handles on the Isolator EXP valves.
10. Turn on the pump and allow the solution to circulate for 20 to 45 minutes, depending on the condition of the appliance.
11. Turn off the pump and close the COLD water drain valve.
12. Remove the hose from the COLD water drain valve; replace cap & washer securely onto the drain valve outlet.
13. Remove the pump and hose from the pail; dispose of the cleansing solution properly.
14. Put the HOT water drain hose end back into the empty pail and open the main water valve on the COLD EXP.
This procedure will flush out the tankless water heater with fresh cold water; flush with at least 20 gallons.
You will have to empty the pail several times.
15. Close the main water valve on the COLD EXP & clean the in-line filter of your tankless water heater if required by the manufacturer.
16. Close the drain valve on the HOT EXP, re move the drain hose, replace cap & washer securely onto the drain valve outlet.
17. Open the main water valves on both the COLD & HOT EXP valves. (Handles parallel to the main valve body).
18. Ensure that both the HOT & COLD drain valve handles are CLOSED (Perpendicular to the drain portion of the body).
19. Restore power to the tankless water heater and turn on the gas valve.
Installation Instructions:
The PRV must be connected by the threaded connection opposite the wing handle on the hot water valve (depicted by the
RED insulator ring), maintaining a ¾" port size with no shut off valve or line restriction in between the appliance and the
PRV. The discharge line from the PRV should pitch downward and terminate 6" above drains where discharge will be
clearly visible. The discharge end of the line shall be plain (unthreaded) and a minimum of ¾" in diameter. The discharge
line material must be suitable for water at least 180 ◦ Fahrenheit. The discharge line shall be as short and straight as
possible such that the arrangement does not reduce the relieving capacity of the pressure relief valve. No valve of any type
may be installed in the discharge line of the pressure relief valve.
Maintenance Instructions:
For proper care of this approved pressure relief valve, it is recommended that the valve is manually operated once a year.
In doing so, it will be necessary to take precautions with regard to the discharge of potentially scalding hot water under
pressure. Ensure discharge has a place to flow. Contact with your body or other property may cause damage or harm.
For kits including a (PRV) Pressure Relief Valve (Item # 20713)
Please note that only the PRV in this package is certified by CSA International as an approved item.
FORM: EXPEN-0417 The Isolator® is a registered trademark of NIBCO INC. ©2017 NIBCO INC., All Rights Reserved.
Publicité

Manuels Connexes pour Nibco Webstone ISOLATOR E-X-P H-44444WPR2

Sommaire des Matières pour Nibco Webstone ISOLATOR E-X-P H-44444WPR2
- Page 1 Ensure discharge has a place to flow. Contact with your body or other property may cause damage or harm. Please note that only the PRV in this package is certified by CSA International as an approved item. FORM: EXPEN-0417 The Isolator® is a registered trademark of NIBCO INC. ©2017 NIBCO INC., All Rights Reserved.
- Page 2 S’assurer que la tuyauterie de purge est installée adéquatement. Tout contact avec l’eau de purge de la valve de surpression peut causer des blessures et dommages. Veuillez noter que seule la valve de surpression incluse dans cet ensemble est certifiée CSA. FORM: EXPFR-0417 The Isolator® is a registered trademark of NIBCO INC. ©2017 NIBCO INC., All Rights Reserved.