Table des Matières
Publicité
Les langues disponibles
Les langues disponibles
Liens rapides
Publicité
Chapitres
Table des Matières

Manuels Connexes pour Perry Electric 1IO6081

Sommaire des Matières pour Perry Electric 1IO6081
- Page 1 INTERRUTTORE ORARIO DIGITALE DIGITAL TIME SWITCH INTERRUPTEUR HORAIRE DIGITAL DIGITALE ZEITSCHALTUHR INTERRUPTOR HORARIO DIGITAL display retroilluminato backlit display écran rétro-éclairé Rückseitig beleuchtete Anzeige pantalla retroiluminada PE - DEIONN053 06/12...
-
Page 2: Table Des Matières
SOMMARIO Descrizione dell’apparecchio ITALIANO (secondo il modello) Gli interruttori orari digitali a 2 moduli DIN disponibili nelle versioni Caratteristiche tecniche/Dati prestazionali Pag. 3 giornaliera o settimanale, con 1 relè (monocanale), sono dotati di un grande display retroilluminato che permette di visualizzare in modo - Modelli disponibili Pag. -
Page 3: Caratteristiche Tecniche/Dati Prestazionali
1.1 - Dati prestazionali 1 - CARATTERISTICHE TECNICHE (secondo il modello) Display LCD 1" 1/3 retroilluminato fisso. Tensione alimentazione 230 V c.a. +/- 10% Numero di programmi: 20 (20 accensioni e 20 spegnimenti) Frequenza 50-60 Hz assegnabili al canale (C1). IP20 Grado di protezione Programmazione minima ON/OFF di 1 secondo. -
Page 4: Modelli Disponibili
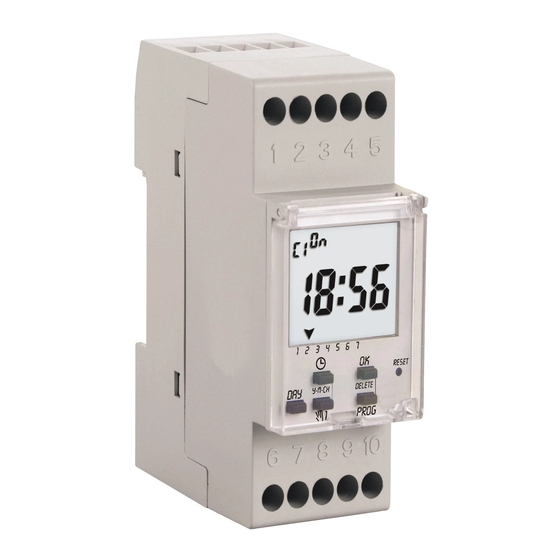
2 - MODELLI DISPONIBILI: 3 - COLLEGAMENTI ELETTRICI Descrizione morsetti: Alimentazione di rete 230V~ morsetto n° 5 = (Linea) 230 Vac morsetto n°10 = (Neutro) Nota: contatto in scambio del relè libero da potenziale. relè Canale 1 1 2 3 4 5 6 7 morsetto n°... -
Page 5: Display E Funzioni Tasti
4 - DISPLAY E FUNZIONI TASTI (secondo il modello) Forzatura manuale temporanea del canale (C1) stato On/OFF del canale (C1) Canale (C1) Impostazioni e/o visualizzazioni: Indicazione ora di un programma (inizio) - Ora attuale Indicazione intervento per secondi - ora ON e ora OFF dei programmi - forzatura manuale permanente Indicazione ora di un programma (fine) -
Page 6: Messa In Funzione
5 - MESSA IN FUNZIONE Importante: nella rappresentazione grafica del Caratteri Caratteri lampeggianti: accesi fissi: display è stata adottata la seguente convenzione. A) Prima accensione del dispositivo Quando viene alimentato per la prima volta, l’interruttore orario presenta il display retroilluminato con i segmenti spenti; per attivarlo premere delicatamente con un sottile utensile il tastino RESET . - Page 7 5.1) Collaudo collegamenti (test relè) Prima di iniziare la procedura di inserimento dell’ora attuale è possibile collaudare i collegamenti elettrici ed il corretto funzionamen- to del relè agendo sul tasto di forzatura manuale . La prima operazione di programmazione riporta il canale allo stato di 1 2 3 4 5 6 7 1 2 3 4 5 6 7 1 2 3 4 5 6 7...
-
Page 8: Programmazione
6 - PROGRAMMAZIONE Principio di programmazione: l’interruttore orario permette l’inserimento di max 20 programmi (On/OFF). un programma è assegnato il canale ( ) ed è formato da: - una commutazione di inizio ( = relè attivato) all’ora programmata. - una commutazione di fine ( = relè... - Page 9 6.1) INSERIMENTO DI UN PROGRAMMA Dopo l’inserimento dell’ora attuale (per modello Giornaliero) e anche il giorno attuale (per modello Settimanale) , sul display appare il programma con lampeggianti gli indici riferiti ai giorni della settimana (solo mod. Settimanale), con il tasto scegliere il giorno o il gruppo di giorni (vedere sotto la TABELLA GRUPPO GIORNI);...
- Page 10 6.2) Programma con attivazione del canale per secondi: da 1 a 99 secondi (es. campane scolastiche, sirene inizio-fine lavoro) In qualsiasi programma libero, selezionare come da procedura precedente, il giorno o il gruppo di giorni (solo mod. Settimanale) impostare l’ora di e confermare con il tasto quindi premere una seconda volta il tasto Sul display apparirà...
-
Page 11: Lettura Dei Programmi (Da P1 A P20)
6.4) Inserimento di un programma con una durata di alcuni giorni (solo per modello settimanale) In questo caso è necessario programmare il giorno e l’ora di attivazione ed il giorno e l’ora di disattivazione. Nell’esempio ripor- tato viene creato il programma con attivazione del canale alle 18:00 del Venerdì... -
Page 12: Modifica Di Un Programma
8 - MODIFICA DI UN PROGRAMMA Per modificare i giorni, l’ora di e/o l’ora di di un programma agire come segue: selezionare il programma da modificare con il tasto PROG come indicato nel cap. “Lettura dei programmi”, modificare il giorno o gruppo di giorni (solo mod. -
Page 13: Inserimento Di Nuovi Programmi Oltre A Quelli Già Inseriti
10 - INSERIMENTO DI NUOVI PROGRAMMI OLTRE A QUELLI GIÀ INSERITI I programmi rimasti liberi possono essere successivamente programmati. Premere il tasto PROG per entrare nella modalità “Lettura dei programmi”; r icercare con il tasto PROG un programma libero, premere il tasto quindi Prog Prog... -
Page 14: Cancellazione Di Tutti I Dati Inseriti
13.2) Forzatura manuale permanente Durante il normale funzionamento o condizione di forzatura manuale temporanea, la forzatura manuale permanente del canale si ottiene premendo per 5 secondi i tasto Lo stato di forzatura permanente viene evidenziato sul display dalla comparsa della scritta Durante la forzatura permanente tutti i programmi vengono inibiti (sospesi);... -
Page 15: Device Description
Device description INDEX ENGLISH (based on the model) DIN module digital time switches available in daily and weekly Technical and functional characteristics Page 16 versions with 1 relay (single channel), equipped with a large backlit display which allows clear and immediate visualisation of charging Available models Page 17 status, date, current time and if manual operation has been selected. -
Page 16: Technical Specifications
1.1 - F unctional characteristics 1 - TECHNICAL SPECIFICATIONS (based on the model) Display LCD 1" 1/3 constantly backlit. Power supply voltage 230 V c.a. +/- 10% Number of programs: 20 (20 on and 20 off) assignable to channel (C1) Frequency 50-60 Hz Minimum ON/OFF programming 1 second. -
Page 17: Available Models
2 - AVAILABLE MODELS: 3 - ELECTRICAL CONNECTIONS Description of t erminals Supply voltage 230V~ terminal n° 5 = (Line) 230 Vac terminal n°10 = (Neutral) Note: contact voltage-free. relay Channel 1 1 2 3 4 5 6 7 terminal n° 1 = NO (normally open contact) Delete terminal n°... -
Page 18: Display And Key Functions
4 - DISPLAY AND KEY FUNCTIONS (based on the model) temporary manual forcing of channel (C1) On/OFF channel (C1) status Channel (C1) Settings and/or display: Indication of hour of a program (start) - Current time Indication of operation per seconds - ON hour and OFF hour of programs - permanent manual forcing Indication of... -
Page 19: Initial Operation
5 - INITIAL OPERATION Characters Important: the following meanings are adopted in Characters permanently blinking: the instructions. alight: A) First time switching on the device RESET key When powered for the first time, some segments on the time display will be off. To activate them, lightly press the using a thin object. - Page 20 5.1) Connections testing ( relay testing Before starting with current hour entry, it is possible to test electrical connections and proper relay operation using manual forcing . The first programming operation brings channel to 1 2 3 4 5 6 7 1 2 3 4 5 6 7 1 2 3 4 5 6 7 5.2) CURRENT HOUR, MINUTES AND DAY ENTRY (weekly model only)
-
Page 21: Programming
6 - PROGRAMMING Programming principle: the time switch allows entry of max 20 programs (On/OFF). A program is assigned to channel ( ) composed of: - a start to switching ( =relay active) at the programmed hour - an end to switching ( =relay in stand-by) at the programmed hour (or seconds of activation) - the day or group of days in which the program must be executed. - Page 22 6.1) ENTERING A PROGRAM After entering the current time (for Daily model) and even the current day (for Weekly model) , program will appear on the display and the indicators corresponding to the days of the week will flash ( Weekly model only ).
- Page 23 6.2) Program with channel activation by seconds: from 1 to 99 seconds (e.g. school bells, sirens for work start and finish, etc.) In any free program, as per the previous procedure, select the day or group of days (Weekly model only) , set the time and confirm with...
-
Page 24: Reading Programs (From P1 To P20)
6.4) Entering a program with a duration of several days (for weekly model only) In this case, it is necessary to program activation day and time and deactivation day and time. In the example shown, program is created with channel activation at 18:00 on Friday and deactivation at 21:00 on Sunday. Attention: all other programs will be disabled during the activation period from 18:00 on Friday to 21:00 on Sunday. -
Page 25: Modifying Programs
8 - MODIFYING PROGRAMS To modify the days, and/or time of a program: select the program to be modified with the PROG key as indicated in chapt. “Reading programs". Modify the day or group of days (Weekly model only) with the key and confirm with Using the key, modify the... -
Page 26: Entering New Programs In Addition To Those Already Entered
10 - ENTERING NEW PROGRAMS IN ADDITION TO THOSE ALREADY ENTERED Programs which have remained free can then be programmed. Press PROG to enter into "Reading programs" mode; use PROG to search for a free program, press then enter the program as indicated in the Prog Prog PROGRAMMING chapter. -
Page 27: Deleting All Entered Data
13.2) Permanent manual forcing During normal operation or temporary manual forcing conditions, channel permanent manual forcing is obtained by pressing for 5 seconds. Permanent forcing status is highlighted on the display by the appearance of the message During permanent forcing , all programs are inhibited (suspended). -
Page 28: Description De L'appareil
FRANÇAIS Description de l'appareil SOMMAIRE (selon le modèle) Les interrupteurs horaires digitaux à 2 modules DIN disponibles en - Caractéristiques techniques/Prestations version journalière ou hebdomadaire, avec 1 relais (monocanal), sont Page 29 équipés d'un grand écran rétro-éclairé qui permet d'afficher de façon - Modèles disponibles Page 30 claire et immédiate, l'état de la charge, le jour, l'heure en cours et si une... -
Page 29: Prestations (Selon Le Modèle)
1.1 - Prestations 1 - CARACTÉRISTIQUES TECHNIQUES (selon le modèle) Écran LCD 1" 1/3 rétro-éclairé fixe. Tension d'alimentation 230 V c.a. +/- 10% Nombre de programme : 20 (20 allumages et 20 arrêts) que l'on Fréquence 50-60 Hz peut assigner au canal (C1). IP20 Degré... -
Page 30: Modèles Disponibles
2 - MODÈLES DISPONIBLES : BRANCHEMENTS ELECTRIQUES Description des bornes: Tension d'alimentation 230V~ borne n° 5 = (Ligne) 230 Vac borne n°10 = (Neutre) Remarque: le contact est sans potentiel. 1 2 3 4 5 6 7 relais Canal 1 borne n°... -
Page 31: Écran Et Fonctions Des Touches
4 - ÉCRAN ET FONCTIONS DES TOUCHES (selon le modèle) forçage manuel temporaire du canal (C1) état du canal (C1) On/OFF Canal (C1) Indication heure d'un programme (début) Programmations et/ou affichages : - heure actuelle Indication intervention par secondes - heure ON et heure OFF des programmes Indication heure d'un programme (fin) - forçage manuel permanent... -
Page 32: Mise En Service
5 - MISE EN SERVICE Important : la convention suivante a été adoptée Caractères Caractères allumés fixes: sur le schéma des instructions. intermittents: A) Premier allumage du dispositif Quand il est alimenté pour la première fois, l'interrupteur horaire se présente avec l'écran rétro-éclairé dont les segments sont RESET éteints ;... -
Page 33: Configuration Heure Et Minutes Actuelles Et Jour Actuel
5.1) Test branchements (test relais) ’heure actuelle Avant de commencer la procédure de configuration de l , il est possible de tester les branchements électriques et le fonctionne- ment correct relais au moyen des touche de forçage manuel La première opération de programmation remet le cana sur OFF. -
Page 34: Programmation
6 - PROGRAMMATION Principe de programmation : l'interrupteur horaire permet de configurer jusqu'à un maximum de 20 programmes (On/OFF). Un programme est assigné au canal ( ) et il est formé de : - une commutation de début ( =relais activé) à l'heure programmée. - une commutation de fin ( =relais au repos) à... -
Page 35: Configuration D'un Programme
6.1) CONFIGURATION D’UN PROGRAMME Après la configuration de l' h eure actuelle (pour modèle Journalier) et aussi du jour actuel (pour modèle Habdomadaire), le programme s' a ffiche sur l' é cran avec les index des jours de la semaine qui clignotent (seulement pour le mod. - Page 36 6.2) Programme avec activation du canal en secondes : de 1 à 99 secondes (par ex. cloches d'écoles, sirènes début-fin de travail) Sur n'importe quel programme libre, comme indiqué lors de la procédure précédente, sélectionner le jour ou le groupe de jours (seulement mod.
-
Page 37: Configuration D'un Programme D'une Durée De Plusieurs Jours
6.4) Configuration d'un programme d'une durée de plusieurs jours (seulement pour le modèle hebdomadaire) Dans ce cas, il est nécessaire de programmer le jour et l'heure d'activation et le jour et l'heure de désactivation. Dans l'exemple indiqué, le programme est créé avec activation du canal à 18h00 le Vendredi et désactivation à 21h00 le Dimanche. Attention : durant la période d'activation, de 18h00 le Vendredi jusqu'à... -
Page 38: Modification D'un Programme
8 - MODIFICATION D'UN PROGRAMME Pour modifier les jours, l'heure de et/ou l'heure de d'un programme, suivre ces instructions : sélectionner le programme à modifier avec la touche PROG comme indiqué au chap. “Lecture des programmes”, modifier le jour ou groupe de jours (seulement pour le mod. -
Page 39: Configuration De Nouveaux Programmes En Plus De Ceux Déjà Configurés
10 - CONFIGURATION DE NOUVEAUX PROGRAMMES EN PLUS DE CEUX DÉJÀ CONFIGURÉS Les programmes restés libres peuvent être ensuite programmés. Appuyer sur la touche PROG pour entrer dans la modalité “Lecture des programmes” ; rechercher au moyen de la touche PROG un programme libre, appuyer sur la touche Prog... -
Page 40: Effacer Toutes Les Données Configurées
13.2) Forçage manuel permanent Durant le fonctionnement normal ou condition de forçage manuel temporaire, le forçage manuel permanent du canal, est obtenu en appuyant pendant 5 secondes sur les touches L'état de forçage permanent est mis en évidence sur l'écran par l'affichage de l'inscription Durant le forçage permanent tous les programmes sont interdits (suspendus) ;... -
Page 41: Beschreibung Des Geräts
INHALT DEUTSCH Beschreibung des Geräts (modellspezifisch) Die digitalen Zeitschaltuhren mit 2 DIN-Modulen sind als Tages- oder - Technische Daten/Leistungsangaben S. 42 Wochenmodelle, mit 1 Relais (ein Kanal). Sie sind mit einem großen Display mit Hintergrundbeleuchtung ausgestattet, das die klare und - Erhältliche Modelle S. -
Page 42: Technische Daten/Leistungsangaben
1 - TECHNISCHE DATEN 1.1 - Leistungsangaben ( modellspezifisch) Betriebsspannung 230 V.A.C. +/- 10% Fixes 1" 1/3-LCD-Display mit Hintergrundbeleuchtung. Frequenz 50-60 Hz Anzahl der Programme: 20 (20 Einschaltvorgänge und 20 IP20 Schutzart Abschaltvorgänge), die dem Kanal (C1) zugewiesen werden können. Minimale Programmierung ON/OFF 1 Sekunde. -
Page 43: Erhältliche Modelle
2 - ERHÄLTLICHE MODELLE: 3 - ELEKTRISCHE ANSCHLÜSSE Beschreibung der Klemmen: Betriebsspannung 230V~ Klemme n° 5 = 230 Vac inie Klemme n°10 = eutral Anmerkung: die Kontakte sind potentialfrei. 1 2 3 4 5 6 7 Relais Kanal 1 Klemme n° 1 = NO ( Kontakt Ruhestellung offen Delete... -
Page 44: Display Und Tastenfunktionen
4 - DISPLAY UND TASTENFUNKTIONEN (modellspezifisch) Vorübergehende manuelle Bedienung Kanal (C1) Status des Kanal (C1) On/OFF- Kanal (C1) Einstellungen und/oder Anzeigen: Anzeige -Uhrzeit eines Programmes (Beginn) - Aktuelle Uhrzeit - ON-Uhrzeit und OFF-Uhrzeit Anzeige sekundenweiser Vorgang der Programme - Permanente manuelle Bedienung Anzeige -Uhrzeit eines Programmes (Ende) Programmnummer von... -
Page 45: Inbetriebnahme
5 - INBETRIEBNAHME Ständig Wichtig: bei der Zeichnung der Anleitung Blinkende aufleuchtende wird folgende Konvention verwendet. Zeichen: Zeichen: A) Erstmalige Inbetriebnahme Gerätes Wenn die Zeitschaltuhr zum ersten Mal mit Strom versorgt wird, präsentiert sich das hintergrundbeleuchtete Display mit ausgeschalteten Segmenten; zum Aktivieren vorsichtig mit einem spitzen Gegenstand die RESET -Taste drücken. - Page 46 5.1) Abnahme der Anschlüsse (Relaistest) Bevor mit dem Vorgang zur Eingabe der aktuellen Uhrzeit begonnen wird, können die elektrischen Anschlüsse und der korrekte Betrieb des Relais geprüft werden, indem die Taste für die manuelle Bedienung gedrückt wird. Der erste Programmiervorgang bringt den Kanal in den Status 1 2 3 4 5 6 7 1 2 3 4 5 6 7...
-
Page 47: Programmierung
6 - PROGRAMMIERUNG Grundlegendes zur Programmierung: die Zeitschaltuhr gestattet die Eingabe von bis zu 20 Programmen (On/OFF). Einem Programm wird der Kanal ( ) zugewiesen. Ein Programm besteht aus: - einem Einschaltvorgang ( =Relais aktiviert) zur programmierten Uhrzeit. - einem Ausschaltvorgang ( =Relais in Ruhestellung) zur programmierten Uhrzeit (oder Sekunden der Aktivierung). - Page 48 6.1) EINGABE EINES PROGRAMMS Nach der Eingabe der aktuellen Uhrzeit (beim Tagesmodell) und des aktuellen Tages ( beim Wochenmodell ), erscheint auf dem Display das Programm wobei die jeweilige Nummer des Wochentages blinkt ( nur Wochenmodell ), mit der Taste den Tag oder den Block von Tagen auswählen (siehe unter TABELLE TAGESBLOCK);...
- Page 49 6.2) Programm mit sekundenweiser Kanalaktivierung: 1 bis 99 Sekunden (z. B. Schulklingeln, Fabriksirenen) Für die Programmierung der freien Programme, wie zuvor beschrieben, den Tag oder den Tagesblock (nur Wochenmodell) auswählen, die Uhrzeit für den Einschaltvorgang auswählen und mit der -Taste bestätigen, dann erneut die -Taste drücken .
-
Page 50: Anzeige Der Programme (P1 Bis P20)
6.4) Eingabe eines Programmes mit einer Dauer von mehreren Tagen (nur Wochenmodell) In diesem Fall müssen der Tag und die Uhrzeit für den Einschaltvorgang sowie der Tag und die Uhrzeit für den Abschaltvorgang programmiert werden. Im angegebenen Beispiel wird das Programm mit Aktivierung des Kanals am Freitag um 18:00 Uhr und ihrer Deaktivierung am Sonntag um 21:00 Uhr gezeigt. -
Page 51: Änderung Eines Programmes
8 - ÄNDERUNG EINES PROGRAMMS Zum Ändern der Tage, der Uhrzeit des Einschaltvorgangs und/oder des Abschaltvorgangs eines Programms wie folgt vorgehen: das zu verän- dernde Programm mit der PROG -Taste auswählen, wie im Kap. “Anzeige der Programme“ beschrieben, den Tag oder Tagesblock (nur Wochenmodell) mit der Taste verändern und mit der... -
Page 52: Eingabe Neuer Programme Neben Den Bereits
10 - EINGABE NEUER PROGRAMME NEBEN DEN BEREITS EINGEGEBENEN Die frei gebliebenen Programme können nacheinander programmiert werden. Die PROG -Taste drücken, um den “Programmanzeigemodus“ aufzurufen, mit der PROG Taste ein freies Programm suchen, mit bestätigen, Prog Prog und dann das Programm eingeben, wie im Kap. PROGRAMMIERUNG erklärt. -
Page 53: Löschen Aller Eingegebenen Daten
13.2) Permanente manuelle Bedienung Während des normalen Betriebsmodus oder der vorübergehenden manuellen Bedienung kann man durch Drücken der Tasten für 5 Sekunden permanenten manuellen Bedienung des Kanals wechseln. Der Status der manuellen Bedienung wird auf dem Display durch die Meldung angezeigt. - Page 54 ESPAÑOL Descripción del aparato ÍNDICE (según el modelo) Los interruptores horarios digitales con 2 módulos DIN disponibles en Pág. 55 - Características técnicas/Datos prestaciones versión diaria y semanal, con 1 relé (mono canal), están dotados por una gran pantalla iluminada en la parte posterior que permite Pág.
-
Page 55: Características Técnicas
1 - CARACTERÍSTICAS TÉCNICAS 1.1 - Datos y prestaciones (según el modelo) Tensión de alimentación 230 V c.a. +/- 10% Pantalla LCD 1" 1/3 iluminación posterior fija. Número de programas: 20 (20 encendidos y 20 apagados). Frecuencia 50-60 Hz IP20 asignables al canal (C1). -
Page 56: Modelos Disponibles
2 - MODELOS DISPONIBLES: 3 - CONEXIONES ELÉCTRICAS Descripción de los terminales: Tensión de alimentación 230V~ borne n° 5 = (Línea) 230 Vac borne n°10 = (Neutro) Nota: con contacto conmutado NA / C/ NC, libre de tensión 1 2 3 4 5 6 7 relé... - Page 57 4 - PANTALLA Y FUNCIÓN DE LAS TECLAS (según el modelo) forzado manual temporal del canal (C1) estado del canal (C1) On/OFF Canal (C1) Configuraciones y/o visualizaciones: Indicación de la hora de un programa (inicio) - Hora actual Indicación de la intervención por segundos - hora ON y hora OFF de los programas - forzado manual permanente Indicación de la hora...
-
Page 58: Puesta En Funcionamiento
5 - PUESTA EN FUNCIONAMIENTO Caracteres Importante: en la gráfica de las instrucciones ha Caracteres encendidos centelleantes: sido adoptada la siguiente visualización. fijos: A) Primer encendido del dispositivo Cuando es alimentado por primera vez, el interruptor horario presenta la pantalla iluminada posteriormente con los segmentos RESET apagados;... - Page 59 5.1) Prueba de las conexiones (test relè) la hora actual Antes de iniciar el procedimiento de introducción de es posible probar las conexiones eléctricas y el funcionamiento correcto del relé actuando sobre la tecla de esfuerzo manual . La primera operación de programación conduce al canal en estado de 1 2 3 4 5 6 7 1 2 3 4 5 6 7 1 2 3 4 5 6 7...
-
Page 60: Programación
6 - PROGRAMACIÓN Principio de programación: el interruptor horario permite la introducción de un máx de 20 programas (On/OFF). A un programa se le asigna el canal ( ) y está formado por: - una conmutación de inicio ( =relé activado) a la hora programada. - una conmutación de final ( =relé... - Page 61 6.1) INTRODUCCIÓN DE UN PROGRAMA Después de introducir la hora actual (para modelo Diario) y el día actual, (para modelo Semanal) , sobre la pantalla aparece el programa con el mensaje con intermitencia de los índices referidos a los días de la semana (sólo mod.
- Page 62 6.2) Programa con activación del canal por segundos: de 1 a 99 segundos (p.ej campanas escolares, sirenas de inicio-fin de trabajo) En cualquier programa libre, como en el proceso anterior, seleccionar el día o el grupo de días ( sólo mod. Semanal ), configurar la hora de y confirmar con la tecla...
- Page 63 6.4) Introducción de un programa con una duración de algunos días (solo para modelo semanal) En este caso es necesario programar el día y la hora de activación y el día y la hora de desactivación. En el ejemplo anterior es creado el programa con activación del canal a las 18:00 h del Viernes y desactivación a las 21:00 h del Domingo.
- Page 64 8 - MODIFICACIÓN DE UN PROGRAMA Para modificar los días, la hora de y/o la hora de de un programa seguir las siguientes instrucciones: seleccionar el programa que se desea modificar con la tecla PROG tal y como se indica en el cap. “Lectura de los programas”, modificar el día o el grupo de días (sólo mod.
- Page 65 10 - INTRODUCCIÓN DE NUEVOS PROGRAMAS ADEMÁS DE AQUELLOS YA INTRODUCIDOS Los programas que han quedado libres pueden ser después programados. Pulsar la tecla PROG para entrar en modalidad “Lectura de los programas”; buscar con la tecla PROG un programa libre, pulsar la tecla Prog Prog introducir el programa tal y como se indica en el cap.
- Page 66 13.2) Forzado manual permanente Durante el funcionamiento normal o condición de forzado manual temporal, el forzado manual permanente del canal se obtiene pulsando durante 5 segundos la tecla El estado de forzado permanente es evidenciado sobre la pantalla con el mensaje Durante el forzado permanente todos los programas son bloqueados (suspendidos);...
- Page 67 SMALTIMENTO DI VECCHI APPARECCHI ELETTRICI ED ELETTRONICI (direttiva europea 2002/96/CE) Questo simbolo sul prodotto o sul suo imballo indica che questo prodotto non può essere trattato come rifiuto domestico.Al contrario, dovrà essere portato ad un punto di raccolta determinato per il riciclaggio degli apparecchi elettrici ed elettronici, come ad esempio: - punti vendita, nel caso si acquisti un prodotto nuovo simile a quello da smaltire - punti di raccolta locali (centri di raccolta rifiuti, centri locali di riciclaggio, ecc...).