Weather Guard 246-3-02 Manuel D'installation
Table des Matières
Les langues disponibles
Les langues disponibles
Liens rapides
TRUCK STORAGE SOLUTIONS
SECURING YOUR REPUTATION
ATTENTION: PLEASE READ AND UNDERSTAND ALL INSTRUCTIONS AND WARNINGS
BEFORE ASSEMBLING, INSTALLING OR USING THIS PRODUCT.
Model# ________________ Serial#__________________
Danger of explosion. Do not use this product for storing or transporting flammables, explosives, hazardous materials, or hazardous waste,
such as containers of gasoline, solvents, gun powder, dynamite, propane tanks, acetylene tanks and cutting torches. Failure to heed this
warning will result in death or serious injury.
This product is only intended and safe for use in storing and transporting small tools, equipment and other similar materials. This product
can reduce the driver's ability to clearly see road-ways, vehicular or pedestrian traffic and other objects through the rear and side windows of
the vehicle, which may cause an accident. Extra precautions should be taken when driving a vehicle with this product. Make all adjustments
necessary to ensure maximum visibility, including but not limited to, changing mirror and seating positions. State and local laws may prohibit
obstruction of windows in a moving vehicle.
These instructions are to be followed using the parts and fasteners supplied for proper installation. Any modifications or improper installation
of this product will create a hazardous condition that could result in death, serious personal injury and/or property damage. All floor mounting
bolts near the fuel tank area should be installed from the underside of the vehicle, to guard against the fuel tank being punctured in the event
of a collision. This would mean not using Blind Fasteners in this area. Holes in this area should be 5/16". Ensure ample space in roof ribs and
sidewall ribs for mounting screws so as not to puncture exterior roof or wall.
Do not install this product where it could interfere with deployment of air bags. Failure to comply could result in death or serious body injury.
Prior to drilling, so as not to cut electric wires, fuel lines, brake lines, etc., check behind and underneath drilling and mounting locations. To
keep debris out of your eyes when checking the underside of the vehicle, or when drilling, always wear protective eye wear. Failure to heed
this warning may result in moderate injury.
Any modification or unintended use of this product shall immediately void all manufacturers warranties. Manufacturer disclaims all liability for
injuries to persons or property resulting from any modification to, or unintended use of this product.
INSTALLATION MANUAL
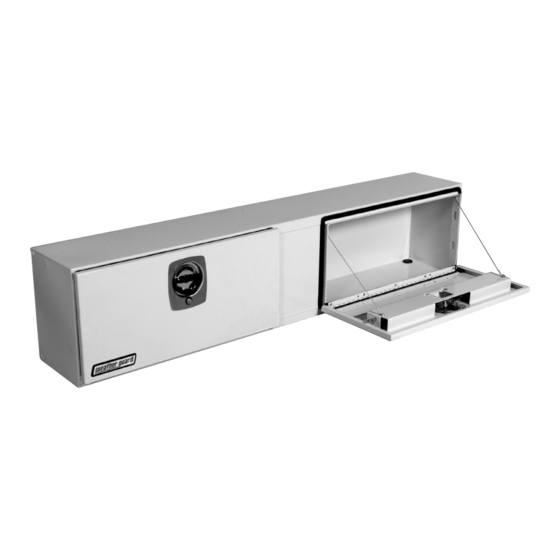
Aluminum & Steel Hi-Side/Super Side Boxes
Model 246-3-02 through 396-5-02
®
PRODUCT REGISTRATION
For your convenience,
place product
registration tear-off
sticker here.
DANGER
WARNING
CAUTION
– NOTICE –
1
WWW.WEATHERGUARD.COM
Purchased Date:
______________________
Place of purchase:
______________________
Key Code:
______________________
Part No. 24-0295 REV. B ECN 5305 04/13
Table des Matières

Manuels Connexes pour Weather Guard 246-3-02


Sommaire des Matières pour Weather Guard 246-3-02
-
Page 13: Enregistrement Du Produit
MANUEL D’INSTALLATION Caisses en aluminium et en acier à parois hautes ou surélevées Modèles 246-3-02 jusqu’à 396-5-02 TRUCK STORAGE SOLUTIONS SECURING YOUR REPUTATION WWW.WEATHERGUARD.COM ® ATTENTION: VEUILLEZ PRENDRE LE TEMPS DE LIRE ET DE COMPRENDRE L’ENSEMBLE DES DIRECTIVES ET DES AVERTISSEMENTS AVANT D’ASSEMBLER, D’INSTALLER OU D’UTILISER CE PRODUIT. -
Page 14: Durée D'installation
DURÉE D’INSTALLATION Durée d’installation approximative : 42 min par unité (0,7 heure), en fonction de l’expérience acquise dans la pose d’équipement pour camionnettes. OUTILS REQUIS • (2) Clés ouvertes ou fermées de 1/2 po • Équerre de charpentier • Clé ouverte ou fermée de 9/16 po •... - Page 15 INSTRUCTIONS D’INSTALLATION REMARQUE : Si vous installez la caisse sur un plateau à ridelles, ignorez ces directives. Installez la caisse de manière à supporter entièrement son fond pour éviter de causer des dommages structurels à la caisse. REMARQUE : Pour installer la caisse dans la boîte d’une camionnette, suivez ces directives et utilisez les pieds de montage inclus.
- Page 16 ÉTAPE 4. Placez la caisse sur la paroi en soutenant l’arrière avec un morceau de bois ou tout autre objet servant à caler, en vous assurant qu’elle est d’équerre avec la paroi. Mettez la caisse de niveau de sorte que son dessus soit horizontal lorsque vous la regardez de l’arrière. REMARQUE : Fixez le pied de montage directement au plateau et non sur un revêtement ou un tapis au fond de la boîte.
- Page 17 Pied blanc pour parois hautes 70161-0 Porte de remplacement 365-0-02 Peinture blanche en aérosol pour retouche 886-1CN 70161-5 Porte de remplacement 365-5-02 WEATHER GUARD (12 oz) ® 70162-0 Porte de remplacement 372-0-02 7101-5 Pied noir pour parois hautes Ensemble de barillet de serrure de poignée en D...
- Page 18 Knaack LLC (le « Fabricant ») garantit à l’acheteur d’origine uniquement que les produits Weather Guard pour fourgonnettes et camions (les « Produits Weather Guard ») seront exempts de vices de matériaux et de fabrication à compter de la date d’achat et pendant toute la durée de vie anticipée du produit Weather Guard.